
A CLI to help with using Firebase in your Flutter applications.
To set up and use this CLI repo locally for the purposes of contributing, clone it and run the following commands from the root of the repository:
# Activate CLI from path:
dart pub global activate --source="path" . --executable="flutterfire" --overwrite

# Confirm you now using a local development version:
flutterfire --help
# You should now see a banner printed at the top of the help output similar to:
# ------------------------------------------------------------------
# | You are running a local development version of FlutterFire CLI. |
# ------------------------------------------------------------------To install, run the following command:
dart pub global activate flutterfire_cli- FlutterFire CLI requires the Firebase CLI (
firebase-tools) to be installed on your local machine, follow these instructions for installation. - If you're running on a windows machine, we highly recommend you install via npm (i.e.
npm install -g firebase-tools). The standalonefirebase-toolsversion can cause problems which you can read about here.
You may run the following command to configure your Flutter application with Firebase.
flutterfire configureThis method, at a minimum, will invoke two prompts of the user. A request to specify your Firebase project and the platforms you wish to configure (i.e. android, iOS, macOS, web & windows).
If you don't want any prompts, you can use the following command:
flutterfire configure --yes --project=<FIREBASE_PROJECT_ID>FlutterFire CLI will auto detect the bundle ID for apple platforms via the project.pbxproj file, if there is no existing app associated with the bundle ID in your Firebase console, it will create one, and subsequently write the relevant GoogleService-Info.plist file to your project in the default location ios/Runner/GoogleService-Info.plist or macos/Runner/GoogleService-Info.plist. A similar process occurs on android, FlutterFire CLI uses the application ID in your app/build.gradle file and will generate a service file at the default location android/app/google-services.json.
Web is slightly different. It will create a web app in your Firebase console if one is not already present, otherwise, it will select the first one available from your Firebase console. If you prefer a specific web app, you can use the --web-app-id flag:
flutterfire configure --yes --project=<FIREBASE_PROJECT_ID> --web-app-id=<WEB_APP_ID>Similarly, you may also specify the bundle ID for your Apple applications and the package name for your Android application:
flutterfire configure --yes --project=<FIREBASE_PROJECT_ID> --android-package-name=<ANDROID_PACKAGE_NAME> --macos-bundle-id=<MACOS_BUNDLE_ID> --ios-bundle-id=<IOS_BUNDLE_ID>If you wish to be specific about which platforms you want to configure, use the --platforms flag:
flutterfire configure --yes --project=<FIREBASE_PROJECT_ID> --platforms=android,ios,webFlutterFire CLI now supports Windows applications. The Firebase console does not allow you to create an application for Windows, FlutterFire CLI will create a web app if you specify windows as a platform you want to configure:
flutterfire configure --yes --project=<FIREBASE_PROJECT_ID> --platforms=windowsYou may also specify a specific web app to use for your windows project by using the --windows-app-id flag:
flutterfire configure --yes --project=<FIREBASE_PROJECT_ID> --windows-app-id=<WEB_APP_ID>- auto-detects the platforms from the project directory.
- prevents a prompt for rewriting the Dart Firebase configuration file (default name -
firebase_options.dart) should you already have one in your project. It will auto rewrite the specific parts of your Firebase app configuration that you have requested (e.g. choosing--platforms=web,androidwill update web and android configurations in thefirebase_options.dartfile and leave the other app configurations within the file intact).
- selects the Firebase project and negates the command prompt to choose which Firebase project you wish to use.
important: You need to run flutterfire configure for every configuration type. E.g. if you have Debug & Release configurations, you need to run flutterfire configure twice with the relevant arguments documented below.
Android Firebase setup is fairly straight forward. It requires the application ID and the file path where you want to place your google-services.json file. Imagine you want to setup you Flutter project's android release build configuration with its own Firebase app. Here is how it would look:
flutterfire configure --platforms=android --android-package-name=your.application.id --android-out=android/app/src/release/google-services.jsonAs we are using the google-services gradle plugin to package the google-services.json file with your app, you can create as many build types & build flavors you require by following this documentation on adding the JSON file. It is simply a case of matching the correct application ID you've associated with a Firebase app in your Firebase console with the correct file path.
important: Use the '--android-package-name' flag otherwise the FlutterFire CLI will auto-detect from your build.gradle file.
Apple has a couple of different options depending on your project setup. You can configure your Firebase app with Apple platform using either a target or build configuration.
important: Use the --ios-bundle-id and/or --macos-bundle-id flag otherwise the FlutterFire CLI will auto-detect from your project.pbxproj file.
Most developers will likely configure with build configuration. As default, a Flutter app comes with three different build configurations: Debug, Profile & Release (important: FlutterFire CLI does not yet support renaming the target from Runner for build configuration which was a feature released in Flutter 3.13.0). Unlike android, it does not matter where you write the GoogleService-Info.plist file. Here is how to setup your Flutter Apple platform with build configuration:
for iOS:
flutterfire configure --platforms=ios --ios-bundle-id=your.bundle.id --ios-build-config=Release --ios-out=ios/release/GoogleService-Info.plistfor macOS:
flutterfire configure --platforms=macos --macos-bundle-id=your.bundle.id --macos-build-config=Release --macos-out=macos/release/GoogleService-Info.plistA more advanced configuration for developers more experienced with Xcode development would be to utilize multiple targets for their Flutter Apple platform setup. By default, a Flutter app comes with only one target - Runner. You would have to set up multiple targets yourself for your different build variations. Once again, it does not matter where you write the GoogleService-Info.plist for target configuration. Let's imagine you have created a target for release and called it ReleaseRunner. Here is how to setup your Flutter Apple platform with target configuration:
for iOS:
flutterfire configure --platforms=ios --ios-target=ReleaseRunner ios-out=ios/release/GoogleService-Info.plistfor macOS:
flutterfire configure --platforms=macos --macos-target=ReleaseRunner macos-out=macos/release/GoogleService-Info.plistConfiguration for your Flutter web app occurs via the Dart Firebase configuration file. It is different in the sense that it requires the user to implement the relevant conditions (e.g, debug, release, etc) upon app start up to determine what type of build should use which Firebase app configuration. For example, if you wish to create a Firebase app for your production app, you might do the following:
flutterfire configure --platforms=web --web-app-id=<FIREBASE_WEB_APP_ID> --out=lib/firebase_release.dartIMPORTANT: The FlutterFire CLI will create only one Firebase web app. If you wish to create more (e.g. For different build environments), you will have to manually create a web app on the Firebase console, and use the Firebase web app ID created to associate with that build type (e.g. debug, release, etc).
In your application code, you might set it up as the following:
import 'package:flutter/foundation.dart' show kDebugMode;
// Assuming you've previously generated another `firebase_options.dart` file
import 'firebase_options.dart';
import 'firebase_release.dart' as firebase_release;

Future<void> main() async {
  WidgetsFlutterBinding.ensureInitialized();
  if (kDebugMode) {
    await Firebase.initializeApp(
        options: DefaultFirebaseOptions.currentPlatform,
    );
  } else {
    // Use the Firebase app options from the generated `firebase_release.dart` file
    await Firebase.initializeApp(
      options: firebase_release.DefaultFirebaseOptions.currentPlatform,
    );
  }

  runApp(App());
}A default Flutter app out of the box has three different build modes; debug, profile and release. If you wish, you can create a Firebase app for each one.
Imagine you want a debug Firebase app configured for iOS, macOS, android & web, you could run the following:
flutterfire configure \
--yes \
--project=your-project-id \
--platforms=ios,macos,android,web \
--android-out=android/app/src/debug/google-services.json \
--android-package-name=com.example.myapp.debug \
--ios-build-config=Debug \
--ios-out=/ios/debug/GoogleService-Info.plist \
--ios-bundle-id=com.example.myApp.ios.debug \
--macos-build-config=Debug \
--macos-out=/macos/debug/GoogleService-Info.plist \
--macos-bundle-id=com.example.myApp.macos.debug \
--web-app-id=<1:XXX:web:XXX> \
--out=lib/debug/firebase_options.dart
Let's create a release build type for your Flutter app, here's how it might look:
flutterfire configure \
--yes \
--project=your-project-id \
--platforms=ios,macos,android,web \
--android-out=android/app/src/release/google-services.json \
--android-package-name=com.example.myapp.release \
--ios-build-config=Release \
--ios-out=/ios/release/GoogleService-Info.plist \
--ios-bundle-id=com.example.myApp.ios.release \
--macos-build-config=Release \
--macos-out=/macos/release/GoogleService-Info.plist \
--macos-bundle-id=com.example.myApp.macos.release \
--web-app-id=<1:XXX:web:XXX> \
--out=lib/release/firebase_options.dart
Important things to note with multi-environment set up
- The android gradle plugin will try to match the path
google-services.jsonto the correct build type. For instance, debug build will find the service file in the following locations:android/app/src/debug/google-services.jsonorandroid/app/google-services.json. - Required to configure the application ID for release build in your android
build.gradle. This might look like the following:
buildTypes {
    release {
        signingConfig signingConfigs.debug
        // This will effectively add the suffix to your applicationId. e.g. "com.example.myapp.release"
        applicationIdSuffix ".release"
    }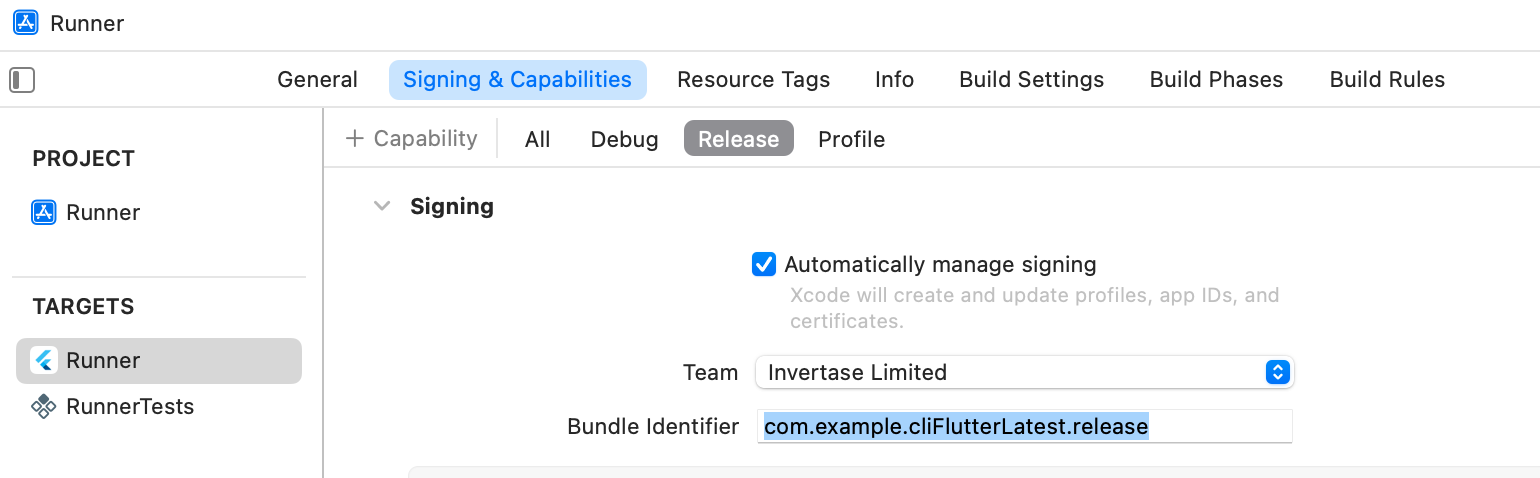
}- Required to configure the bundle ID for release build configuration in Xcode for macOS & iOS under "Signings and Capabilities" tab. Below is an image of where you can update the release build configuration bundle ID:

- Required to manually create a Firebase web app for release and use the Firebase web App ID as an argument for
--web-app-id. - Required to implement your own logic for configuring build types for your Flutter web app as mentioned above.
If you require further granular builds i.e. build flavors, you can refer to this article which demonstrates how to configure different build flavors using VGV CLI to create a Flutter app that has build flavors out of the box.
There is another command that you might want to run each time you configure your project with another Firebase product. For example, if you configure Real time database for your Firebase project, you will be required to reinstall every service file for each platform. By running:
flutterfire reconfigureIt will rewrite all your service files in place and your Dart initialization file. It does this by using the firebase.json to track each of your configurations to update the service file at the correct location.
important: This command will also add the debug symbol upload script for Apple projects if you have updated your project to use Firebase Crashlytics. It will also update your build.gradle files as appropriate depending on what Firebase products your project requires (e.g. The command will write the required Firebase Performance and Crashlytics dependencies in your android build.gradle files if your Flutter project has firebase_performance & firebase_crashlytics dependencies).
- Use the Firebase service files for android (
google-services.json), iOS & macOS (GoogleService-Info.plist). See this comment for further information why we don't recommend Dart initialization for these platforms. - Do not update your
Runnertarget name for Apple platform when usingbuild configurationset up. We do not currently support it. - Apple configuration will only apply if you're configuring from a macOS environment. For example, configuring an iOS app on a Windows machine will not work.
Built and maintained by Invertase.