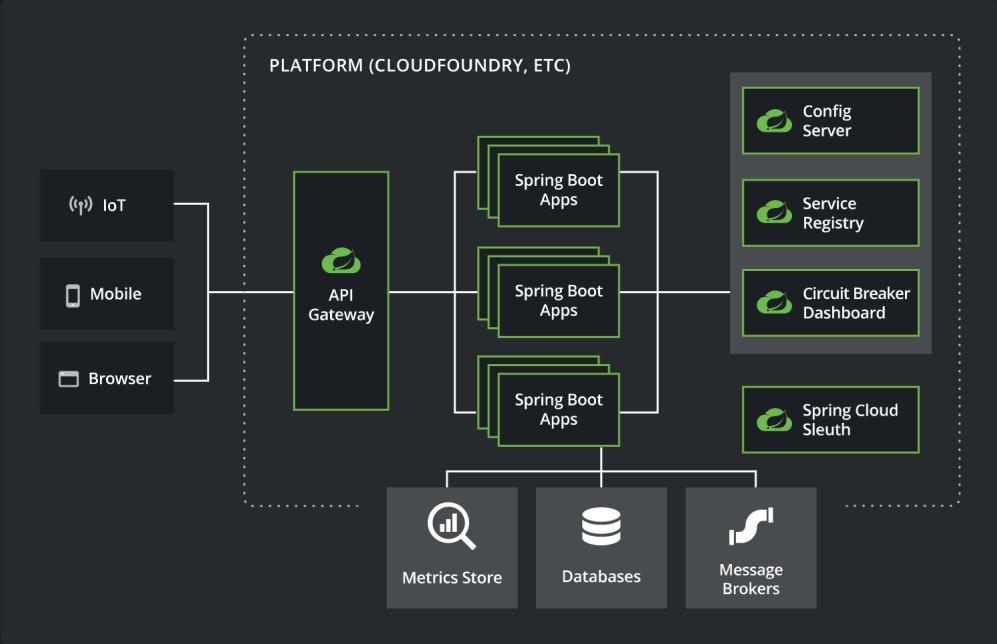
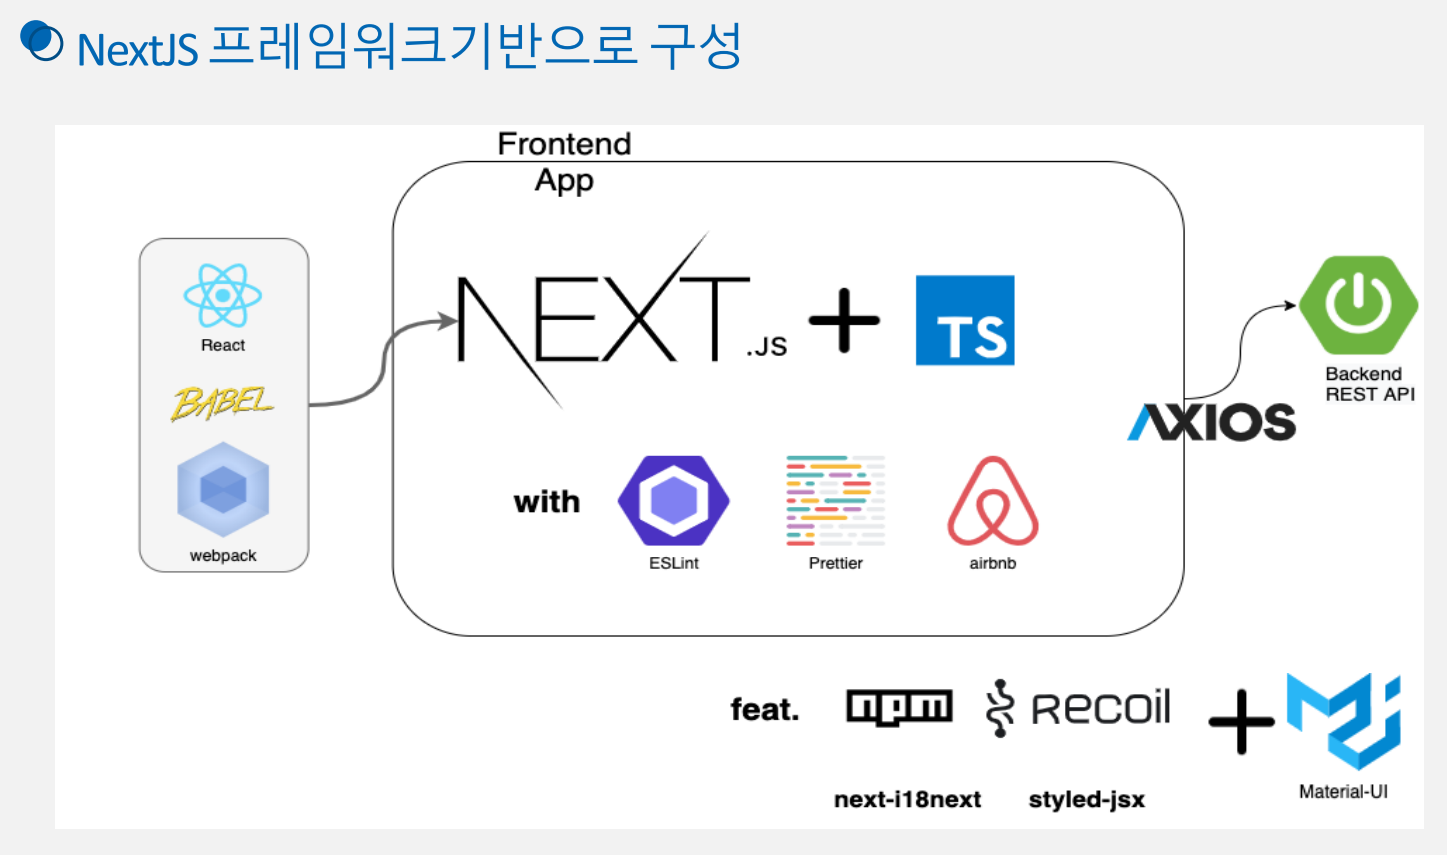
'클라우드 네이티브 기반 행정·공공 서비스 확산 지원(2021)' 사업의 일환으로 제작된 MSA(Microservices Architecture) 템플릿의 교육 소스코드이다. This is the training source code for the Microservices Architecture (MSA) template created as part of the "Supporting the Spread of Cloud-Native Administrative and Public Services (2021)" project.
├─backend
│  ├─apigateway
│  ├─board-service
│  ├─config
│  ├─discovery
│  ├─module-common
│  ├─portal-service
│  ├─reserve-check-service
│  ├─reserve-item-service
│  ├─reserve-request-service
│  └─user-service
├─config
├─docker-compose
│  ├─app
│  │  ├─mesh
│  │  └─service
│  ├─elk
│  │  ├─kibana
│  │  │  └─config
│  │  └─logstash
│  │      ├─config
│  │      └─pipeline
│  ├─mysql
│  │  └─init
│  └─opensearch
│      └─logstash
│          ├─config
│          └─pipeline
├─frontend
│  ├─admin
│  │  ├─public
│  │  │  ├─images
│  │  │  └─locales
│  │  ├─server
│  │  ├─src
│  │  │  ├─@types
│  │  │  ├─components
│  │  │  ├─constants
│  │  │  ├─hooks
│  │  │  ├─libs
│  │  │  ├─pages
│  │  │  ├─service
│  │  │  ├─stores
│  │  │  ├─styles
│  │  │  └─utils
│  │  └─test
│  ├─portal
│  │  ├─public
│  │  │  ├─locales
│  │  │  └─styles
│  │  ├─src
│  │  │  ├─@types
│  │  │  ├─components
│  │  │  ├─constants
│  │  │  ├─hooks
│  │  │  ├─libs
│  │  │  │  └─Storage
│  │  │  ├─pages
│  │  │  ├─service
│  │  │  ├─stores
│  │  │  ├─styles
│  │  │  └─utils
│  │  └─test
│  └─practice-image
└─k8s
    ├─applications
    │  ├─backend
    │  │  ├─apigateway
    │  │  │  └─ingress
    │  │  ├─board-service
    │  │  ├─config
    │  │  ├─discovery
    │  │  │  └─ingress
    │  │  ├─portal-service
    │  │  ├─reserve-check-service
    │  │  ├─reserve-item-service
    │  │  ├─reserve-request-service
    │  │  └─user-service
    │  └─frontend
    │      ├─admin
    │      │  └─ingress
    │      └─portal
    │          └─ingress
    └─environments
        ├─configmaps
        ├─databases
        │  └─mysql
        │      └─init
        ├─jenkins
        ├─logging
        │  └─elk
        │      ├─elasticsearch
        │      ├─kibana
        │      │  └─ingress
        │      └─logstash
        ├─nfs
        ├─rabbitmq
        │  └─ingress
        ├─storage
        ├─vagrant
        └─zipkin
            └─ingress
/backend: Spring Boot를 기반으로 백앤드에 올려지는 서비스들 Services on the backend based on Spring Boot/backend/apigateway: Microservice에 대한 API 관리 및 모니터링 서비스 API management and monitoring service for microservices (service mesh)/backend/board-service: 게시판 서비스 (게시판, 게시물, 첨부파일 관리) Bulletin Board Service (Manage boards, posts, and attachments)/backend/config: 별도의 통합된 설정 관리 서비스 제공을 통해 환경 독립적 서비스 제공 Provide environment-independent services by offering separate, unified configuration management services (service mesh)/backend/discovery: 마이크로서비스들을 등록하여 관리하고 요청 시 해당 서비스를 찾아 호출 Register and manage microservices and find and invoke them on demand (service mesh)/backend/user-service: 사용자 서비스 (로그인, 회원가입, 비밀번호 찾기, 관리자) User services (login, sign up, forgot password, admin)/backend/portal-service: 포털 공통 서비스 (메뉴, 코드, 컨텐츠, 권한, 인가, 배너, 첨부파일 관리) Portal common services (menu, code, content, permissions, authorizations, banners, attachment management)/backend/reserve-check-service: 예약 확인 서비스 Reservation Confirmation Service (non-blocking)/backend/reserve-item-service: 예약 물품 서비스 Reserved Item Service (non-blocking)/backend/reserve-request-service: 예약 신청 서비스 Reservation Request Service (non-blocking)/config: backend 의 config 서버에서 사용하는 설정 yaml 파일 모음 폴더 A folder containing a collection of configuration YAML files used by the CONFIG server in the backend./docker-compose: Docker에 여러 컨테이너의 실행을 관리하는 yaml 구성 파일들 YAML configuration files to manage the running of multiple containers in Docker/frontend/admin: Next.js + Typescript + Material UI 활용한 Admin Dashboard./frontend/portal: Next.js + Typescript 활용한 React 기반 프론트엔드./frontend/practice-image: 배너 이미지 Banner images/k8s: Kubernetes 환경 배포를 위한 Resource 템플릿 yaml 파일 Resource template yaml file for deploying to a Kubernetes environment/k8s/applications: Backend와 Frontend 애플리케이션의 k8s Resource 템플릿 yaml 파일 k8s Resource template yaml files for the backend and frontend applications/k8s/environments/configmaps: Pods에서 사용하는 환경변수로서 Key-Value 쌍의 형태로 저장된 객체 정의 Define objects stored as key-value pairs as environment variables used by Pods./k8s/environments/databases: MySQL 관련 객체 정의 Define MySQL-related objects/k8s/environments/jenkins: Jenkins 관련 객체 정의 Defining Jenkins-related objects/k8s/environments/logging: Centralized Logging을 위한 ELK 관련 객체 정의 Define ELK-specific objects for Centralized Logging/k8s/environments/nfs: NFS 노드 볼륨 구성 Configure NFS Node Volumes/k8s/environments/rabbitmq: Message Broker 관련 객체 정의 Defining Message Broker-related objects/k8s/environments/storage: PersistentVolumeClaim 정의/k8s/environments/vagrant: 가상화 소프트웨어 개발환경의 생성을 쉽게 구성하도록 하는 Vagrant 관련 정의 Vagrant-specific definitions that make it easy to configure the creation of a virtualized software development environment/k8s/environments/zipkin: 분산 트랜잭션 추적을 위한 Zipkin 관련 정의 Zipkin-specific definitions for distributed transaction tracing
- 개발환경 Eclipse IDE 를 실행한다. Run the Eclipse IDE for your development environment.
- Eclipse IDE 메뉴에서 File>Import… 를 클릭한다. From the Eclipse IDE menu, click File>Import....
- Import 창이 열리면 Gradle>Existing Gradle Project 를 선택하고 Next 버튼을 클릭한다. In the Import window that opens, select Gradle>Existing Gradle Project and click the Next button.
- Import Gradle Project 창이 열리면 Next 버튼을 클릭한다.
- Project root directory 에서 ${home}/workspace.edu/egovframe-msa-edu/backend/config를 선택하고 Finish 버튼을 클릭한다. Select ${home}/workspace.edu/egovframe-msa-edu/backend/config from the project root directory and click the Finish button.
- 위의 과정을 반복하여 아래의 프로젝트를 import 한다. (소규모는 1-6, 대규모는 1-9) Repeat the above to import the following projects (1-6 for small, 1-9 for large)
- config
- discovery
- apigateway
- user-service
- portal-service
- board-service
- reserve-check-service
- reserve-item-service
- reserve-request-service
- 모든 프로젝트를 import 하고 Project Explorer 를 확인하면 board-service, portal-service, user-service 프로젝트에 오류 표시가 출력된다. querydsl 로 generate 되는 클래스들을 build path 에 추가해야 한다. After importing all the projects and checking the Project Explorer, the board-service, portal-service, and user-service projects show errors. You need to add the classes that are generated by querydsl to the build path.
- Window>Show View>Other 을 클릭해서 열린 창에서 Gradle>Gradle Tasks 를 선택하고 Open 버튼을 클릭하면 Gradle Tasks 탭이 열린다. Click Window>Show View>Other, select Gradle>Gradle Tasks in the opened window, and click the Open button to open the Gradle Tasks tab.
- Gradle Tasks 오른쪽 윗부분의 View Menu 버튼을 클릭해서 Show All Tasks 를 체크한다. Click the View Menu button in the top right corner of Gradle Tasks and check Show All Tasks.
- Gradle Tasks 에서 portal-service>other>compileQuerydsl 을 더블클릭 또는 우클릭 후 Run Gradle Tasks 를 클릭하면 build 가 시작된다. In Gradle Tasks, double-click portal-service>other>compileQuerydsl or right-click and click Run Gradle Tasks to start the build.
- Project Explorer 에서 board-service, portal-service, user-service 를 선택하고 F5 또는 우클릭 후 Refresh 를 클릭해서 프로젝트를 새로고침한다. In the Project Explorer, select board-service, portal-service, user-service, and press F5 or right-click and click Refresh to refresh the project.
- Project Explorer 에서 board-service, portal-service, user-service 를 우클릭하고 Properties 를 클릭한다. In Project Explorer, right-click the board-service, portal-service, or user-service, and then click Properties.
- Properties 창이 열리면 왼쪽 메뉴에서 Java Build Path를 선택하고 오른쪽 Source 탭에서 Add Folder… 버튼을 클릭한다. In the Properties window that opens, select Java Build Path from the left menu and click the Add Folder... button on the right Source tab.
- Source Folder Selection 창이 열리면 build>generated>querydsl 을 체크하고 OK 버튼을 클릭한다. In the Source Folder Selection window that opens, check build>generated>querydsl and click the OK button.
- Properties 창에서 Apply and Close 버튼을 클릭하면 창이 닫히면서 프로젝트를 다시 빌드하고 오류 표시는 사라진다. When you click the Apply and Close button in the Properties window, the window closes and the project rebuilds and the error message disappears.
(ELK 설정, Config 설정, OAuth 2.0 설정, API 호출 및 JUnit 테스트 관련해서는 02.MSA템플릿_백엔드구성및실습.pdf 파일을 참조한다.)
node : 14.8.0
npm : 6.14.7
Visual Studio Code : latest
- https://nodejs.org/en/download 에서 다운로드 후 설치하고 버전을 확인한다. Download and install from https://nodejs.org/en/download and check the version.
node -v
npm -v
- Visual Studio Code 에서 frontend/admin 폴더를 연다. In Visual Studio Code, open the frontend/admin folder.
- Terminal 에서 다음을 실행한다. In a terminal, run the following
npm install
npm run dev
- 로그인 화면에서 email 란에 '1@gmail.com', password 란에 'test1234!' 입력 후 로그인한다. On the login screen, enter '1@gmail.com' in the email field and 'test1234!' in the password field to log in.
(기타 상세한 내용은 03.MSA템플릿_프론트엔드구성및실습.pdf 파일을 참조한다.) (For more details, see 03.MSA템플릿_프론트엔드구성및실습.pdf).


