official source code of paper 'PatchmatchNet: Learned Multi-View Patchmatch Stereo'

27.09.2021: The codes now allows for Torchscript export.
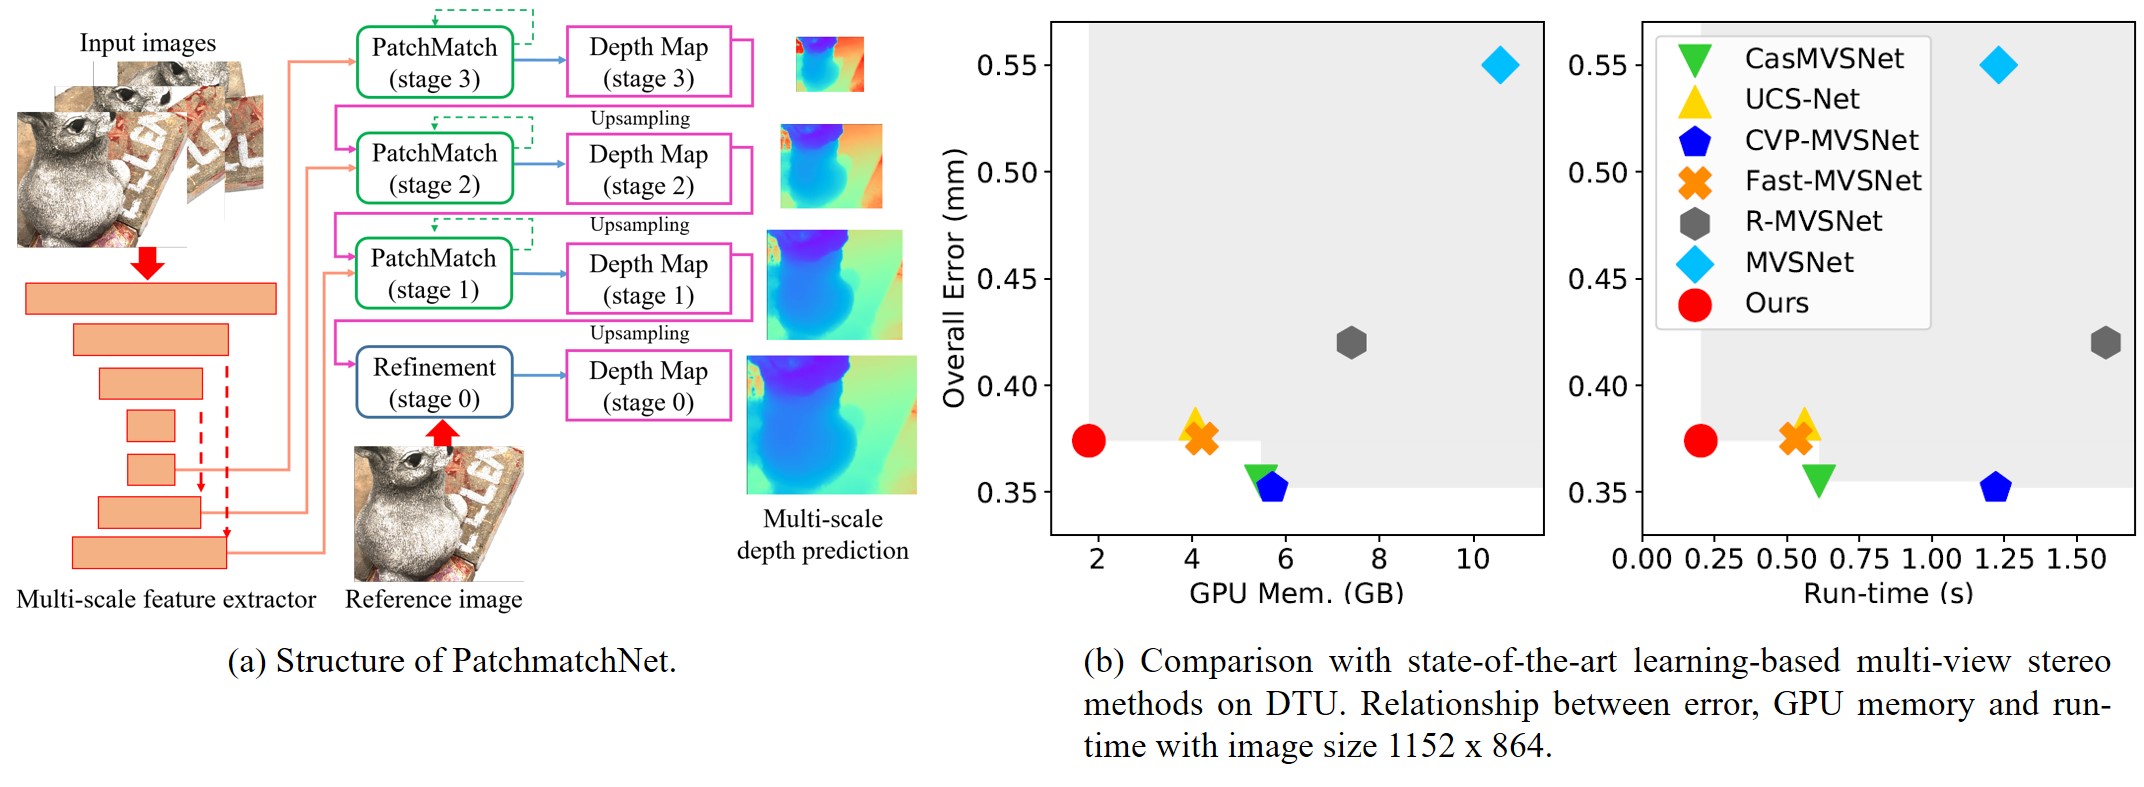
PatchmatchNet is a novel cascade formulation of learning-based Patchmatch which aims at decreasing memory consumption and computation time for high-resolution multi-view stereo. If you find this project useful for your research, please cite:
@misc{wang2020patchmatchnet,
      title={PatchmatchNet: Learned Multi-View Patchmatch Stereo},
      author={Fangjinhua Wang and Silvano Galliani and Christoph Vogel and Pablo Speciale and Marc Pollefeys},
      journal={CVPR},
      year={2021}
}
- python 3.7
- CUDA >= 10.1
pip install -r requirements.txt
- Download our pre-processed dataset: DTU's evaluation set, Tanks & Temples and ETH3D benchmark. Each dataset is already organized as follows:
root_directory
├──scan1 (scene_name1)
├──scan2 (scene_name2)
      ├── images
      │   ├── 00000000.jpg
      │   ├── 00000001.jpg
      │   └── ...
      ├── cams_1
      │   ├── 00000000_cam.txt
      │   ├── 00000001_cam.txt
      │   └── ...
      └── pair.txt
Camera file cam.txt stores the camera parameters, which includes extrinsic, intrinsic, minimum depth and maximum depth:
extrinsic
E00 E01 E02 E03
E10 E11 E12 E13
E20 E21 E22 E23
E30 E31 E32 E33

intrinsic
K00 K01 K02
K10 K11 K12
K20 K21 K22

DEPTH_MIN DEPTH_MAX
pair.txt stores the view selection result. For each reference image, 10 best source views are stored in the file:
TOTAL_IMAGE_NUM
IMAGE_ID0                       # index of reference image 0
10 ID0 SCORE0 ID1 SCORE1 ...    # 10 best source images for reference image 0
IMAGE_ID1                       # index of reference image 1
10 ID0 SCORE0 ID1 SCORE1 ...    # 10 best source images for reference image 1
...
- In
eval.sh, setDTU_TESTING,ETH3d_TESTINGorTANK_TESTINGas the root directory of corresponding dataset, set--outdiras the directory to store the reconstructed point clouds, uncomment the evaluation command for corresponding dataset (default is to evaluate on DTU's evaluation set). For Tanks & Temples and ETH3D, modify--splitas the dataset you want to evaluate (intermediateoradvancedfor Tanks & Temples,trainortestfor ETH3D) CKPT_FILEis the checkpoint file (our pretrained model ischeckpoints/model_000007.ckpt), change it if you want to use your own model.- Test on GPU by running
sh eval.sh. The code includes depth map estimation and depth fusion. The outputs are the point clouds inplyformat. - For quantitative evaluation on DTU dataset, download SampleSet and Points. Unzip them and place
Pointsfolder inSampleSet/MVS Data/. The structure looks like:
SampleSet
├──MVS Data
      └──Points
In evaluations/dtu/BaseEvalMain_web.m, set dataPath as path to SampleSet/MVS Data/, plyPath as directory that stores the reconstructed point clouds and resultsPath as directory to store the evaluation results. Then run evaluations/dtu/BaseEvalMain_web.m in matlab.
The results look like:
| Acc. (mm) | Comp. (mm) | Overall (mm) |
|---|---|---|
| 0.427 | 0.277 | 0.352 |
- For detailed quantitative results on Tanks & Temples and ETH3D, please check the leaderboards (Tanks & Temples, ETH3D)
- For evaluation, we support preparing the custom dataset from COLMAP's results. The script
colmap_input.py(modified based on the script from MVSNet) converts COLMAP's sparse reconstruction results into the same format as the datasets that we provide. After reconstruction, COLMAP will generate a folderCOLMAP/dense/, which containsCOLMAP/dense/images/andCOLMAP/dense/sparse. Then you need to run like this:
python colmap_input.py --folder COLMAP/dense/
- In
datasets/custom.pyandeval_custom.py, you can change parameters such asimg_wh(need to be divisible by 8) for your own settings. - In
eval.sh, setCUSTOM_TESTINGas the root directory of the dataset, set--outdiras the directory to store the reconstructed point clouds, uncomment the evaluation command. Test on GPU by runningsh eval.sh.
Download pre-processed DTU's training set. The dataset is already organized as follows:
root_directory
├──Cameras_1
├──Rectified
└──Depths_raw
- In
train.sh, setMVS_TRAININGas the root directory of dataset; set--logdiras the directory to store the checkpoints. - Train the model by running
sh train.sh.
--patchmatch_iteration represents the number of iterations of Patchmatch on multi-stages (e.g., the default number 1,2,2 means 1 iteration on stage 1, 2 iterations on stage 2 and 2 iterations on stage 3). --propagate_neighbors represents the number of neighbors for adaptive propagation (e.g., the default number 0,8,16 means no propagation for Patchmatch on stage 1, using 8 neighbors for propagation on stage 2 and using 16 neighbors for propagation on stage 3). As explained in our paper, we do not include adaptive propagation for the last iteration of Patchmatch on stage 1 due to the requirement of photometric consistency filtering. So in our default case (also for our pretrained model), we set the number of propagation neighbors on stage 1 as 0 since the number of iteration on stage 1 is 1. If you want to train the model with more iterations on stage 1, change the corresponding number in --propagate_neighbors to include adaptive propagation for Patchmatch expect for the last iteration.
This project is done in collaboration with "Microsoft Mixed Reality & AI Zurich Lab". Thanks to Yao Yao for opening source of his excellent work MVSNet. Thanks to Xiaoyang Guo for opening source of his PyTorch implementation of MVSNet MVSNet-pytorch.