A Discord bot that speaks, listens, and runs commands, like a smart speaker
- Text-to-speech 50+ languages
- Speech-to-text 50+ languages
- Translate 100+ languages
- Transcribe and translate in real-time
- Text, slash, and voice commands
- Extensible plugin system
- Node.js v18 or newer
- Set up a bot application
- Enable the Message Content and Server Members intents in Discord Developer Portal
- Add your bot to servers with the invite link below
https://discord.com/api/oauth2/authorize?client_id=__YOUR_CLIENT_ID__&permissions=3238976&scope=bot%20applications.commands
The following, required permissions will be granted automatically. If not, you have to do it manually.
- Text Channel
- View Channels
- Send Messages
- Embed Links
- Add Reactions
- Manage Messages
- Read Message History
- Voice Channel
- Connect
- Speak
First of all, install packages.
npm iSecond, edit src/env/default.ts.
locale: Language code, or region locale code- e.g.
en,jp,zh,en-US,en-GB,zh-TW,zh-HK - cf. Languages.ts, RegionLocales.ts
- e.g.
discord.token: Your bot's token- Or, comment out the
tokenfield and set it to an environment variable as DISCORD_TOKEN
- Or, comment out the
Now, src/env/default.ts should look like this.
export const env: Env = {
  locale: 'en',
  discord: {
    token: 'XXXX...',
    ...
Then build and launch.
npm run build
npm start
The bot should work perfectly, except for speech-to-text. It'll be explained later. Let's check out the basic features first.
iwassistant accepts commands in three ways.
| Type | Description | User Action |
|---|---|---|
| Slash | Modern Discord bot style | Input /help in a text channel |
| Text | Smart speaker-ish style | Input "OK assistant, help" in a text channel |
| Voice | Actual smart speaker style | Say "OK assistant, help" in a voice channel |
After the /help command, you'd see some commands you can use in your server. Those commands are provided by plugins.
iwassistant itself doesn't have any feature, its plugins have. The following plugins are builtin.
| Name | Command | Description |
|---|---|---|
| guild-announce | - | Announcements in a voice channel |
| guild-config | /config-server |
Configure server's settings |
/config-user |
Configure user's settings | |
/config-channel |
Configure text and voice* channel's settings | |
| guild-follow | - | Auto-join to a voice channel |
| guild-help | /help |
List all the available commands |
| guild-notify | - | Notify message reactions via DM |
| guild-react | - | Auto-response to text messages |
| guild-stt | - | Speech-to-text features |
| guild-summon | /join |
Join to a voice channel |
/leave |
Leave from a voice channel | |
| guild-translate | - | Translation features |
| guild-tts | - | Text-to-speech features |
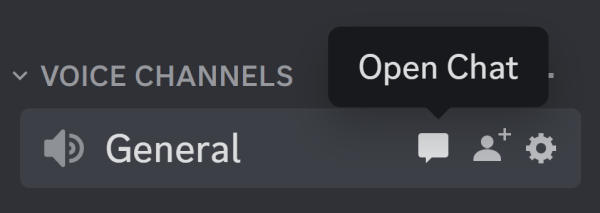
*Input the command in a text chat in a voice channel
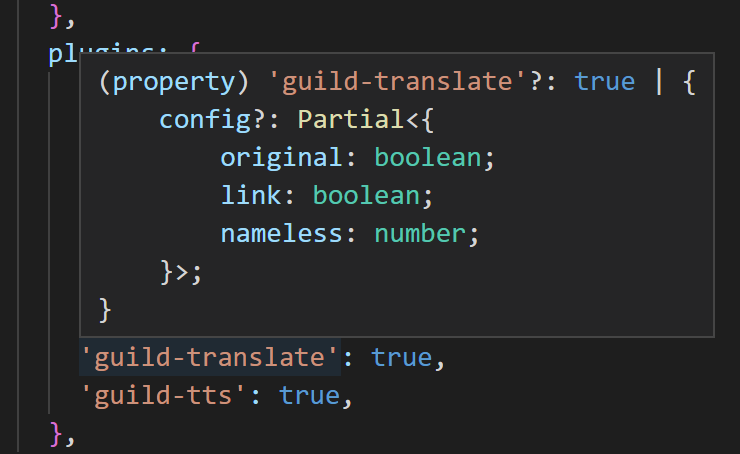
You can enable/disable/customize the plugins and build your own assistant by editing src/env/default.ts. When you mouse over a plugin name in Visual Studio Code, the pop-up window tells what properties the plugin has. Or, you can just jump to the definition by the F12 key.
There are three types of plugin properties. config, permissions, and i18n. Here are examples.
    'guild-translate': {
      config :{
        // hide original text in translation
        original: false,
      }
}, 'guild-help': {
permissions: {
// restrict command
help: ['SendMessages'],
}
}, 'guild-announce': {
i18n: {
// add Korean dictionary
ko: {
dict: {
join: ['안녕하세요, ${name}님', '환영합니다, ${name}님'],
stream: ['손님 여러분, ${name}님이 스트리밍을 시작했습니다'],
},
},
}
}, 'guild-help': {
i18n: {
// add Korean command
ko: {
command: {
help: {
description: '도움말 보기',
example: '도움말',
patterns: ['도움말'], // RegExp format
},
},
},
}
},The builtin plugins only support English, Japanese, Simplified Chinese, and Traditional Chinese. If you add a new command language to your settings, you must also add an activation word to the assistant property.
  assistant: {
    activation: {
      word: {
        ko: {
          example: 'OK 어시스턴트, ',
          patterns: ['어시스턴트'], // RegExp format
        },
      }
    }
  },
Your i18n settings will be merged with the default settings but the activation word settings will not. For example, when you add ko and still want to have en and ja, you have to copy and paste the en and ja settings from the default settings.
By default, voice commands are only available when dictating. If you want to make them available at all times, here is the solution.
    'guild-stt': {
      config: {
        command: true,
      },
    },
With this setting, the guild-stt plugin always transcribes every speech to activate and parse commands, which means that a speech-to-text engine consumes its resources for several seconds every time. When you use the Google Cloud speech-to-text engine, and want to save your money, be careful with this setting.
iwassistant has four types of engines, store, translator, tts, and stt. The following engines are builtin.
| Name | Description | Free |
|---|---|---|
| store-local | Local JSON store | ✔️ |
| store-firestore | Google Cloud Firestore | |
| translator-google-translate | Google Translate translator | ✔️ |
| translator-google-cloud | Google Cloud Translation | |
| tts-google-translate | Google Translate text-to-speech | ✔️ |
| tts-google-cloud | Google Cloud text-to-speech | |
| stt-google-chrome | Google Chrome speech-to-text | ✔️ |
| stt-google-cloud | Google Cloud speech-to-text |
Like the plugins, the engines are customizable and switchable by src/env/default.ts. Here is an example.
  engines: {
    'store-local': {
      // move the data directory from `tmp/store/1/` to `tmp/store/2/`
      id: '2',
    },
    'stt-google-chrome': {
      // change the executable path of Google Chrome
      exec: '/home/kanata/apps/google/chrome',
    },
},The free engines are very basic or unreliable. For example, if you use the tts-google-translate engine thousands of times in a few minutes, you might get banned from the API for a while. If you want to make your bot more reliable, use the Google Cloud engines instead. They are not free, but thankfully, they have free quotas. Firestore, Cloud Translation, and Cloud Text-to-Speech will probably not charge you if your bot is private. However, the free quota of Cloud Speech-to-Text is only one hour per month. Be careful with your settings and be aware of what you're doing. Here is the setup procedure.
- Create a project and select it
- Setup APIs
- Firestore: Create a Firestore in Native mode database (cf. Guide)
- Cloud Translation: Enable the API
- Cloud Text-to-Speech: Enable the API
- Cloud Speech-to-Text: Enable the API
- Create a service account and get a JSON file
- Select your project
- Input a service account name as you want
CREATE AND CONTINUE- Set the role as
owner DONE- Select the account you've just created
- Go to the
KEYStab ADD KEYandCreate new keyCREATE
- Save the JSON file as
secrets/google-cloud.json - Edit
src/env/default.tsas follows, then build and launch
  engines: {
    'store-firestore': true,
    'translator-google-cloud': true,
    'tts-google-cloud': true,
    'stt-google-cloud': true,
},The stt-google-chrome engine is disabled by default because the setup procedure is complicated. It takes some time but it's something you have to do if you want to use a free speech-to-text engine.
First of all, enable the engine in src/env/default.ts.
'stt-google-chrome': true,Note: The setup procedure for Ubuntu Server will be explained later.
Second, install the requirements.
- Google Chrome
- Virtual audio device
- Windows/Mac: VB-CABLE Virtual Audio Device
- Ubuntu: PulseAudio (How to add devices is the same as Ubuntu Server)
Then build and launch. Google Chrome should start automatically. Oh, don't worry. The Chrome user profile is completely isolated. It won't mess up your main profile. The iwassistant user profile is stored in tmp/chrome/. If you want to reset the Chrome settings, just delete the directory.
Okay, back to the procedure.
- Join a voice channel
- Summon the bot with the
/joincommand if the bot doesn't follow you - Say something in the voice channel
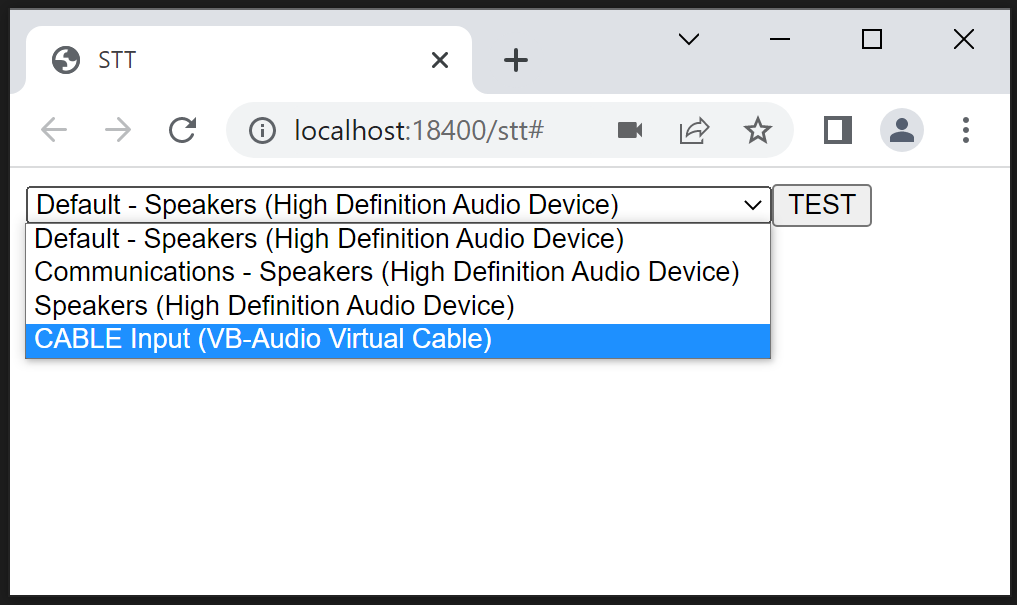
You would hear your voice on your machine since the Chrome playback device is the default audio device. Let's change it to the virtual playback device.
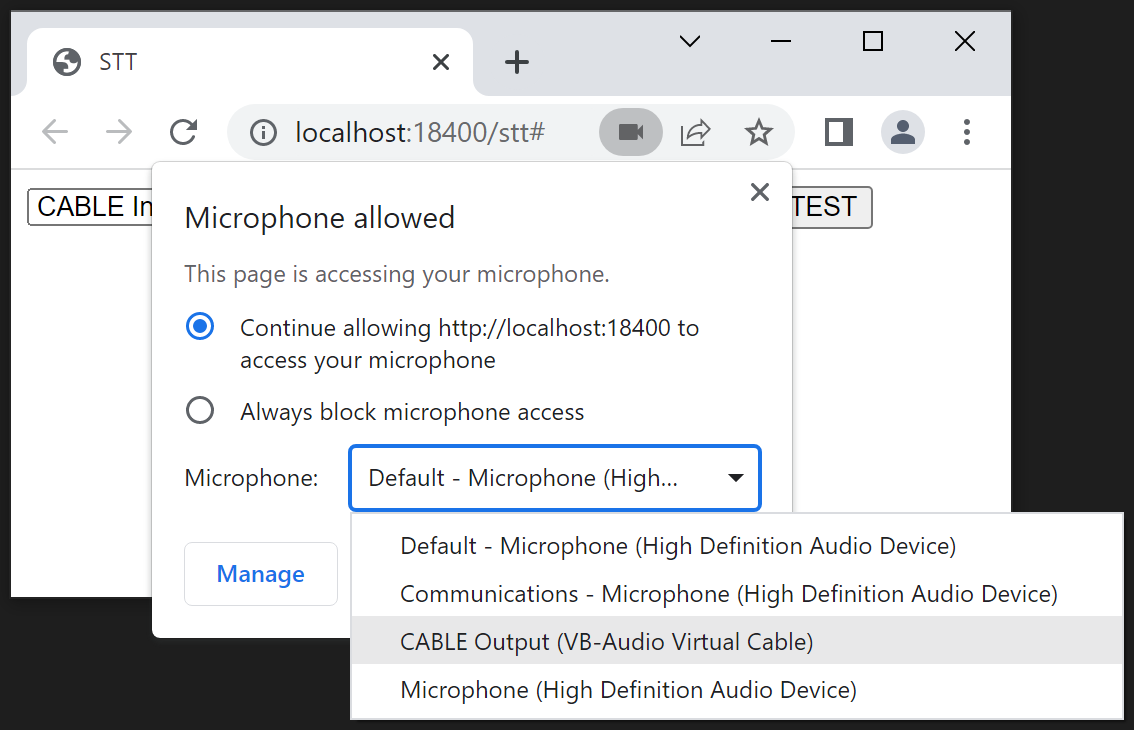
And change the microphone device as well.
Say "OK assistant, help" in the voice channel. The bot should run the /help command. If not, something went wrong with your settings. Check your operating system's volume mixer. Does it react when you speak in the voice channel? Launching in debug mode npm run debug also helps you understand what's going on inside.
With the proper settings, the logs should look like this.
[INF] [APP] Launching iwassistant
[INF] [APP] Locale: en
[INF] [STT] [Chrome:18400] Output Device: {0.0.1.00000000}.{xxxxxxxx-xxxx-xxxx-xxxx-xxxxxxxxxxxx}
[INF] [STT] [Chrome:18400] Input Devices:
[INF] [STT] - Default - Speakers (High Definition Audio Device)
[INF] [STT] - Communications - Speakers (High Definition Audio Device)
[INF] [STT] - Speakers (High Definition Audio Device)
[INF] [STT] * CABLE Input (VB-Audio Virtual Cable)
As noted before, the user profile, including the audio device settings, is stored in tmp/chrome/. It's gone when you delete the directory. If you want to make it permanent, you can set it in src/env/default.ts beforehand.
    'stt-google-chrome': {
      instances: [
        {
          port: 18_400,
          input: 'CABLE Input (VB-Audio Virtual Cable)',
          output: '{0.0.1.00000000}.{xxxxxxxx-xxxx-xxxx-xxxx-xxxxxxxxxxxx}',
        },
      ],
    },
Note: The settings are the default audio devices. They will be overwritten by a user profile.
Also, you can run multiple instances of Chrome. If your machine has three pairs of virtual audio devices, it can run three Chrome speech-to-text engines simultaneously, which means that the engines can transcribe three user speeches simultaneously.
Here is an example of a Windows machine that has VoiceMeeter Potato.
    'stt-google-chrome': {
      instances: [
        {
          port: 18_400,
          input: 'VoiceMeeter Input (VB-Audio VoiceMeeter VAIO)',
          output: '{0.0.1.00000000}.{xxxxxxxx-xxxx-xxxx-xxxx-xxxxxxxxxxxx}',
        },
        {
          port: 18_401,
          input: 'VoiceMeeter Aux Input (VB-Audio VoiceMeeter AUX VAIO)',
          output: '{0.0.1.00000000}.{yyyyyyyy-yyyy-yyyy-yyyy-yyyyyyyyyyyy}',
        },
        {
          port: 18_402,
          input: 'VoiceMeeter VAIO3 Input (VB-Audio VoiceMeeter VAIO3)',
          output: '{0.0.1.00000000}.{zzzzzzzz-zzzz-zzzz-zzzz-zzzzzzzzzzzz}',
        },
      ],
},Here is the setup procedure for Ubuntu Server 22.04.
# Become a root user
sudo -i

# Prepare to install Google Chrome
curl -fsSL https://dl-ssl.google.com/linux/linux_signing_key.pub | gpg --dearmor -o /etc/apt/trusted.gpg.d/google.gpg
sh -c 'echo "deb http://dl.google.com/linux/chrome/deb/ stable main" >> /etc/apt/sources.list.d/google-chrome.list'

# Install the packages
apt update
apt install -y xvfb pulseaudio google-chrome-stable

# Return to a user
exit

# Setup virtual audio devices
mkdir -p ~/.config/pulse/
cp /etc/pulse/default.pa ~/.config/pulse/
cat <<EOF >> ~/.config/pulse/default.pa
load-module module-null-sink sink_name="v-input-1" sink_properties=device.description="v-input-1"
load-module module-remap-source master="v-input-1.monitor" source_name="v-output-1" source_properties=device.description="v-output-1"
load-module module-null-sink sink_name="v-input-2" sink_properties=device.description="v-input-2"
load-module module-remap-source master="v-input-2.monitor" source_name="v-output-2" source_properties=device.description="v-output-2"
EOF

# Restart PulseAudio
systemctl --user restart pulseaudio
Edit src/env/default.ts as follows.
    'stt-google-chrome': {
      instances: [
        {
          port: 18_400,
          input: 'v-input-1',
          output: 'v-output-1',
        },
        {
          port: 18_401,
          input: 'v-input-2',
          output: 'v-output-2',
        },
      ],
    },
Then build and launch. It should work perfectly.
npm run build
xvfb-run -n 0 -s "-screen 0 1x1x8" npm start
To make it as a service, create a unit file as /etc/systemd/system/iwassistant.service.
[Unit]
Description=iwassistant
After=network-online.target multi-user.target graphical.target

[Service]
ExecStart=/bin/bash -c 'sleep 5 && pulseaudio -D && xvfb-run -n 0 -s "-screen 0 1x1x8" node ./dist/app'
WorkingDirectory=/home/kanata/iwassistant
User=kanata
Group=kanata
Restart=always
KillSignal=SIGINT

[Install]
WantedBy=multi-user.target
Note: Replace kanata with your username
Enable and start the service.
sudo systemctl enable iwassistant
sudo systemctl start iwassistant
systemctl status iwassistant
After that, iwassistant starts automatically when your machine reboots.
Tips: Show the logs
journalctl -u iwassistant -f- Copy
examples/env/default.tsassrc/env/my-alt-env.ts - Edit
src/env/my-alt-env.tsas you want - Build and launch with an env option
npm run build
npm start -- --env my-alt-envTo be written
Note: This is not about sharding, it's about multiple clients in one Discord server.
To be written
# Launch without build
npm run dev

# Launch with debug logs without build
npm run debug

# Auto-restart
nodemon --watch './src/**' --signal SIGINT ./src/app/index.ts- Copy
examples/user/plugins/iwassistant-plugin-guild-echoassrc/user/plugins/iwassistant-plugin-guild-echo - Add
'guild-echo': trueto your env
- Copy
examples/user/engines/iwassistant-engine-tts-notifierassrc/user/engines/iwassistant-engine-tts-notifier - Add
'tts-notifier': trueto your env
# Copy docker compose
cp docker-compose.example.yml docker-compose.yml

# Rewrite DISCORD_TOKEN
vi docker-compose.yml

# Launch iwassistant
docker compose up- More detailed examples
- More test codes
- Music player plugin
- "OK assistant, play some music" in a Discord voice channel would be cool
- Home assistant
- Migration from Kanata 2nd Voice Bot
Name: Kanata
Language: Japanese(native) English(intermediate) Chinese(basic)
Discord: Kanata#3360
GitHub: https://github.com/knt2nd


