Note: This branch contains code for IndicOCR-v2. For IndicOCR-v1, kindly visit the this branch.
This repository contains code for various OCR models for classical Sanskrit Document Images. For a quick understanding of how to get the IndicOCR and CNN-RNN up and running, kindly continue to read this Readme. For more detailed instructions, visit our Wiki page.
The IndicOCR model and CNN-RNN models are best run on a GPU.
Please cite our paper if you end up using it for your own research.
@InProceedings{Dwivedi_2020_CVPR_Workshops,
author = {Dwivedi, Agam and Saluja, Rohit and Kiran Sarvadevabhatla, Ravi},
title = {An OCR for Classical Indic Documents Containing Arbitrarily Long Words},
booktitle = {The IEEE/CVF Conference on Computer Vision and Pattern Recognition (CVPR) Workshops},
month = {June},
year = {2020}
}
The following table shows the comparitive results for the IndicOCR-v2 model with other state of the art models.
| Row | Dataset | Model | Training Config | CER (%) | WER (%) |
|---|---|---|---|---|---|
| 1 | new | IndicOCR-v2 | C3:mix training + real finetune | 3.86 | 13.86 |
| 2 | new | IndicOCR-v2 | C1:mix training | 4.77 | 16.84 |
| 3 | new | CNN-RNN | C3:mix training + real finetune | 3.77 | 14.38 |
| 4 | new | CNN-RNN | C1:mix training | 3.67 | 13.86 |
| 5 | new | Google-OCR | -- | 6.95 | 34.64 |
| 6 | new | Ind.senz | -- | 20.55 | 57.92 |
| 7 | new | Tesseract (Devanagiri) | -- | 13.23 | 52.75 |
| 8 | new | Tesseract (Sanskrit) | -- | 21.06 | 62.34 |
The code is written in tensorflow framework.
In the model/attention-lstm directory, run the following commands:
create conda create -n indicOCR python=3.6.10
conda activate indicOCR
conda install pip
pip install -r requirements.txt
To install the aocr (attention-ocr) library, from the model/attention-lstm directory, run:
python setup.py install
Make sure to have/create a .txt file with every line of the file in the following format:
path/to/image<space>annotation
ex: /user/sanskrit-ocr/datasets/train/1.jpg I am the annotated text
aocr dataset /path/to/txt/file/ /path/to/data.tfrecords
To train the data.tfrecords file created as described above, run the following command.
CUDA_VISIBLE_DEVICES=0 aocr train /path/to/tfrecords/file --batch-size <batch-size> --max-width <max-width> --max-height <max-height> --max-prediction <max-predicted-label-length> --num-epoch <num-epoch>
To validate many checkpoints, run
python ./model/evaluate/attention_predictions.py <initial_ckpt_no> <final_ckpt_step> <steps_per_checkpoint>
This will create a val_preds.txt file in the model/attention-lstm/logs folder.
To test a single checkpoint, run the following command:
CUDA_VISIBLE_DEVICES=0 aocr test /path/to/test.tfrecords --batch-size <batch-size> --max-width <max-width> --max-height <max-height> --max-prediction <max-predicted-label-length> --model-dir ./modelss
Note: If you want to test multiple checkpoints which are evenly spaced (numbering wise), use the method described in the validation section.
To compute the CER and WER of the predictions, run the following command:
python ./model/evaluate/get_errorrates.py <predicted_file_name>
ex: python model/evaluate/get_errorrates.py val_preds.txt
The results of error rates will be written to a file output.json in the visualize directory.
The code is written in tensorflow framework.
To download the best CNN-RNN model, kindly visit this page.
In the model/CNN-RNN directory, run the following commands:
create conda create -n crnn python=3.6.10
conda activate crnn
conda install pip
pip install -r requirements.txt
Make sure to have/create a .txt file with every line of the file in the following format:
path/to/image<space>annotation
ex: /user/sanskrit-ocr/datasets/train/1.jpg I am the annotated text
python model/CRNN/create_tfrecords.py /path/to/.txt/file ./model/CRNN/data/tfReal/data.tfrecords
To train the data.tfrecords file created as described above, run the following command.
python model/CRNN/train.py <training tfrecords filename> <train_epochs> <path_to_previous_saved_model> <steps-per_checkpoint>
ex: python ./model/CRNN/train.py train_feature.tfrecords 20 model/CRNN/model/shadownet/shadownet_-40 200
Note: If you are training from scratch just set the <path_to_previous_saved_model> arguement to 0.
ex: python model/CRNN/train.py data.tfrecords 100 0 <steps-per_checkpoint>
To validate many checkpoints, run
python ./model/evaluate/crnn_predictions.py <tfrecords_file_name> <initial_step> <final_step> <steps_per_checkpoint> <out_file>
This will create a out_file in the model/CRNN/logs folder.
Note: the tfrecords_file_name should be relative to the model/CRNN/data/tfReal/ directory.
Same as above
To compute the CER and WER of the predictions, run the following command:
Validation:
python model/evaluate/get_errorrates_crnn.py <path_to_predicted_file>
Test:
python model/evaluate/get_errorrates_crnn.py <path_to_predicted_file>
ex: python model/evaluate/get_errorrates_crnn.py model/CRNN/logs/test_preds_final.txt
Visit our Wiki page.
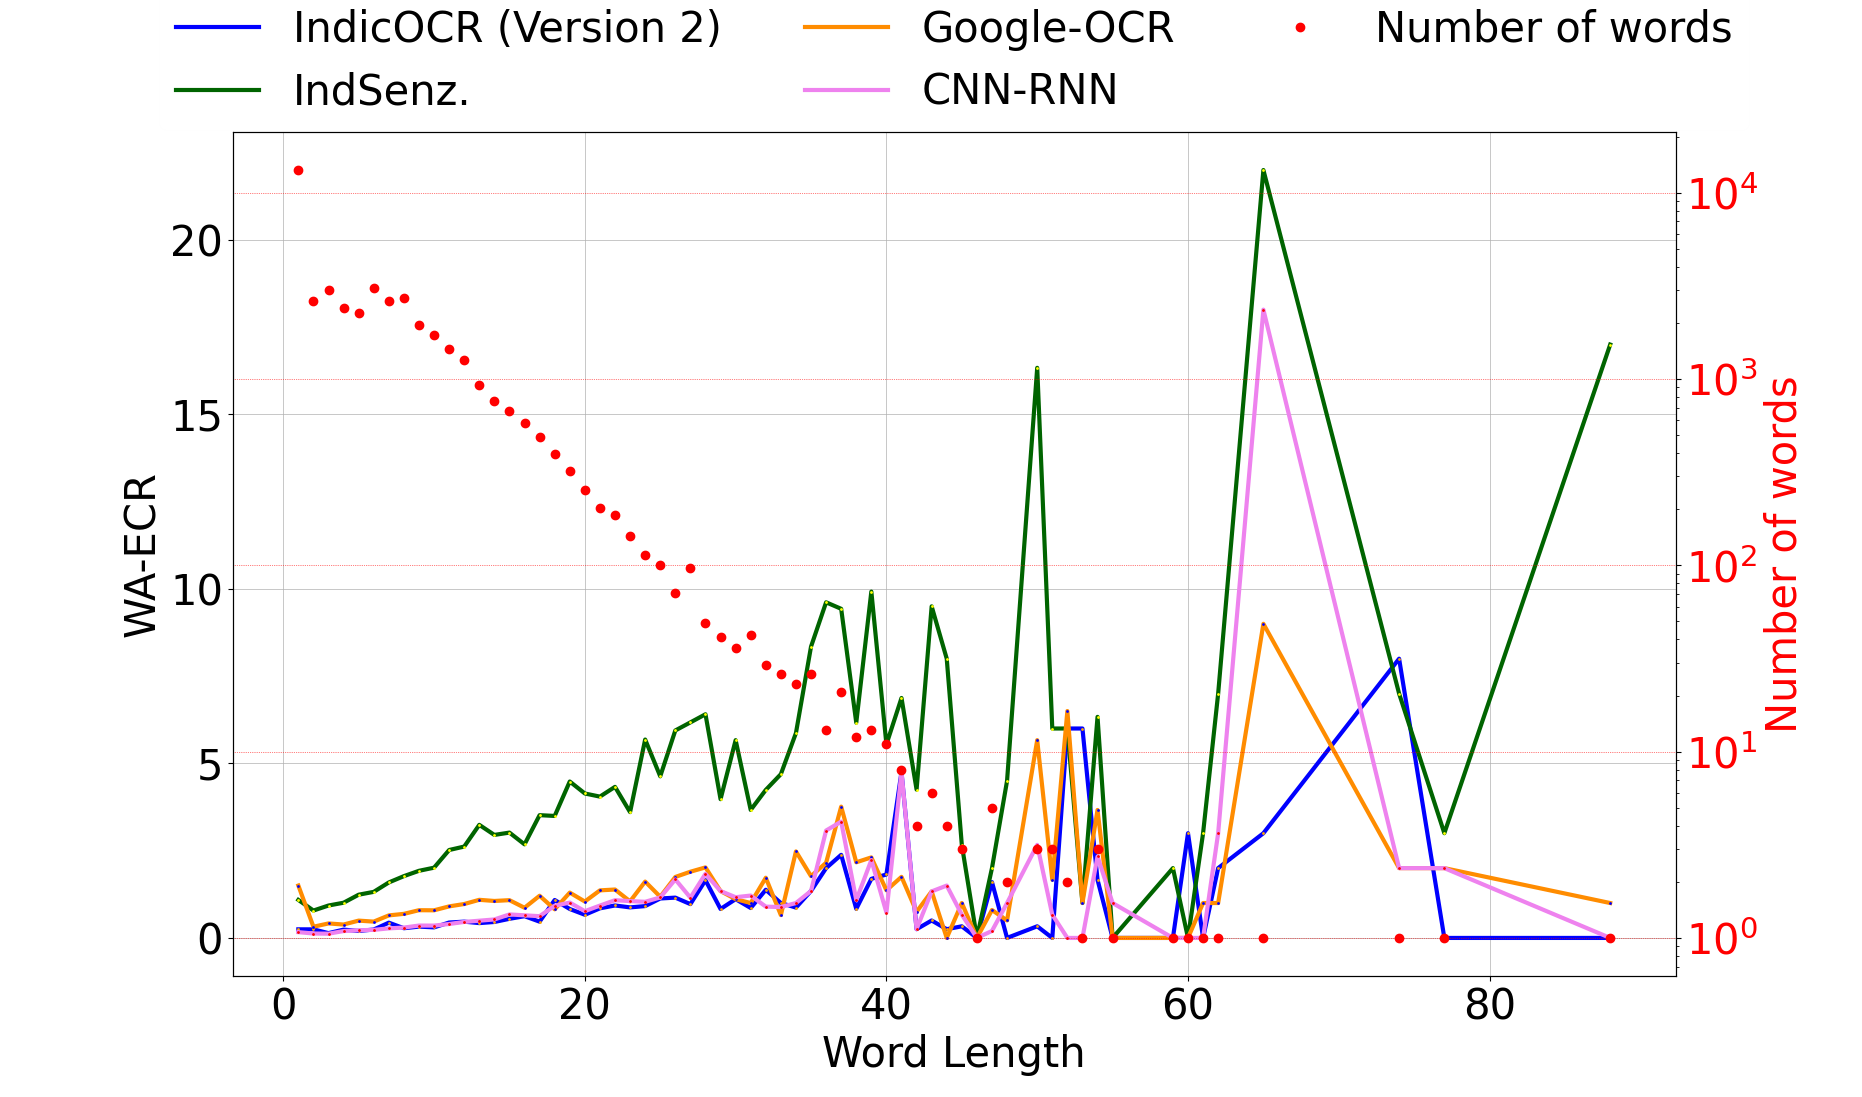
To gain a better insight into performance, we compute the word-averaged erroneous character rate (WA-ECR). This is defined as follows:
WA-ECR: = E/N
Where:
- E: number of erroneous characters across all words of length L
- N : number of L length words in the test set.
Figure: Distribution of word-averaged erroneous character rate (WA-ECR) as a function of length, for different models. The lower WA-ECR the better. The test words histogram in terms of word lengths can also be seen in the plot (red dots, log scale).
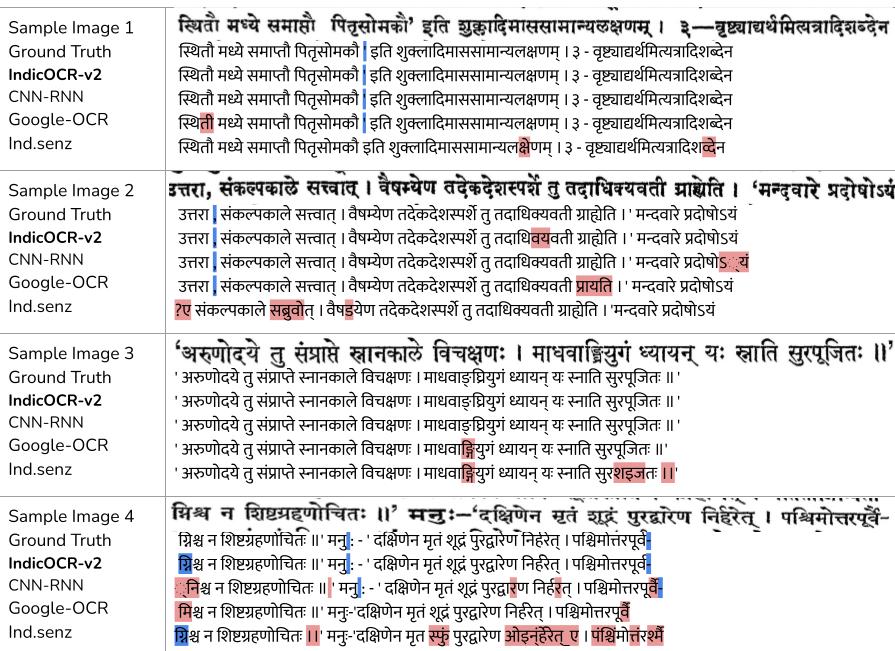
Figure: Qualitative results for different models. Errors relative to ground truth are highlighted in red. Blue highlighting indicates text missing from at least one of the OCRs. A larger amount of blue within a line for an OCR indicates better coverage relative to others OCRs. Smaller amount of red indicates absence of errors.

