This project consists of three arduino sketches:
- FollowMeTag - broadcasts position, altitude, velocity
- FollowMeController - receives info from tag and communicates with Cleanflight flight controller
- FollowMeChecker - a helper sketch to check that radio data is being sent correctly
Together the first two of these can be used to allow a quadcopter running Cleanflight iNav firmware to follow a point of interest as it moves, and aim a camera gimbal to keep that point in view. FollowMeTag will be attached to the point-of-interest, and FollowMeController will ride on the quadcopter.
There are various modes of control, listed below. In all modes the quad will turn to face the tag.
- turn only - the quad will not move anywhere
- overhead - the quad will move to the same position as the tag
- fixed offset - the quad will maintain a fixed relative lat/lon/alt from the tag
- fixed radius - the quad will maintain a constant distance away from the tag horizontally
- circle - the quad will rotate around the tag
Additionally, the camera gimbal will turn to face the tag regardless of whether or not the follow-me system is active in the flight controller. For example, when flying fully manually or in other autonomous states such as return-to-home or waypoint mode, the camera gimbal will still face toward the tag.
You can see more details and usage examples in this YouTube video: https://www.youtube.com/watch?v=fA5sFRh3OkY
You will need a multirotor running Cleanflight iNav with all necessary sensors (baro, mag, gps) to be capable of autonomous functions, eg. position hold, return-to-home.
This has been tested with Cleanflight iNav v1.2 and v1.3.
https://github.com/iNavFlight/inav
You will need a spare UART port to connect the arduino, I used UART1 on a Flip32 which is shared with the USB, so I need to disconnect the arduino if I want to connect the flight controller to the Cleanflight configurator.
The flight controller is expected to be running at VCC = 5v.
(optional) The camera gimbal should be one that accepts regular servo signals (1000μs - 2000μs pulse width) to control the angle of view. For yaw control you will need a 3-axis gimbal. You may need to be able to modify the movement range of each axis. For example with the sketch as is, the pitch movement range is expected to be -90 to +90 degrees and the yaw is -180 to +180 degrees. I tested with the HAKRC 3-axis gimbal (https://goo.gl/og7awr) which runs the kick-ass STorM32 firmware and lets you customize dozens of other useful values such as how quickly the gimbal should turn etc.
FollowMeTag requires an arduino (I used 3.3v pro-mini), u-blox GPS module (6 series or higher), MS5611 barometer and nRF24L01 radio. With some modification of the code, you could make this without a barometer, but this is not recommended unless you'll only ever be using it on ground you know to be level. The default GPS settings are to use a 10Hz update rate, if your GPS module is not capable of this you might have to modify the rate to a lower setting (in GPS.h)
FollowMeController requires a 5v arduino (I used pro-mini) and nRF24L01 radio. Optionally, you can use a mini OLED screen to show status info, and a LED to show radio reception 'heartbeat'.
FollowMeChecker requires an arduino, mini OLED screen (I2C type) and nRF24L01 radio.
FollowMeController uses MSP (MultiWii Serial Protocol) to communicate with the Cleanflight iNav flight controller.
http://www.stefanocottafavi.com/msp-the-multiwii-serial-protocol
http://www.multiwii.com/wiki/index.php?title=Multiwii_Serial_Protocol
MSP is a two-way protocol, allowing the onboard FollowMeController arduino to query information that the Cleanflight iNav flight controller knows. The arduino obtains the following MSP data:
- MSP_RAW_GPS - for latitude, longitude
- MSP_ALTITUDE - for altitude
- MSP_ATTITUDE - for yaw
- MSP_RC - for RC transmitter switch states
Combined with the latitude/longitude/altitude being broadcast from the tag, the controller can calculate the necessary position and altitude to move to, the correct heading, and the gimbal angle for the camera. The controller sends a MSP_SET_WP message to Cleanflight to relay this info. This process occurs all the time, but the waypoint messages are ignored unless the GCS_NAV flight mode is active (along with its prerequisites like POSHOLD etc).
Cleanflight settings
In the Modes section of the Cleanflight iNav configurator, you'll need to set up a mode that has all of these states enabled together:
- ANGLE - for autolevel
- MAG - to enable control of heading
- NAV ALTHOLD - for altitude hold
- NAV POSHOLD - for position hold
- GCS NAV - to accept movement instructions via MSP
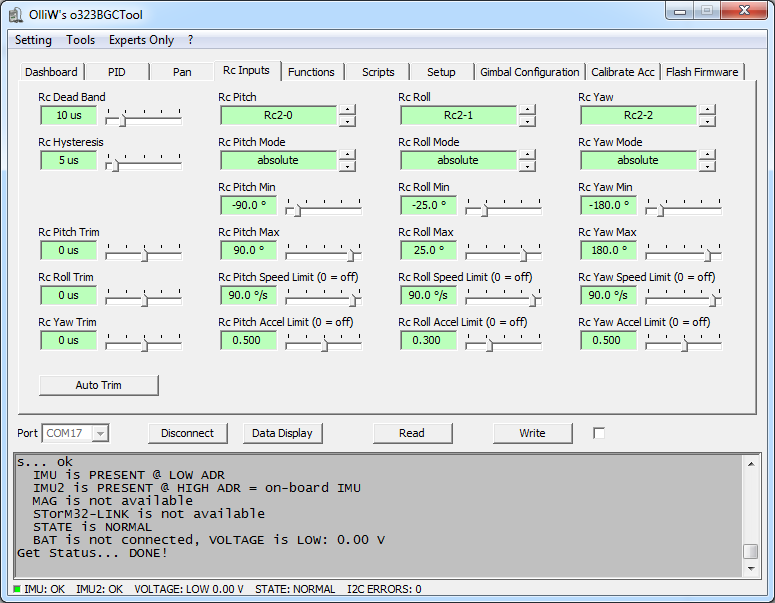
Gimbal settings The pitch movement range (pitch min, pitch max) should be -90 to +90 degrees and the yaw range (yaw min, yaw max) should be -180 to +180 degrees with positioning modes as 'absolute'. Pan mode will typically be 'hold hold pan'.

Switch settings
The FollowMeController needs to know what switch positions signify that the follow-me mode is active. Currently these are hardcoded in the rc_loop() function in the rc.h file. Here are the values I'm using:
boolean followSwitchConditionsMet =
    rcChannels[RC_AUX1] > 1300 && rcChannels[RC_AUX1] < 1700 && // switch 1 mid
    rcChannels[RC_AUX2] > 1700; // switch 2 high
This means that when I have my AUX1 switch in the middle position (about 1500μs) and my AUX2 switch high (about 2000μs) then the FollowMeController will know it is active. You should edit this condition to match the configuration of your switches when follow-me will be active. You can look at the "Mode" value on the OLED screen of the FollowMeController to check that you have the right configuration (mode value will be 1 when the condition is met, zero otherwise).
Currently the control mode to use is also hardcoded in rc.h:
_controlMode controlMode = CM_OVERHEAD;
... but you could have this set this via a switch in rc_loop(), for example:
_controlMode oldMode = controlMode;

if ( rcChannels[RC_AUX3] < 1500 )
    controlMode = CM_CIRCLE;
else
    controlMode = CM_FIXED_OFFSET;

if ( controlMode != oldMode )
    enterFollowMeMode();
(When the mode type is changed, enterFollowMeMode() should be called again to reset the relative offsets.)
Please be very careful with this until you have verified that things are working as expected - it could easily crash your quad and ruin your gimbal or camera. When you switch into the follow-me mode, be ready to immediately switch back again if it doesn't look right. I always start from regular position hold, this should be safe to switch back to if you panic. Start from the most basic modes first (eg. turn only) and progress to the more complex ones. For the gimbal control, you can verify that just by carrying the quad around by hand and checking how the gimbal moves.
- Place the quad and the tag at the same altitude.
- Power up the tag and wait for about ten seconds for it to establish a 'zero' altitude.
- Power up the quad, wait for gimbal to initialize etc.
Depending on how good the GPS reception is, you may need to wait longer for the tag, or the quad, or both, to establish a GPS fix. Once both the tag and the quad have a good GPS fix, you should see the gimbal face toward the tag (when the tag is further than 2 meters away, see below). If you have a 'heartbeat' LED connected, you should see it flashing to show that radio packets are being received from the tag. If you have an OLED screen connected, you should see data showing on the screen. See the YouTube video linked to above for more details.
Here are some more details about each mode type:
-
Turn only
When follow me mode is activated, the current latitude/longitude/altitude are stored, and used as the target position and altitude. No minimum altitude is enforced. The heading is continuously set to face the quad toward the tag. -
Overhead
When follow me mode is activated, the difference between the quad altitude and the tag altitude is stored as a relative altitude. The target lat/lon is continuously set to the location of the tag, and the target altitude is continously set to the current tag altitude plus the relative altitude. Since this will bring the quad and tag in very close proximity horizontally, a minimum relative altitude of 5 meters is enforced. The heading is continuously set to face the quad toward the tag. -
Fixed offset
When follow me mode is activated, the difference between the current latitude/longitude/altitude of the quad and the tag is recorded as an offset to maintain. The target lat/lon/alt is continuously set to the current location of the tag plus the offset. No minimum altitude is enforced. The heading is continuously set to face the quad toward the tag. -
Fixed radius
When follow me mode is activated, the horizontal distance between the current latitude/longitude of the quad and the tag is recorded as a radius to maintain, and the difference between the quad altitude and the tag altitude is stored as a relative altitude. The target lat/lon is continuously set to a point on a circle of the desired radius around the tag, which is closest to the current position of the quad. No minimum altitude is enforced. The heading is continuously set to face the quad toward the tag. -
Circle
When follow me mode is activated, the horizontal distance between the current latitude/longitude of the quad and the tag is recorded as a radius to maintain, and the difference between the quad altitude and the tag altitude is stored as a relative altitude. The target lat/lon is continuously set to a point on a circle of the desired radius around the tag, which rotates along the circumference at 4 m/s, starting at due north of the tag and rotate clockwise. In my tests the speed that it actually moves at seems a bit slower than 4 m/s but I can't see anywhere I might have messed this up... No minimum altitude is enforced. The heading is continuously set to face the quad toward the tag.
About radio communication
The tag continuously transmits its current location/altitude/velocity. If the radio communication stops, the FollowMeController will stay at the last received position. If you see the quad behaving as if the tag was not moving when it actually is, perhaps there is a problem with the radio connection.
Every 5 packets the 'heartbeat' LED will be toggled on or off. Typically there will be around 50 packets received per second, so this will result in about 5 flashes of the LED per second. If this heartbeat stops you will know that there is a problem with the radio connection. (Note that when the tag starts up, there is a period of a few seconds where no radio packets are sent while the barometer calibration is being done, this is normal.)
About heading control and gimbal aiming
In all modes the quad and gimbal will turn to face the tag, as long as the quad and the tag are more than 2 meters apart horizontally. When they are close together the correct angle becomes hard to determine, which usually results in continual rotating back and forward as their relative positions move just a little. While technically this is the correct behavior, it's really annoying to watch the recorded video like that, so heading adjustment and gimbal aiming is not done when the quad and the tag are close.
The yaw range of the gimbal being -180 to 180 degrees, means that when the desired yaw angle of the gimbal crosses from the very low end to the high end, the gimbal will turn almost a full revolution. This can happen when the tag goes around directly behind the quad. On a gimbal with unlimited yaw rotation and a quad with retractable landing gear this would not be a problem, but most affordable gimbals do not have unlimited yaw rotation. However, since the quad also turns to face the tag, this situation should not arise often.
Since the purpose of a camera gimbal is to smooth out sudden movements, it is rather sluggish to respond to change of pitch or yaw instructions. For a STorM32 controller you can improve this somewhat by increasing the "Rc Pitch Speed Limit" and "Pitch Pan" values (and same for yaw, see above example), but the yaw movement will most likely still be quite sluggish to respond when the quads adjusts its heading. The reason for this is that when the quad changes its heading, the 'local' yaw heading needed for the gimbal changes too. But until the MSP message comes through the new angle is not known, so there will always be a delay. (Side note, this problem would also be solved by an unlimited yaw gimbal, because then the pan mode could be set to 'hold hold hold'.)
You may find that the resulting angle of the gimbal is a bit off. If you are using a STorM32 gimbal controller you can trim the RC inputs with the gimbal configuration program. You can also modify the trim values used in the setPitch() and setYaw() functions (in gimbal.h of FollowMeController).
About barometric altitude measurements
Altitude values for the tag and the quad are found by measuring air pressure. Please keep in mind that this is a pretty rough measurement and is a bit slow to react to changes in altitude sometimes. The relative altitude targets mentioned above are not really intended to handle quick changes in height like walking up a flight of stairs (although that might work out ok). They are more intended for gradual changes like walking over uneven ground, or a gradually sloping hill.
Another point to keep in mind is that air pressure changes over time with the weather. If you leave the tag running for an hour or so, the air pressure might become quite different to what it recorded as 'zero'. If you were to also leave the quad running for that same hour as well, then they will still both be in sync, but if the quad was restarted at the end of the hour, it will have a different idea of what is 'zero' altitude. This will not matter for the relative altitude modes because they use the difference in altitude at the time that follow-me was activated, but it will affect the camera gimbal direction, and it will also affect the 5 meter minimum altitude enforced by the 'overhead' mode. If you leave the tag running for a long time and then notice that the vertical direction of the camera is a bit off, you might want to try restarting the tag.