Transcribe and translate audio offline on your personal computer. Powered by OpenAI's Whisper.
![]()


- Real-time transcription and translation from your computer's microphones to text (Demo)
- Import audio and video files and export transcripts to TXT, SRT, and VTT (Demo)
To install Buzz, download the latest version for your operating system. Buzz is available on Mac and Windows.
Install via brew:
$ brew install --cask buzz- Download and run the
Buzz-x.y.z.exefile.
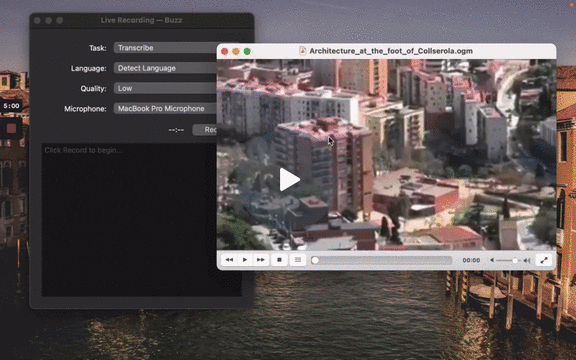
To start a live recording:
- Select a recording task, language, quality, and microphone.
- Click Record.
Note: Transcribing audio using the default Whisper model is resource-intensive. If your computer is unable to keep up with real-time transcription, consider turning on GGML inference.
| Field | Options | Default | Description |
|---|---|---|---|
| Task | "Transcribe", "Translate" | "Transcribe" | "Transcribe" converts the input audio into text in the selected language, while "Translate" converts it into text in English. |
| Language | See Whisper's documentation for the full list of supported languages | "Detect Language" | "Detect Language" will try to detect the spoken language in the audio based on the first few seconds. However, selecting a language is recommended (if known) as it will improve transcription quality in many cases. |
| Quality | "Very Low", "Low", "Medium", "High" | "Very Low" | The transcription quality determines the Whisper model used for transcription. "Very Low" uses the "tiny" model; "Low" uses the "base" model; "Medium" uses the "small" model; and "High" uses the "medium" model. The larger models produce higher-quality transcriptions, but require more system resources. See Whisper's documentation for more information about the models. |
| Microphone | [Available system microphones] | [Default system microphone] | Microphone for recording input audio. |

To record audio playing from an application on your computer, you may install an audio loopback driver (a program that lets you create virtual audio devices). The rest of this guide will use BlackHole on Mac, but you can use other alternatives for your operating system (see LoopBeAudio, LoopBack, and Virtual Audio Cable).
-
Install BlackHole via Homebrew
brew install blackhole-2ch
-
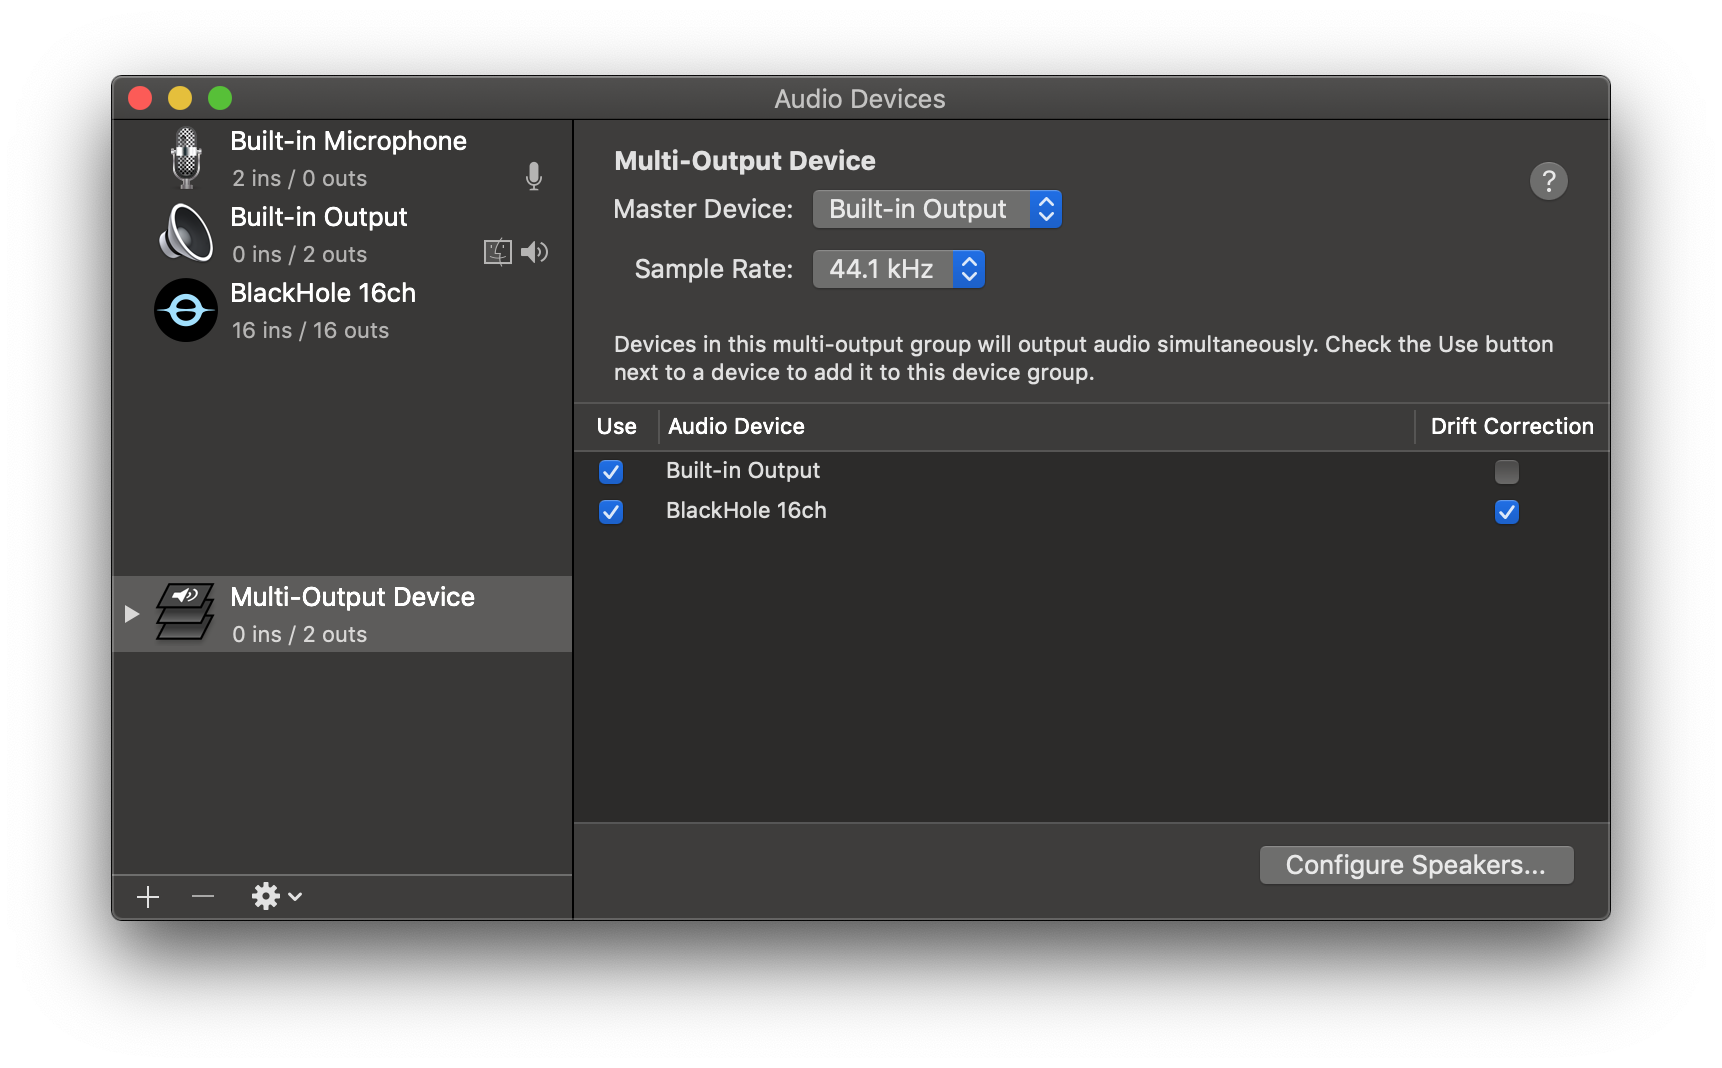
Open Audio MIDI Setup from Spotlight or from
/Applications/Utilities/Audio Midi Setup.app. -
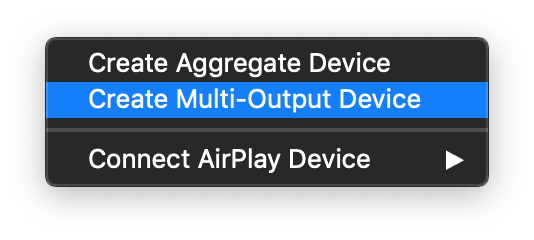
Click the '+' icon at the lower left corner and select 'Create Multi-Output Device'.
-
Add your default speaker and BlackHole to the multi-output device.
-
Select this multi-output device as your speaker (application or system-wide) to play audio into BlackHole.
-
Open Buzz, select BlackHole as your microphone, and record as before to see transcriptions from the audio playing through BlackHole.
To import a file:
- Click Import on the File menu (or Command + O on Mac, Ctrl + O on Windows).
- Choose an audio or video file. Supported formats: "mp3", "wav", "m4a", "ogg", "mp4", "webm", "ogm".
- Select a task, language, quality, and export format.
- Click Run.
| Field | Options | Default | Description |
|---|---|---|---|
| Export As | "TXT", "SRT", "VTT" | "TXT" | Export file format |
| Word-Level Timings | Off / On | Off | If checked, the transcription will generate a separate subtitle line for each word in the audio. Enabled only when "Export As" is set to "SRT" or "VTT". |
(See the Live Recording section for more information about the task, language, and quality settings.)
(Default: off)
Turn this on to use inference from Whisper.cpp. Whisper.cpp runs faster than Whisper's original Python implementation but requires a different set of models for inference. Whisper.cpp currently does not support the "Detect Language" option, and transcription will fall back to the original Whisper inference if selected. See the Whisper.cpp documentation for more information.
| Model | Link | Size | SHA256 |
|---|---|---|---|
| tiny | https://ggml.buzz.chidiwilliams.com/ggml-model-whisper-tiny.bin | 78 MB | be07e048e1e599ad46341c8d2a135645097a538221678b7acdd1b1919c6e1b21 |
| base | https://ggml.buzz.chidiwilliams.com/ggml-model-whisper-base.bin | 148 MB | 60ed5bc3dd14eea856493d334349b405782ddcaf0028d4b5df4088345fba2efe |
| small | https://ggml.buzz.chidiwilliams.com/ggml-model-whisper-small.bin | 488 MB | 1be3a9b2063867b937e64e2ec7483364a79917e157fa98c5d94b5c1fffea987b |
| medium | https://ggml.buzz.chidiwilliams.com/ggml-model-whisper-medium.bin | 1.53 GB | 6c14d5adee5f86394037b4e4e8b59f1673b6cee10e3cf0b11bbdbee79c156208 |
| large | https://ggml.buzz.chidiwilliams.com/ggml-model-whisper-large.bin | 3.1 GB | 9a423fe4d40c82774b6af34115b8b935f34152246eb19e80e376071d3f999487 |
To build/run Buzz locally from source, first install the dependencies:
-
Clone the repository
git clone --recurse-submodules https://github.com/chidiwilliams/buzz
-
Install Poetry.
-
Install the project dependencies.
poetry install
-
(Optional) To use Whisper.cpp inference, run:
make libwhisper.so
Then, to run:
poetry run python main.pyTo build:
poetry run pyinstaller --noconfirm Buzz.spec-
Where are the models stored?
The Whisper models are stored in
~/.cache/whisper. The Whisper.cpp models are stored in~/Library/Caches/Buzz(Mac OS),~/.cache/Buzz(Unix),C:\Users\<username>\AppData\Local\Buzz\Buzz\Cache(Windows). -
What can I try if the transcription runs too slowly?
Try using a lower quality or turning on GGML inference.