Table of Contents
This project is a vital aspect of the 2024 Data Engineering Zoomcamp curriculum. Within this project, I constructed a data pipeline tasked with loading and processing data retrieved from a Kaggle dataset, which includes 2023 Spotify data. Access to the dataset is accessible on Kaggle.
This dataset comprises an API extraction encompassing various aspects of artists, including details about their music, genres, albums, tracks, and audio features. The dataset consists of four files: Album.csv, which contains information about the albums created by the artists; Artist.csv, which provides comprehensive details about the artists; Feature.csv, which includes the audio features of the tracks; and Track.csv, which contains details about the tracks and their popularity. For more information, please Kaggle
What is the objective of this project? The objective is to construct a data pipeline that retrieves, stores, cleans, and presents the data through a straightforward dashboard for visualization. With this objective in mind, we can analyze various aspects such as the types of albums preferred by certain artists, the number of track releases over the years, albums with a high number of tracks, artists with a significant volume of tracks, and the audio features of all tracks in the dataset, among others.
- Dataset repo: Kaggle
- Infrastructure as Code: Terraform
- Workflow Orchestration: Airflow
- Data Lake: Google Cloud Storage
- Data Warehouse: Google BigQuery
- Transformation: DBT
- Visualisation: Metabase
- Programming Language: Python and SQL

The cloud infrastructure has been established using Terraform, while Airflow is being executed within a local Docker container.
- A Google Cloud Platform account.
- A kaggle account.
- Install VSCode or Zed or any other IDE that works for you.
- Install Terraform
- Install Docker Desktop
- Install Google Cloud SDK
- Clone this repository onto your local machine.
- Go to Google Cloud and create a new project.
- Retrieve the project ID and define the environment variable
GCP_PROJECT_IDin the .env file located in the root directory. - Create a Service account with the following roles:
BigQuery AdminStorage AdminStorage Object AdminViewer
- Download the Service Account credentials and store it in
$HOME/.google/credentials/. - You need to activate the following APIs here
- Cloud Storage API
- BigQuery API
- Assign the
GOOGLE_APPLICATION_CREDENTIALSenvironment variable to the path of your JSON credentials file, such thatGOOGLE_APPLICATION_CREDENTIALSwill be $HOME/.google/credentials/<authkeys_filename>.json- add this line to the end of the
.bashrcfile
export GOOGLE_APPLICATION_CREDENTIALS=${HOME}/.google/google_credentials.json
- Activate the enviroment variable by runing
source .bashrc
- add this line to the end of the
- A detailed description on how to authenicate is found here
- Specify the environment variables
KAGGLE_USERandKAGGLE_TOKENin the .env file situated in the root directory. Please note thatKAGGLE_TOKENis interchangeable withKAGGLE_KEY.
- Using either Zed or VSCode, open the cloned project
DE-2024-project-spotify. - To customize the default values of
variable "project"andvariable "region"to your preferred project ID and region, you have two options: either edit the variables.tf file in Terraform directly and modify the values, or set the environment variablesTF_VAR_projectandTF_VAR_region. - Open the terminal and navigate to the root directory of the project.
- Change the directory to the terraform folder by running the command
cd terraform. - Set an alias with the command
alias tf='terraform'. - Initialise Terraform by executing
tf init. - Plan the infrastructure using
tf plan. - Apply the changes with
tf apply.
- Please confirm that the following environment variables are configured in
.envin the root directory of the project.AIRFLOW_UID. You can use runecho -e "AIRFLOW_UID=$(id -u)" > .envon your CLIKAGGLE_USERNAME. This should be set from Set up kaggle section.KAGGLE_TOKEN. This should be set from Set up kaggle section tooGCP_PROJECT_ID. This should be set from Create a Google Cloud Project sectionGCP_SPOTIFY_BUCKET=spotify_project_datalake_<GCP project id>GCP_SPOTIFY_WH_DATASET=spotify_warehouseGCP_SPOTIFY_WH_EXT_DATASET=spotify_warehouse_ext
- Run
docker-compose up. - Access the Airflow dashboard by navigating to
http://localhost:8080/in your web browser. The interface will appear similar to the following screenshot. Log in usingairflowas the username and password.

- To access the Metabase dashboard, open your web browser and visit
http://localhost:1460. The interface will look similar to the following screenshot. You will need to sign up to use the UI.

Once you've completed all the steps outlined in the previous section, you should now be able to view the Airflow dashboard in your web browser. Below, you'll see a list of DAGs available.
 Below is the DAG's graph.
 To run the DAG, Click on the play button

- Navigate to the root directory of the project in the terminal, and then change the directory to the "data_dbt" folder using the command
cd data_dbt. - Create a "profiles.yml" file within
${HOME}/.dbt, and define a profile for this project according to the instructions provided below.
data_dbt_spotify:
  outputs:
    dev:
      dataset: spotify_warehouse
      fixed_retries: 1
      keyfile: <location_google_auth_key>
      location: <preferred project region>
      method: service-account
      priority: interactive
      project: <preferred project id>
      threads: 6
      timeout_seconds: 300
      type: bigquery
target: dev- To run all models, run
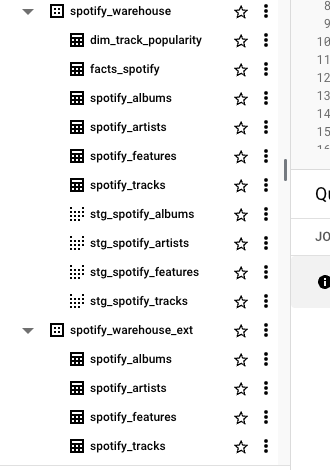
dbt run -t dev - Navigate to your Google BigQuery project by clicking on this link. There, you'll find all the tables and views created by DBT.

Please watch the provided video tutorial for guidance on configuring your Metabase database connection with BigQuery. You can customize your dashboard to suit your preferences. Additionally, you can view the complete screenshot of the dashboard I created in this PDF.


Twitter: @iamraphson
I want to express my deepest appreciation to the organizers, especially Alex, for offering the Data Engineering Zoomcamp course. It has been an incredibly valuable learning experience for me.
🦅