항해마켓 프로젝트입니다. 항해마켓은 판매자가 팔고싶은 물건을 등록할 수 있고 판매자와 구매자 간의 채팅기능을 사용할 수 있는 마켓입니다.
팀프로젝트의 백엔드 Repository 입니다.
-
React, Spring을 기반으로 프로젝트 구현
- 각 파트의 별도 Repository를 생성 후 작업
- 프론트 : AWS S3 정적 호스팅
- 백엔드 : AWS EC2 서버 호스팅
- 빌드 후, S3와 EC2 연동
-
로그인 처리는 Jwt Token 방식으로 처리
-
게시글 작성 시 프론트에서 이미지 파일 형태로 받아 서버측에서 S3에 업로드 후 Url 돌려주는 방식
-
채팅은 STOMP와 SockJS로 구성
- 명칭 : 항해마켓
- 개발 인원 : 5명 (프론트 2명[허민규,이지은], 백엔드 3명[김승욱,장현준,이은지])
- 개발 기간 : 2021.04.09 ~ 2021.04.22
- 개발 환경 : React, Spring
- 형상 관리 툴 : git
- 일정 관리 툴 : Notion
- 사이트 : 항해마켓
- 시연 영상 : 유튜브 링크


- 로그인, 회원가입
- 소셜로그인
- 게시글 CRUD
- 이미지 S3 업로드
- 댓글 CRUD
- 찜하기 (좋아요)
- 팔로우
- 채팅
@Entity
@Getter
@NoArgsConstructor
public class Board extends Timestamped{

    @Id @GeneratedValue
    private Long id;
    @Column(nullable = false)
    private String title;
    @Column(nullable = false)
    private String content;
    @Column(nullable = false)
    private int price;
//    @Column(nullable = true)
//    private boolean status;
//    @Column(nullable = true)
//    private boolean exchange;
    private String imgUrl;

    @ManyToOne(fetch = FetchType.LAZY)
    //@JoinColumn(name = "USER_ID")
    private User user;

    @JsonIgnore
    @OneToMany(mappedBy = "board", cascade = CascadeType.ALL)
    private List<Heart> hearts = new ArrayList<>();

    @JsonIgnore
    @OneToMany(mappedBy = "board", cascade = CascadeType.ALL)
    private List<Comment> comments = new ArrayList<>();


    public Board(BoardRequestDto requestDto) {
        this.title = requestDto.getTitle();
        this.content = requestDto.getContent();
        this.price = requestDto.getPrice();
        //this.status = requestDto.isStatus();
        //this.exchange = requestDto.isExchange();
        this.imgUrl = requestDto.getImgUrl();
    }

    public void update(BoardRequestDto requestDto) {
        this.title = requestDto.getTitle();
        this.content = requestDto.getContent();
        this.price = requestDto.getPrice();
        //this.status = requestDto.isStatus();
        //this.exchange = requestDto.isExchange();
        this.imgUrl = requestDto.getImgUrl();
    }

    public void addUser(User user) {
        this.user = user;
        user.getBoards().add(this);
    }
}- set을 사용하지않고 생성자로만 생성할 수 있도록 하였습니다.
- 양방향 연관관계를 사용하여 편의메소드를 만들어 양방향 모두 매핑을 시켜주었습니다.
- Board가 지워질때 연관된 내용들도 지워지도록 cascade = CascadeType.ALL을 사용했습니다.
@RestController
@RequiredArgsConstructor
public class BoardController {

    private final BoardService boardService;
    private final S3Uploader s3Uploader;

    //전체게시글 조회, 검색 (메인페이지)
    @GetMapping("/main")
    public List<BoardMainDto> getBoard(@RequestParam(value = "searchText", required = false) String searchText){
        if (searchText == null){
            return boardService.getBoard();
        }else{
            return boardService.getSearchBoard(searchText);
        }
    }

    // 게시글 작성
    @PostMapping("/boards")
    public BoardPostDto createBoard(@RequestParam("title") String title, @RequestParam("content") String content,
                                      @RequestParam("price") int price, @RequestParam(value = "status", required = false) boolean status, @RequestParam(value = "exchange", required = false) boolean exchange,
                                      @RequestParam("file") MultipartFile files, @AuthenticationPrincipal PrincipalDetails userDetails) throws IOException {

        String imgUrl = s3Uploader.upload(files, "static");
        BoardRequestDto requestDto = new BoardRequestDto(title, content, price, status, exchange, imgUrl);

        return boardService.createBoard(requestDto, userDetails.getUser().getId());

    }

    // 게시글 수정
    @PutMapping("/boards/{boardId}")
    public ResponseEntity updateBoard(@PathVariable Long boardId, @RequestParam("title") String title, @RequestParam("content") String content,
                                      @RequestParam("price") int price, @RequestParam(value = "status", required = false) boolean status, @RequestParam(value = "exchange", required = false) boolean exchange,
                                      @RequestParam("file") MultipartFile files, @RequestParam(value = "imgUrl", required = false) String imgUrl, @AuthenticationPrincipal PrincipalDetails userDetails) throws IOException {

        // 이미지 수정없이 게시글 수정할 때는 s3에 업로드 할 필요 없으므로 imgUrl이 안넘어 올 경우에만 업로드를 시켜준다.
        if(imgUrl == null) {
            imgUrl = s3Uploader.upload(files, "static");
        }
        // 이미지를 수정안한 상태에서 보낼경우 또 업로드 하지않게 만들어야 할듯
        BoardRequestDto requestDto = new BoardRequestDto(title, content, price, status, exchange, imgUrl);

        Board board = boardService.updateBoard(boardId, requestDto, userDetails.getUser().getId());
        if (board==null){
            Message message = new Message("자신이 작성한 게시글만 수정할 수 있습니다.");
            return new ResponseEntity<>(message, HttpStatus.INTERNAL_SERVER_ERROR);
        }
        return ResponseEntity.ok().build();
    }

    // 게시글 삭제
    @DeleteMapping("/boards/{boardId}")
    public ResponseEntity deleteBoard(@PathVariable Long boardId, @AuthenticationPrincipal PrincipalDetails userDetails){
        Board board = boardService.deleteBoard(boardId, userDetails.getUser().getId());
        if (board==null){
            Message message = new Message("자신이 작성한 게시글만 삭제할 수 있습니다.");
            return new ResponseEntity<>(message, HttpStatus.INTERNAL_SERVER_ERROR);
        }
        return ResponseEntity.ok().build();

    }

    // 게시글 상세페이지
    @GetMapping("/boards/{boardId}/details")
    public BoardDetailDto getDetailBoard(@PathVariable Long boardId, @AuthenticationPrincipal PrincipalDetails userDetails){
        return boardService.getDetailBoard(boardId, userDetails.getUser().getId());
    }

}- 게시글 작성, 수정 시 이미지 파일을 s3에 업로드 후 imgUrl을 프론트쪽에 넘겨줍니다.
- 게시글 작성과 수정 같은경우 파일을 같이 받아야해서 param을 사용하여 한개씩 받은다음에 객체에 넣어주는 식으로 진행하였습니다.
- CRUD로 나누어 주고 비즈니스 로직은 Service에서 처리하도록 Service를 호출하여 줍니다.
@Service
@RequiredArgsConstructor
public class BoardService {
    private final BoardRepository boardRepository;
    private final UserRepository userRepository;
    private final static int size = 10;

    // 게시글 조회
    public List<BoardMainDto> getBoard() {
        List<Board> board = boardRepository.findAllByOrderByModifiedAtDesc();
        List<BoardMainDto> mainDtoList = new ArrayList<>();
        // main에 필요한 값들만 Dto로 만들어서 보내준다.
        for(int i=0; i<board.size(); i++){
            BoardMainDto mainDto = new BoardMainDto(board.get(i));
            mainDtoList.add(mainDto);
        }
        return mainDtoList;
    }

    // 검색한 게시글 조회
    public List<BoardMainDto> getSearchBoard(String title) {
        List<Board> board = boardRepository.findByTitleContainingOrContentContaining(title, title);
        List<BoardMainDto> mainDtoList = new ArrayList<>();
        // main에 필요한 값들만 Dto로 만들어서 보내준다.
        for(int i=0; i<board.size(); i++){
            BoardMainDto mainDto = new BoardMainDto(board.get(i));
            mainDtoList.add(mainDto);
        }
        return mainDtoList;
    }

    // 게시글 작성
    public BoardPostDto createBoard(BoardRequestDto requestDto, Long userId) {
        User user = userRepository.findById(userId).orElseThrow(
                () -> new IllegalArgumentException("계정이 존재하지 않습니다.")
        );
        Board board = new Board(requestDto);
        board.addUser(user);
        boardRepository.save(board);
        BoardPostDto boardPostDto = new BoardPostDto(board);
        return boardPostDto;

    }

    // 게시글 수정
    @Transactional
    public Board updateBoard(Long boardId, BoardRequestDto requestDto, Long userId) {
        User user = userRepository.findById(userId).orElseThrow(
                () -> new IllegalArgumentException("계정이 존재하지 않습니다.")
        );
        Board board = boardRepository.findById(boardId).orElseThrow(
                ()-> new IllegalArgumentException("게시글이 존재하지 않습니다.")
        );
        if (board.getUser().getId().equals(userId)){
            board.update(requestDto);
            return board;
        }
        else{
            return null;
        }

    }

    // 게시글 삭제
    @Transactional
    public Board deleteBoard(Long boardId, Long userId) {
        User user = userRepository.findById(userId).orElseThrow(
                () -> new IllegalArgumentException("계정이 존재하지 않습니다.")
        );
        Board board = boardRepository.findById(boardId).orElseThrow(
                ()-> new IllegalArgumentException("게시글이 존재하지 않습니다.")
        );
        if (board.getUser().getId().equals(userId)) {
            boardRepository.deleteById(boardId);
            return board;
        }
        else{
            return null;
        }
    }


    // 게시글 상세조회
    public BoardDetailDto getDetailBoard(Long boardId, Long id) { // 게시글 작성한 사람의 아이디와 이메일을 보낸다.
        Board board = boardRepository.findById(boardId).orElseThrow(
                ()-> new IllegalArgumentException("게시글이 존재하지 않습니다.")
        );
        BoardDetailDto boardDetailDto = new BoardDetailDto(board);
        return boardDetailDto;
    }
}- 계정과 게시글이 존재하는지 확인한 다음에 예외처리를 해줍니다.
- 값을 반환해줄 때 Entity 값을 그대로 보내주면 연관관계가 매핑이 되어있기 때문에 무한루프 또는 성능저하로 이루어질 수 있기 때문에 Dto를 따로 만들어 프론트에서 그때 필요한 값들만을 보내주었습니다.
@Slf4j
@RequiredArgsConstructor
@Component
public class S3Uploader {
    private final AmazonS3 amazonS3;

    //private final static String TEMP_FILE_PATH = "src/main/resources/";

    @Value("${cloud.aws.s3.bucket}")
    private String bucket;

    // MultipartFile을 전달받아 File로 전환한 후 S3에 업로드
    public String upload(MultipartFile multipartFile, String dirName) throws IOException{
        System.out.println(multipartFile);
        File uploadFile = convert(multipartFile)
                .orElseThrow(() -> new IllegalArgumentException("MultipartFile -> File 전환 실패"));
        return upload(uploadFile, dirName);
    }

    private String upload(File uploadFile, String dirName){
        String fileName = dirName + "/" + UUID.randomUUID().toString().replaceAll("-", ""); // 버킷안에 dirName 폴더로 UUID를 사용해 랜덤이름으로 파일이름 저장
        String uploadImageUrl = putS3(uploadFile, fileName); // S3 업로드

        removeNewFile(uploadFile); //로컬에 생성된 File 삭제(MultipartFile -> File 전환 하며 로컬에 파일 생성됨)
        return uploadImageUrl; // 업로드된 파일의 S3 URL 주소 반환
    }

    private String putS3(File uploadFile, String fileName){
        amazonS3.putObject(
                new PutObjectRequest(bucket, fileName, uploadFile)
                .withCannedAcl(CannedAccessControlList.PublicRead) // PublicRead 권한으로 업로드 됨
        );
        return amazonS3.getUrl(bucket, fileName).toString(); // Url 받아옴
    }

    private void removeNewFile(File targetFile){ // S3에 올리면서 생성된 로컬파일 삭제
        if(targetFile.delete()){
            log.info("파일이 삭제되었습니다.");
        }else{
            log.info("파일이 삭제되지 못했습니다.");
        }
    }

    private Optional<File> convert(MultipartFile file) throws IOException{ // MultipartFile -> File로 변경
        File convertFile = new File(file.getOriginalFilename());

        if(convertFile.createNewFile()){

            try(FileOutputStream fos = new FileOutputStream(convertFile)){
                fos.write(file.getBytes());
            }
            return Optional.of(convertFile);
        }
        return Optional.empty();
    }
}- 프론트에서 form-data 형식으로 multipart 파일을 받으면 s3Uploder를 호출해 file로 변환시켜주고 그 파일을 s3버킷 폴더에 uplode를 시켜주고 업로드 시키는 과정중에 로컬에 생성된 파일을 제거해주고 s3로부터 받은 imgUrl을 프론트에 보내줍니다.
@Entity
@Getter
@NoArgsConstructor
public class Comment {

    @Id @GeneratedValue
    private Long id;

    @Column(nullable = false)
    private String comment;

    @ManyToOne(fetch = FetchType.LAZY)
    private Board board;

    @ManyToOne(fetch = FetchType.LAZY)
    private User user;

    public Comment(CommentDto commentDto) {
        this.comment = commentDto.getComment();
    }

    public void addUser(User user) {
        this.user = user;
        user.getComments().add(this);
    }

    public void addBoard(Board board) {
        this.board = board;
        board.getComments().add(this);
    }

    public void update(CommentDto commentDto) {
        this.comment = commentDto.getComment();
    }
}- 연관관계 양방향 매핑을 진행하였고 연관관계 편의 메소드를 사용하여 양방향에 매핑을 진행하였습니다.
- ManyToOne 같은 경우 fetch default 값이 즉시로딩이므로 지연로딩으로 바꿔주었습니다.
@RestController
@RequiredArgsConstructor
public class CommentController {

    private final CommentService commentService;

    @GetMapping("/boards/{boardId}/comments")
    public List<CommentDto> getComment(@PathVariable Long boardId, @AuthenticationPrincipal PrincipalDetails userDetails){
        return commentService.getComment(boardId, userDetails.getUser().getId());
    }

    @PostMapping("/boards/{boardId}/comments")
    public ResponseEntity postComment(@PathVariable Long boardId, @AuthenticationPrincipal PrincipalDetails userDetails, @RequestBody CommentDto commentDto){
        System.out.println(commentDto.getComment());
        Comment comment = commentService.postComment(boardId, userDetails.getUser().getId(), commentDto);
        if(comment == null){
            Message message = new Message("댓글 작성 오류입니다.");
            return new ResponseEntity<>(message, HttpStatus.INTERNAL_SERVER_ERROR);
        }else{
            return ResponseEntity.ok().build();
        }
    }

    @PutMapping("/boards/{boardId}/comments/{commentId}")
    public HashMap<String, Object> updateComment(@PathVariable Long boardId, @PathVariable Long commentId, @AuthenticationPrincipal PrincipalDetails userDetails,
                                 @RequestBody CommentDto commentDto){
        CommentDto comment = commentService.updateComment(boardId, commentId, userDetails.getUser().getId(), commentDto);
        HashMap<String, Object> hashMap = new HashMap<>();
        if(comment == null){
            hashMap.put("message", "자신이 작성한 댓글만 수정 할 수 있습니다.");
            return hashMap;
        }else{
            hashMap.put("comment", comment);
            return hashMap;
        }

    }

    @DeleteMapping("/boards/{boardId}/comments/{commentId}")
    public ResponseEntity deleteComment(@PathVariable Long boardId, @PathVariable Long commentId, @AuthenticationPrincipal PrincipalDetails userDetails){

        Comment comment = commentService.deleteComment(boardId, commentId, userDetails.getUser().getId());
        if(comment == null){
            Message message = new Message("자신이 작성한 댓글만 삭제할 수 있습니다.");
            return new ResponseEntity<>(message, HttpStatus.INTERNAL_SERVER_ERROR);
        }else {
            return ResponseEntity.ok().build();
        }
    }
}- PathVariable로 게시글 id와 댓글 id를 받아주고 @AuthenticationPrincipal 사용하여 현재 로그인한 정보도 받아주었습니다.
- 게시글과 마찬가지로 비즈니스 로직은 Service에서 처리하도록 Service를 호출해줍니다.
@Service
@RequiredArgsConstructor
public class CommentService {

    private final CommentRepository commentRepository;
    private final UserRepository userRepository;
    private final BoardRepository boardRepository;

    public List<CommentDto> getComment(Long boardId, Long userId) {
        List<Comment> comment = commentRepository.findByBoardId(boardId);
        List<CommentDto> commentDtoList = new ArrayList<>();
        for(int i=0; i<comment.size(); i++){
            CommentDto commentDto = new CommentDto(comment.get(i));
            commentDtoList.add(commentDto);
        }
        return commentDtoList;

    }


    public Comment postComment(Long boardId, Long userId, CommentDto commentDto) {
        User user = userRepository.findById(userId).orElseThrow(
                ()-> new IllegalArgumentException("계정이 존재하지 않습니다.")
        );
        Board board = boardRepository.findById(boardId).orElseThrow(
                ()-> new IllegalArgumentException("게시글이 존재하지 않습니다.")
        );
        Comment comment = new Comment(commentDto);
        comment.addUser(user);
        comment.addBoard(board);
        commentRepository.save(comment);
        return comment;
    }

    @Transactional
    public CommentDto updateComment(Long boardId, Long commentId, Long userId, CommentDto commentDto) {
        User user = userRepository.findById(userId).orElseThrow(
                ()-> new IllegalArgumentException("계정이 존재하지 않습니다.")
        );
        Board board = boardRepository.findById(boardId).orElseThrow(
                ()-> new IllegalArgumentException("게시글이 존재하지 않습니다.")
        );
        Comment comment = commentRepository.findById(commentId).orElseThrow(
                ()-> new IllegalArgumentException("댓글이 존재하지 않습니다.")
        );
        if (userId.equals(board.getUser().getId())) {
            comment.update(commentDto);
            commentDto.update(comment);
            return commentDto;

        }else{
            return null;
        }

    }

    public Comment deleteComment(Long boardId, Long commentId, Long userId) {
        User user = userRepository.findById(userId).orElseThrow(
                ()-> new IllegalArgumentException("계정이 존재하지 않습니다.")
        );
        Board board = boardRepository.findById(boardId).orElseThrow(
                ()-> new IllegalArgumentException("게시글이 존재하지 않습니다.")
        );
        Comment comment = commentRepository.findById(commentId).orElseThrow(
                ()-> new IllegalArgumentException("댓글이 존재하지 않습니다.")
        );
        if (userId.equals(board.getUser().getId())){
            commentRepository.deleteById(commentId);
            return comment;
        }else{
            return null;
        }

    }
}- 댓글조회에서 Entity를 보내주는게 아니라 필요한 값을 Dto에 담아서 리턴을 해주었습니다.
- 댓글작성에서는 양방향 연관관계를 모두 매핑해주기 위해서 선언했던 편의메소드를 호출하여 매핑을 진행하였습니다.
- 수정같은 경우 @Transaction을 붙여 다시한번 save하지 않아도 db에 데이터가 바뀔수 있도록 하였습니다.
@Entity
@Getter
public class Heart {
    @Id @GeneratedValue
    private Long id;

    @ManyToOne(fetch = FetchType.LAZY)
    //@JoinColumn(name = "USER_ID")
    private User user;

    @ManyToOne(fetch = FetchType.LAZY)
    //@JoinColumn(name = "BOARD_ID")
    private Board board;


    public void addUser(User user) {
        this.user = user;
        user.getHearts().add(this);
    }

    public void deleteUser(User user) {
        this.user = null;
        user.getHearts().remove(this);
    }

    public void addBoard(Board board) {
        this.board = board;
        board.getHearts().add(this);
    }

    public void deleteBoard(Board board) {
        this.board = null;
        board.getHearts().remove(this);
    }
}- 좋아요를 어느게시글에 어느 사용자가 눌렀는지 알기위해서 User, Board랑 연관관계를 맺었습니다.
@RestController
@RequiredArgsConstructor
public class HeartController {

    private final HeartService heartService;

    @GetMapping("/boards/{boardId}/heart")
    public HashMap<String, Object> getHeart(@PathVariable Long boardId, @AuthenticationPrincipal PrincipalDetails userDetails) {
        return heartService.getHeart(boardId, userDetails.getUser().getId());
    }

    @PostMapping("/boards/{boardId}/heart")
    public ResponseEntity createHeart(@PathVariable Long boardId, @AuthenticationPrincipal PrincipalDetails userDetails){
        Heart heart = heartService.createHeart(boardId, userDetails.getUser().getId());
        if(heart == null){
            Message message = new Message("이미좋아요 상태입니다.");
            return new ResponseEntity<>(message, HttpStatus.INTERNAL_SERVER_ERROR);
        }
        return ResponseEntity.ok().build();
    }

    @DeleteMapping("/boards/{boardId}/heart")
    public ResponseEntity deleteHeart(@PathVariable Long boardId, @AuthenticationPrincipal PrincipalDetails userDetails){
        Heart heart = heartService.DeleteHeart(boardId, userDetails.getUser().getId());
        if(heart == null){
            Message message = new Message("취소할 좋아요가 없습니다.");
            return new ResponseEntity<>(message, HttpStatus.INTERNAL_SERVER_ERROR);
        }
        return ResponseEntity.ok().build();
    }
}- 해당 게시글에 해당 사용자가 이미 좋아요 상태일 경우에 Post로 api 호출이 온경우에는 에러메세지를 보내주었습니다. Delete도 마찬가지 입니다.
@Service
@RequiredArgsConstructor
public class HeartService {

    private final HeartRepository heartRepository;
    private final BoardRepository boardRepository;
    private final UserRepository userRepository;


    // 좋아요 조회
    public HashMap<String,Object> getHeart(Long boardId, Long userId) {
        User user = userRepository.findById(userId).orElseThrow(
                () -> new IllegalArgumentException("계정이 존재하지 않습니다.")
        );
        Board board = boardRepository.findById(boardId).orElseThrow(
                () -> new IllegalArgumentException("게시글이 존재하지 않습니다.")
        );
        Heart heart = heartRepository.findByBoardIdAndUserId(boardId, userId);

        // 게시글 좋아요 갯수
        List<Heart> heartCount = heartRepository.findByBoardId(boardId);
        Integer Count = heartCount.size();
        HashMap<String,Object> hashMap = new HashMap<>();

        if(heart == null){
            hashMap.put("check", false);
            hashMap.put("heartCount", Count);
            return hashMap;
        }else{
            hashMap.put("check", true);
            hashMap.put("heartCount", Count);
            return hashMap;
        }
    }

    // 좋아요 하기
    public Heart createHeart(Long boardId, Long userId){
        User user = userRepository.findById(userId).orElseThrow(
                () -> new IllegalArgumentException("계정이 존재하지 않습니다.")
        );
        Board board = boardRepository.findById(boardId).orElseThrow(
                () -> new IllegalArgumentException("게시글이 존재하지 않습니다.")
        );
        Heart heart = heartRepository.findByBoardIdAndUserId(boardId, userId); // user_id 추가해야함
        if(heart == null){
            Heart newHeart = new Heart();
            newHeart.addUser(user);
            newHeart.addBoard(board);
            heartRepository.save(newHeart);
            return newHeart;
        }else{
            return null;
        }
    }

    // 좋아요 취소
    @Transactional
    public Heart DeleteHeart(Long boardId, Long userId){
        User user = userRepository.findById(userId).orElseThrow(
                () -> new IllegalArgumentException("계정이 존재하지 않습니다.")
        );
        Board board = boardRepository.findById(boardId).orElseThrow(
                () -> new IllegalArgumentException("게시글이 존재하지 않습니다.")
        );
        Heart heart = heartRepository.findByBoardIdAndUserId(boardId, userId); // user_id 추가해야함
        if(heart == null){
            return null;
        }else{
            heartRepository.deleteById(heart.getId());
            return heart;
        }

    }
}- 좋아요 조회 시 해당 게시글에 해당 사용자가 좋아요를 눌렀는지 heartRepository.findByBoardIdAndUserId를 통해 확인을 해서 true또는 false를 map에 넣어줍니다.
- 해당 게시글에 총 좋아요 수가 몇개인지는 heartRepository.findByBoardId로 나온 List.size()수 이다.
@Entity
@Getter
public class Follow {

    @Id @GeneratedValue
    private Long id;

    @ManyToOne(fetch = FetchType.LAZY)
    private User user;

    @ManyToOne(fetch = FetchType.LAZY)
    private User followUser;


    public void addUser(User user) {
        this.user = user;
        user.getRequestUsers().add(this);
    }

    public void addFollowUser(User followUser) {
        this.followUser = followUser;
        followUser.getResponseUsers().add(this);
    }
}- follow 같은 경우에는 나와 상대가 팔로우 인지 알려면 자신의 아이디와 팔로우할 상대의 아이디를 외래키로 가지고 있어야 하기 때문에 User를 외래키로 user, followUser를 만들었습니다.
@RestController
@RequiredArgsConstructor
public class FollowController {

    private final FollowService followService;

    // 팔로우 조회(팔로우 상태, 상대 팔로우 횟수)
    @GetMapping("/users/{followUserId}/follow")
    public HashMap<String, Object> getFollow(@PathVariable Long followUserId, @AuthenticationPrincipal PrincipalDetails userDetails){
        return followService.getFollow(followUserId, userDetails.getUser().getId());
    }

    // 팔로우 하기
    @PostMapping("/users/{followUserId}/follow")
    public ResponseEntity createFollow(@PathVariable Long followUserId, @AuthenticationPrincipal PrincipalDetails userDetails){

        // 로그인한 id와 팔로우 할려는 id 가 같을경우 에러
        if (followUserId.equals(userDetails.getUser().getId())){
            Message message = new Message("자신을 팔로우 할 수 없습니다.");
            return new ResponseEntity<>(message, HttpStatus.INTERNAL_SERVER_ERROR);
        }
        Follow follow = followService.createFollow(followUserId, userDetails.getUser().getId());

        // 이미 팔로우 상태일 경우 delete api를 호출해야 한다.
        if(follow == null){
            Message message = new Message("이미 팔로우 상태입니다.");
            return new ResponseEntity<>(message, HttpStatus.INTERNAL_SERVER_ERROR);
        }
        return ResponseEntity.ok().build();
    }

    // 팔로우 취소
    @DeleteMapping("/users/{followUserId}/follow")
    public ResponseEntity deleteFollow(@PathVariable Long followUserId, @AuthenticationPrincipal PrincipalDetails userDetails){
        Follow follow = followService.deleteFollow(followUserId, userDetails.getUser().getId());

        // 팔로우 상태가 아닐경우 Post api를 호출해야 한다.
        if(follow == null){
            Message message = new Message("취소할 팔로우가 없습니다.");
            return new ResponseEntity<>(message, HttpStatus.INTERNAL_SERVER_ERROR);
        }
        return ResponseEntity.ok().build();
    }
}- 현재 로그인한 나의 아이디는 token을 통해서 받고 내가 팔로우를 할 상대의 아이디는 PathVariable을 통해서 받습니다.
- 그리고 토큰으로 받은 아이디와 PathVariable로 받은 아이디가 같은경우 에러메세지를 출력합니다.
@Service
@RequiredArgsConstructor
public class FollowService {

    private final FollowRepository followRepository;
    private final UserRepository userRepository;


    // 팔로우 조회
    public HashMap<String,Object> getFollow(Long followUserId, Long userId) {
        User followUser = userRepository.findById(followUserId).orElseThrow(
                () -> new IllegalArgumentException("팔로우한 사용자를 찾을 수 없습니다.")
        );
        User user = userRepository.findById(userId).orElseThrow(
                () -> new IllegalArgumentException("계정이 존재하지 않습니다.")
        );
        Follow follow = followRepository.findByFollowUserIdAndUserId(followUserId, userId);

        // 내 팔로우 수가 아니라 상대방 팔로우 수이다.
        List<Follow> followCount = followRepository.findByFollowUserId(followUserId); // 내가 지금 로그인한 아이디에 팔로우 카운트를 찾으려면 userId넣으면 될 것 같음
        Integer Count = followCount.size();
        HashMap<String,Object> hashMap = new HashMap<>();

        if(follow == null){
            hashMap.put("check",false);
            hashMap.put("followCount", Count);
            return hashMap;
        }else{
            hashMap.put("check",true);
            hashMap.put("followCount", Count);
            return hashMap;
        }
    }

    // 팔로우 하기
    public Follow createFollow(Long followUserId, Long userId) {
        User followUser = userRepository.findById(followUserId).orElseThrow(
                () -> new IllegalArgumentException("팔로우한 사용자를 찾을 수 없습니다.")
        );
        User user = userRepository.findById(userId).orElseThrow(
                () -> new IllegalArgumentException("계정이 존재하지 않습니다.")
        );
        Follow follow = followRepository.findByFollowUserIdAndUserId(followUserId, userId);
        if(follow == null){
            Follow newFollow = new Follow();
            // 연관관계 편의 메소드를 사용해서 매핑
            newFollow.addUser(user);
            newFollow.addFollowUser(followUser);
            followRepository.save(newFollow);
            return newFollow;
        }else{
            return null;
        }
    }

    // 팔로우 취소
    public Follow deleteFollow(Long followUserId, Long userId) {
        User followUser = userRepository.findById(followUserId).orElseThrow(
                () -> new IllegalArgumentException("팔로우한 사용자를 찾을 수 없습니다.")
        );
        User user = userRepository.findById(userId).orElseThrow(
                () -> new IllegalArgumentException("계정이 존재하지 않습니다.")
        );
        Follow follow = followRepository.findByFollowUserIdAndUserId(followUserId, userId);
        if(follow == null){
            return null;
        }else{
            followRepository.deleteById(follow.getId());
            return follow;
        }
    }
}- 현재로그인한 사용자가 followUserId 사용자한테 follow한 상태인지 확인하기 위해서 followRepository.findByFollowUserIdAndUserId를 사용하여 테이블이 존재한다면 팔로우를 한 상태이기 때문에 map에 true를 넣어서 반환해줍니다.
- 그리고 followUserId 사용자에 총 팔로우 수를 followRepository.findByFollowUserId를 사용하여 List.size()로 팔로우 수를 찾아서 map에 넣어서 반환해줍니다.
    @RequiredArgsConstructor
    @Getter
    @Setter
    public class SignupReqeustDto {

        @NotBlank(message = "아이디를 비워둘 수 없습니다.")
        @Pattern(regexp = "^(?=.*[A-Za-z])(?=.*[0-9])[A-Za-z[0-9]]{4,12}$",
                message = "아이디는 숫자와 영어를 포함한 4-12글자여야합니다.")
        private String username;

        @NotBlank(message = "비밀번호를 비워둘 수 없습니다.")
        @Pattern(regexp = "^(?=.*[A-Za-z])(?=.*[0-9])(?=.*[$@$!%*#?&])[A-Za-z[0-9]$@$!%*#?&]{8,20}$",
                message = "비밀번호는 영문 대소문자와 숫자,특수문자를 포함한 8-20자여야합니다.")
        private String password;

        @NotBlank(message = "이메일을 비워둘 수 없습니다.")
        @Email(message = "메일 양식을 지켜주세요.")
        private String email;

private String myself;- @vaild 어노테이션을 이용해서 객체에서 유효성 검사를 처리합니다. (controller의 @RequestBody 에 @vaild 추가해서 사용.)
- @Patten : 정규식을 이용하여 유효성 검사 가능.
- @NotBlank : 빈값(공백 포함)인 경우 프론트에게 error메세지 반환.
- @Email : 이메일 양식 확인
    /* 아이디(username) 중복 체크 */
    @GetMapping("/signups/username/{username}")
    public ResponseEntity username(@PathVariable String username){
        return ResponseEntity.ok(userService.usernameCheck(username));
    }

    /* 이메일 중복 체크 */
    @GetMapping("/signups/email/{email}")
    public ResponseEntity email(@PathVariable String email){
        return ResponseEntity.ok(userService.emailCheck(email));
}- 서버단에서 이메일과 아이디를 DB에 혹시라도 잘못된 데이터가 들어가지않도록 처리했습니다.
 @Test
        public void 회원가입() throws Exception {

            //given
            SignupReqeustDto reqeustDto = SignupReqeustDto.builder()
                    .username(username)
                    .password(password)
                    .email(email)
                    .city(city)
                    .street(street)
                    .myself(myself)
                    .build();
            String url = "http://localhost:" + port + "/signups";

            //when
            ResponseEntity<Long> responseEntity = restTemplate.postForEntity(url, reqeustDto, Long.class);

            //then
            assertThat(responseEntity.getStatusCode()).isEqualTo(HttpStatus.OK);

            List<User> all = userRepository.findAll();

            assertThat(all.get(0).getUsername()).isEqualTo(username);
            assertThat(bCryptPasswordEncoder.matches(all.get(0).getPassword(), password));
            assertThat(all.get(0).getEmail()).isEqualTo(email);
            assertThat(all.get(0).getMyself()).isEqualTo(myself);
            assertThat(all.get(0).getAddress().getCity()).isEqualTo(city);
            assertThat(all.get(0).getAddress().getStreet()).isEqualTo(street);
}- 회원가입과 관련된 테스트 코드를 작성하였습니다.
@Configuration
@EnableWebSecurity//시큐리티 활성화
@RequiredArgsConstructor
public class WebSecurityConfig extends WebSecurityConfigurerAdapter {

    private final CorsFilter corsFilter;
    private final UserRepository userRepository;

    /* 비밀번호 암호화 */
    @Bean
    public BCryptPasswordEncoder encodePwd(){
        return new BCryptPasswordEncoder();
    }

    @Override
    protected void configure(HttpSecurity http) throws Exception {

        // 한글 인코딩
        CharacterEncodingFilter filter = new CharacterEncodingFilter();
        filter.setEncoding("UTF-8");
        filter.setForceEncoding(true);
        http.addFilterBefore(filter, CsrfFilter.class);


        http.csrf().disable();

        http
                .sessionManagement().sessionCreationPolicy(SessionCreationPolicy.STATELESS)  //session을 사용하지않겠다 .

                //jwt와 cors 관련 filter
                .and()
                    .addFilter(corsFilter)
                    .formLogin().disable()
                    .httpBasic().disable()
                    .addFilter(new JwtAuthenticationFilter(authenticationManager()))
                    .addFilter(new JwtAuthorizationFilter(authenticationManager(),userRepository))
                //권한 설정
                .authorizeRequests()
                    .antMatchers("/h2-console/**" ).permitAll()
                    .antMatchers("/user/**").permitAll()
                    //.antMatchers("/boards").access("hasRole('ROLE_USER') ")
                    .antMatchers("/boards/**").permitAll()
                    .antMatchers("/kakao/**").permitAll()
                    .anyRequest().permitAll();

    }

}- JwtAuthenticationFilter(토큰발급)와 JwtAuthorizationFilter(토큰 인증)를 구현해 Spring security 필터가 작동되기전에 구현한 필터를 타도록 설정을 해두었습니다.
- jwt토큰을 사용함으로 session을 사용하지않고 구현한 필터를 통해 로그인과 권한 인증이 검증되도록 구현했습니다.
@RequiredArgsConstructor
public class JwtAuthenticationFilter extends UsernamePasswordAuthenticationFilter {

    private final AuthenticationManager authenticationManager;

    // login요청을 하면 로그인 시도를 위해서 실행되는 함수.
    @Override
    public Authentication attemptAuthentication(HttpServletRequest request, HttpServletResponse response) throws AuthenticationException {
        System.out.println("로그인 시도 중.");


        try {
            //username,password를 받는다.
            ObjectMapper om = new ObjectMapper();
            User user = om.readValue(request.getInputStream(), User.class);
            System.out.println(user);

            UsernamePasswordAuthenticationToken authenticationToken
                    = new UsernamePasswordAuthenticationToken(user.getUsername(),user.getPassword());

            //PrincipalDetailsService의 loadUserByUseranme() 함수가 실행됨.
            Authentication authentication = authenticationManager.authenticate(authenticationToken);
            PrincipalDetails principalDetails = (PrincipalDetails) authentication.getPrincipal();
            System.out.println("로그인 완료 : "+ principalDetails.getUser().getUsername());
            return authentication;

        } catch (IOException e) {
            e.printStackTrace();
        }


        return null;
    }

    //JWT토큰을 만들어서 response에 넘겨줌.
    @Override
    protected void successfulAuthentication(HttpServletRequest request,
                                            HttpServletResponse response,
                                            FilterChain chain,
                                            Authentication authResult) throws IOException, ServletException {
        System.out.println("인증 완료 토큰발급.");

        // user정보를 통해서 jwt토큰 생성.
        PrincipalDetails principalDetails = (PrincipalDetails) authResult.getPrincipal();
        String jwtToken = JWT.create()
                .withSubject(JwtProperties.SECRET)
                .withExpiresAt(new Date(System.currentTimeMillis() + JwtProperties.EXPIRATION_TIME))
                .withClaim("id", principalDetails.getUser().getId())
                .withClaim("username", principalDetails.getUser().getUsername())
                .sign(Algorithm.HMAC512(JwtProperties.SECRET));

        /* body에 담을 유저 정보 생성*/
        ObjectMapper objectMapper = new ObjectMapper();
        UserInfoDto userInfoDto = new UserInfoDto(principalDetails.getUser().getId(),principalDetails.getUsername(),principalDetails.getUser().getEmail());
        String userInfoJson = objectMapper.writeValueAsString(userInfoDto);

        /* response에 토큰과 유저정보 담음.*/
        response.addHeader(JwtProperties.HEADER_STRING,JwtProperties.TOKEN_PREFIX+jwtToken);
        response.addHeader("Content-type","applcation/json");
        response.getWriter().write(userInfoJson);
    }
}- UsernamePasswordAuthenticationFilter 필터를 상속받아 구현했으며 토큰을 만들어서 발급하는 방식으로 되어있습니다.
- attemptAuthentication함수가 요청을 성공적으로 수행하면 successfulAuthentication가 작동하는 방식으로 구현되어있습니다. 토큰을 발급해 유저정보를 reponse에 실어 보냅니다.
   //저장한 kakaoUser정보로 로그인요청
        if(kakaoLoginInfo != null){

            String username = kakaoLoginInfo.getKakaoId();
            String password = kakaoLoginInfo.getPassword();

            //HttpPost 요청
            HttpClient client = HttpClientBuilder.create().build();
            String postUrl ="http://localhost:8080/login";
            HttpPost httpPost = new HttpPost(postUrl);
            String data = "{" +
                    "\"username\": \""+username+"\", " +
                    "\"password\": \""+password+"\""+
                    "}";

            StringEntity entity = new StringEntity(data, ContentType.APPLICATION_FORM_URLENCODED);
            httpPost.setEntity(entity);

            HttpResponse responsePost = client.execute(httpPost);

            //HttpPost요청이 정상적으로 완료 되었다면
            if (responsePost.getStatusLine().getStatusCode() == 200) {

                // response Body에 있는 값을 꺼냄
                HttpEntity entitys = responsePost.getEntity();
                String content = EntityUtils.toString(entitys);

                // response header에 있는 token꺼냄
                String value = responsePost.getFirstHeader("Authorization").getValue();

                //다시 진짜 사용자의 요청에 리턴해 줄 response에 토큰과 사용자 정보를 넣는다.
                response.addHeader("Authonrazation", value);
                response.getWriter().write(content);

            } else {
                //에러 처리.
                response.getWriter().write("kakaoLoginError");
            }

        }else{
            //에러처리
            response.getWriter().write("kakaoUserNotFount");
        }
- 카카오톡 로그인의 경우 카카오서버에서 카카오 유저의 정보를 반환해서 해당하는 유저가 없는 경우에 회원가입을 진행합니다 . 그 후 회원가입된 정보를 토대로 구현해둔 login로직을 타도록 HttpClinet를 이용해 서버에게 로그인 요청을 보내는 방식으로 구현되어있습니다.

- WebSocket은 웹 상에서 쉽게 소켓통신을 하게 해주는 라이브러리로 실시간 채팅 서비스 등등 여러 유요한 서비스에 기반이 된다. 스프링 부트환경에서는 이러한 서비스를 구현하기 위해서 필요한 2가지가 있다. WebSocket의 기능을 보완해주고 향상시켜주는 SockJs라이브러리와 메시징 전송을 좀 더 효율적으로 지원해주기 위한 STOMP 프로토콜이 존재한다.일반 스프링 환경에서는 핸들러만 구현해주고 직접 호출했지만 부트 환경에서는 핸들러와 브로커라는 개념을 이용해서 서로간의 통신을 하게 된다.
-
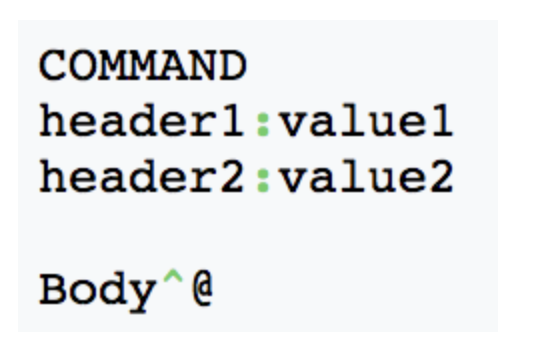
STOMP는 Simple/Streaming Text Oriented Messaging Protocol의 약자이다. 텍스트 기반의 메세징 프로토콜이다. 유사한 프로토콜은 OASIS표준으로 선정된 AMQP가 있다. 웹 소켓을 지원한다. TCP나 WebSocket과 같은 신뢰성있는 양방향 streaming network protocol상에 사용될 수 있다. HTTP에 모델링 된 frame 기반 프로토콜이다.
- 아래는 해당 frame워크의 구조이다
- 헤더와 바디로 구성되어있다. 아래는 STOMP의 구조이다.
-
위의 구조에서 중요한 개념은 브로커와 Subscribe의 개념이다. STOMP는 구독이라는 개념을 통해 내가 통신하고자 하는 주체(topic)을 판단하여 브로커라는 개념을 두어 실시간, 지속적으로 관심을 가지며 해당 요청이 들어오면 처리하게 되는 구조이다.
-
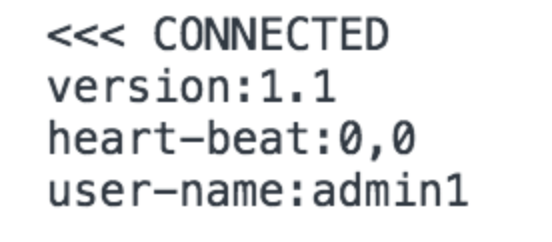
Connect
연결에 관한 구조이다. 버전정보와 현재의 세션정보를 가져온다. 세션은 스프링 시큐리티를 연동하여 등록한다.
-
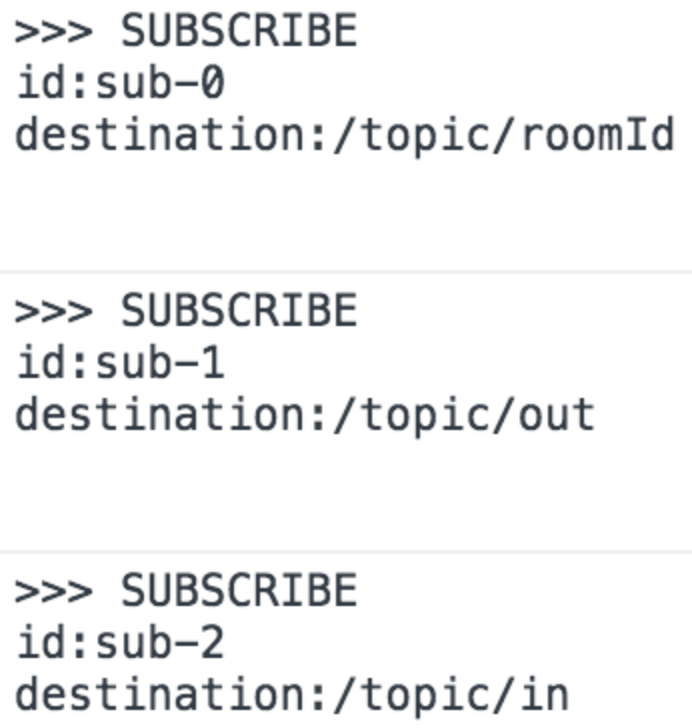
Subscribe
구독이라는 개념을 이용하여 현재 메세지에 대한 목적지를 설정한다. 구조를 보면 각각의 destination이 있다. Connect 이후에 subscribe를 설정하게 된다. 등록되지 않은 subscribe를 호출 시 찾을 수 없기에 정확한 통신이 되지 않는다.
-
Message
메세지를 전송 시 구조이다. 메세지의 전달지(destination)와 해당 메세지의 정보들이 출력된다. 현재 위의 구조는 데이터의 타입은 JSON으로 전송하였고 목적지는 /topic/ + roomId이다. 데이터는 JSON구조로 key, value로 되어있다. 다양한 데이터 타입을 가질 수 있다.


-
Build.gradle
implementation 'org.springframework.boot:spring-boot-starter-websocket'
- 웹 소켓 라이브러리를 등록해준다.
-
WebSocketConfig.java
@Configuration
@EnableWebSocketMessageBroker
public class WebSocketConfig implements WebSocketMessageBrokerConfigurer {
    @Override
    public void registerStompEndpoints(StompEndpointRegistry registry) {
        registry.addEndpoint("/chatting").withSockJS();
        registry.addEndpoint("/chatting");
    }

    @Override
    public void configureMessageBroker(MessageBrokerRegistry registry) {
        registry.enableSimpleBroker("/topic");
        registry.setApplicationDestinationPrefixes("/app");
    }
}
WebSocketMessageBrokerConfigure를 implement를 받아서 관련 메소드들을 오버라이드 합니다. 위 STOMP의 구조를 설명했듯이 브로커라는 개념이 적용된다. setApplicationDesinationPrefixes 메소드를 이용하여서 전송할 목적지의 prefix값을 설정한다. 마지막으로 addEndpoint로 웹 소켓에서 활용될 주소를 적어주고 withSockJS를 이용하여서 향상된 SockJS를 사용 하겠다는 것을 알려준다.
-
ChatMessageController.java
@Controller
@RequiredArgsConstructor
public class ChatMessageController {
    private final SimpMessagingTemplate simpMessagingTemplate;
    private final ChatMessageService chatMessageService;
    @MessageMapping("/chat/send")
    public void sendMsg(ChatMessageForm message) {
        String receiver = message.getReceiver();
        System.out.println(receiver);
        chatMessageService.save(message);
        simpMessagingTemplate.convertAndSend("/topic/" + receiver,message);
    }

}
다음과 같이 controller단에서 받을 수 있다. /app의 경우 기본 publish로 지정했기 때문에 /app 이후 url만 MessageMapping으로 요청받고 각자 입맛에 맞게 변형한 뒤 SimplMessagingTemplate를 통해서 내가 보내주고자 하는 사람이 subscribe한 링크로 보내주면 됩니다. 이런식으로 client가 채팅방을 만들 때 publish는 모두 동이랗ㄴ 링크로 두고 subscribe를 개인의 고유한 url로 만들 어서 각각의 유저끼리 1:1 채팅이 가능하도록 합니다.