Vue.js + TypeScript + NEM2-SDK でNEM2 walletを作る
概要
初めまして、shoheiです。iOS/Android/Webアプリ開発をしているフリーランスエンジニアです。また、ブロックチェーンを用いたプロダクト開発も行っております。
本章では、Vue.js + TypeScript + NEM2-SDKを用いてWebウォレットを作成します。あらかじめ用意している gitリポジトリ を clone してウォレット機能を実装していきます。最後に静的ホスティングサービスの Github Pages を利用して、Web上にNEM2ウォレットを公開します。
macOS 環境下を前提に解説しています。
目次
- 事前準備
- はじめに
- ウォレット
- 残高取得
- 送金
- 送金トランザクション履歴の取得
- モザイク、ネームスペース作成(アグリゲートトランザクション)
- モザイク送信
- Github Pagesへ公開
事前準備
はじめる前に、node.js、yarn、Vue cliのインストールをしてください。
node.jsの導入
次の公式サイトからインストーラーをダウンロードしてnode.jsをインストールしてください。
yarnの導入
npm install -g yarnVue cliの導入
npm install -g @vue/cliバージョンが表示されればインストール成功です。
node --version
v10.15.1

npm --version
6.4.1

yarn --version
1.16.0

vue --version
3.4.0
動作確認は Google Chrome を利用します。
はじめに
本ウォレットは0から作り始まるのではなく、あらかじめ用意しているリポジトリを利用し、不足部のコードを実装して作り上げていきます。実装済みのリポジトリは https://github.com/hukusuke1007/nem2-wallet-workshop-answer で管理しています。
まずは、利用する gitリポジトリ を clone します。
git clone https://github.com/hukusuke1007/nem2-wallet-workshop.gitclone すると nem2-wallet-workshop のディレクトリができているので移動します。
cd nem2-wallet-workshopnem2-wallet-workshop が作業用ディレクトリになります。移動後、yarnコマンドを使って依存ライブラリをインストールします。
yarnローカルサーバーを立ち上げます。
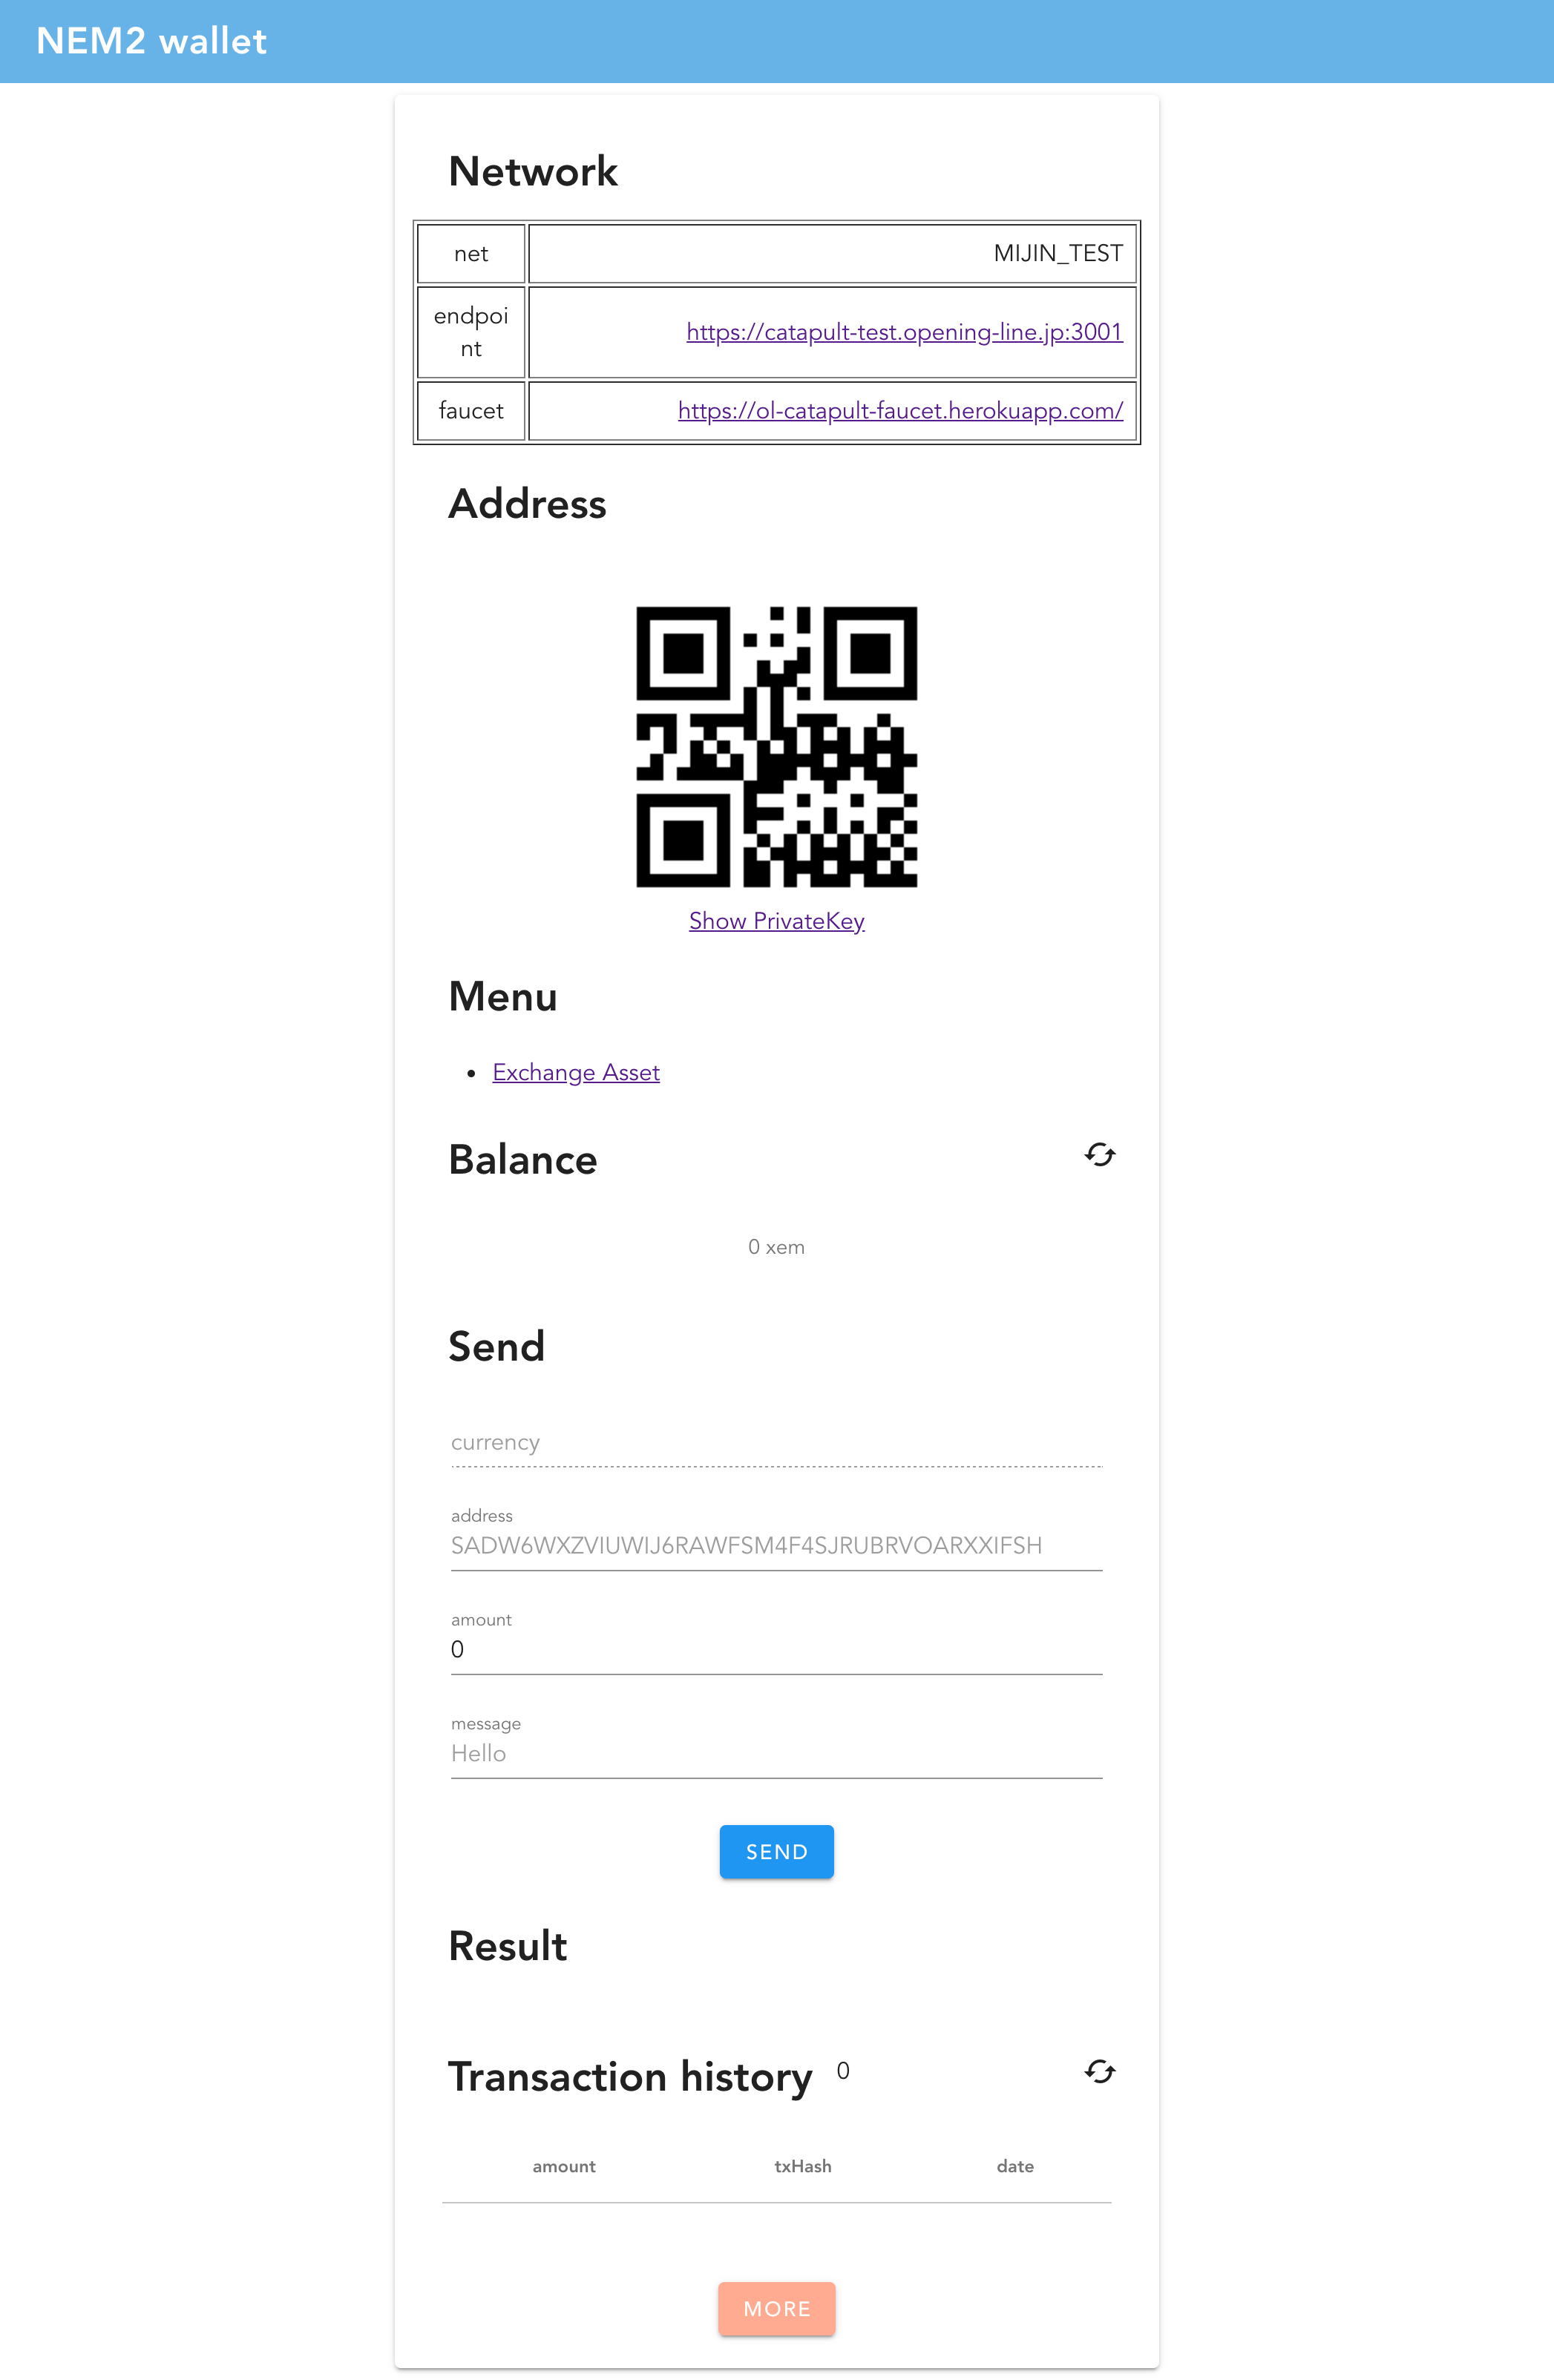
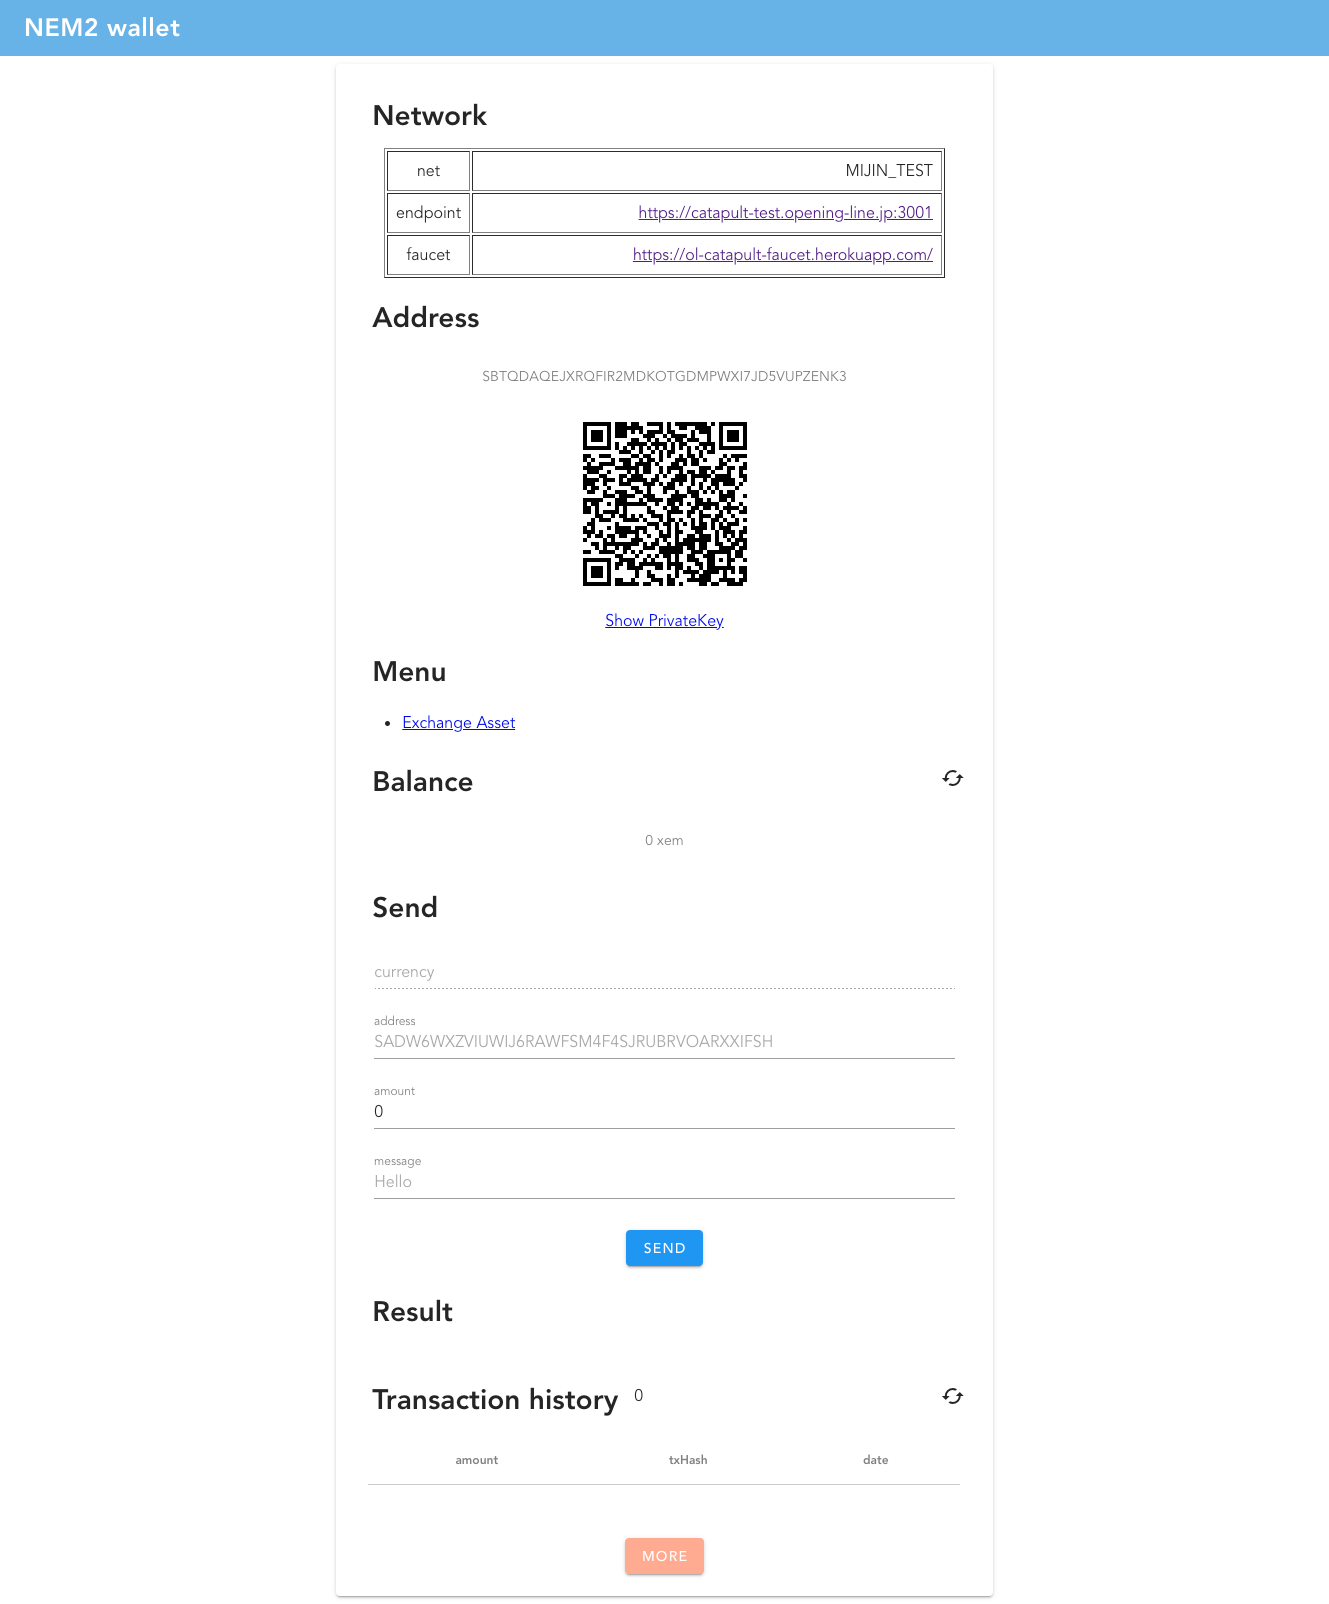
yarn serveブラウザで http://localhost:8080/ へアクセスし、次の画面が表示できれば準備完了です。
ディレクトリ構成は次の通りです。
├── README.md
├── src
│   ├── App.vue
│   ├── assets
│   │   └── logo.png
│   ├── domain
│   │   ├── configure
│   │   │   └── NemNode.ts
│   │   ├── entity
│   │   │   ├── AggregateConsig.ts
│   │   │   ├── AggregateConsigInfo.ts
│   │   │   ├── AggregateEscrowDTO.ts
│   │   │   ├── AssetCreation.ts
│   │   │   ├── AssetForm.ts
│   │   │   ├── AssetMosaic.ts
│   │   │   ├── MosaicAggregate.ts
│   │   │   ├── MosaicDTO.ts
│   │   │   ├── MosaicEntity.ts
│   │   │   ├── NamespaceEntity.ts
│   │   │   ├── SendAsset.ts
│   │   │   ├── TransactionError.ts
│   │   │   ├── TransactionHistory.ts
│   │   │   ├── TransactionHistoryInfo.ts
│   │   │   ├── TransactionResult.ts
│   │   │   └── Wallet.ts
│   │   ├── helper
│   │   │   └── NemHelper.ts
│   │   ├── repository
│   │   │   ├── AggregateTransactionRepository.ts
│   │   │   ├── MosaicRepository.ts
│   │   │   ├── NamespaceRepository.ts
│   │   │   ├── TransactionRepository.ts
│   │   │   └── WalletRepository.ts
│   │   └── usecase
│   │       ├── AssetExchangeUseCase.ts
│   │       ├── LoadBalanceUseCase.ts
│   │       ├── LoadTransactionHistoryUseCase.ts
│   │       ├── LoadWalletUseCase.ts
│   │       └── SendCoinUseCase.ts
│   ├── infrastructure
│   │   ├── datasource
│   │   │   ├── AggregateTransactionDataSource.ts
│   │   │   ├── MosaicDataSource.ts
│   │   │   ├── NamespaceDataSource.ts
│   │   │   ├── TransactionDataSource.ts
│   │   │   └── WalletDataSource.ts
│   │   └── wrapper
│   │       └── ListenerWrapper.ts
│   ├── main.ts
│   ├── presentation
│   │   └── views
│   │       ├── AssetExchangePage.vue
│   │       ├── HomePage.vue
│   │       └── TransactionPage.vue
│   ├── provide.ts
│   ├── registerServiceWorker.ts
│   ├── router.ts
│   ├── shims-tsx.d.ts
│   ├── shims-vue.d.ts
│   └── store.ts
├── tsconfig.json
├── tslint.json
├── vue.config.js
└── yarn.lock
設計指針
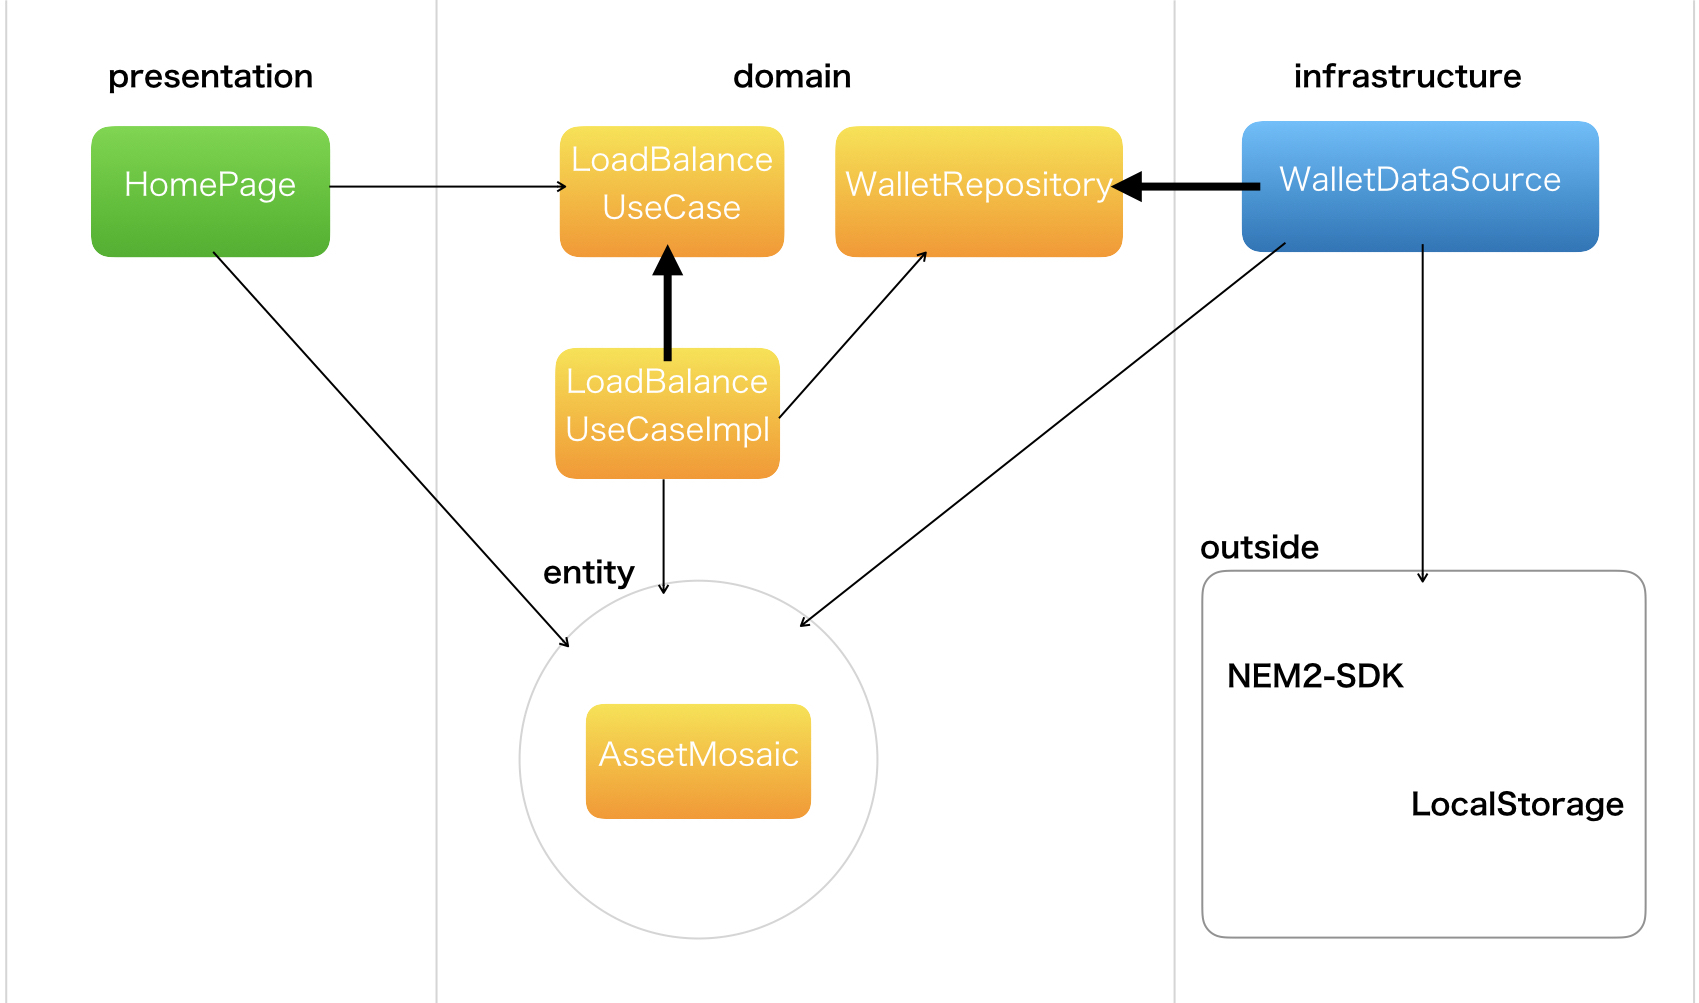
本ウォレットは クリーンアーキテクチャ を採用しています。presentation層、domain層、infrastructure層に役割を分けて実装しています。
各層の役割は次の通りです。
| 層 | 役割 |
|---|---|
| presentation | UI/UX部の実装とそれらに依存するロジックを実装します。フォームやボタンの表示や押下イベントをトリガーにdomain層へリクエストします。 |
| domain | 各機能のロジックを実装します。domain層はインターフェース(repository)を経由してinfrastructure層へリクエストします。 |
| infrastructure | 外部とのやりとりするロジックを実装します。 |
各層の関係性を示すために、例として HomePage.vue 上にNEM2-SDKライブラリ経由でウォレットの残高を取得する設計図を示します(クリーンアーキテクチャの詳しい説明については割愛します)。
NEM2-SDK や ローカルストレージなどの外部との直接やりとりは、infrastructure層で行います。実装部は provide.ts 上で依存注入(DI)しています。
const host = process.env.NODE_HOST
const ws = process.env.NODE_WS
const port = process.env.NODE_PORT
const network: number = Number(process.env.NETWORK)
const generateHash = process.env.NETWORK_GENERATION_HASH
const nemNode = new NemNode(host, ws, port, network, generateHash)

const walletDataSource = new WalletDataSource(nemNode)
const transactionDataSource = new TransactionDataSource(nemNode)
const aggregateTransactionDataSource = new AggregateTransactionDataSource(nemNode)
const mosaicDataSource = new MosaicDataSource(nemNode)
const namespaceDataSource = new NamespaceDataSource(nemNode)

export const provide = {
  LoadBalanceUseCase: new LoadBalanceUseCaseImpl(walletDataSource, namespaceDataSource),
  LoadWalletUseCase: new LoadWalletUseCaseImpl(walletDataSource),
  SendCoinUseCase: new SendCoinUseCaseImpl(transactionDataSource, walletDataSource),
  LoadTransactionHistoryUseCase: new LoadTransactionHistoryUseCaseImpl(transactionDataSource, walletDataSource),
  AssetExchangeUseCase: new AssetExchangeUseCaseImpl(transactionDataSource, walletDataSource, aggregateTransactionDataSource, mosaicDataSource, namespaceDataSource),
}
ブロックチェーンノードの設定
.env で設定しています。
# Network
#  MAIN_NET = 104
#  TEST_NET = 152
#  MIJIN = 96
#  MIJIN_TEST = 144
NETWORK = 144

# Node URL
NODE_HOST = 'https://catapult-test.opening-line.jp'
NODE_WS = 'wss://catapult-test.opening-line.jp'
NODE_PORT = '3001'

# Generation hash
# ex. http://elephant.48gh23s.xyz:3000/block/1 is meta.generationHash
NETWORK_GENERATION_HASH = '453052FDC4EB23BF0D7280C103F7797133A633B68A81986165B76FCE248AB235'

# Faucet. It cloud get a xem of catapult.
FAUCET_URL = 'https://ol-catapult-faucet.herokuapp.com/'

# Blockchain explorer.
EXPLORER_URL = 'http://catapult-test.opening-line.jp:8000'
本ウォレットはテストネットを利用しています。今後、メインネットが稼働しましたら .env の設定を変更するだけで、容易にメインネットへの切り替えができます。
ウォレット
ウォレットの作成と保存
NEM2-SDKを利用してウォレットを作成します。「送金先アドレス、公開鍵、秘密鍵」の生成は全てSDKが行なっているため、アプリ側からはSDKのAPIを呼ぶだけです。src/infrastructure/datasource/WalletDataSource.ts の createWallet 関数を実装していきます。
const account = Account.generateNewAccount(this.nemNode.network)作成されたウォレット情報が account の中にあるので「送金先アドレス、公開鍵、秘密鍵、ネットワークタイプ」を Walletクラス に入れ直します。
const wallet = new Wallet(
  account.address.plain(),
  account.publicKey,
  account.privateKey,
  account.address.networkType.valueOf(),
)
ブラウザ上のローカルストレージに保存します。ローカルストレージの操作は localForage のライブラリを利用します。保存形式はJSONです。
await localForage.setItem(this.localStorageKey, wallet.toJSON())全体の実装は次の通りです。
async createWallet() {
  const account = Account.generateNewAccount(this.nemNode.network)
  const wallet = new Wallet(
    account.address.plain(),
    account.publicKey,
    account.privateKey,
    account.address.networkType.valueOf(),
  )
  await localForage.setItem(this.localStorageKey, wallet.toJSON())
  return wallet
}
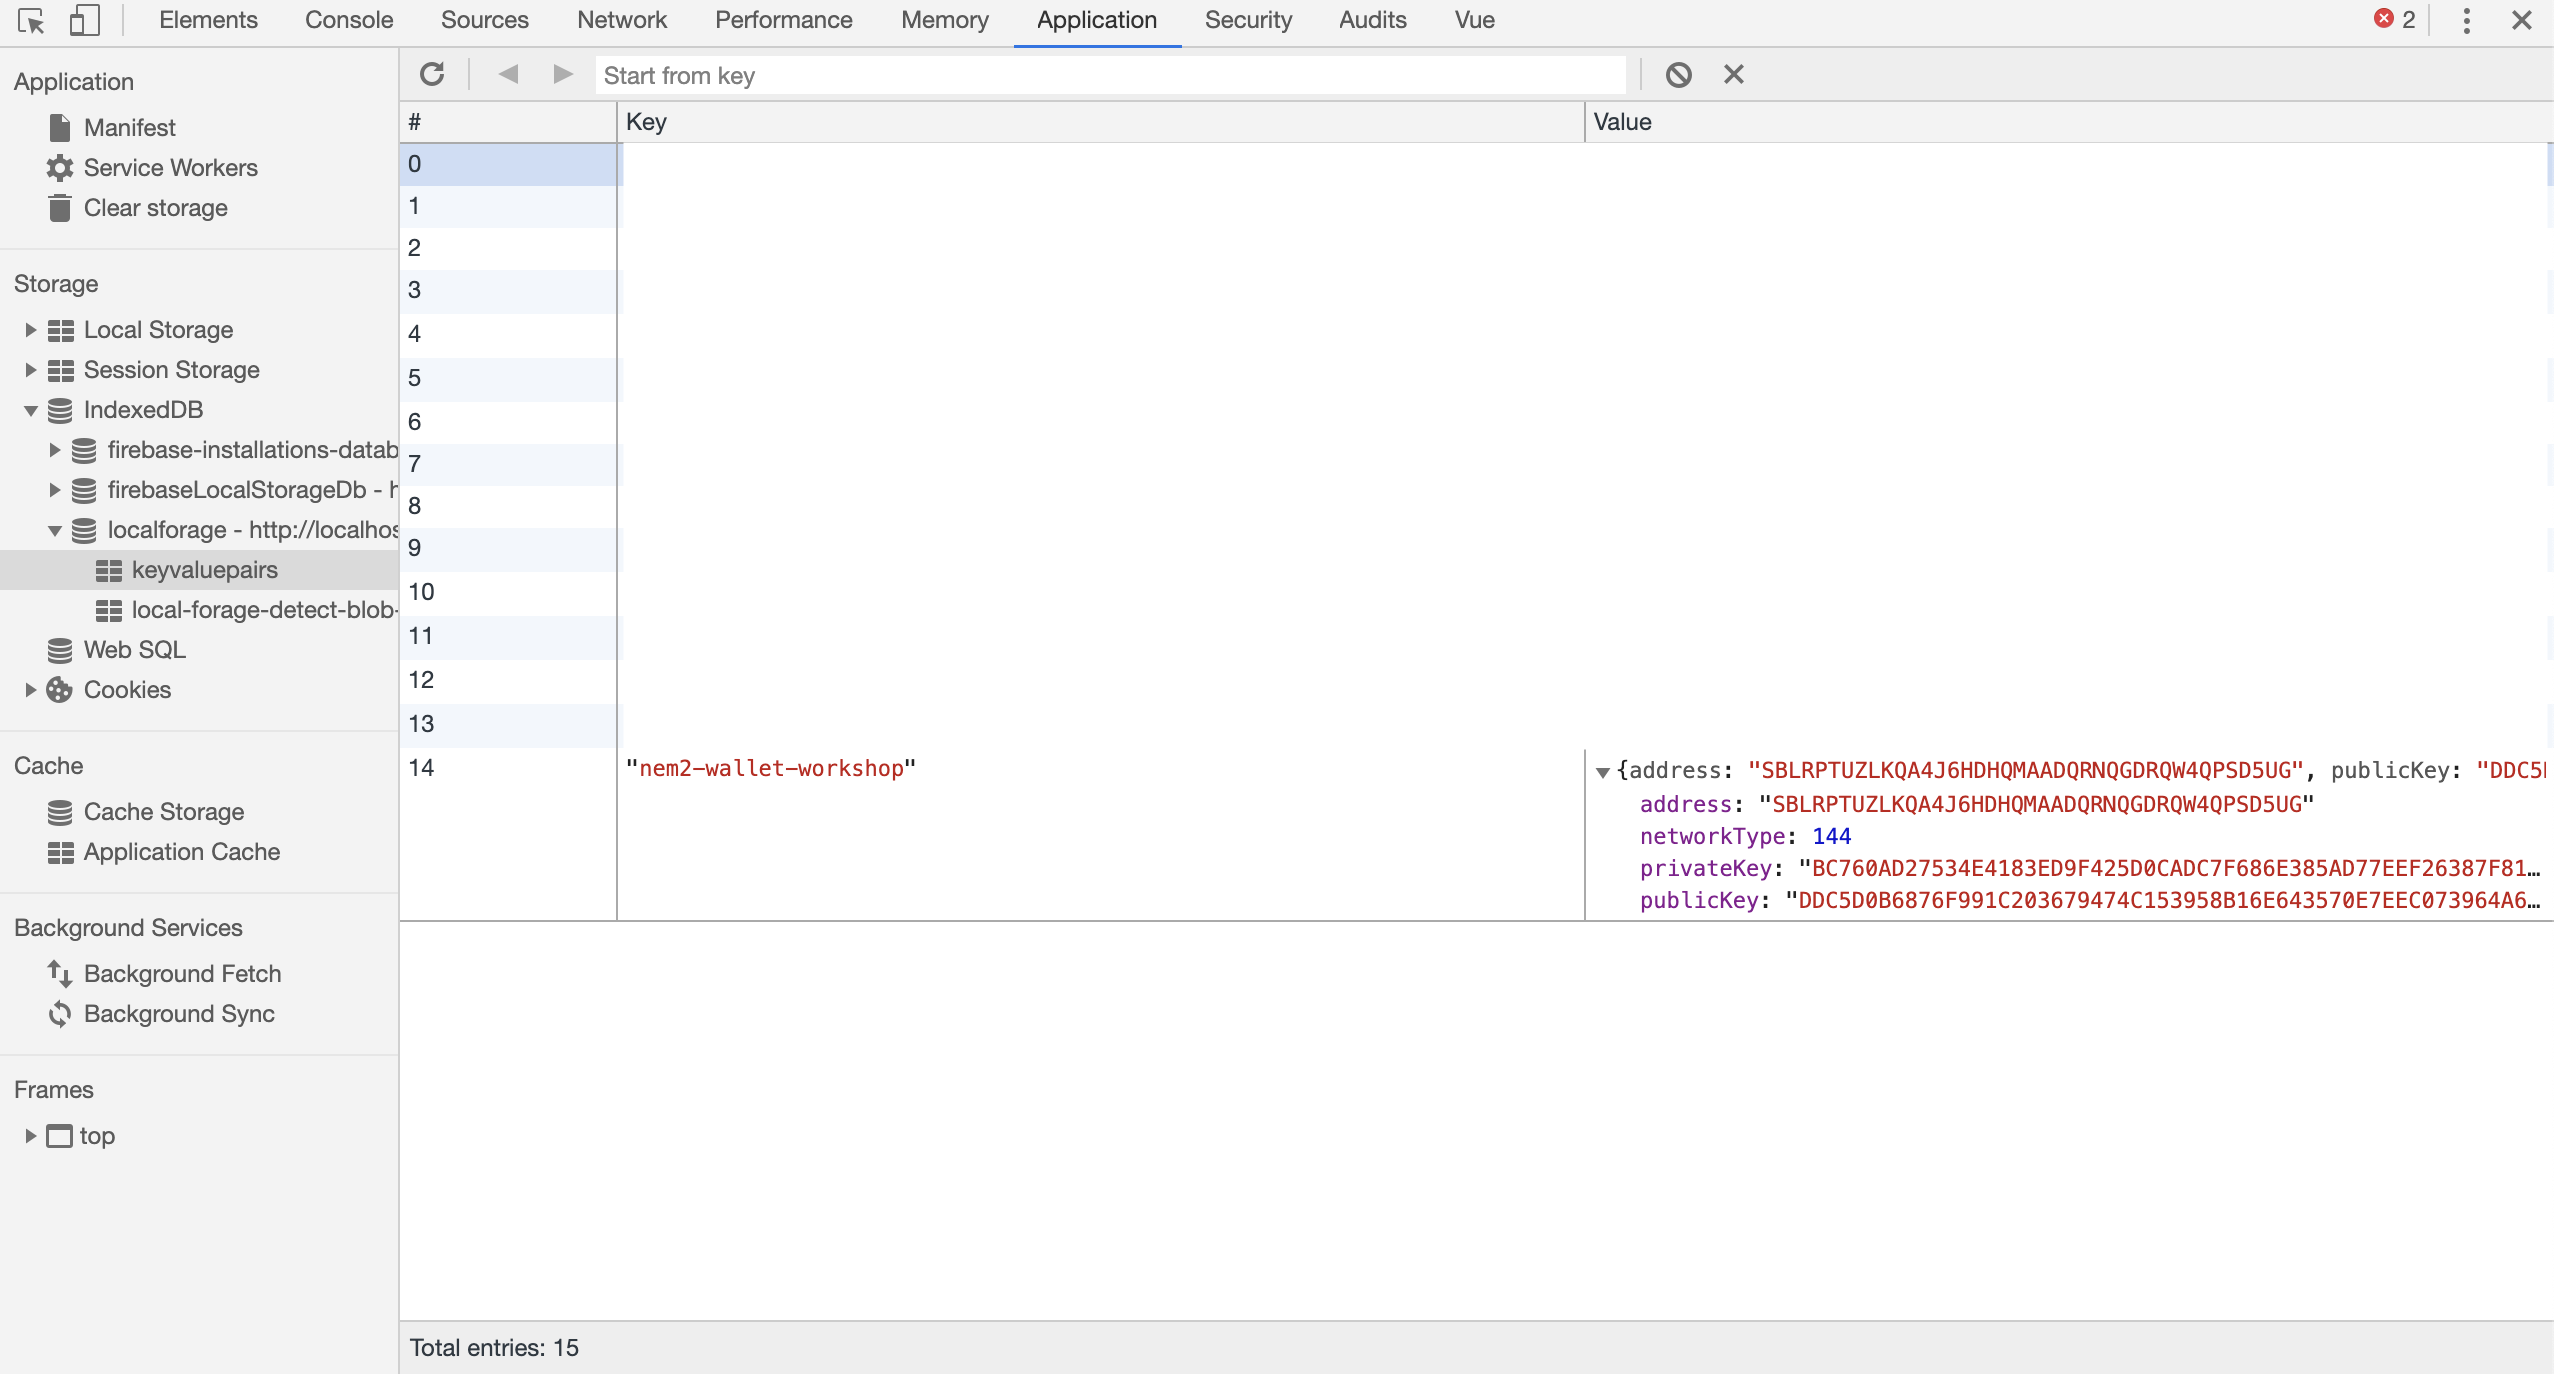
ブラウザの検証ツールより、ローカルストレージを確認して nem2-wallet-workshop のkeyに紐づいて JSON形式でウォレットが保存されていれば成功です。
なお、ローカルストレージはドメイン毎に管理されているため、URLのドメインが変わるとウォレットも新しく生成される仕様にしています。
保存したウォレットを取得
保存したウォレットの取得処理を実装します。src/infrastructure/datasource/WalletDataSource.ts の loadWallet 関数を実装していきます。ローカルストレージから先ほど保存したウォレットに紐づく key を指定して取得します。
const item: any = await localForage.getItem(this.localStorageKey)取得したウォレットはJSONのままですので、Walletクラス に入れ直します。
if (item !== null) {
  return new Wallet(
    'address' in item ? item.address : undefined,
    'publicKey' in item ? item.publicKey : undefined,
    'privateKey' in item ? item.privateKey : undefined,
    'networkType' in item ? item.networkType : undefined,
  )
} else {
  return undefined
}
全体の実装は次の通りです。
async loadWallet() {
  const item: any = await localForage.getItem(this.localStorageKey)
  if (item !== null) {
    return new Wallet(
      'address' in item ? item.address : undefined,
      'publicKey' in item ? item.publicKey : undefined,
      'privateKey' in item ? item.privateKey : undefined,
      'networkType' in item ? item.networkType : undefined,
    )
  } else {
    return undefined
  }
}
HomePage.vue の画面上に送金先アドレス(40文字の英数字)が表示されれば成功です。
残高取得
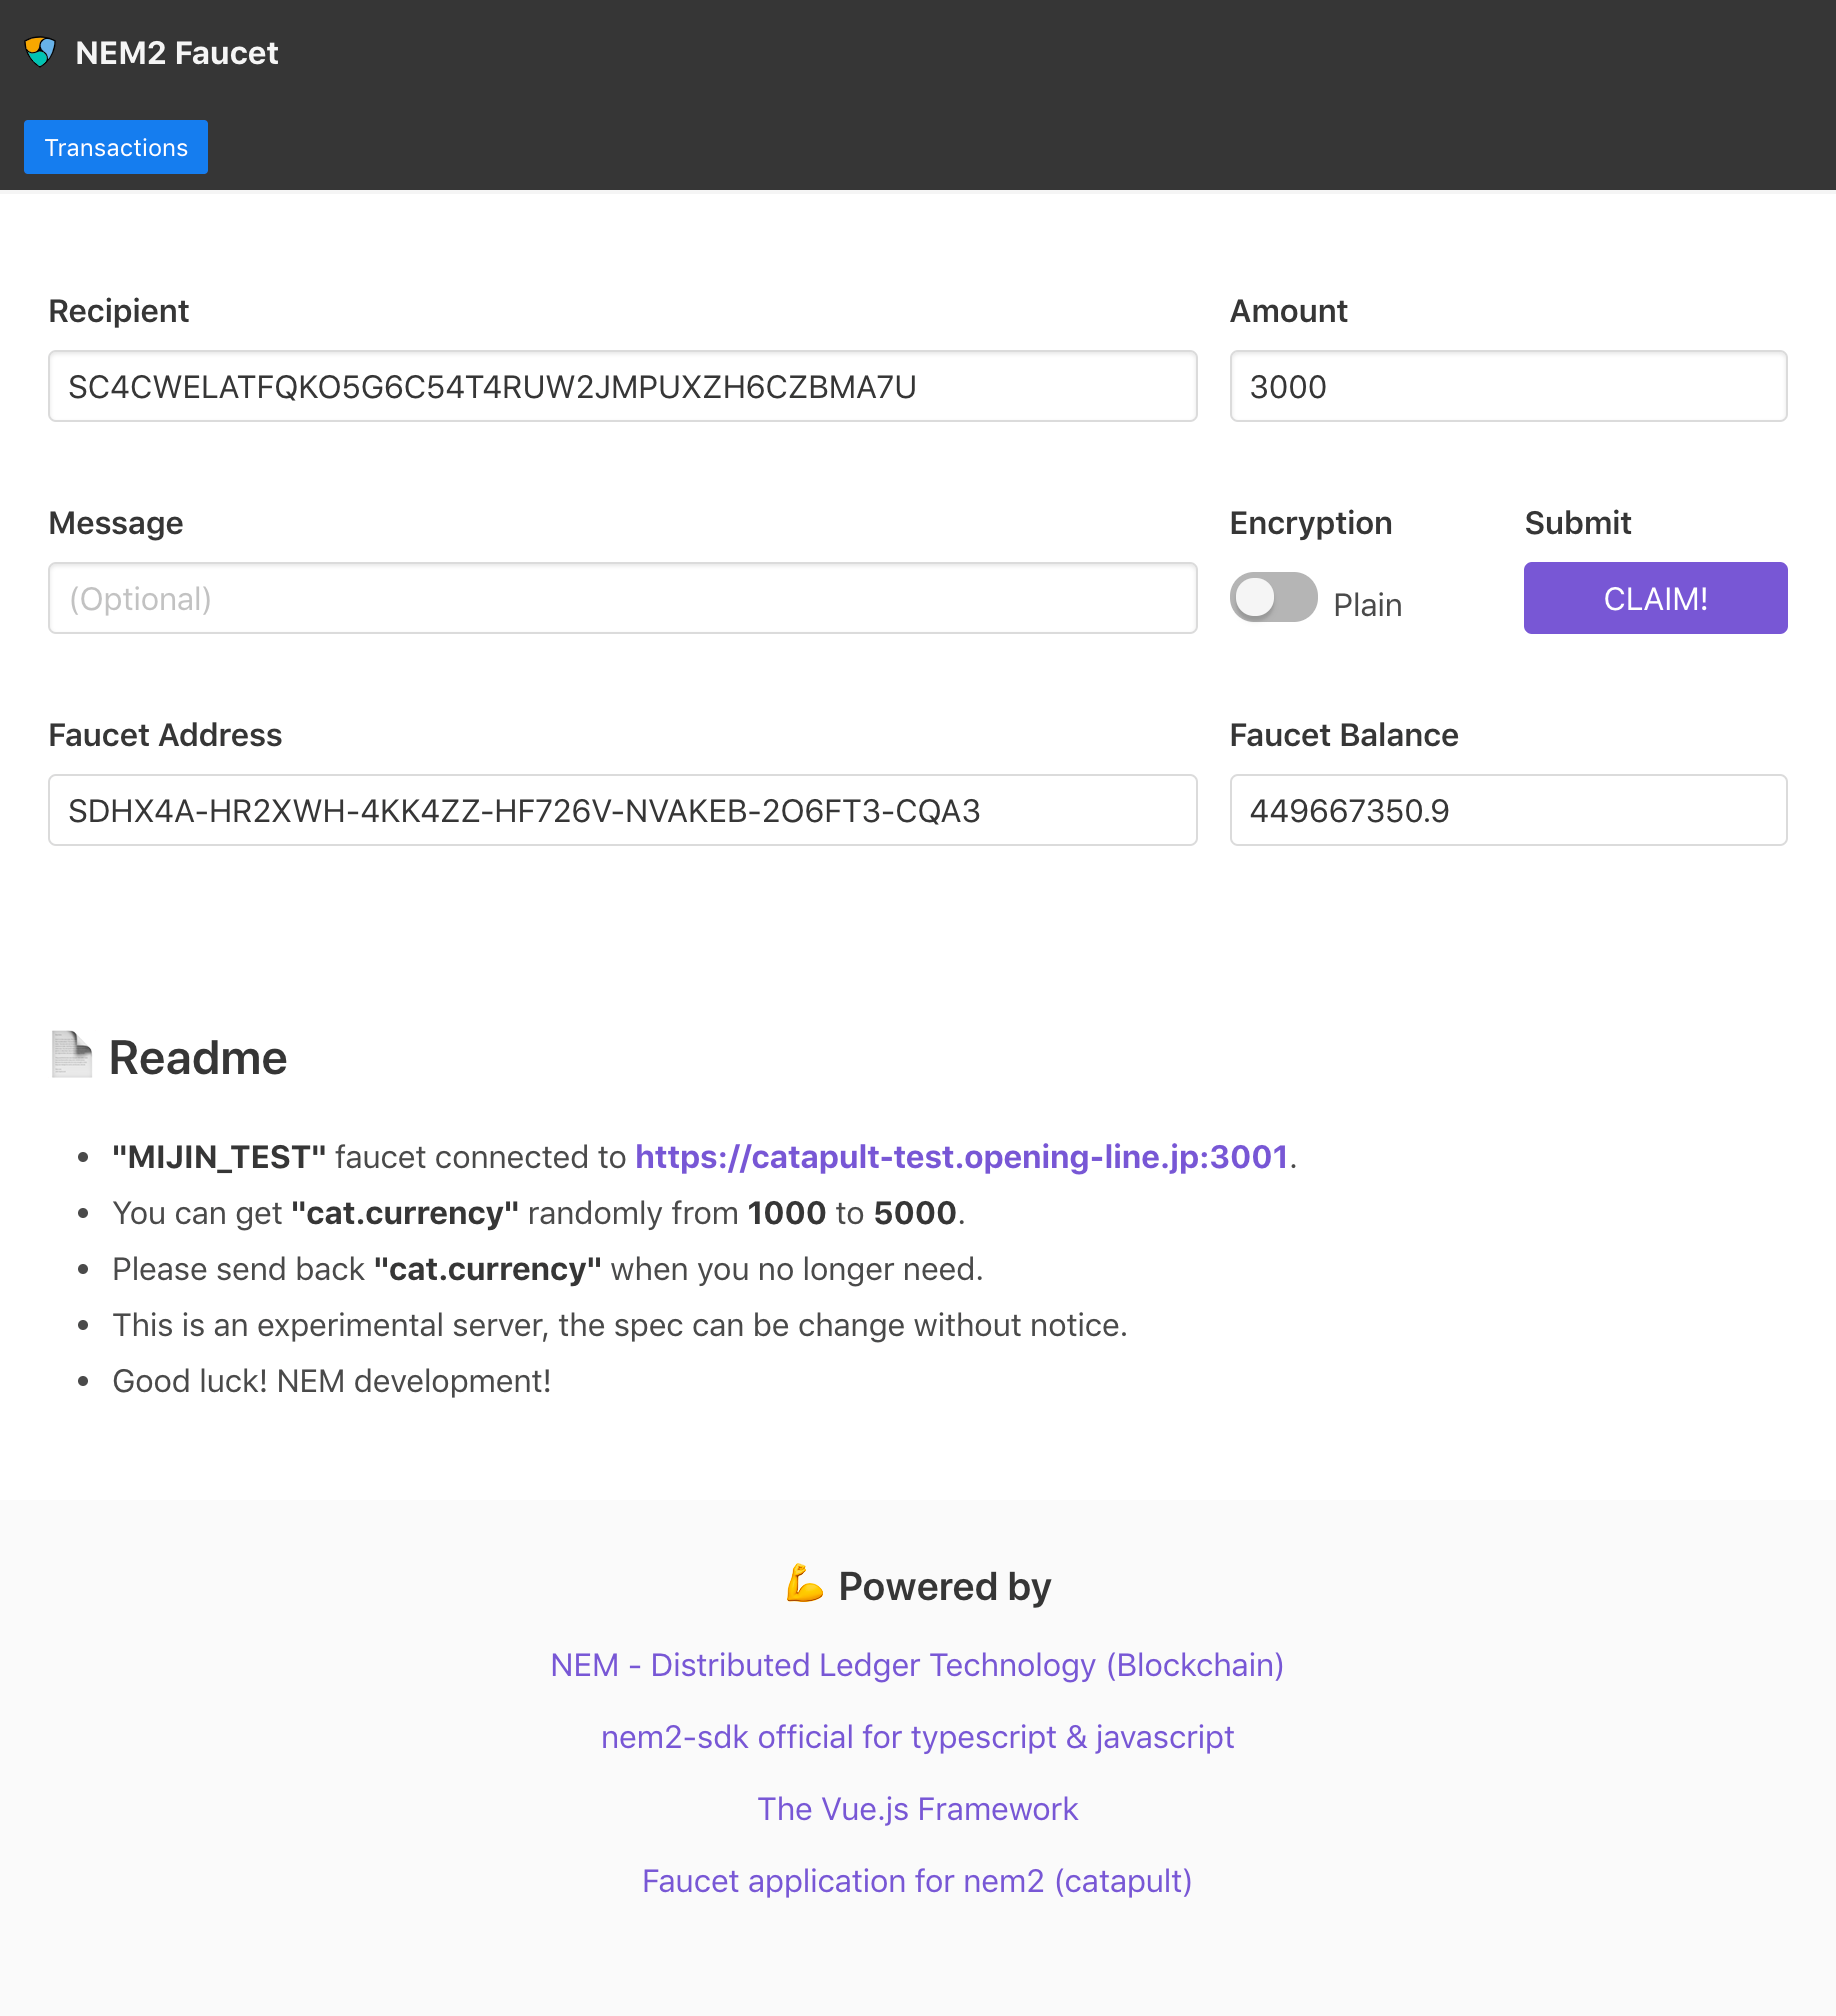
ウォレットの残高取得処理を実装します。実装する前に、ウォレット作成で作った送金先アドレスへテストネット用のNEMを送ります。Faucet URLにアクセスして、送金先アドレスと送る数量を設定して CLAIM! を選択してください(HomePage.vueの画面の上部からFaucetへアクセスすることもできます)。
https://ol-catapult-faucet.herokuapp.com/
残高取得処理を実装します。src/infrastructure/datasource/WalletDataSource.ts の loadBalance 関数を実装していきます。
残高はブロックチェーンノードをアクセスして取得するため、非同期処理になります。NEM2-SDKではこの非同期処理を RxJS を利用して結果を返すようにしています。本ウォレット内では非同期処理を容易に扱うため infrastructure層では RxJS で結果を受け取った後に Promise を使って domain層 へ結果を返すようにします。
mosaicsAmountViewFromAddress を用いて送金先アドレスが保持する全ての 残高 を取得します。なお、accountHttpにあるgetAccountInfoからも残高を取得することができますが、NEM以外のモザイクの残高は取得できないため、ここではmosaicsAmountViewFromAddressを利用します。
const address = Address.createFromRawAddress(addr)
this.mosaicService.mosaicsAmountViewFromAddress(address)
  .pipe(
    combineAll(),
    map((items) => items.map((item) => new AssetMosaic(item.fullName(), item.relativeAmount(), item.mosaicInfo.divisibility, item))),
  ).subscribe(
    (items) => resolve(items),
    (error) => reject(error))
mosaicsAmountViewFromAddress はモザイクがそれぞれ独立してストリームへ流れてくるため combineAll を利用して次のストリームへまとめて流すようにします。map では AssetMosaicクラス へ入れ直した配列を次のストリームへ流し、resolve で Promiseに結果に入れます。なお、エラーが発生した場合は reject にエラー内容を入れると、利用側の try - catch の例外処理として動いてくれます。
全体の実装は次の通りです。
async loadBalance(addr: string): Promise<AssetMosaic[]> {
  return new Promise((resolve, reject) => {
    const address = Address.createFromRawAddress(addr)
    this.mosaicService.mosaicsAmountViewFromAddress(address)
      .pipe(
        combineAll(),
        map((items) => items.map((item) => new AssetMosaic(item.fullName(), item.relativeAmount(), item.mosaicInfo.divisibility, item))),
      ).subscribe(
        (items) => resolve(items),
        (error) => reject(error))
  })
}
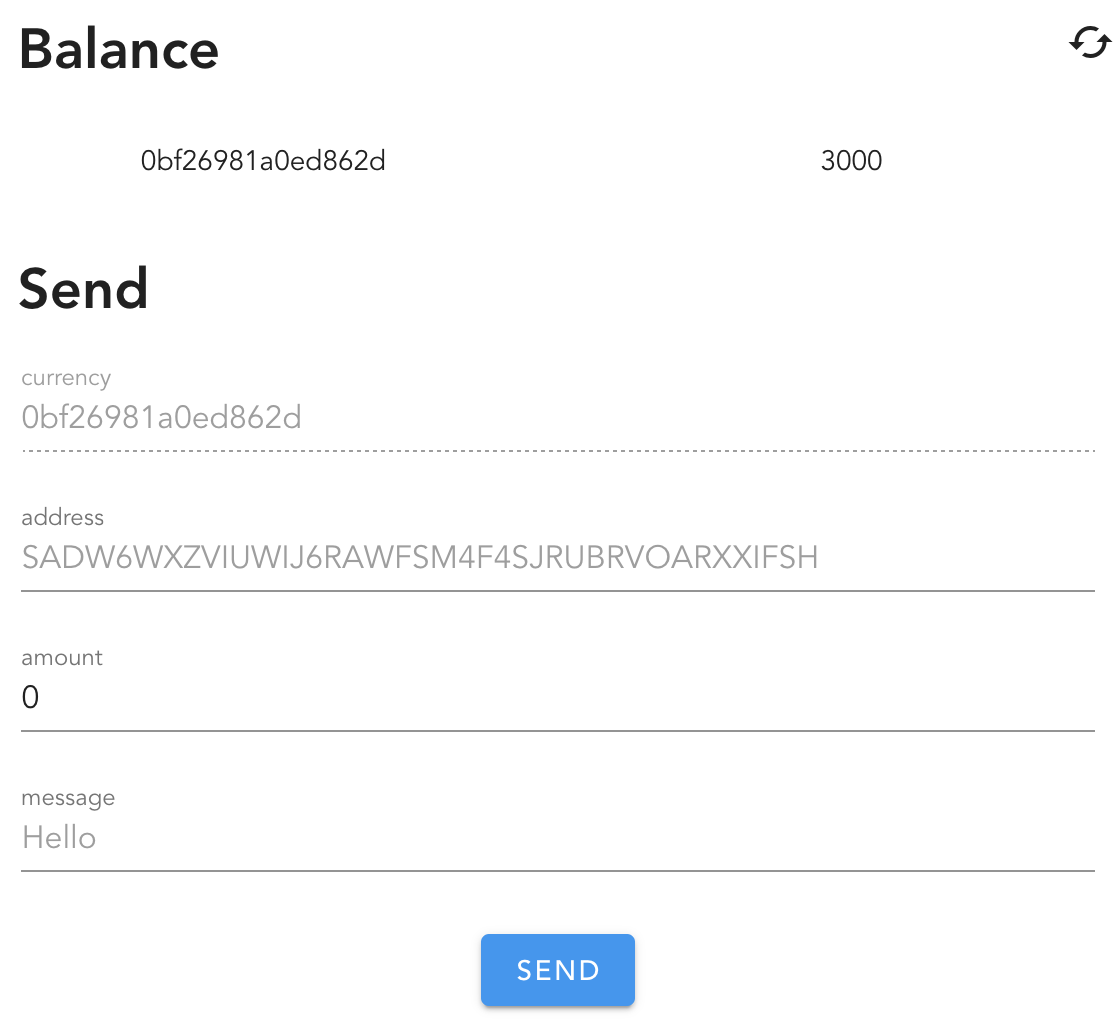
実装後、HomePage.vue の画面の Balance を確認すると 16進数のid と 先ほどFaucetで送った数量が表示されます。この16進数のid が NEM の namespaceId です。
送金
送金処理の実装をします。src/infrastructure/datasource/TransactionDataSource.ts の sendAsset 関数を実装していきます。
送金用トランザクションは TransferTransaction.create を利用します。「トランザクションの有効期限、送金先のアドレス、送金するモザイクの種類と数量、メッセージ、ネットワークタイプ」を指定して作成します。
const recipientAddress = Address.createFromRawAddress(asset.address)
const transferTransaction = TransferTransaction.create(
    Deadline.create(),
    recipientAddress,
    [new Mosaic(new MosaicId(asset.mosaicId), UInt64.fromUint(asset.getRawAmount()))],
    asset.message !== undefined ? PlainMessage.create(asset.message) : PlainMessage.create(''),
    this.nemNode.network)
なお、今回はNEMとNEM以外のモザイクも送れるよう 第3引数に Mosaic を指定しています。NEMだけを扱いたい場合は NetworkCurrencyMosaic.createRelative(asset.relativeAmount) を指定すればできます。
トランザクションを作った後、自身の秘密鍵で署名を行います。
const account = Account.createFromPrivateKey(privateKey, this.nemNode.network)
const signedTransaction = account.sign(transferTransaction, this.nemNode.networkGenerationHash)
ブロックチェーンノードへリクエストします。
this.listenerWrapper.loadStatus(account.address.plain(), signedTransaction.hash)
  .then((response) => resolve(response))
  .catch((error) => reject(error))
this.transactionHttp
  .announce(signedTransaction)
  .subscribe(
    (response) => console.log(response),
    (error) => reject(error))
リクエストの結果は listenerWrapper 経由で返ってきます。NEM2では announce 後はリクエスト受け取りの結果が返ってきますが、実行そのものの結果はウェブソケット(Listener)経由で返ってきます。Listener をラップした ListenerWrapperクラス 経由で実行結果を取得します。
全体の実装は次の通りです。
async sendAsset(privateKey: string, asset: SendAsset): Promise<TransactionResult> {
  return new Promise((resolve, reject) => {
    const recipientAddress = Address.createFromRawAddress(asset.address)
    const transferTransaction = TransferTransaction.create(
        Deadline.create(),
        recipientAddress,
        [new Mosaic(new MosaicId(asset.mosaicId), UInt64.fromUint(asset.getRawAmount()))],
        asset.message !== undefined ? PlainMessage.create(asset.message) : PlainMessage.create(''),
        this.nemNode.network)
    const account = Account.createFromPrivateKey(privateKey, this.nemNode.network)
    const signedTransaction = account.sign(transferTransaction, this.nemNode.networkGenerationHash)

    this.listenerWrapper.loadStatus(account.address.plain(), signedTransaction.hash)
      .then((response) => resolve(response))
      .catch((error) => reject(error))
    this.transactionHttp
      .announce(signedTransaction)
      .subscribe(
        (response) => console.log(response),
        (error) => reject(error))
  })
}
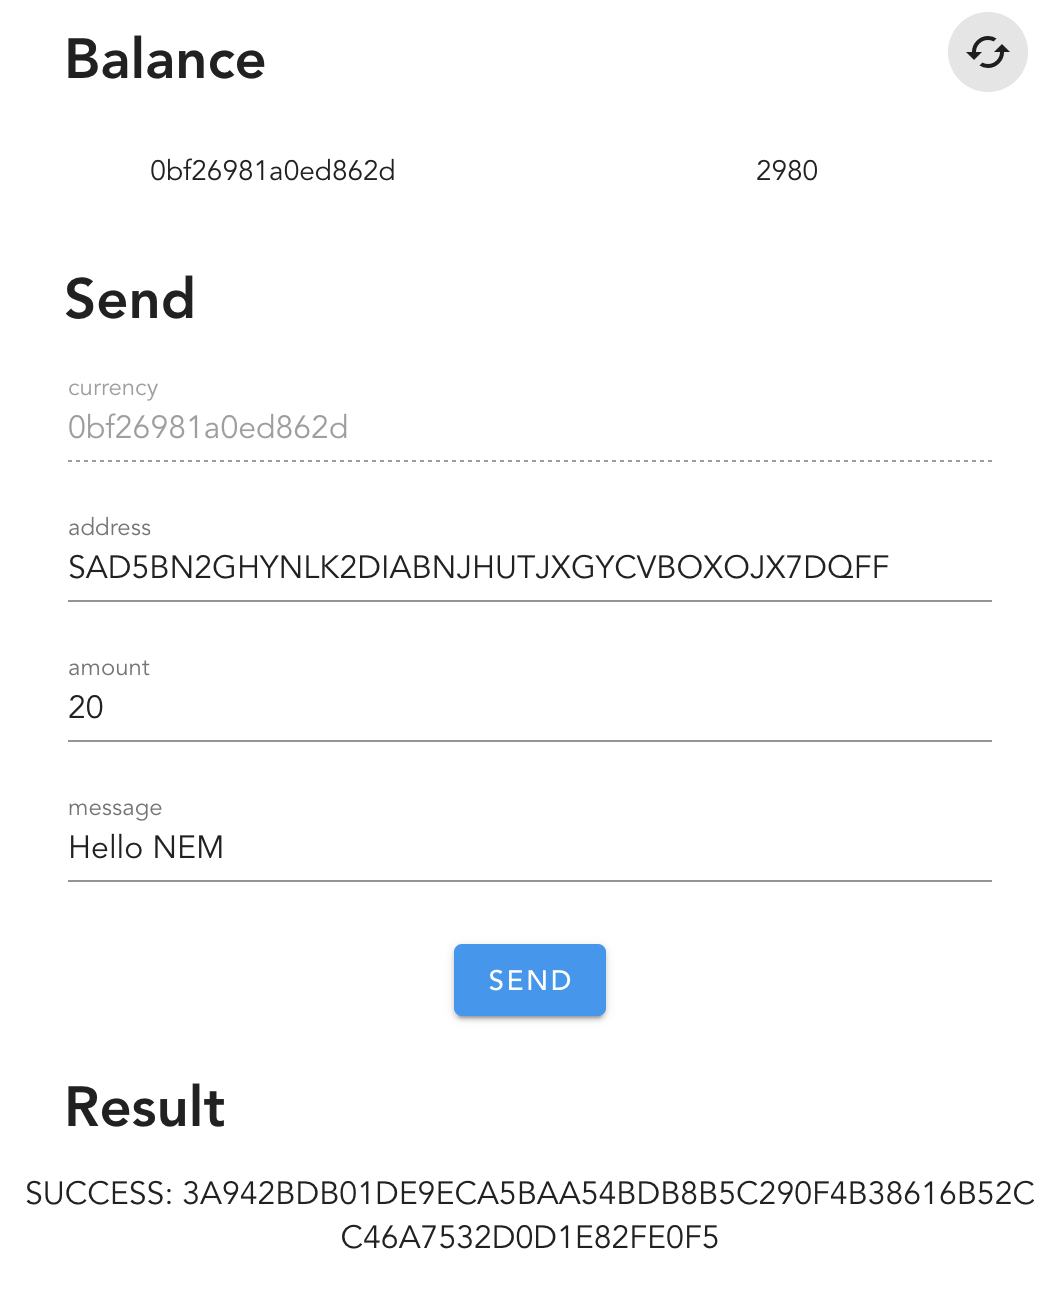
送金処理の動作確認のため、試しに次のウォレットへNEMを送金してみてください。
SAD5BN2GHYNLK2DIABNJHUTJXGYCVBOXOJX7DQFF
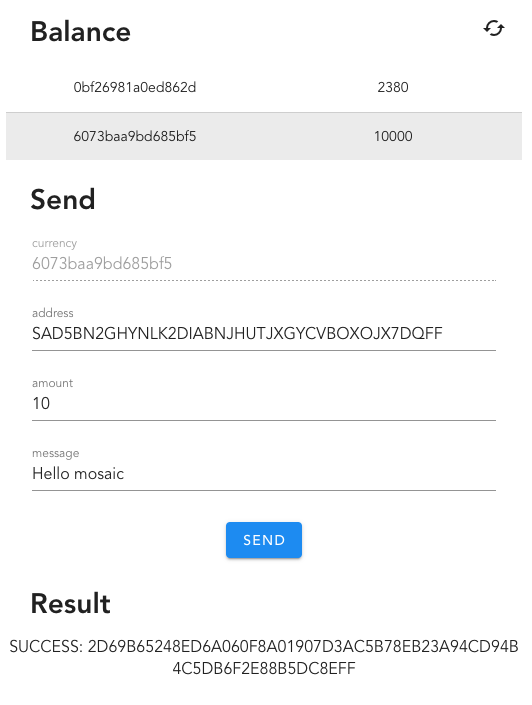
送金後、次のような画面になると成功です。ResultにはトランザクションIDが表示されます。Balanceの右側の更新アイコンを押下すると最新の残高が画面上に反映されます。
送金トランザクション履歴の取得
送金履歴の取得処理を実装します。src/infrastructure/datasource/TransactionDataSource.ts の transactionHistoryAll 関数を実装していきます。
トランザクション履歴の取得は accountHttp の transactions で取得できますが、送金履歴だけを取得するとなると一手間かけなければいけません。また、取得したトランザクションのタイムスタンプやモザイクの可分性を同時に取得しないといけないため、実装がやや複雑になります。それらの処理はすべて RxJS の pipe の中で実装していきます。
let lastTransactionId: string
let transactions: TransferTransaction[] = []
const publicAccount = PublicAccount.createFromPublicKey(publicKey, this.nemNode.network)
this.accountHttp.transactions(publicAccount, new QueryParams(limit, id, Order.DESC))
  .pipe(
    // これ以降の処理を実装していく
まずは、取得したトランザクション履歴が空の場合の処理を行います。空の場合は TransactionHistoryInfo に undefined を指定して返します。
map((items) => {
  if (items.length === 0) {
    resolve(new TransactionHistoryInfo(undefined))
  }
  return items
}),
取得したトランザクションを TransferTransaction のみにフィルタリングして、TransferTransactionの場合は TransferTransaction にキャスト変換します。さらに、キャスト変換した TransferTransaction の transactionInfo が TransactionInfo のみにフィルタリングして transactions へ入れてからストリームへ流します。transactions は 後に配列要素の最後のトランザクションIDを取得するために使用します。
mergeMap((items) => transactions = items.filter((item) => item instanceof TransferTransaction)
  .map((item) => item as TransferTransaction)
  .filter((item) => item.transactionInfo !== undefined && item.transactionInfo instanceof TransactionInfo)),
それぞれのトランザクション履歴から タイムスタンプとモザイクの可分性を取得します。zip を用いて並列処理でストリームへ流します。第1引数は今までストリームから流れてきたトランザクション履歴、第2引数はトランザクションIDのブロック取得API、第3引数はモザイク情報を取得APIです。
なお、今回はトランザクション履歴には1つのモザイクのみを扱う前提で実装しています。複数のモザイクが入ったトランザクション履歴がある場合は期待通りに動作しませんのであらかじめご了承ください。
mergeMap((item) => {
  return zip(
    of(item),
    this.blockHttp.getBlockByHeight(item!.transactionInfo!.height.compact()),
    item!.mosaics[0].id instanceof MosaicId ?
      this.mosaicHttp.getMosaic(new MosaicId(item!.mosaics[0].id.toHex())).pipe(
        map((mosaic) => mosaic.divisibility),
        catchError((error) => of(0)), // Errorの場合は暫定対策として0を返すようにする
      ) : of(6), // NEMの場合はnamespaceIdしかとれないのでof(6)を返すようにする
  )
}),
必要な情報が揃ったので TransactionHistoryクラス に入れ直します。combineAll で全てのトランザクション履歴が流れてくるまで待ちます。
map(([tx, block, divisibility]) =>
  of(new TransactionHistory(
    tx.transactionInfo!.id,
    tx.mosaics.length !== 0 ? tx.mosaics[0].amount.compact() / Math.pow(10, divisibility) : 0,
    tx.maxFee.compact(),
    tx.recipient instanceof Address ? tx.recipient.plain() : '',
    tx.signer !== undefined ? tx.signer!.address.plain() : '',
    tx.message.payload,
    tx !== undefined ? new Date(block.timestamp.compact() + Date.UTC(2016, 3, 1, 0, 0, 0, 0)) : undefined,
    tx.transactionInfo!.hash,
    tx,
  )),
),
combineAll(),
最後に TransactionHistoryInfoクラス にデータを入れ直します。ページング処理ができるよう最後のトランザクションIDと、先ほど入れ直した TransactionHistory を降順にソートしたものを TransactionHistoryInfo に入れます。
map((items) => {
  lastTransactionId = transactions.slice(-1)[0].transactionInfo!.id
  return new TransactionHistoryInfo(lastTransactionId, items.sort((a, b) => {
    const aTime = a.date!.getTime()
    const bTime = b.date!.getTime()
    if (aTime > bTime) { return -1 }
    if (aTime < bTime) { return 1 }
    return 0
  }))
}),
全体の実装は次の通りです。
async transactionHistoryAll(publicKey: string, limit: number, id?: string): Promise<TransactionHistoryInfo> {
  return new Promise((resolve, reject) => {
    let lastTransactionId: string
    let transactions: TransferTransaction[] = []
    const publicAccount = PublicAccount.createFromPublicKey(publicKey, this.nemNode.network)
    this.accountHttp.transactions(publicAccount, new QueryParams(limit, id, Order.DESC))
      .pipe(
        map((items) => {
          if (items.length === 0) {
            resolve(new TransactionHistoryInfo(undefined))
          }
          return items
        }),
        mergeMap((items) => transactions = items.filter((item) => item instanceof TransferTransaction)
          .map((item) => item as TransferTransaction)
          .filter((item) => item.transactionInfo !== undefined && item.transactionInfo instanceof TransactionInfo)),
        mergeMap((item) => {
          return zip(
            of(item),
            this.blockHttp.getBlockByHeight(item!.transactionInfo!.height.compact()),
            item!.mosaics[0].id instanceof MosaicId ?
              this.mosaicHttp.getMosaic(new MosaicId(item!.mosaics[0].id.toHex())).pipe(
                map((mosaic) => mosaic.divisibility),
                catchError((error) => of(0)), // Errorの場合は暫定対策として0を返すようにする
              ) : of(6), // NEMの場合はnamespaceIdしかとれないのでof(6)を返すようにする
          )
        }),
        map(([tx, block, divisibility]) =>
          of(new TransactionHistory(
            tx.transactionInfo!.id,
            tx.mosaics.length !== 0 ? tx.mosaics[0].amount.compact() / Math.pow(10, divisibility) : 0,
            tx.maxFee.compact(),
            tx.recipient instanceof Address ? tx.recipient.plain() : '',
            tx.signer !== undefined ? tx.signer!.address.plain() : '',
            tx.message.payload,
            tx !== undefined ? new Date(block.timestamp.compact() + Date.UTC(2016, 3, 1, 0, 0, 0, 0)) : undefined,
            tx.transactionInfo!.hash,
            tx,
          )),
        ),
        combineAll(),
        map((items) => {
          lastTransactionId = transactions.slice(-1)[0].transactionInfo!.id
          return new TransactionHistoryInfo(lastTransactionId, items.sort((a, b) => {
            const aTime = a.date!.getTime()
            const bTime = b.date!.getTime()
            if (aTime > bTime) { return -1 }
            if (aTime < bTime) { return 1 }
            return 0
          }))
        }),
      ).subscribe(
        (response) => resolve(response),
        (error) => reject(error))
  })
}
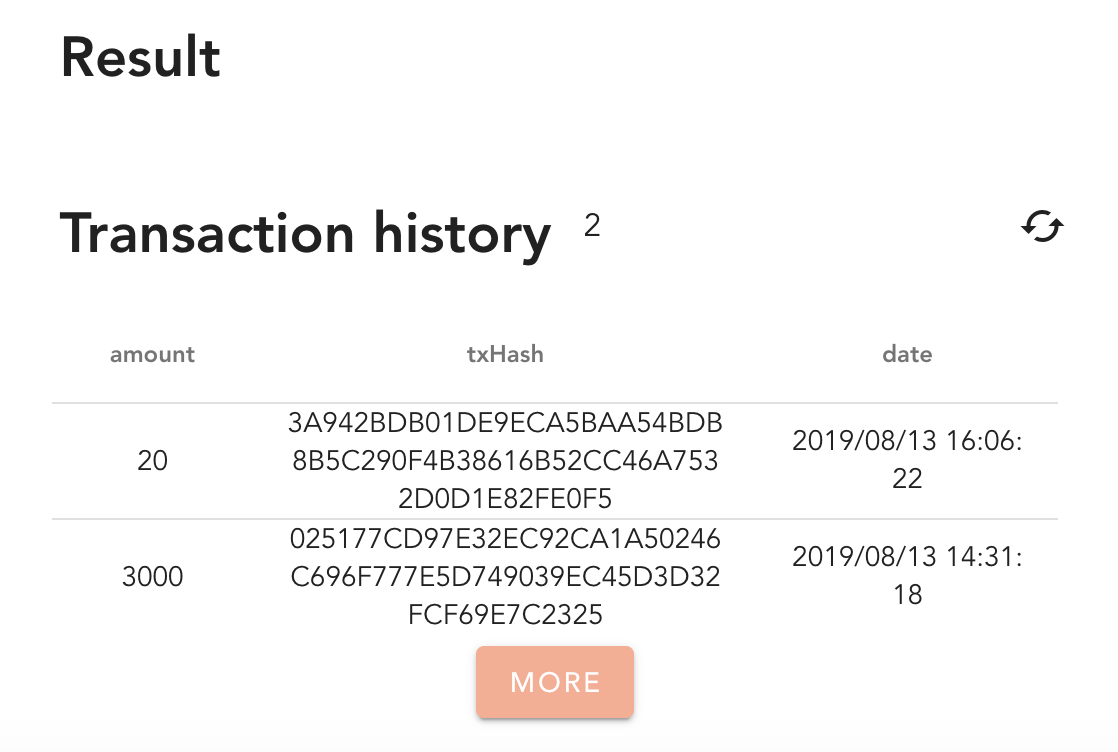
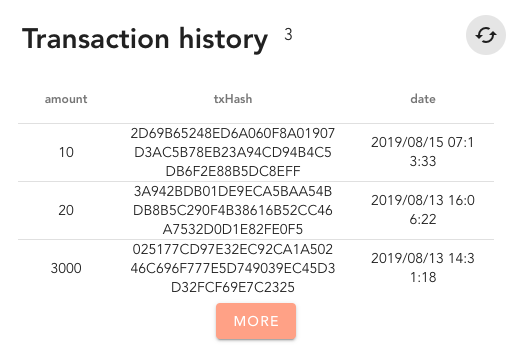
HomePage.vue の画面からトランザクション履歴の一覧が表示されると成功です。
モザイク、ネームスペース作成(アグリゲートトランザクション)
モザイクとネームスペースを作成する処理を実装します。モザイクとネームスペースとの紐付けも行い、アグリゲートトランザクションを使って一括で実行できるようにします。
モザイク作成のトランザクション
src/infrastructure/datasource/MosaicDataSource.ts の createMosaicDefinitionTxAggregate 関数を実装していきます。
MosaicDefinitionTransaction.create を利用してモザイク作成のトランザクションを作成します。必要なnone, mosaicIdはSDKのAPIを使って取得します。モザイクのプロパティは「供給量、第3者への転送可否、可分性、有効期限」を設定します。有効期限はモザイクのレンタル期間の承認済みブロック数を指定します。期間は 3650 日(10年)まで許可されており、期限の切れないモザイクを作るためにはプロパティを未定義にします。
const nonce = MosaicNonce.createRandom()
const mosaicId = MosaicId.createFromNonce(nonce, account.publicAccount)
const mosaicDefinitionTransaction = MosaicDefinitionTransaction.create(
    Deadline.create(),
    nonce,
    mosaicId,
    MosaicProperties.create({
      supplyMutable: asset.supplyMutable,
      transferable: asset.transferable,
      divisibility: asset.divisibility,
      duration: asset.durationCount !== undefined ? UInt64.fromUint(asset.durationCount) : undefined }),
    this.nemNode.network)
次に、src/infrastructure/datasource/MosaicDataSource.ts のcreateMosaicSupplyChangeTxAggregate 関数を実装していきます。これはモザイクの供給量を設定するために必要です。APIの第2引数では先ほど作成したモザイクIDを指定し、第4引数では供給量を指定します。
const mosaicSupplyChangeTransaction = MosaicSupplyChangeTransaction.create(
  Deadline.create(),
  new MosaicId(mosaicId),
  MosaicSupplyType.Increase,
  UInt64.fromUint(maxAmount),
  this.nemNode.network)
モザイクを作成する際は、MosaicDefinitionTransaction と MosaicSupplyChangeTransactionを利用して二つのトランザクションの作成が必要になります。
全体の実装は次の通りです。
createMosaicDefinitionTxAggregate(privateKey: string, asset: AssetCreation): MosaicAggregate {
  const account = Account.createFromPrivateKey(privateKey, this.nemNode.network)
  const nonce = MosaicNonce.createRandom()
  const mosaicId = MosaicId.createFromNonce(nonce, account.publicAccount)
  const mosaicDefinitionTransaction = MosaicDefinitionTransaction.create(
      Deadline.create(),
      nonce,
      mosaicId,
      MosaicProperties.create({
        supplyMutable: asset.supplyMutable,
        transferable: asset.transferable,
        divisibility: asset.divisibility,
        duration: asset.durationCount !== undefined ? UInt64.fromUint(asset.durationCount) : undefined }),
      this.nemNode.network)
  const txInfo = { mosaicId: mosaicId.toHex(), transaction: mosaicDefinitionTransaction }
  return new MosaicAggregate(txInfo.mosaicId, txInfo.transaction.toAggregate(account.publicAccount))
}

createMosaicSupplyChangeTxAggregate(privateKey: string, mosaicId: string, maxAmount: number): any {
  const account = Account.createFromPrivateKey(privateKey, this.nemNode.network)
  const mosaicSupplyChangeTransaction = MosaicSupplyChangeTransaction.create(
    Deadline.create(),
    new MosaicId(mosaicId),
    MosaicSupplyType.Increase,
    UInt64.fromUint(maxAmount),
    this.nemNode.network)
  return mosaicSupplyChangeTransaction.toAggregate(account.publicAccount)
}
ネームスペース作成のトランザクション
src/infrastructure/datasource/NamespaceDataSource.ts の createNamespaceTxAggregate 関数を実装していきます。RegisterNamespaceTransaction.createRootNamespace を利用します。第2引数に登録したい名前と第3引数にレンタルする期間のブロック数を指定します。
const registerNamespaceTransaction = RegisterNamespaceTransaction.createRootNamespace(
  Deadline.create(),
  name,
  UInt64.fromUint(rentalBlock),
  this.nemNode.network)
次に モザイクとネームスペースを紐づけるトランザクションを作成します。src/infrastructure/datasource/NamespaceDataSource.ts の createMosaicToNamespaceTxAggregate 関数を実装していきます。AliasTransaction.createForMosaic を利用します。第3引数にネームスペースの名前、第4引数にモザイクIDを指定します。
const mosaicAliasTransaction = AliasTransaction.createForMosaic(
  Deadline.create(),
  AliasActionType.Link,
  new NamespaceId(namespace),
  new MosaicId(mosaicName),
  this.nemNode.network)
全体の実装は次の通りです。
createNamespaceTxAggregate(privateKey: string, name: string, rentalBlock: number): any {
  const account = Account.createFromPrivateKey(privateKey, this.nemNode.network)
  const registerNamespaceTransaction = RegisterNamespaceTransaction.createRootNamespace(
    Deadline.create(),
    name,
    UInt64.fromUint(rentalBlock),
    this.nemNode.network)
  return registerNamespaceTransaction.toAggregate(account.publicAccount)
}

createMosaicToNamespaceTxAggregate(privateKey: string, namespace: string, mosaicName: string): any {
  const account = Account.createFromPrivateKey(privateKey, this.nemNode.network)
  const mosaicAliasTransaction = AliasTransaction.createForMosaic(
    Deadline.create(),
    AliasActionType.Link,
    new NamespaceId(namespace),
    new MosaicId(mosaicName),
    this.nemNode.network)
  return mosaicAliasTransaction.toAggregate(account.publicAccount)
}
アグリゲートトランザクション
複数のトランザクションを一括で処理できるアグリゲートトランザクションを実装します。 一括で処理できるアグリゲートトランザクションを@{アグリゲートコンプリート}と呼びます。複数のトランザクションを1つにまとめてリクエストできます。リクエストされたトランザクションに関わる全員が署名するとブロックチエーンに書き込まれます。
src/infrastructure/datasource/AggregateTransactionDataSource.ts の requestComplete 関数を実装していきます。
AggregateTransaction.createComplete を利用してアグリゲートコンプリートを行います。第2引数に複数のトランザクションを指定します。
const aggregateTransaction = AggregateTransaction.createComplete(
  Deadline.create(),
  aggregateTransactions,
  this.nemNode.network,
  [])
コンプリートのトランザクションができましたら、署名して announce します。結果は Listener 経由で返ってきます。
const signedTransaction = account.sign(aggregateTransaction, this.nemNode.networkGenerationHash)
this.listenerWrapper.loadStatus(account.address.plain(), signedTransaction.hash)
  .then((response) => resolve(response))
  .catch((error) => reject(error))
this.transactionHttp.announce(signedTransaction)
    .subscribe(
      (response) => console.log('request', response),
      (error) => reject(error))
全体の実装は次の通りです。
async requestComplete(privateKey: string, aggregateTransactions: any[]): Promise<TransactionResult> {
  return new Promise((resolve, reject) => {
    const account = Account.createFromPrivateKey(privateKey, this.nemNode.network)
    const aggregateTransaction = AggregateTransaction.createComplete(
      Deadline.create(),
      aggregateTransactions,
      this.nemNode.network,
      [])
    const signedTransaction = account.sign(aggregateTransaction, this.nemNode.networkGenerationHash)
    this.listenerWrapper.loadStatus(account.address.plain(), signedTransaction.hash)
      .then((response) => resolve(response))
      .catch((error) => reject(error))
    this.transactionHttp.announce(signedTransaction)
        .subscribe(
          (response) => console.log('request', response),
          (error) => reject(error))
  })
}
ユースケースを実装する
モザイク作成、ネームスペース作成、モザイクとネームスペースの紐付けの処理は実装できたので、これらを操作するロジックを実装します。「オリジナルアセットを作成する」という機能になるため、そのビジネスロジックはdomain層のUseCaseで実装します。
src/domain/usecase/AssetExchangeUseCase.ts の createAsset 関数を実装していきます。
まずは、ネームスペース名、ウォレットを用意します。
const wallet = await this.walletRepository.loadWallet()
if (wallet === undefined) { throw new Error('wallet is nothing..') }
const privateKey = wallet!.privateKey!
const namespace = asset.namespace
作成するモザイクのネームスペースが重複していないか確認します。
const status = await this.namespaceRepository.loadNamespace(namespace)
if (status !== undefined) {
  return 'Already exist namespace.'
}
トランザクションを作成します。先ほど実装した「ネームスペース作成、モザイク作成、モザイク供給量変更、モザイクとネームスペースの紐付け」を利用します。
const namespaceTxAggregate = await this.namespaceRepository.createNamespaceTxAggregate(privateKey, namespace, 100)

const mosaicAggregate = await this.mosaicRepository.createMosaicDefinitionTxAggregate(privateKey, asset)
const mosaicId: string = mosaicAggregate.mosaicId

const mosaicSupplyChangeTxAggregate = await this.mosaicRepository.createMosaicSupplyChangeTxAggregate(privateKey, mosaicId, asset.maxAmount)

const mosaicToNamespaceTxAggregate = await this.namespaceRepository.createMosaicToNamespaceTxAggregate(privateKey, namespace, mosaicId)
そして、これらのトランザクションをアグリゲートコンプリートとしてリクエストします。
const result = await this.aggregateRepository.requestComplete(privateKey, [
  namespaceTxAggregate,
  mosaicAggregate.aggregate,
  mosaicSupplyChangeTxAggregate,
  mosaicToNamespaceTxAggregate,
])
全体の実装は次の通りです。
async createAsset(asset: AssetCreation) {
  let message: string = ''
  try {
    const wallet = await this.walletRepository.loadWallet()
    if (wallet === undefined) { throw new Error('wallet is nothing..') }
    const privateKey = wallet!.privateKey!
    const namespace = asset.namespace

    const status = await this.namespaceRepository.loadNamespace(namespace)
    if (status !== undefined) {
      return 'Already exist namespace.'
    }

    const namespaceTxAggregate = await this.namespaceRepository.createNamespaceTxAggregate(privateKey, namespace, 100)

    const mosaicAggregate = await this.mosaicRepository.createMosaicDefinitionTxAggregate(privateKey, asset)
    const mosaicId: string = mosaicAggregate.mosaicId

    const mosaicSupplyChangeTxAggregate = await this.mosaicRepository.createMosaicSupplyChangeTxAggregate(privateKey, mosaicId, asset.maxAmount)

    const mosaicToNamespaceTxAggregate = await this.namespaceRepository.createMosaicToNamespaceTxAggregate(privateKey, namespace, mosaicId)

    const result = await this.aggregateRepository.requestComplete(privateKey, [
      namespaceTxAggregate,
      mosaicAggregate.aggregate,
      mosaicSupplyChangeTxAggregate,
      mosaicToNamespaceTxAggregate,
    ])
    message = `SUCCESS: ${result.hash}`
  } catch (error) {
    throw error
  }
  return message
}
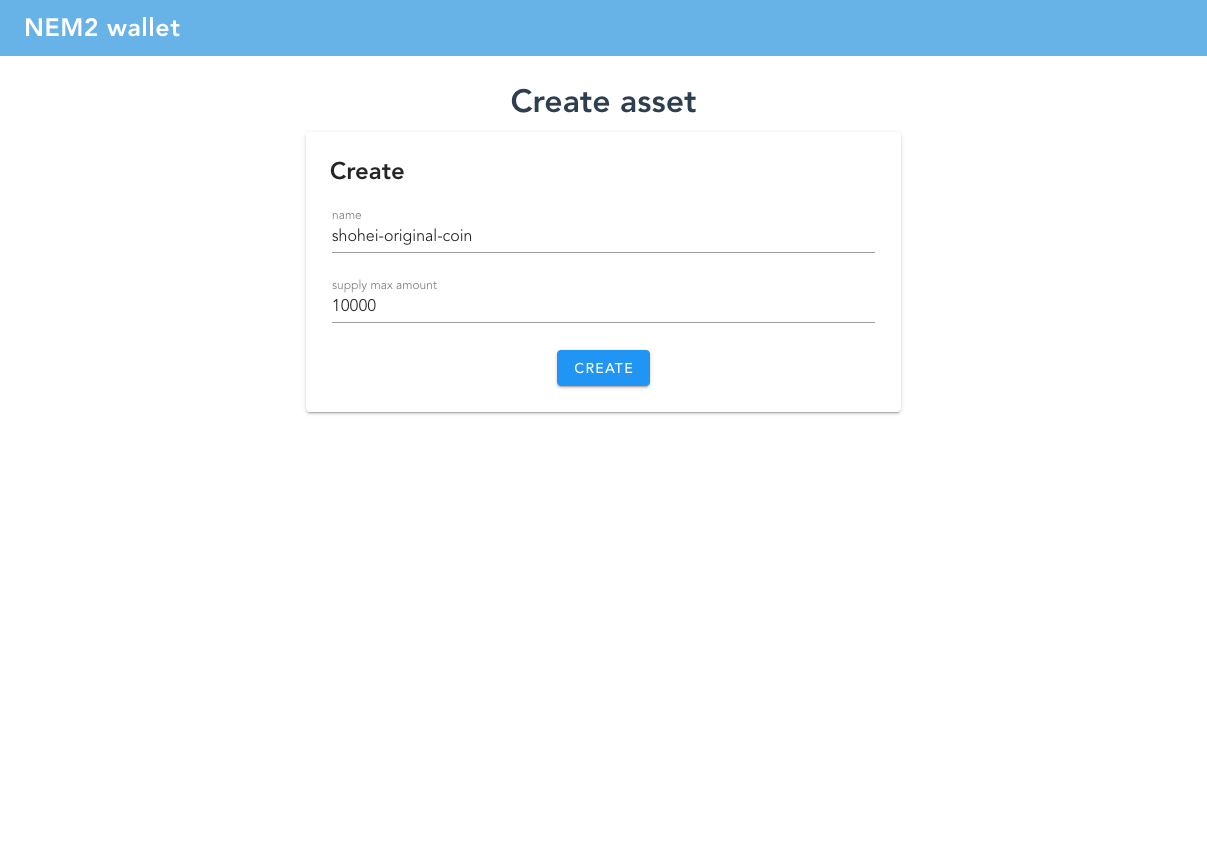
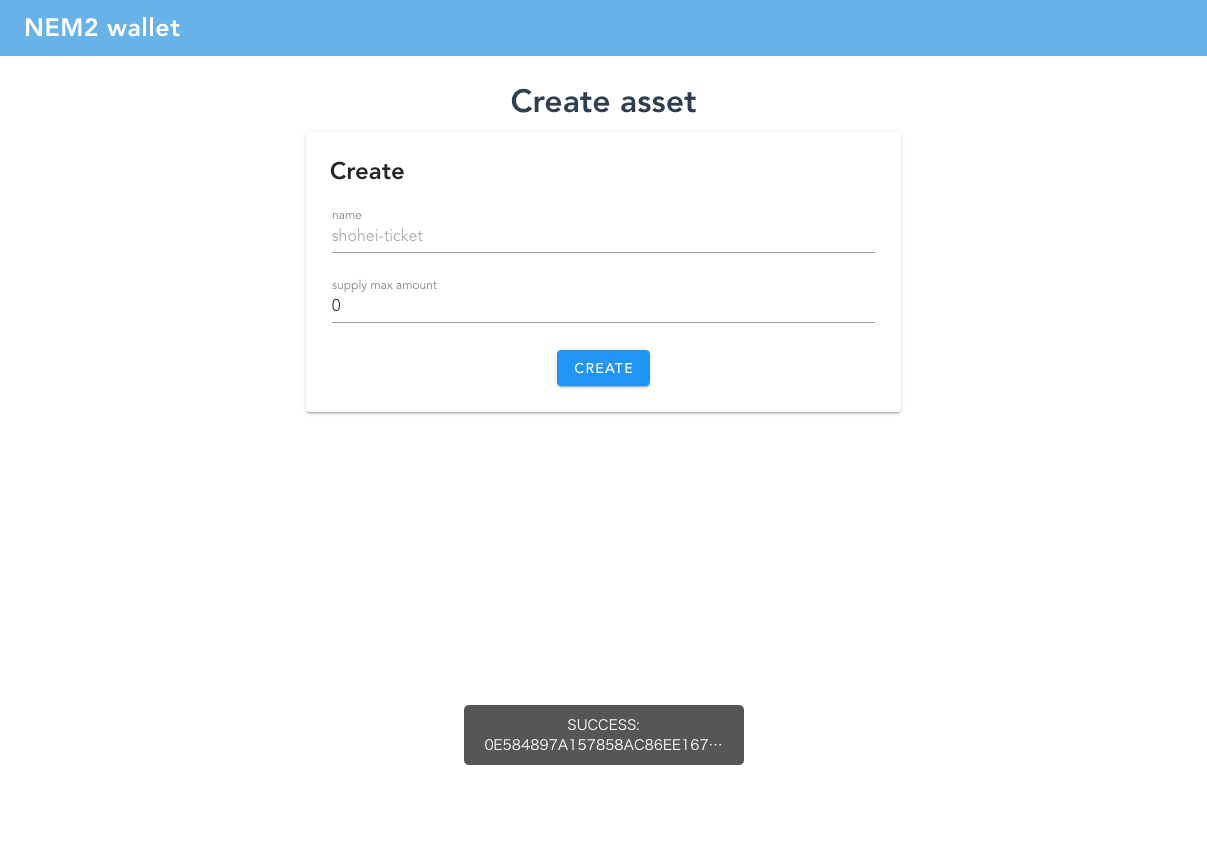
では、モザイクを作成してみましょう。AssetExchangePage.vue の画面上のフォームに作成するモザイクの情報を入力してください(TOP画面 Menuの Exchange Asset のリンクから遷移できます)。今回はお手軽に作成できるようネームスペース名と供給量のみ入力できるようにしています。好きなネームスペース名を入力し、供給量を入力後 Create ボタンを選択してください。
少し時間がかかりますが、次のようにToastが表示されれば成功です。
TOP画面に戻り、残高に反映されているか確認できます(本当はネームスペース名と残高を表示したかったのですが、ネームスペースの情報取得がまだ対応されていないため、モザイクIDを表示しています)。
モザイク送信
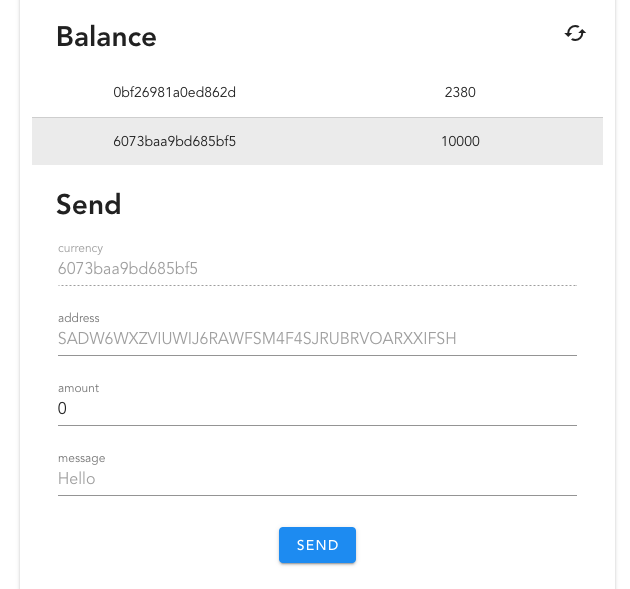
作成したモザイクを送金してみましょう。HomePage.vue の画面より、作成したモザイクを選択し、数量を入力してください。前回のNEM送金時と同様に、次のウォレットへモザイクを送金してみてください。
SAD5BN2GHYNLK2DIABNJHUTJXGYCVBOXOJX7DQFF
次のような画面になると送金成功です。
残高とトランザクション履歴が反映されていることを確認してください。
Github Pagesへ公開
では、最後に作成したNEM2ウォレットをWeb上に公開しましょう。静的ページのホスティングサービスである Github Pages を使えば容易に公開できます。なお、Github Pagesへ公開するためにはあらかじめGithubの登録が必要です。
リポジトリの登録
ウォレットのコード一式をリポジトリへ登録します。
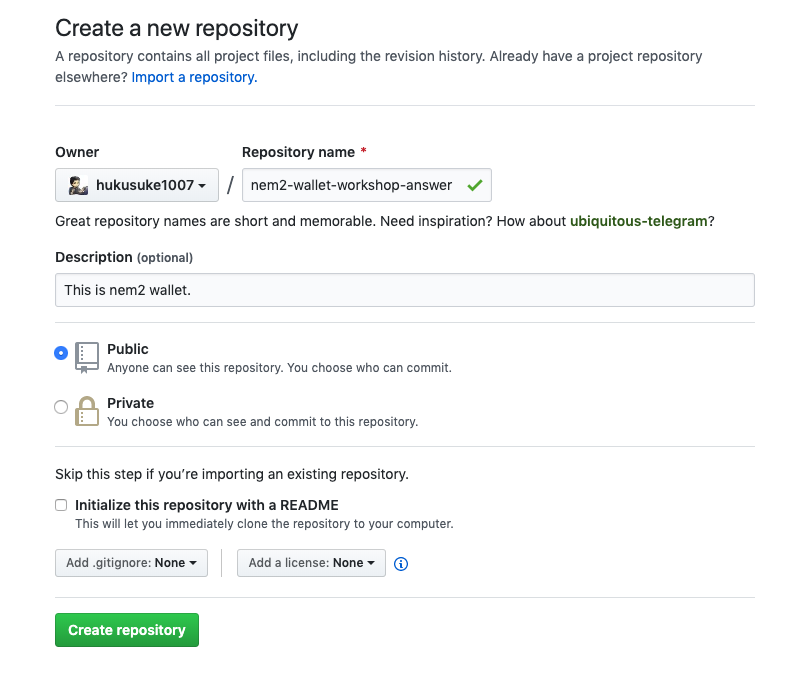
まずは Githubのリモートリポジトリを作成します。GitHubを開き、New repository( https://github.com/new )を選択してください。
リポジトリ名を nem2-wallet-workshop-answer にして作成してください。
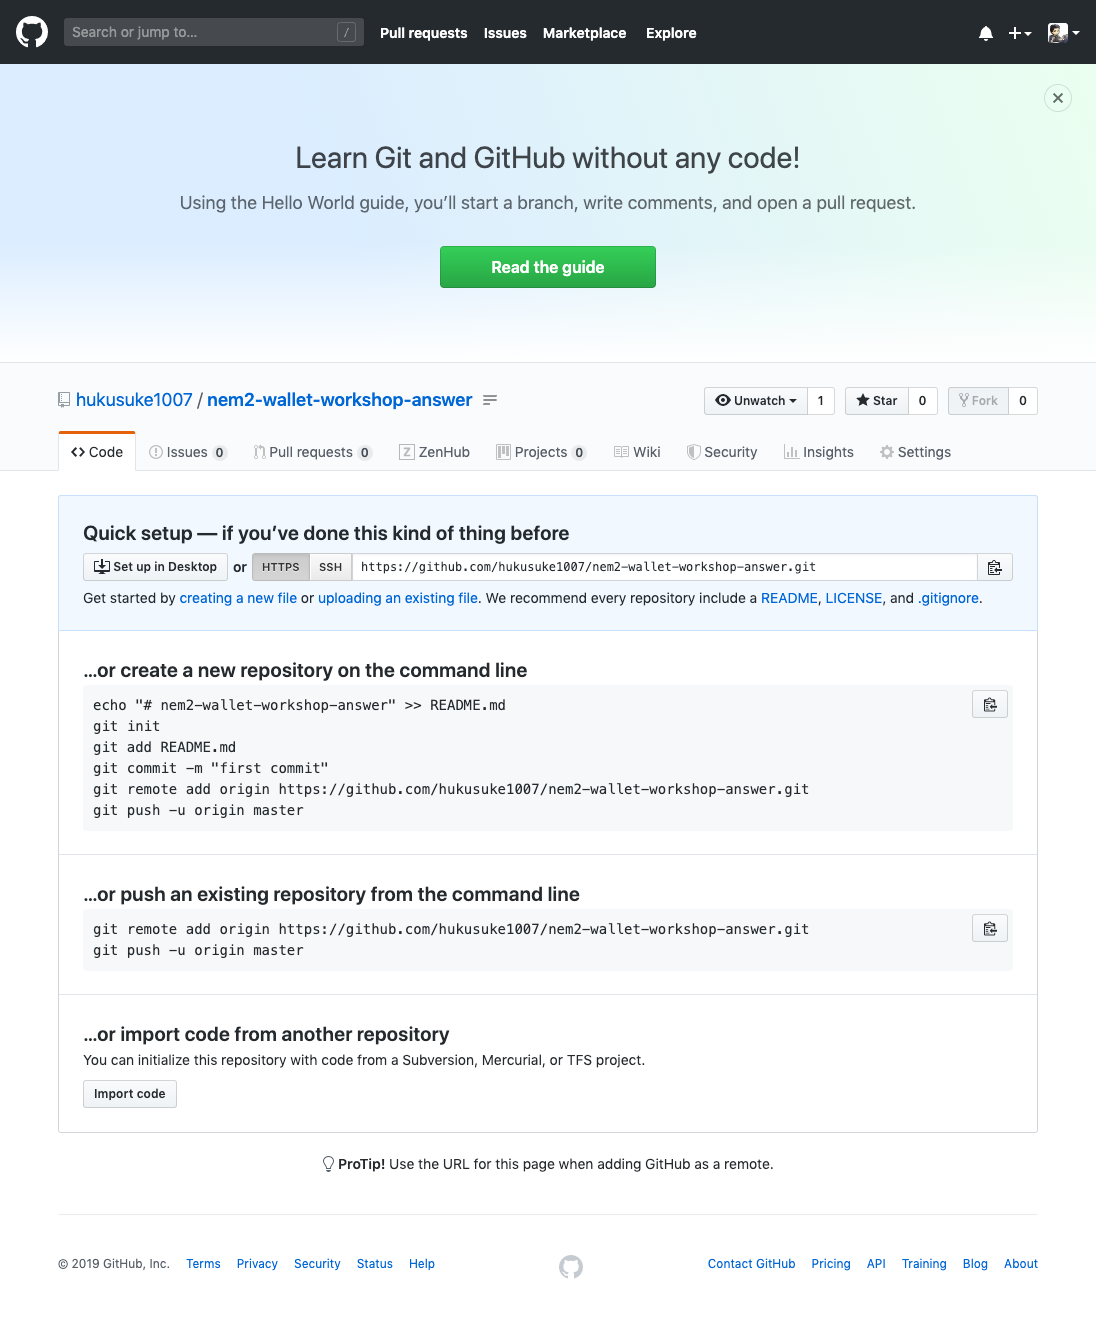
作成すると次のような画面になります。
次に、ローカルリポジトリを作成してリモートリポジトリへプッシュします。
cloneして取り入れているためgitディレクトリを削除します。作業していたディレクトリへ移動して次のコマンドを実行してください。
rm -rf .git削除後、次のコマンドを入力してローカルリポジトリを作成してリモートリポジトリへプッシュします。
git init
git add *
git commit -m "first commit"
git remote add origin https://github.com/hukusuke1007/nem2-wallet-workshop-answer.git
git push -u origin master
プッシュすると、先ほど作ったGithubのリポジトリにソースコードがアップロードされていることが確認できます。
静的ページを公開する
リポジトリの準備はできたので、静的ページを公開します。今まで実装したコードを公開できる静的ページに変換します。作業していたディレクトリへ移動し、次のコマンドを実行してください。
yarn builddocsディレクトリが作成されていることを確認してください。
ls
LICENSE			docs			postcss.config.js	tsconfig.json		yarn.lock
README.md		node_modules		public			tslint.json
desgin.key		package.json		src			vue.config.js
Githubへプッシュします。
git add *
git commit -m "create docs"
git push origin HEAD
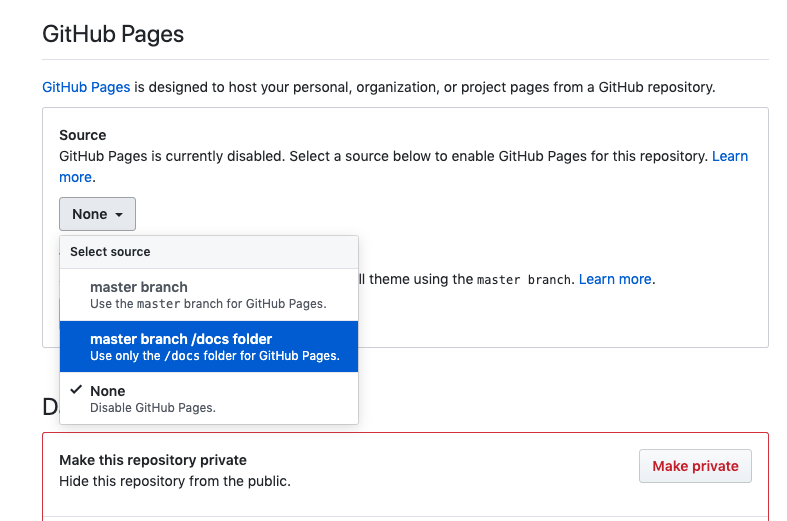
次に、Githubを開き、リポジトリのSettingよりGithub Pagesを有効にします。
指定するディレクトリを docs にします。
生成されたURLをアクセスするとウォレットが表示されます。
https://hukusuke1007.github.io/nem2-wallet-workshop-answer/
お疲れ様でした。これで作成したNEM2ウォレットがWeb上に公開できました。Githubドメインになったため、localhostで作成していたウォレットとは別のウォレットが作成されます。
http://localhost:8080/ 環境も立ち上げて、localhostのウォレットからGithubドメインのウォレットへ送金して遊んでみてください。
著者
shohei(中川祥平)
2013年からエンジニアとして京セラ株式会社のグループ会社へ入社し、組み込みソフトウェア開発、ディレクションに従事。在籍中、趣味でiOS/Androidアプリの開発を行い、個人アプリを数本リリース。その後、Web系ベンチャーへ転職。
2017年末にブロックチェーン技術に出会い、世の中を変えれる技術だと確信し、ブロックチェーントークンを使った健康促進アプリ「FiFiC」の開発、 現在はフリーランスエンジニアとして活動し、主にiOS/Android、Web、ブロックチェーンを使ったアプリの開発を行っている。
同時に「未経験から自走できるエンジニアとして成長できるコミュニティ」をコンセプトに開発コミュニティ「もくdev」 を発足。関東・関西合わせて500人以上の規模のコミュニティを運営。
https://twitter.com/hobbydevelop
・もくdev 大阪
・もくdev 東京
https://mokudev-tokyo.connpass.com/
備考
・NEM2-SDK
https://nemtech.github.io/ja/index.html
・NEM2 walletサンプルコード
https://github.com/hukusuke1007/nem2-wallet-workshop-answer
・Vue.js公式サイト
