RWallet
Introduction
This is a multi-cryptocurrency wallet application. Supports both english and spanish.
Prerequisite
To run on Android
- In order to run this App in Android Simulator, Android Studio needs to be installed. Please refer to https://developer.android.com/studio
- Open Android Studio, create a device via
Tools > AVD Manager > Create Virtual Device. After downloading required dependencies, start the device by clicking on Play icon. - Now we are testing if you can invoke
adbin terminial. This is for running rWallet Android App on Android virtual device.- Since we already have Android Studio installed we can add
platform-toolsto pathecho 'export ANDROID_HOME=/Users/$USER/Library/Android/sdk' >> ~/.bash_profile echo 'export PATH=${PATH}:$ANDROID_HOME/tools:$ANDROID_HOME/platform-tools' >> ~/.bash_profile - Then, refresh bash profile by
source ~/.bash_profile - Start using adb with
adb devices - If you have a virtual device running, it should show
List of devices attached
emulator-5554	device
- Since we already have Android Studio installed we can add
To run on iOS Devices
- XCode needs to be installed. iOS simulator will be install along with XCode.
Getting Started
These instructions will get you a copy of the project up and running on your local machine for development and testing purposes. See deployment for notes on how to deploy the project on a live system.
The first three steps are needed for both Android and iOS devices.
-
npm installto install dependencies -
Create an environment variable file named
.envin the root directory# Parse server configuration # Dogfood Server URL http://130.211.12.3/parse # Devbox Server URL for Android Simulator http://10.0.2.2:1338/parse # Devbox Server URL for iOS Simulator http://<YOUR_IP_ADDRESS>:1338/parse PARSE_SERVER_URL=If .env file is changed, manually edit the file importing react-native-dotenv by either adding an empty line or whitespace will work.
-
npm run androidornpm run ios. The script will first start server daemon in a separate terminal window, the same effect asnpm run start. You should see console output like below.> rwallet@0.0.1 start /Users/mikasa/Documents/repos/rwallet > node node_modules/react-native/local-cli/cli.js start ┌──────────────────────────────────────────────────────────────────────────────┐ │ │ │ Running Metro Bundler on port 8081. │ │ │ │ Keep Metro running while developing on any JS projects. Feel free to │ │ close this tab and run your own Metro instance if you prefer. │ │ │ │ https://github.com/facebook/react-native │ │ │ └──────────────────────────────────────────────────────────────────────────────┘ Looking for JS files in /Users/mikasa/Documents/repos/rwallet Loading dependency graph, done.- For Android,
npm run androidwill start the app in your physical device or Android virtual device. You need to check what device are available by runningadb devicesin terminal. To test the app in a physical Android device, you need to make sure Developer Options -> Enable Debugging via USB is turned on for that device. Note: If you encounter an error like below then you need to create a local.properties file under ./android and add one linesdk.dir = /Users/<username>/Library/Android/sdkin it.SDK location not found. Define location with an ANDROID_SDK_ROOT environment variable or by setting the sdk.dir path in your project's local properties file at '/Users/<usernmae>/Documents/repos/rwallet/android/local.properties'. - For iOS device,
npm run ioswill start the App in iOS physical or virtual device.
- For Android,
-
Hot reload code change - Press Command + m on virtual device and select
Enable Hot Reloadingto hot reload file changes.
Fastlane
Set up Fastlane
| Homebrew | Installer Script | Rubygems |
|---|---|---|
| macOS | macOS | macOS or Linux with Ruby 2.0.0 or above |
brew cask install fastlane |
Download the zip file. Then double click on the install script (or run it in a terminal window). |
sudo gem install fastlane -NV |
Build on iOS
- Make sure you have the latest version of the Xcode command line tools installed:
xcode-select --install - Set up fastlane match by running
fastlane match init. match is the alias for thesync_code_signingaction. It creates all required certificates & provisioning profiles and stores them in a separate git repository. - Gernerate certificates by
fastlane match appstore - Once match is set, run
fastlane ios beta version:<version_number> build:<build_number>to push to TestFlight. For example,fastlane ios beta version:0.8.1 build:3(build parameter can be omitted for auto-increment)
build on Android
- Make sure you have Android Studio installed, so that it is easy to sync the gradle build config.
- To build the APK, run
fastlane android build_apk version:<version_number> code:<version_code>
Devleopment
Remote Debugging
Remote Debugging on iOS Simulator
- Run
npm run iosto start the app in Simulator. - Wait for the build
Remote Debugging on Android Devices
Step 1: Discover your Android device
- Open the Developer Options screen on your Android. See Configure On-Device Developer Options.
- Select Enable USB Debugging
- On your development machine, open Chrome.
- Open DevTools.
- In DevTools, click the Main Menu Main Menu then select More tools > Remote devices.

- In DevTools, open the Settings tab.
- Make sure that the Discover USB devices checkbox is enabled.
- Connect your Android device directly to your development machine using a USB cable. The first time you do this, you usually see that DevTools has detected an unknown device. If you see a green dot and the text Connected below the model name of your Android device, then DevTools has successfully established the connection to your device.

- If your device is showing up as Unknown, accept the Allow USB Debugging permission prompt on your Android device.


Step 2: Debug content on your Android device from your development machine TODO: How to debug android app with Mac OS is to be added
Debugging
-
Mac OS Dev environment
- In Android Simulator, press Command + M to start remote debugging
- In iOS Simulation, press Command + D to start remote debugging
-
Linux Dev environment
- In Android Simulator
-
Windows Dev environment
Deployment
-
Android
- Modify keystore setting in ./android/gradle.properties
- Run
npm run androidto build android apk. the apk file will be generated at the path: ./android/app/build/outputs/apk/release
-
iOS
- Change signing team in the project settings

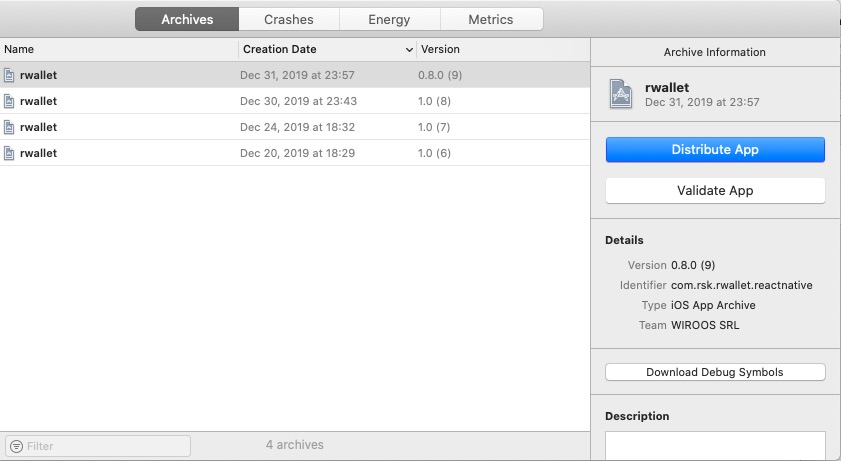
- Build ios app via Product -> Archive in Xcode
- Window -> Organizer, Distribute app to App Store Connect
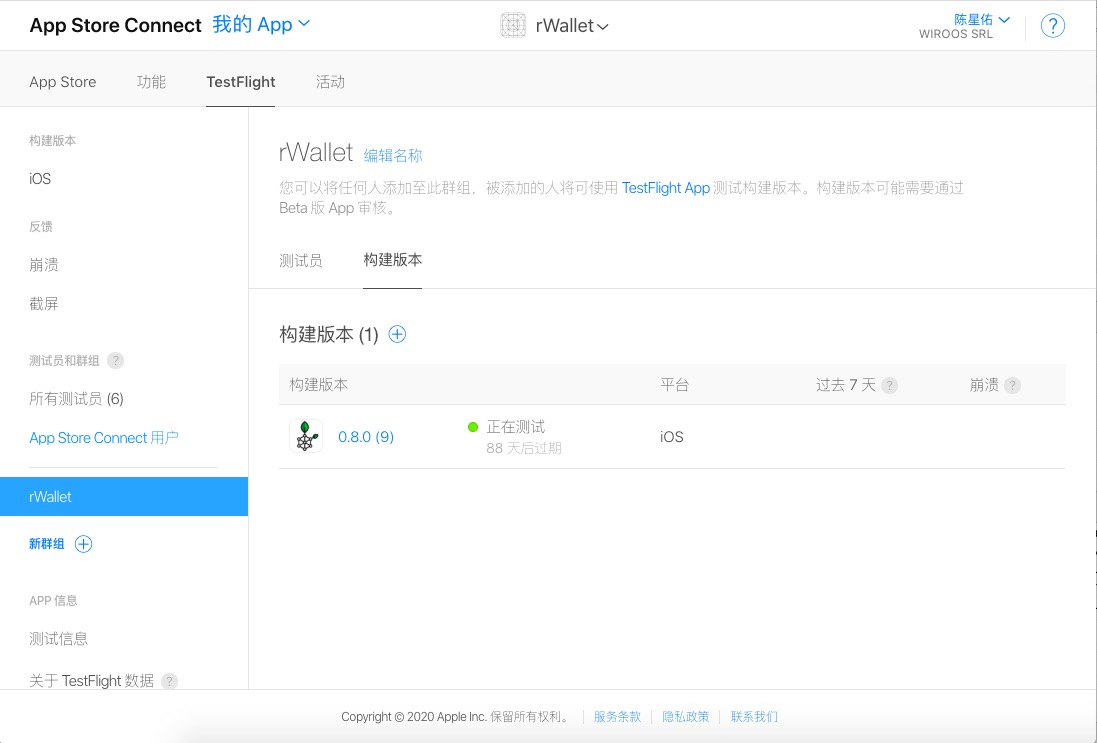
- Login App Store Connect, add new build to TestFlight
- Change signing team in the project settings
Testing Procedure
Unit Testing
Unit Testing module is to be added.
Manual Testing
Manual Testing has to be done on a real iOS/android device. This is to make sure we mimic real user's experience.
Steps
- Create a wallet
- Check Go Back Button
- Enable all three testnet tokens
- Import a wallet
- Check Go Back Button
- Enable all three testnet tokens
- Delete a walelt
- Goes to Me bottom tab and delete a Key
- Go back to dashboard and make sure wallet is deleted
- Receive Test BTC
- Send Test BTC from an external wallet, and make sure transaction and balance correct in Address Detail page
- Send Test BTC from rWallet, and make sure transaction and balance correctin Address Detail page
- Receive Test RBTC
- Send Test RBTC from an external wallet, and make sure transaction and balance correct in Address Detail page
- Send Test RBTC from rWallet, and make sure transaction and balance correctin Address Detail page
- Receive Test RIF
- Send Test RIF from an external wallet, and make sure transaction and balance correct in Address Detail page
- Send Test RIF from rWallet, and make sure transaction and balance correctin Address Detail page
- Send Test BTC
- Send Test BTC to an external wallet, and make sure transaction and balance correct in Address Detail page
- Send Test BTC to another address in rWallet, and make sure transaction and balance correctin Address Detail page
- Send Test RBTC
- Send Test RBTC to an external wallet, and make sure transaction and balance correct in Address Detail page
- Send Test RBTC to another address in rWallet, and make sure transaction and balance correctin Address Detail page
- Send Test RIF
- Send Test RIF to an external wallet, and make sure transaction and balance correct in Address Detail page
- Send Test RIF to another address in rWallet, and make sure transaction and balance correctin Address Detail page
- Change Language Settings
- Change Language in Me tab, and make sure the App doesn't crash (We don't support any other launage yet)
- Change Currency Settings
- Change Currency in Me tab, and make sure the App doesn't crash (We don't support any other launage yet)
- Click on Social Media Link
- Click on all Social Media link, and make sure mobile phone could navigate to the correct webpage/app