The following deployable architecture automates the deployment of a sample NodeJS application on IBM Cloud, including all underlying IBM Cloud infrastructure. This architecture implements the best practices for in reference architecture.
This deployable architecture provides a comprehensive foundation for trust, observability, security, and regulatory compliance by configuring the IBM Cloud account to align with compliance settings, deploying key and secret management services, and deploying the infrastructure to support CI/CD/CC pipelines for secure application lifecycle management. These pipelines facilitate the deployment of the application, vulnerability checks, and auditability, ensuring a secure and trustworthy deployment of applications on IBM Cloud.
This deployable architecture is designed to showcase a fully automated deployment of a Code Engine NodeJS application through IBM Cloud Project, providing a flexible and customizable foundation for your own application deployments on IBM Cloud. This architecture deploys the following sample application by default.
By leveraging this architecture, you can accelerate your deployment and tailor it to meet your unique business needs and enterprise goals.
By using this architecture, you can:
- Establish Trust: The architecture ensures trust by configuring the IBM Cloud account to align with compliance settings as defined in the Financial Services framework.
- Ensure Observability: The architecture provides observability by deploying services such as IBM Log Analysis, IBM Monitoring, IBM Activity Tracker, and log retention through Cloud Object Storage buckets.
- Implement Security: The architecture ensures security by deploying IBM Key Protect and IBM Secrets Manager.
- Achieve Regulatory Compliance: The architecture ensures regulatory compliance by implementing CI/CD/CC pipelines, along with IBM Security Compliance Center (SCC) for secure application lifecycle management.
To deploy this architecture, follow these steps.
Before deploying the deployable architecture, ensure you have:
-
Created an API key in the target account with sufficient permissions. The target account is the account that will be hosting the resources deployed by this deployable architecture. See instructions Note the API key, as it will be used later. On evaluation environments, you may simply grant
Administratorrole onIAM Identity Service,All Identity and Access enabled servicesandAll Account Managementservices. If you need to narrow down further access, for a production environment for instance, the minimum level of permissions is indicated in the Permission tab of the deployable architecture. -
(Optional) Installed the IBM Cloud CLI's Project add-on using the
ibmcloud plugin install projectcommand. More information is available here.
-
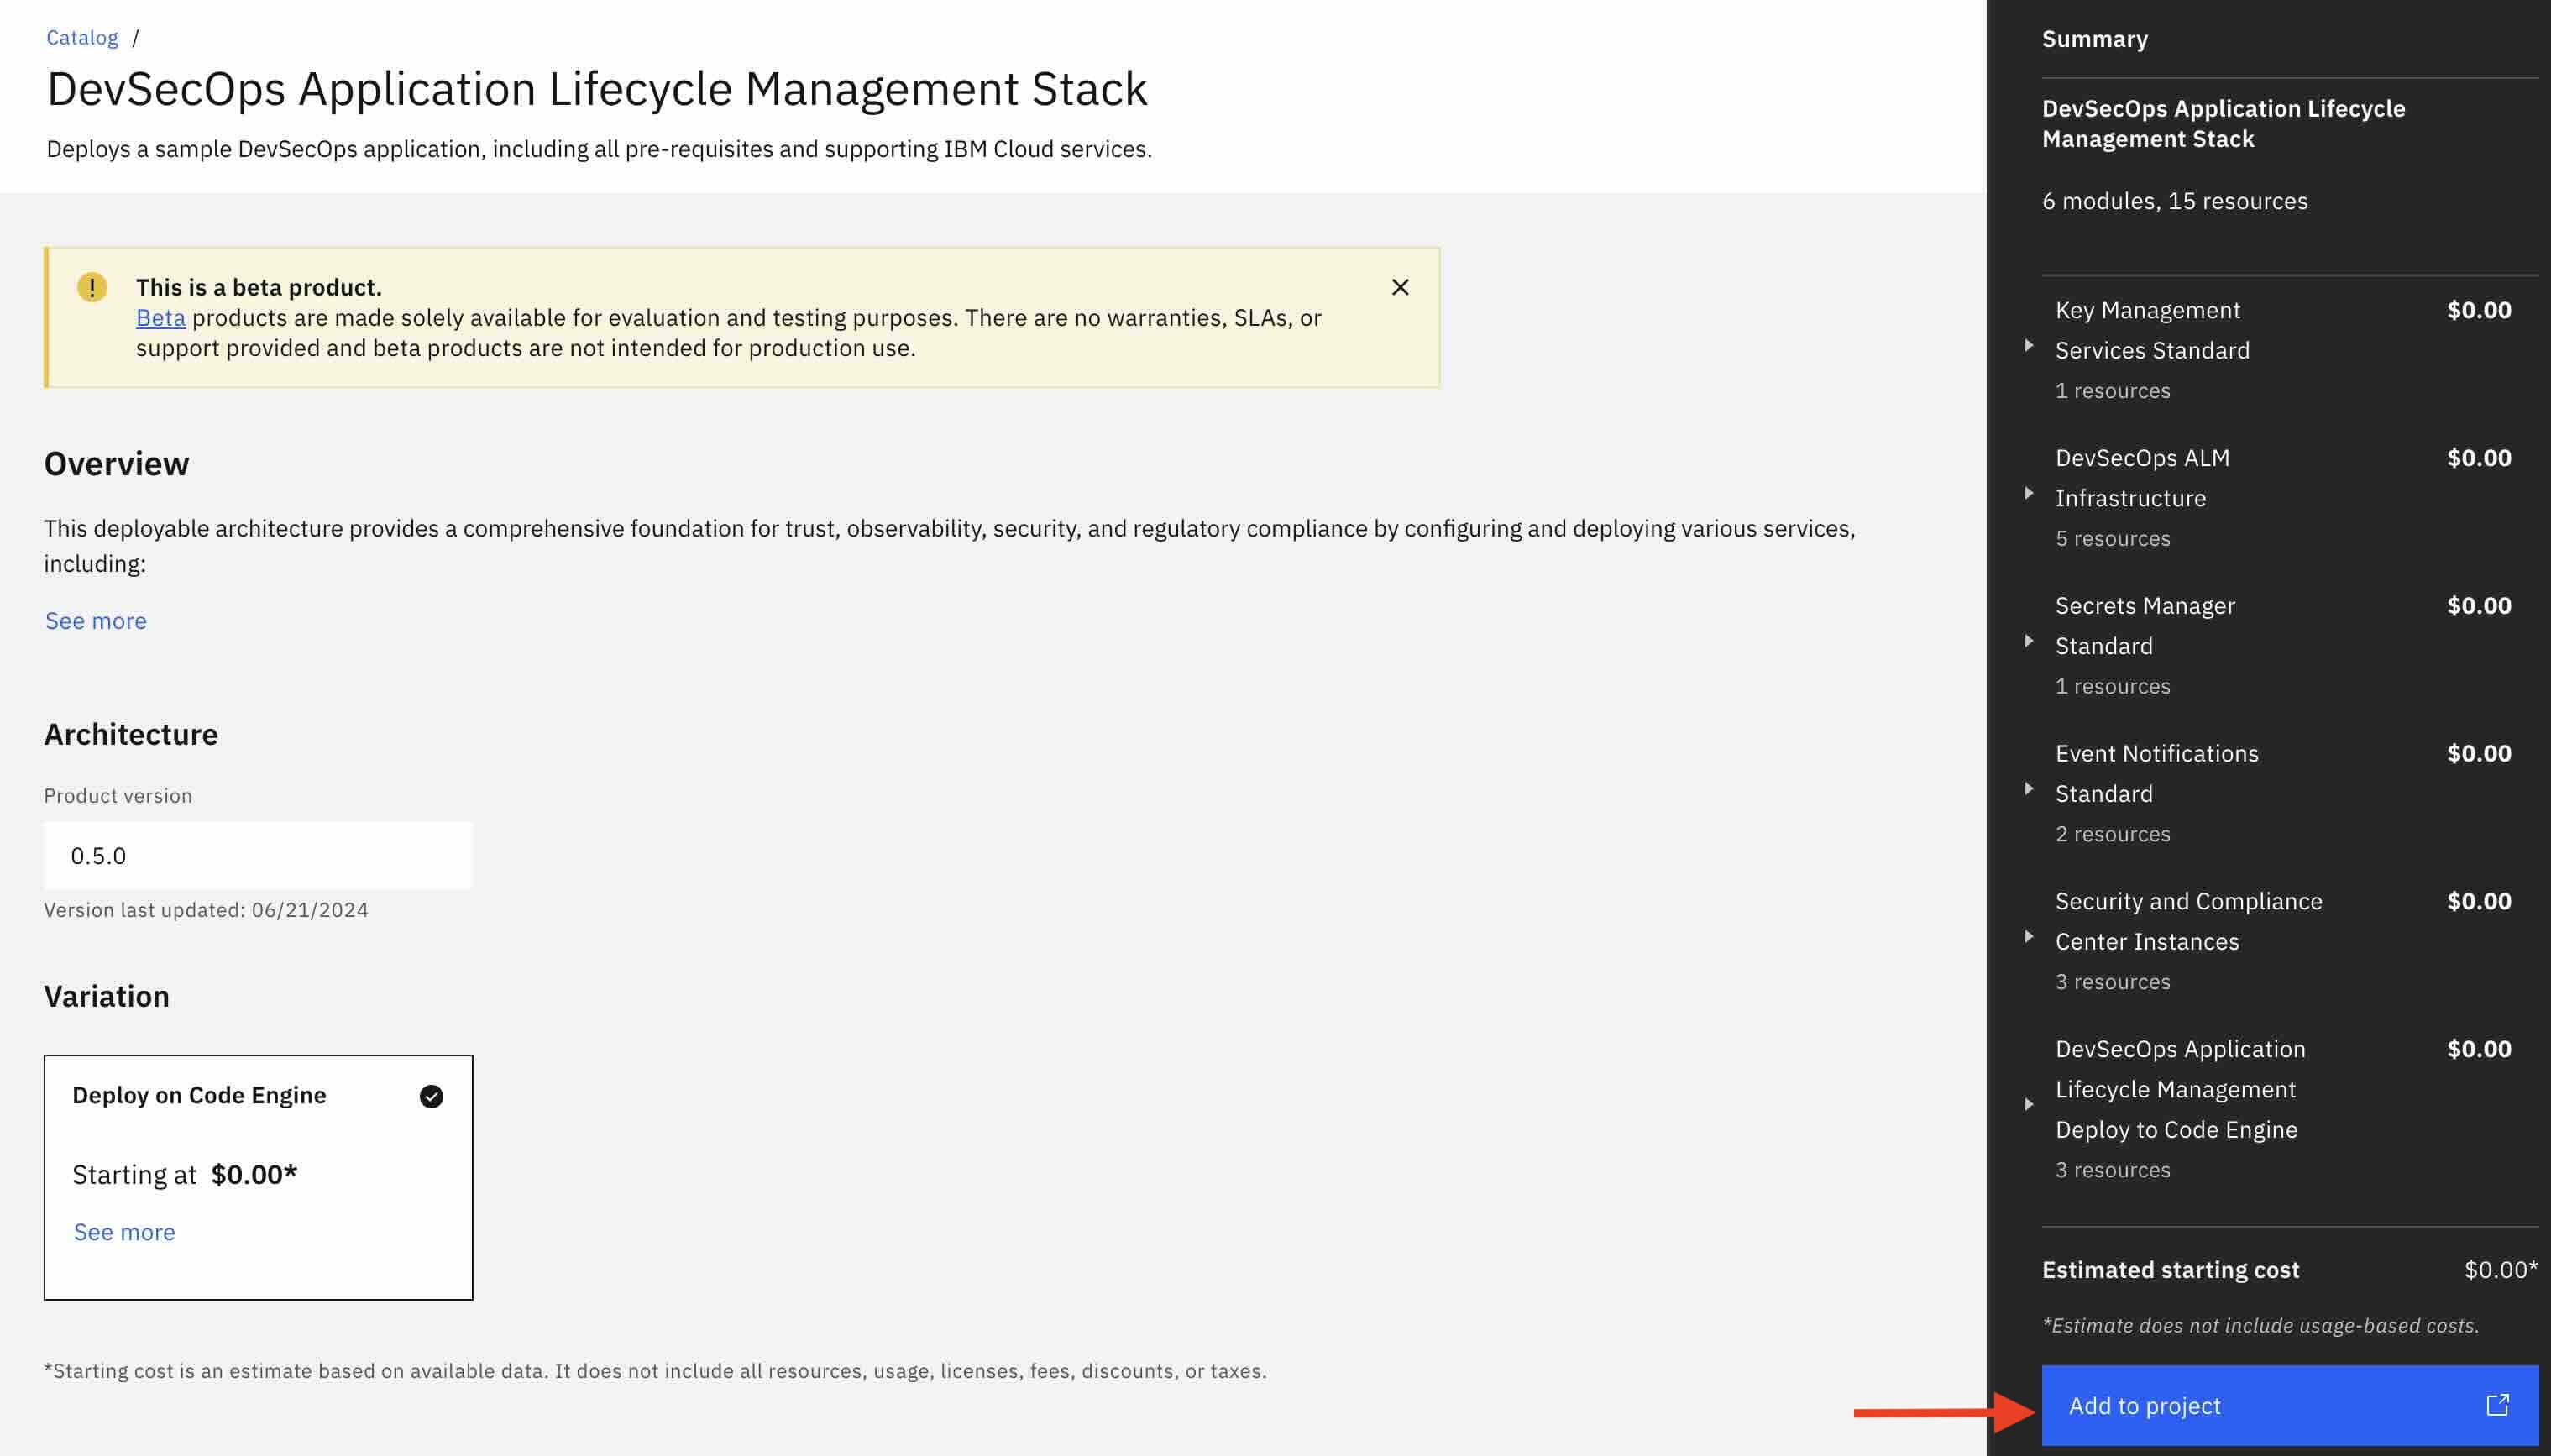
Locate the tile for the Deployable Architecture in the IBM Cloud Catalog.
-
Click the "Add to project" button.
-
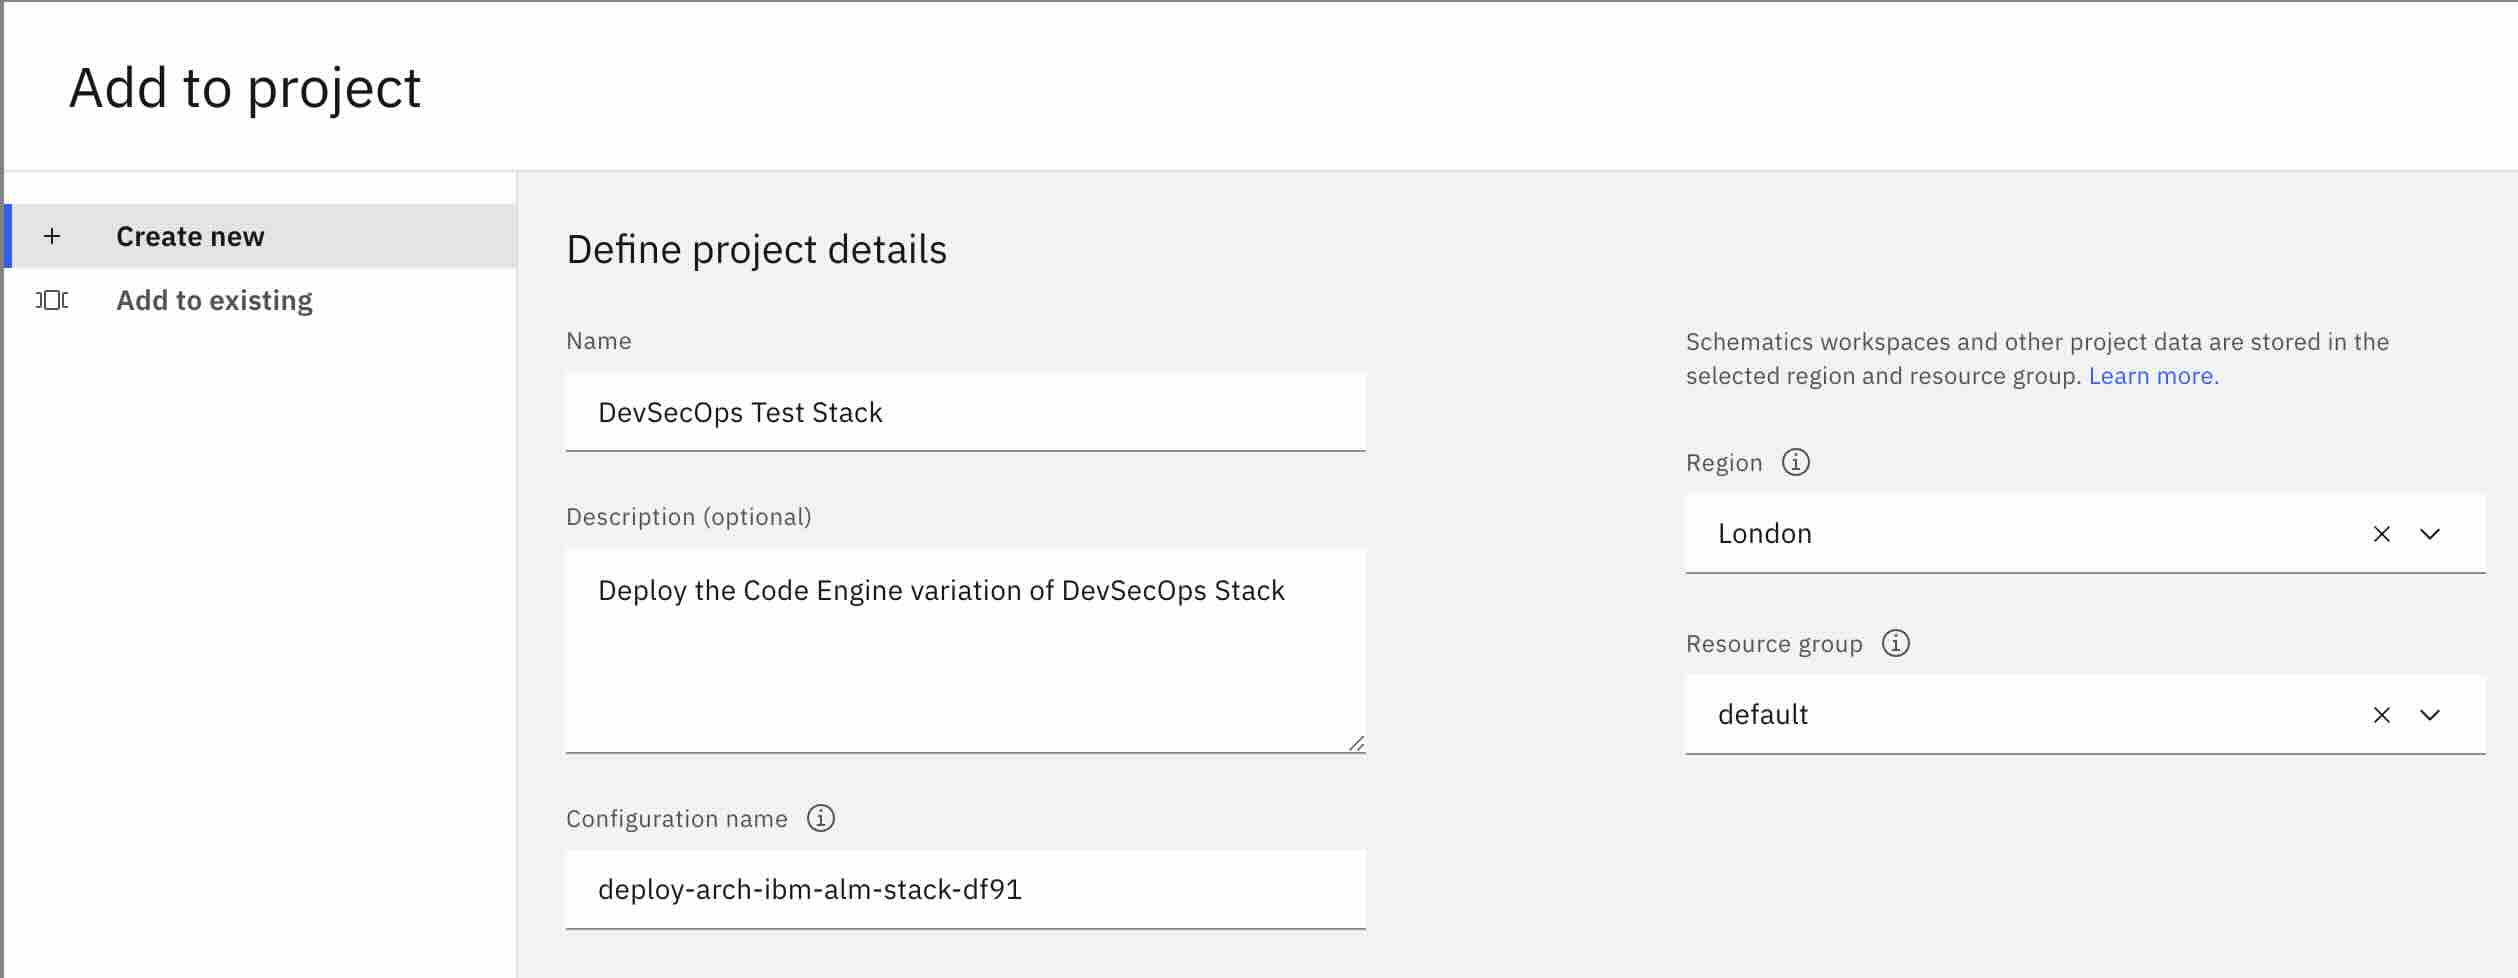
Select Create new and enter the following details:
-
Name and Description (e.g., "Retrieval Augmented Generation Pattern")
-
Region and Resource Group for the project. e.g. for evaluation purposes, you may select the region the closest to you, and the Default resource group. For more insights on the recommended production topology, refer to the Enterprise account architecture Central administration account white paper.
-
Configuration Name (name of the automation in the project, e.g., "dev" or "prod", ideally matching the deployment target, but this can be any name)
-
-
Click the Add button (or Create if this is the first project in the account) at the bottom right of the modal popup to complete.


After completing Step 2 - Deploy the Stack in a New Project from Catalog, you are directed to a page allowing you to enter the configuration for your deployment:
-
Under Security -> Authentication, enter the API Key from the prereqs in the
api_keyfield.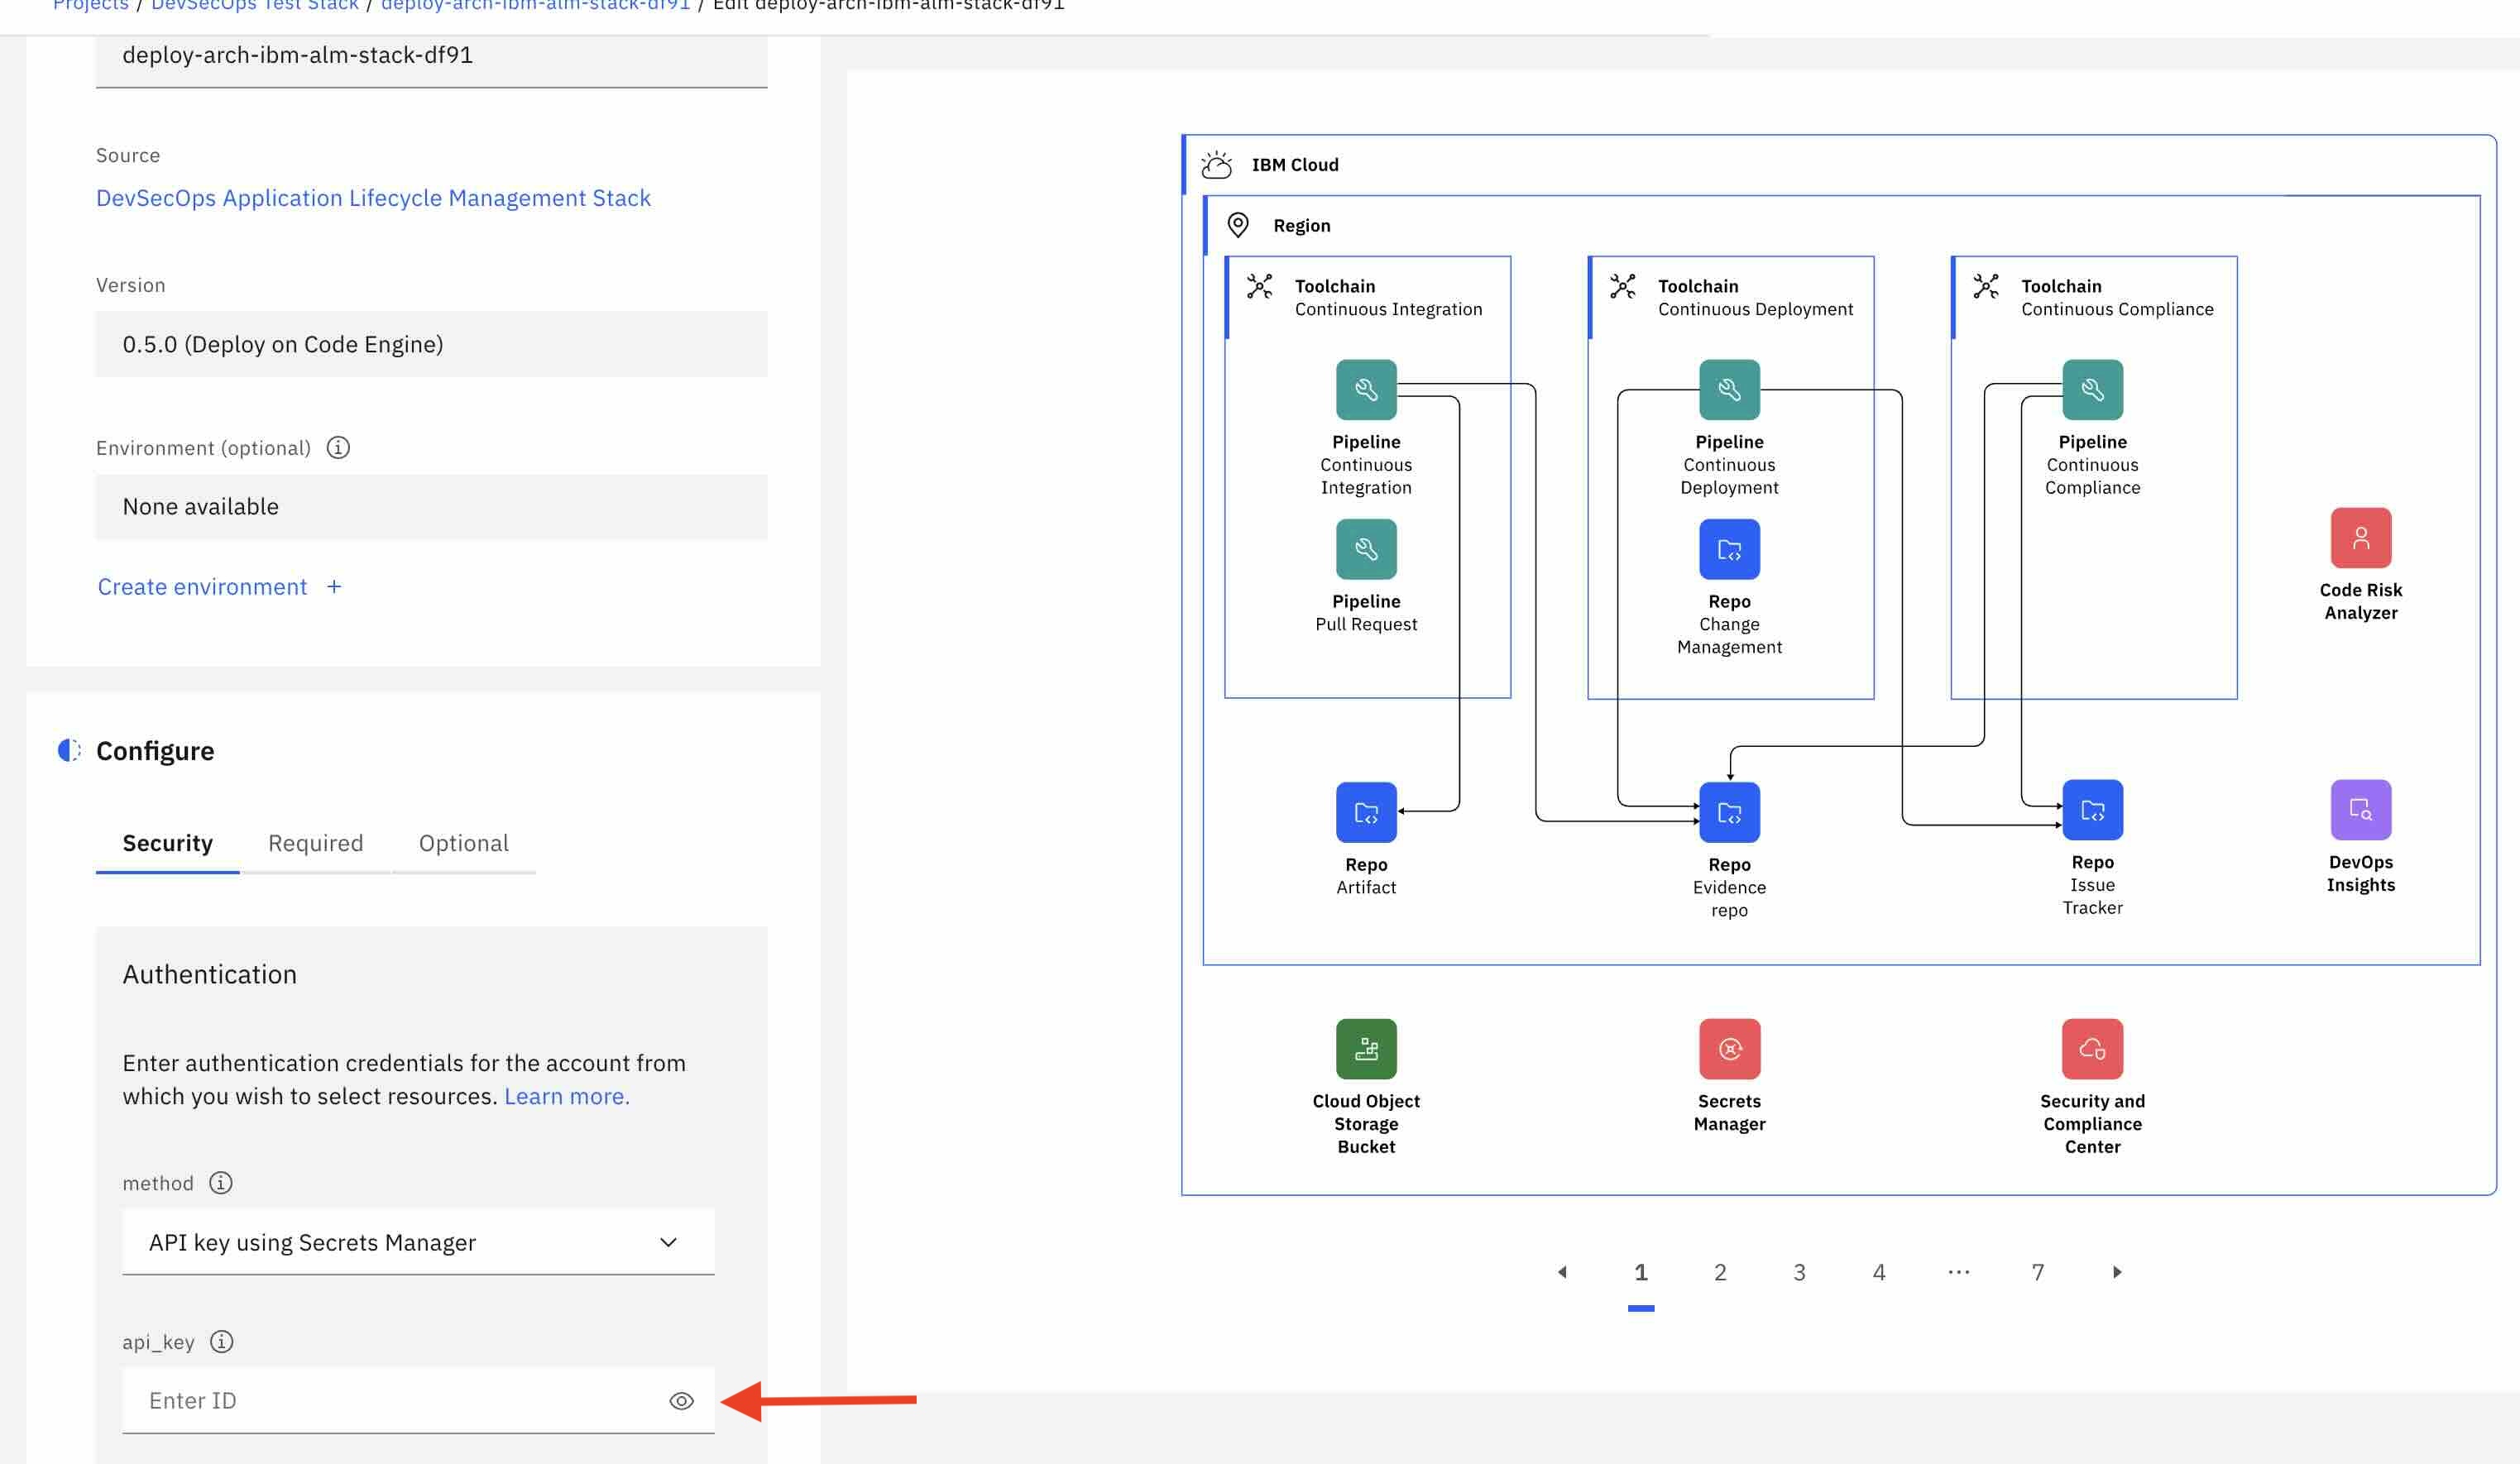
-
Under Required, select a region to deploy the resources and specify a name for the resource that is created.
-
Under Optional, there are entries to specifiy an alternative resource prefix as well as plans for Secret Manager
sm_service_planand SCCscc_service_plan. Setting the optionuse_existing_resource_grouptotruechanges the behaviour ofresource_group_namefrom creating a new resource group to treating the specified resource group name as an existing resource group.

You may explore the other available inputs, such as the region and resource group name (under optional tab), leave them as is, or modify them as needed.
Once ready, click the "Save" button at the top of the screen.
Navigate to the project deployment view by clicking the project name in the breadcrumb menu.

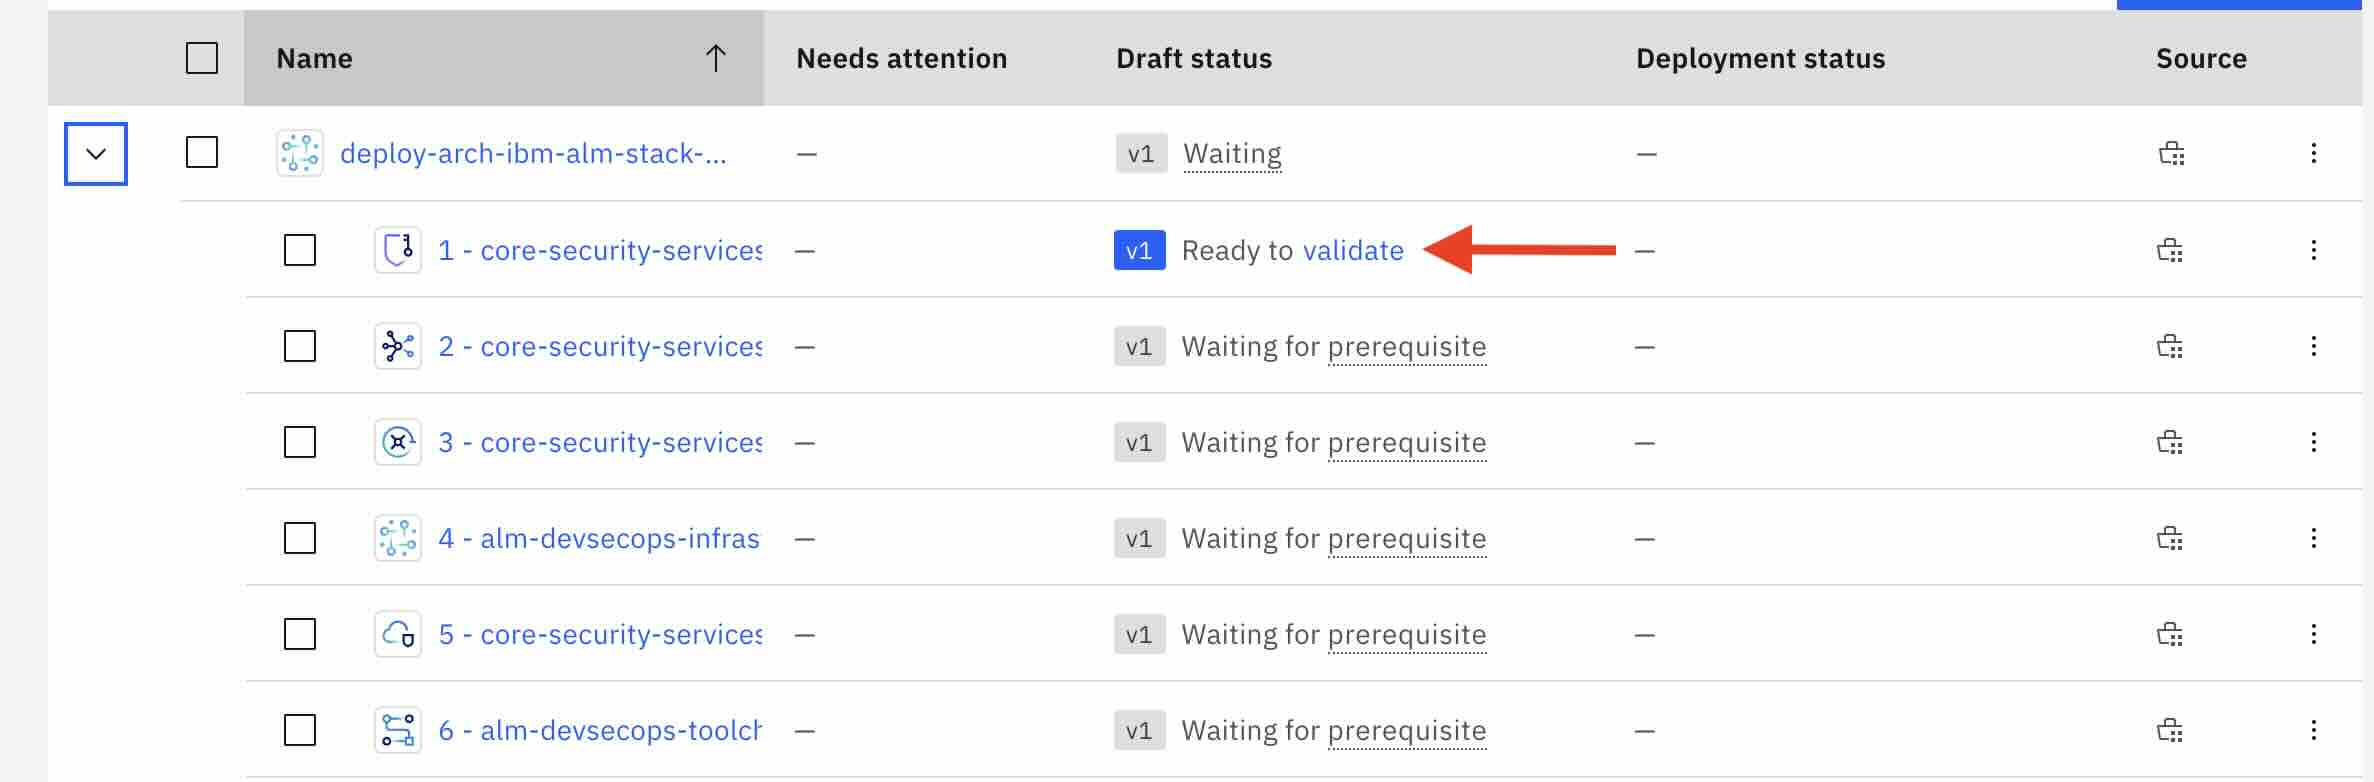
You should be directed to a screen looking like:

Note: in some rare occurences, the first member of the stack may not be marked as "Ready to validate". Refreshing the page in your browser window should solve this problem.
Two approaches to deploy the architecture:
- Fully Automated End-to-End. Recommended for demo or non-critical environments. This approach allows Project to validate, approve, and deploy all stack members automatically.
- Member-by-Member. Recommended for critical environments, such as production. This approach enables a detailed review of changes from each stack member before automation is executed, ensuring precise control over the deployment process.
To enable auto-deployment:
- Go to Manage > Settings > Auto-deploy and toggle On.
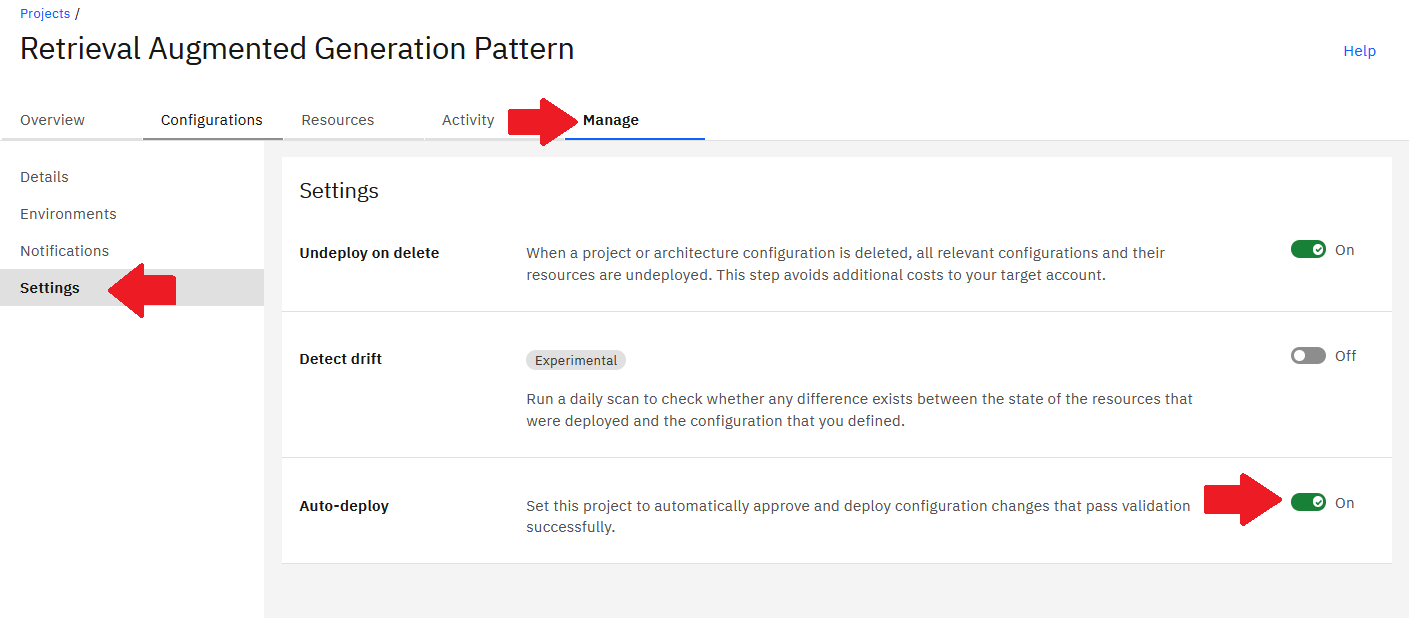
- Return to the Configurations tab and click Validate under stack configuration.

The project will then validate, approve, and deploy each stack member, taking approximately one hour to complete.
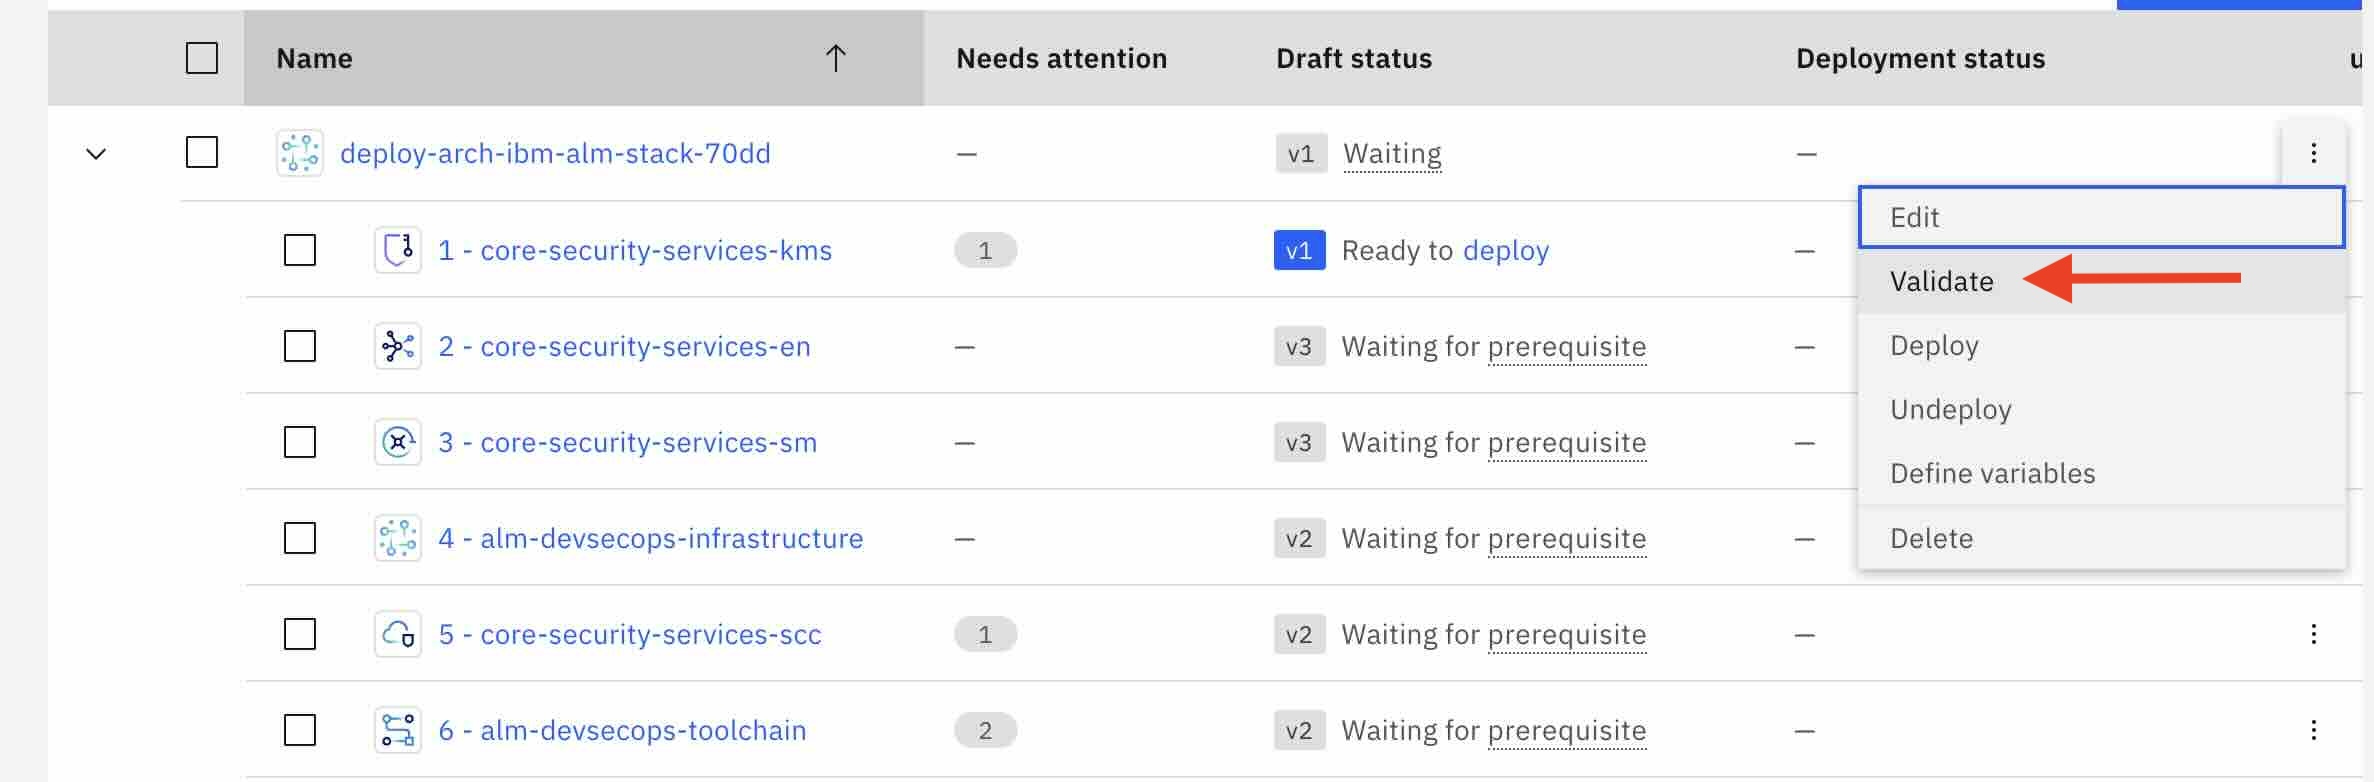
-
Click on validate
-
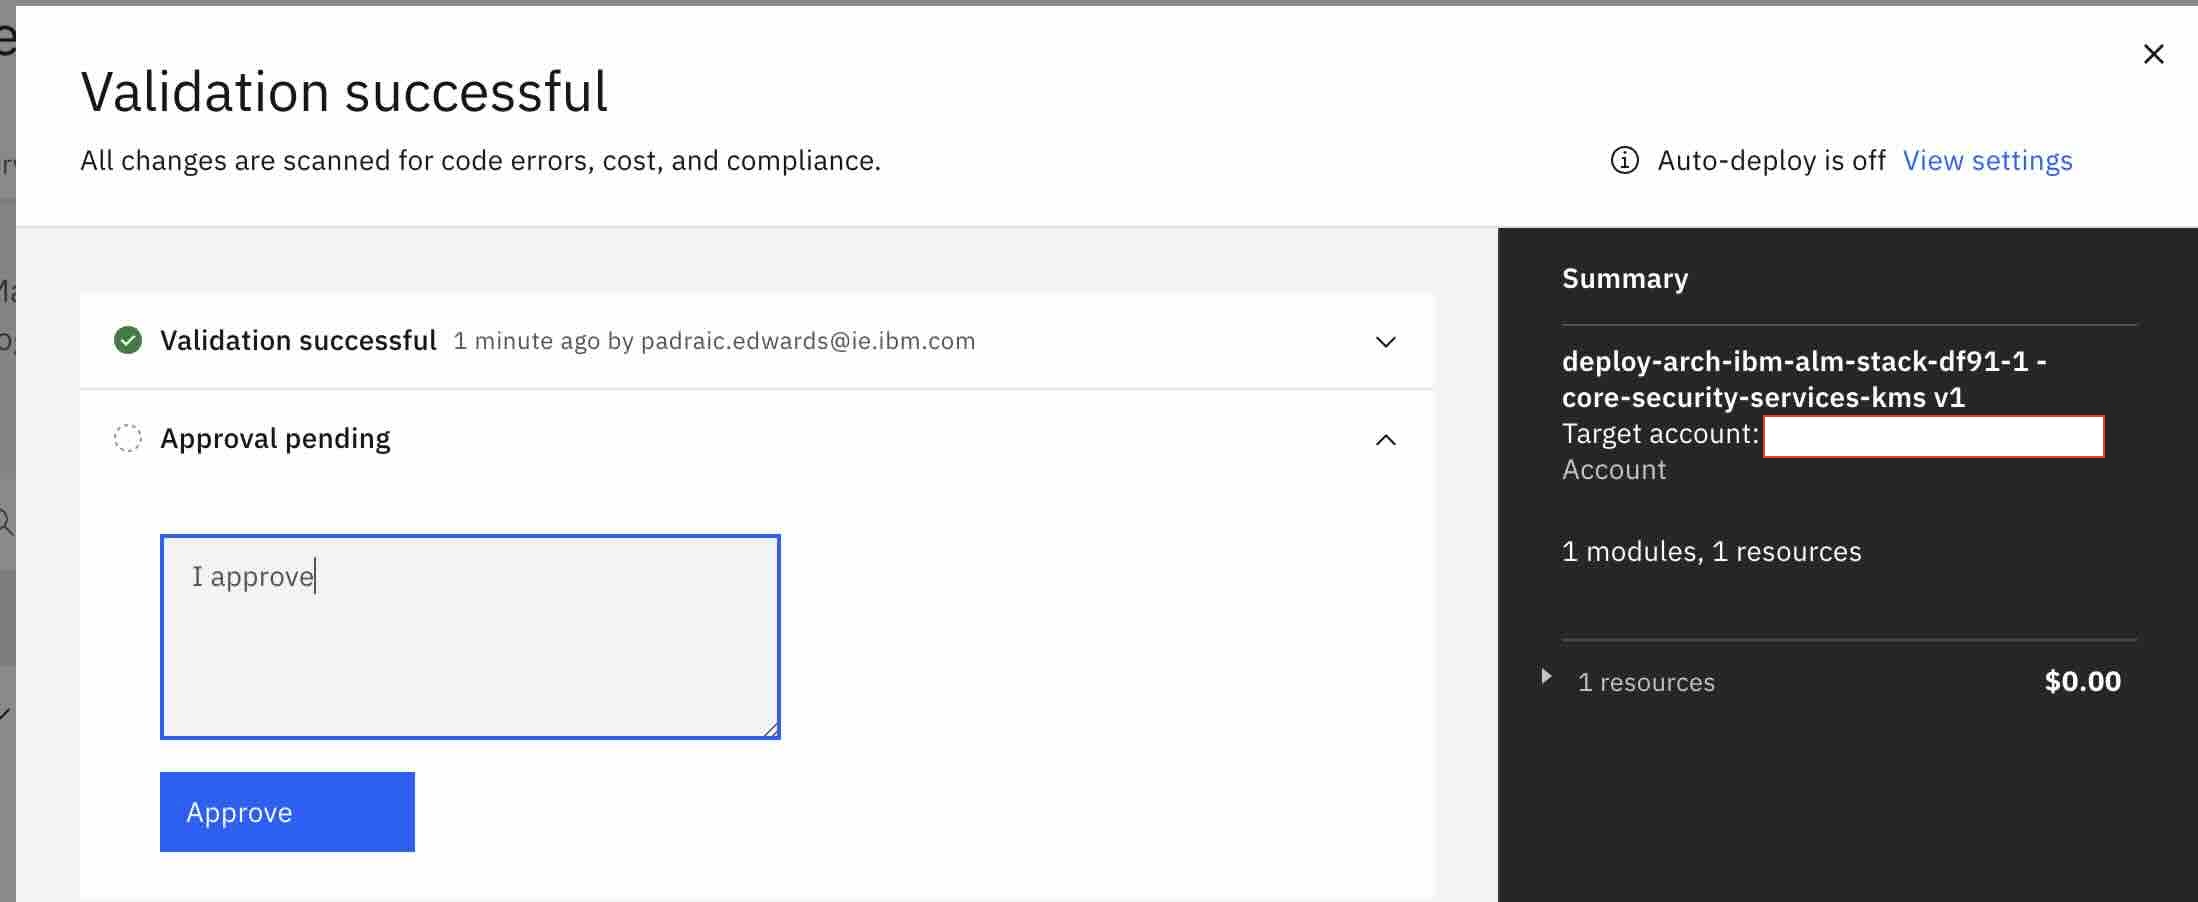
Wait for validation

-
Approve and click the deploy button
-
Wait for deployment
-
Repeat step 1 for the next configuration in the architecture. Note that as you progress in deploying the initial base configuration, you will be given the option to validate and deploy multiple configuration in parallel.


At this point, the infrastructure has been successfully deployed in the target account, and the initial build of the sample application has started in the newly-provisioned DevOps service.
To monitor the build and deployment of the application, follow these steps:
- Access the DevOps Toolchains View: Navigate to the DevOps / Toolchains view in the target account.
- Select the Resource Group and Region: Choose the resource group and region where the infrastructure was deployed. The resource group name is based on the prefix and resource_group_name inputs of the deployable architecture.
- Select the Toolchain: Select "DevSecOps CI Toolchain"
- Access the Delivery Pipeline: In the toolchain view, select ci-pipeline under Delivery pipeline
- View the CI Pipeline Status: The current status of the CI pipeline execution can be found under the "ci-webhook-trigger" section.
Once the initial run of the CI pipeline complete, you should be able to view the application running in the created Code Engine project.
The automation is configured to deploy a Trial version of Secret Manager by default to minimize costs. However, the Trial version has some limitations. If you want to avoid these limitations, you can opt to deploy a standard (paid) instance of Secret Manager under the Optional settings of the stack.
Here are the limitations of the Trial version:
- Account limitation: Only one Trial instance of Secret Manager can be deployed at a time in a given account.
- Deployment error: You will encounter an error in the Secret Manager deployment step if there is already a Trial instance deployed in the same account.
- Re-deployment failure: If the automation provisions a Trial version of Secrets Manager, and is un-deployed and then re-deployed again with the Trial version in the same account, the "3 - Security Service - Secret Manager" deployment will fail. This is because you can only have one Trial version of Secrets Manager in an account, and even after deletion, the prior Trial version of Secrets Manager needs to be removed from the "reclamation" state as well.
The deployable architecture can only be deployed with an API Key associated with a user. It is not compatible with API Keys associated with a serviceId. Additionally, it cannot be deployed using the Project trusted profile support.
What are reclamations? In IBM Cloud, when you delete a resource, it doesn't immediately disappear. Instead, it enters a "reclamation" state, where it remains for a short period of time (usually 7 days) before being permanently deleted. During this time, you can still recover the resource if needed.
To resolve the re-deployment failure, you will need to delete the Secret Manager service from the reclamation state by running the following commands:
ibmcloud resource reclamations #  lists all the resources in reclamation state, get the reclamation ID of the secret manager service
ibmcloud resource reclamation-delete <reclamation-id>
You may see notifications in IBM Cloud Project indicating that one or more configurations in the stack have new versions available. You can safely ignore these messages at this point, as they will not prevent you from deploying the stack. No specific action is required from you.