The easiest straightforward method to get rid of the Intel ME.
This project helps you to create a Raspberry Pi image that can clean the Intel ME blob from your machine and optionally install Core/libreboot.
In other words, "me-cleaner and libre firmware for dummies."
It's a binary blob on your firmware in the flash chip. It's a software that runs independently of the main CPU on a co-processor/microcontroller on the PCH. Intel ME runs even when the machine is off and before anything on your machine with the highest ring permission. It can access anything on your computer. It does a lot of (good?) things, but no one knows exactly what the Intel ME is capable of.
It is a modified version of MINIX. One good overview is here.
The ME firmware is very big, so the code doesn't reside on the coprocessor hardware. The firmware has to be fed to the coprocessor from somewhere. That somewhere is, in practice, a region of the flash chip of the computer. The ME firmware takes something like 512K-3MB in that 8MB chip. There is a hardware watchdog on the coprocessor that checks if the operation of the ME firmware is "on" for half an hour after the boot process. If it realizes that the ME is not operational at all, it will reset the CPU. When the firmware runs, it sets certain (hidden/privileged) registers or memory values to signal the watchdog that it's operational, thus makeing the hardware watchdog happy.
The problem is you can't just feed the coprocessor a totally bogus ME code. Before the coprocessor runs the code, it will check certain signatures and if they don't match, the coprocessor won't run it. The me-cleaner software changes the firmware in a clever way: The botched code still passes some minimum security requirements, the coprocessor still executes it, and it still flags the ME as somewhat operational, thus the watchdog is still happy.
Now the layout of the firmware has also one more tidbit. On the firmware, you can mark certain critical regions of the chip to be read-only to prevent that region from ever being written on. In the factory firmware, the ME region is often marked as read only, that's why you can't change the ME firmware from the machine itself (even if you can update and flash a new firmware from the machine itself).
Analogy of that is like you can't install and run the anti-virus from an infected computer. If the virus itself is smart enough, it could prevent any anti-virus being run. You will have to start with a clean computer, and plug the infected HDD in, and clean it from there. The Raspberry Pi is acting as the "clean" computer to clean the virus here.
Freedom from binary blobs shouldn't be hard or expensive.
This is after a person told me, "you need to make it easy for us mere mortals."
One doesn't need to be an electrical engineer to do be able to clean the ME on your computer. Just run some simple commands and connect 6 wires to a Raspberry Pi.
I've been thinking about this project for over a year, but prototyping was easy because I can just carry a customized Pi image with me. Now, to publish the source and customization process, there is a lot of scripting needed (because what's the point of advocating removing the 8MB Intel ME blob by releasing a 2GB blob and tell everyone to run it). I finally got up my butt and did it. Every script is simple and can be audited quickly.
This pipeline has been tested to work on a Dell Chromebook 7310. That's all I have.
It should work with many other Chromebooks and Thinkpads, but have not been verified. If you succeed cleaning your ME with this method, please send me an email.
Remember that ultimately you're responsible for trying this with your machine. I can't guarrantee that it will work. I can't guarrantee that what I told you to do won't fry your $4000 laptop. I wrote the whole thing in ten hours.
That being said, I have put every safeguard I could think of and made this process as simple and clear as possible. As long as you don't fry your chip by connecting a 1.8V chip to the 3.3V Raspberry Pi, the entirely process is undoable. In fact, it won't even work without you backing up first, and it never overwrites the backup file.
Hardware wise, you will need:
- a Raspberry Pi (Pi 0 WH is the easiest and cheap),
- a Pomona SOIC-8/SOIC-16 clip,
- 6 female2female jumper wires,
- a microUSB cable, and
- a microSD card >= 2GB.
If you really want to be cheap, buy a Pi 0 original for $5 in Microcenter, but then you'll have to solder the headers.
The Bill of Materials should about less than $50 in total. More likely than not you already have everything, except for the SOIC-8 clip.


Clean the "target" computer, open it up and make sure it has a SOIC-8 flash chip. MAKE VERY SURE that the chip is 3.3V or 3.3V-tolerant. Many Chromebooks use 3.3V chips, but it looks like some use 1.8V chips.
Look up your flash chip to see what model it is. The datasheet will tell you how to wire the SOIC clip. If you use a Chromebook, then they seem to follow one pattern.
Make sure that me_cleaner works on your machine If me_cleaner works, this should work as well (theoretically).
If you use the Pi 0, you'll need a "spare" computer that can be used to control it. Alternatively, you can attach a set of keyboard/HDMI cables/monitor to type to the Raspberry Pi.
The spare computer can run Linux or Windows, it doesn't matter. I'm not sure about Macs, you'll need to install drivers on Mac to get it to talk to the Pi via USB-serial. It is easier just to boot your Mac with a live Linux distro.
If you want to flash coreboot at the same time you clean the ME, you need
to put the ROM file you prepared to the folder coreboot
and name it coreboot.bin. It will be copied to /home/pi/coreboot.bin.
The cleaning script will prioritize cleaning/flashing the coreboot image over
the stock image pulled from the chip.
Now you can run the script in this repo in any Linux distro to create a ezpi4me image. Some of live distros are alright. Don't use Windows.
Fedora:
$ sudo dnf install qemu-user-static kpartx parted
$ sudo systemctl restart systemd-binfmt.service
$ sudo ./make-ezpi4me.sh
Debian/Ubuntu:
$ sudo apt install qemu-user-static kpartx parted
$ sudo ./make-ezpi4me.sh
Write the image to the micro-SD card. It should be named ezpi4me.img.
$ sudo dd if=ezpi4me.img of=/dev/Your_MicroSD_card
Wire the SOIC clip to the Pi according to this guide.
All Chromebooks I'm aware of so far have the same wiring scheme. Not sure about Thinkpads, please refer to the datasheets:
              ┌───── Little "dot" on the chip
              │
             ╔═════════╗
    CS#    1═╣o        ╠═8    VCC
   MISO    2═╣         ╠═7    ---
    ---    3═╣         ╠═6    SCLK
    GND    4═╣         ╠═5    MOSI
             ╚═════════╝

RPi header  SPI flash
25          GND
24          CS#
23          SCLK
21          MISO/DO
19          MOSI/DI
17          VCC
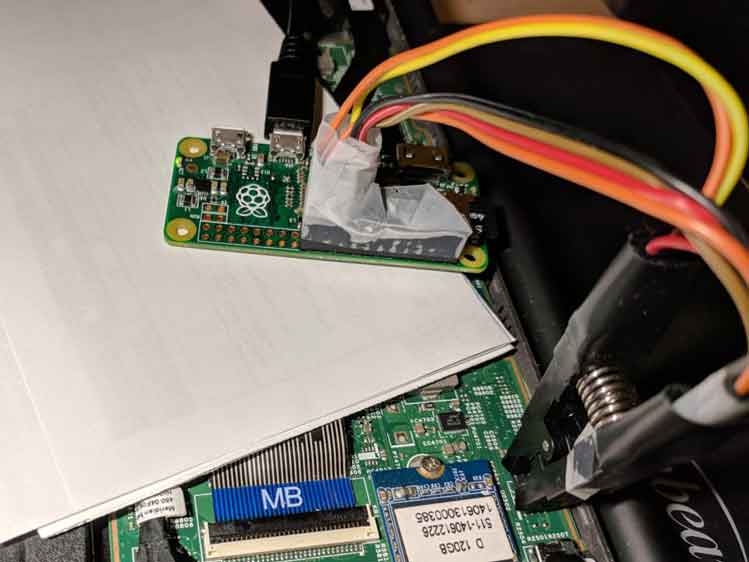
If you're confused, I have a video here, your setup should look roughly like this.
You do not need to wire pin 3 and pin 7 on the clip.
Now, you have two ways to proceed:
-
Easiest way: You need another linux/windows computer. Plug the micro-USB to the Pi 0 using the USB OTG port on the Pi 0 (NOT PWR) -- that's the middle, not the outermost micro-USB port. Now install
screen(Linux) or Putty (Win). On Linux:$ sudo screen /dev/ttyUSB0 115200 or $ sudo screen /dev/ttyACM0 115200
On Windows, use Putty to create a new connection to whatever COM port that shows up in Device Manager.
Press Enter a couple of times so it shows the login prompt after you connect.
Note: The first boot is slow. It might take 10-15 minutes before the login prompt shows up. There won't be debug text. Be patient.
- Alternatively, you can use a USB-OTG cable, a mini-HDMI to HDMI adapter and a USB keyboard to connect to the Pi Zero directly (for typing).
Later versions of ezpi4me might do everything automatically for you without requiring you to type, however I would rather have you to see and control the process now.
Connect the chip on the "target" to the SOIC clip. Make sure leg #1 matches :)
Log in with username pi, and password raspberry. Anyway, now you're at the command line.
ezpi4me has the following utilities. Run them in this order:
$ sudo ezpi4me-check-chip  <-- checks if you see the chip
$ sudo ezpi4me-rom-backup  <-- backs up the current ROM from the chip
$ sudo ezpi4me-rom-clean   <-- cleans the ME from the ROM
$ sudo ezpi4me-rom-reflash <-- flashes it back to the chip
After you ran those commands, the "target" computer will be free of Intel ME.

Chromebooks have UEFI builds by MrChromebox
After you have flashed his firmware, you won't be able to boot stock ChromeOS anymore, but Linux and Windows (and possibly macOS, in the future) will.
There are several ways to do it. You can either do it the long-way: Follow his intructions to have the UEFI firmware installed (do the write protection screw thing), then run ezpi4me route: do the backup-clean-reflash.
You can take the shortcut: Go to MrChromebox.tech's ChromeOS firmware scripts repo,
then look for your full-rom URL=fullrom_source+coreboot_uefi_yourdev.
For example, for Dell Chromebook 13 (lulu) it is:
https://www.mrchromebox.tech/files/firmware/full_rom/coreboot_tiano-lulu-mrchromebox_20180204.rom
After download the file,
- rename it to
coreboot.bin, - put it in the
corebootfolder in ezpi4me, - run the
make-ezpi4me.shscript, - boot the pi, and
- do the backup-clean-reflash routine.
- Why can't I just flash the cleaned UEFI firmware directly on the same laptop?
The region of the Intel ME is protected, it does not allow anything to write over itself on the same computer. You have to have an external programmer.
- Why does anyone want to neuter the Intel ME?
It is often a matter of principles.
Why does anyone run GNU/Linux instead of Windows 10?
- Do I have to use coreboot?
No. Even if you use your computer's default firmware, it should work.
In the case of Chromebook it just means that you'll run ChromeOS without Intel ME. On ChromeOS, you can't check to make sure that the ME is actually gone without root/developer access and a chroot.
- How do I know my computer is free of Intel ME after I've done this?
On Linux: Clone the coreboot repository, then compile the intelmetool and run it.
On Windows: You don't see the Intel ME controller in Device Manager no more.
- Where is the flash chip?
It often has 8 legs, but you'll have to search online to see where the chip is located on your machine model.
If it helps, mine looks like this.

- How do I know my chip is 3.3V?
Look at the markings of the chip, then Google chip_name + datasheet. If you have a Winbond W25Q64.V chip, it is sure to be 3.3V.
In general, the generation of your CPU decides whether it is 1.8 or 3.3V
According to MrChromebox: "SNB/IVB/HSW/BDW all use 3.3V. BYT/BSW/(SKL?) use 1.8V."
- Do I need to disconnect the laptop battery when I flash the firmware?
You really should. But sometimes I forgot to do it and it didn't hurt the machine.
- How do I know what's the pin 1 on the SOIC clip?
It doesn't matter, you select any corner and mark it. Then it's your pin 1.
- I saw the black SOIC clips on sale on eBay/Aliexpress for a much cheaper price. Should I buy one?
Be mindful of the pitch of the clip legs. Some are not 0.1 inch and it will be a pain to deal with. The Pomona (blue) clips always have 0.1 inch pitch.
- What do I do if I have a 1.8V chip?
I don't know. Use a level shifter. I might be able to get a circuit board working in the future... That's in the todo list. But you'd have to have additional hardware.
.
Chromebook-specifics
- Do I have to locate and unfasten the write-protect screw?
No. The Pi talks to the chip directly, it doesn't care if the write-protect screw is fastened or not.
- Should I leave the write-protect screw unfastened?
It's your choice. However, if you leave it unfastened, anything that has root access can write over your UEFI firmware. I leave it fastened.
-
Code & knowledge: me-cleaner, MrChromebox, Coreboot, John Lewis, /r/chrultrabook.
-
My personal thanks to Don Bindner for chroot, ideas and linux discussions in general, vnhacker for encouragements, bunnie for advice and support, chrunchyjesus for proofreading and formatting the readme.
Have questions? Create an issue on Github.
Comments? Go to my blog.