![]()
A Spark AR effect for music lovers to learn, practise & perform beatboxing in a whole new way !
In this step-by-step tutorial, you will be creating a Spark AR effect which gamifies the whole beatboxing experience. Users score points & unlock new levels by beatboxing the right sounds. The effect enables beatboxers to showcase their skills like never before. You can see the effect in action using this link Shockwave Demo Video.
By the end of the tutorial, you will be familiar with using:
-
Audio Analyzer patch and Script to split microphone audio into bands and differentiate sounds.
-
Shaders patches to transform Camera Texture & Materials based on signals from Audio Analyzer.
-
Native UI Picker items as levels to gamify the effect.
-
JSON data to indicate sounds and create new levels for the effect.
-
Dynamic Instantiation to recycle and reuse scene objects.
-
SDF Textures to mimic Spot Lights.
The effect can recognize following sounds:
| # | Name | Equivalent Beatbox Sound | Denoted By | 3D Object | Prominent Band | Color |
|---|---|---|---|---|---|---|
| 1 | Kick Drum | Listen | k | Cube | band1 | #ff55ff |
| 2 | Snare | Listen | s | Tetrahedron | band4 | #aaff00 |
| 3 | Hi-Hat | Listen | h | Cylinder | band7 | #55ffff |
| 4 | Water Drop (Beta) | Listen | wd | Droplet | band2 | #0055ff |
- Prerequisites
- Downloading the project
- Understanding the Assets
- Creating Layers & Scene Elements
- Bridging Patch Editor & Script
- Scripting
- Patch Editor
- Next Steps
Following is an Advanced tutorial for Spark AR Creators who have some experience in building complex effects. Please familiarize yourself with the following concepts before proceeding.
To follow this tutorial, download sample content and open the unfinished effect in Spark AR Studio v102 and above. All the required assets have already been imported to help you get started.
All patch assets other than Circle & Custom Ripple Animation, have been imported from Spark AR Library.
| # | Name | Patch Image | Sample Output |
|---|---|---|---|
| 1 | 4 Colors Gradient |  |
 |
| 2 | Circle |  |
 |
| 3 | Adjust Colors |  |
 |
| 4 | Custom Ripple Animation |  |
 |
| 5 | Grid |  |
 |
| 6 | RGB Shift Shader |  |
 |
The effect uses the following 4 Blocks each representing a particular sound.
| # | Name | Sound | Image |
|---|---|---|---|
| 1 | cubeBlock | Kick Drum |  |
| 2 | cylinderBlock | Snare |  |
| 3 | tetrahedronBlock | Hi-Hat |  |
| 4 | waterDropBlock | Water Drop (Beta) |  |
All block send & receive the following inputs & output respectively.
- z-position (Number) : Blocks use this to animate 3D object along z-axis.
- hit (Boolean) : Used to trigger hit animation, change materials & visibility of items.
- z-position (Number) : To determine the current position of the 3D object in the z-axis at any given instance.
| Textures | Usage |
|---|---|
 |
lock is used in Native UI picker to denote levels which are yet to be unlocked by the user. |
 |
l1 to l7 are used as items in Native UI picker to denote levels unlocked by the user. |
| cameraTexture is transformed using Shaders patches based on audio signals. | |
 |
dot is used by scoreBackgroundMaterial to create circular background. |
 |
hit is used by Plane objects to indicate that a Block was hit. |
Audio files are categorised into:
- Instruction Audio: Used to guide users.(level1Intro.m4a,level2Intro.m4a,level3Intro.m4a,level6Intro.m4a)
- Level Audio: Background music played for each level.(level1Music.m4a,level2Music.m4a,level4Music.m4a,level5Music.m4a,level6Music.m4a,level7Music.m4a),
- Level Unlock Audio: Played when user unlocks a level. levelUnlocked.m4a
unlockAudioPlaybackController is used to play levelUnlocked.m4a from script.
A total of three layers are used to render objects in the scene.

Go to Layers panel, create three layers and rename them to topLayer, middleLayer & bottomLayer. Make sure layers are arranged in the same order as shown in the image.

-
In the Scene panel, create a new Face Tracker object, call it faceTracker.
-
Right-click on the faceTracker object > Add > Choose Null Object from the list and call it scoreContainer.
-
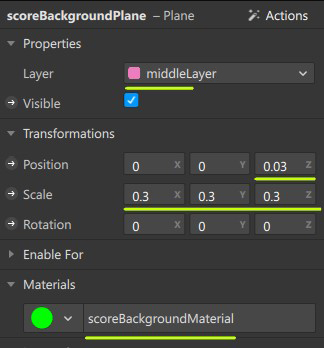
Right-click on the scoreContainer object > Add > Choose Plane from the list and call it scoreBackgroundPlane.
-
Update properties of scoreBackgroundPlane to:
-
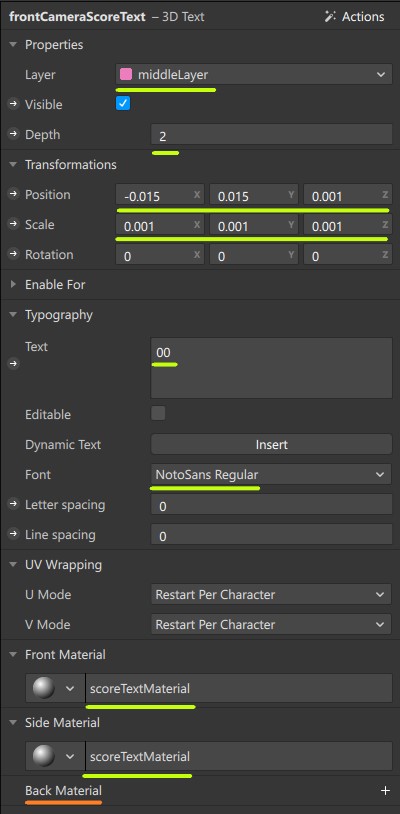
In the Scene panel, Right-click on the scoreBackgroundPlane object > Add > Choose 3D Text from the list and call it frontCameraScoreText.
-
Update properties of frontCameraScoreText to:
-
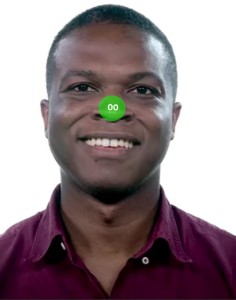
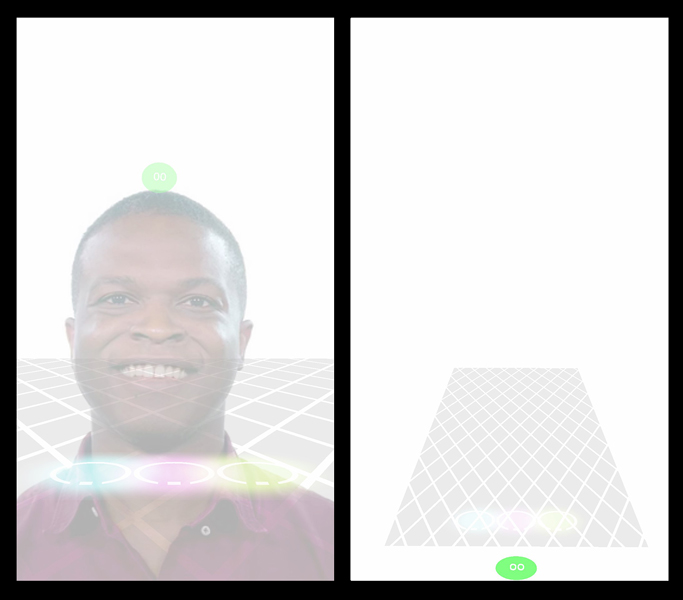
Select the faceTracker object and change its Layer to middleLayer in the Inspector. Proceed by selecting Add Object and Children. At this point, your project will look like this:


The Score is currently positioned at the center of the screen. Using patches, it will be made to float on top of user's head. But before that, let's understand how patches are organised in the project.
You will notice 6 Comment Patches of different color in the Patch Editor. They are patches are used to organize patches into different categories.

| # | Name | Color | Content |
|---|---|---|---|
| 1 | Signal Senders | Blue | All Sender patches,Variables From Script patchSignal Senders and Camera patch |
| 2 | Level Music | Orange | Patches required to play Level Audio |
| 3 | Level Introduction | Purple | Patches required to play Instruction Audio |
| 4 | Microphone Audio | Red | Patches required to split microphone audio into bands and boost frequencies |
| 5 | Triggered | Yellow | Patches required to transform Camera Texture & Materials based on Microphone Audio |
| 6 | Normal | Green | Patches required to position and transform Scene elements |
Make sure all the patches created in this section are placed inside the green Normal Comment Patch unless specified otherwise.
Now let's make the Score float on top of user's head.
-
Select scoreContainer, go to Inspector and click on Actions.
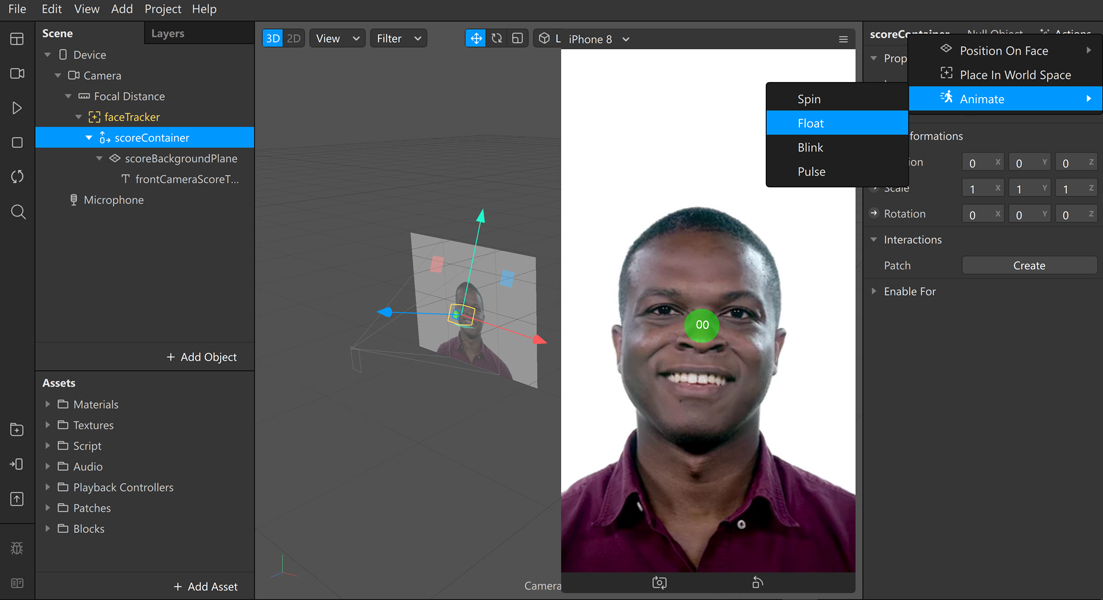
-
From the dropdown, select Animate > Float. This will open up the Patch Editor and automatically create patches required to make the scoreContainer float.
-
Edit values of Transition Patch to reduce the range of motion of scoreContainer.
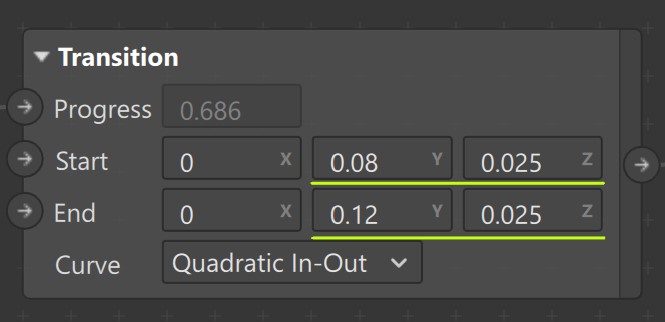


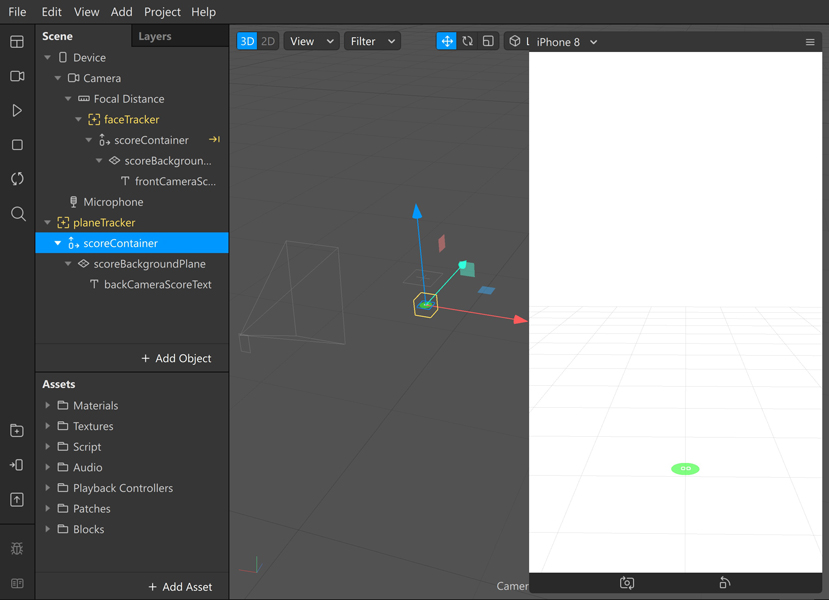
-
In the Scene panel, create a new Plane Tracker object, call it planeTracker.
-
As of now, the class name required to dynamically instantiate 3D Text is not known so we will duplicate it. Right-click on the scoreContainer object & select Duplicate from the list. This will create scoreContainer0.
-
Drag & Drop scoreContainer0 into planeTracker and rename it to scoreContainer. Select frontCameraScoreText and rename it to backCameraScoreText.
-
Update scoreContainer properties to :
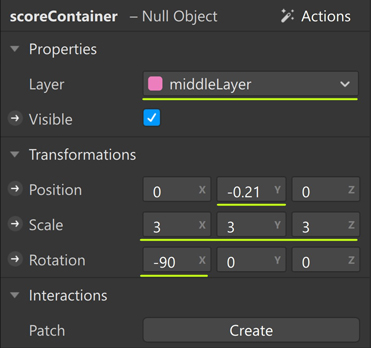
-
Feel free to position scoreBackgroundPlane anywhere in the world space.

The flat horizontal surface on which objects slide is called Grid Plane.
-
Under Focal Distance, create a new Null Object object and call it frontCameraPlatform.
-
Update properties of frontCameraPlatform to:
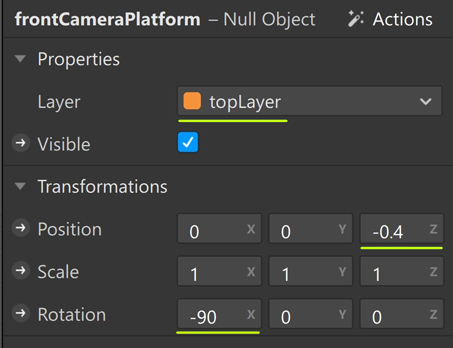
-
Duplicate frontCameraPlatform object, Drag & Drop it into planeTracker and rename it to backCameraPlatform.

Using Script we will,
- Dynamically instantiate gridPlane object & import gridMaterial
- Update properties & material of gridPlane.
- Import frontCameraPlatform & backCameraPlatform as Scene Objects.
- Make gridPlane a child of frontCameraPlatform or backCameraPlatform.
Add Scripting Dynamic Instantiation capability to your project & switch to code editor.
const Scene = require('Scene'); // To import Scene Elements
const Materials = require('Materials'); // To import Materials
const CameraInfo = require('CameraInfo'); // To determine whether the user is using front/back camera

(async function () {

    //==============================================================================
    // Dynamically Instantiating Objects + Importing corresponding Materials & Scene objects.
    //==============================================================================

    const [gridPlane, cameraPlatformItems, gridMaterial, frontCameraPlatform, backCameraPlatform, frontCameraScoreText, backCameraScoreText] = await Promise.all([

        Scene.create("Plane", {
            "name": "gridPlane",
        }),

        //cameraPlatformItems will be used to group all the dynamically instantiated object.
        Scene.create("SceneObject", {
            "name": "cameraPlatformItems",
        }),

        Materials.findFirst("gridMaterial"),

        Scene.root.findFirst('frontCameraPlatform'),
        Scene.root.findFirst('backCameraPlatform'),

        Scene.root.findFirst('frontCameraScoreText'),
        Scene.root.findFirst('backCameraScoreText'),

    ]);

    //To determine whether the user is using front/back camera at any given point.
    var frontCamera = false;

    //Stores the status of Dynamic Instantiation of objects.
    var instantiated = false;

    //scoreText will hold reference to frontCameraScoreText/backCameraScoreText
    var scoreText = frontCameraScoreText;

    //==============================================================================
    // Monitor whether the user is using front/back camera
    //==============================================================================

    CameraInfo.captureDevicePosition.monitor({ fireOnInitialValue: true }).subscribe(function (event) {

        //Set value of frontCamera
        (event.newValue == "FRONT") ? frontCamera = true : frontCamera = false;

        //Remove cameraPlatformItems from it's previous parent(frontCameraPlatform/backCameraPlatform)
        instantiated?cameraPlatformItems.removeFromParent():"";

        //Update reference stored in scoreText based on the value of frontCamera
        frontCamera ? scoreText = frontCameraScoreText : scoreText = backCameraScoreText ;

        //Add cameraPlatformItems as child of frontCameraPlatform / backCameraPlatform based on the value of frontCamera
        frontCamera ? frontCameraPlatform.addChild(cameraPlatformItems) : backCameraPlatform.addChild(cameraPlatformItems)

        // (Optional) Update properties of gridPlane based on the value of frontCamera.
        frontCamera ? gridPlane.transform.y = 0.1 : gridPlane.transform.y = 0.5;
        frontCamera ? gridPlane.transform.scaleX = 12 : gridPlane.transform.scaleX = 6;
        frontCamera ? gridPlane.transform.scaleY = 24 : gridPlane.transform.scaleY = 16;

        //Check if the objects were not instantiated before
        if (!instantiated) {

            //set instantiated to true so that we don't have to instantiate again.
            instantiated = true;

            //Set properties & material of gridPlane
            gridPlane.transform.z = -0.22;
            gridPlane.transform.scaleZ = 1;
            gridPlane.material = gridMaterial;

            //Add all the instantiated objects as a children of cameraPlatformItems
            cameraPlatformItems.addChild(gridPlane);


        }

    });

})();
At this point, your project will look like this:

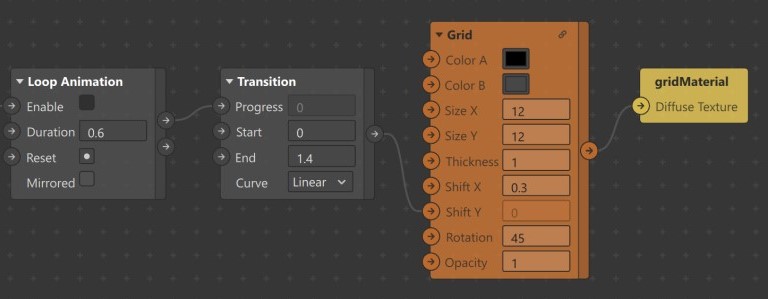
Let's generate grid pattern, animate and assign it as texture to gridMaterial.
-
Locate the Grid patch in the Assets panel. Drag and Drop it inside the Patch Editor.
-
Edit values of Grid patch, Set
- Color A to #000000
- Color B to #000000, also set value of Alpha Channel to 0
- Size X & Size Y to 12
- Shift X to 0.3
- Rotation to 45
-
Connect Grid patch output to Diffuse Texture of gridMaterial patch. Grid pattern will now be visible on simulator.
-
Create a Loop Animation patch and a Transition patch to animate Grid pattern.
-
Set End value of Transition patch to 1.4
-
Reduce Duration of Loop Animation patch to 0.6.
-
Connect
- Progress output of Loop Animation patch to Progress input of Transition patch.
- Output of Transition patch to Shift Y port of Grid patch.
-
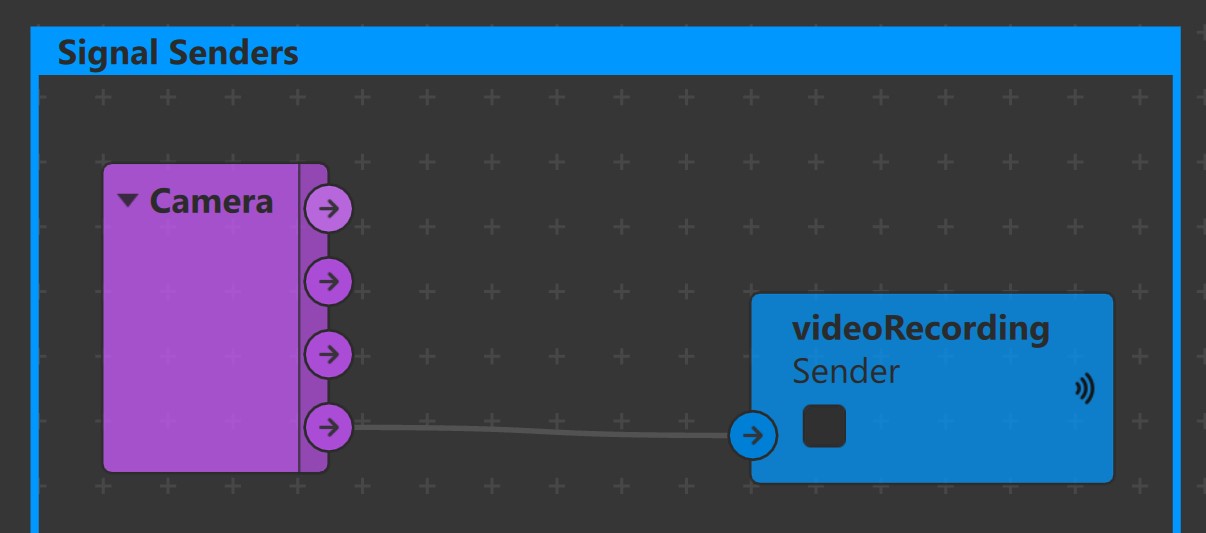
Next, we need logic to enable/disable Grid Animation, as and when user starts/stops recording video.
-
In the Scene panel, select Camera object, drag and drop it inside the Patch Editor to create Camera patch. Make sure it is placed inside the blue Signal Senders Comment patch.
-
Create a new Sender patch and call it videoRecording. Connect Video Recording output of Camera patch to input of videoRecording Sender patch.
-
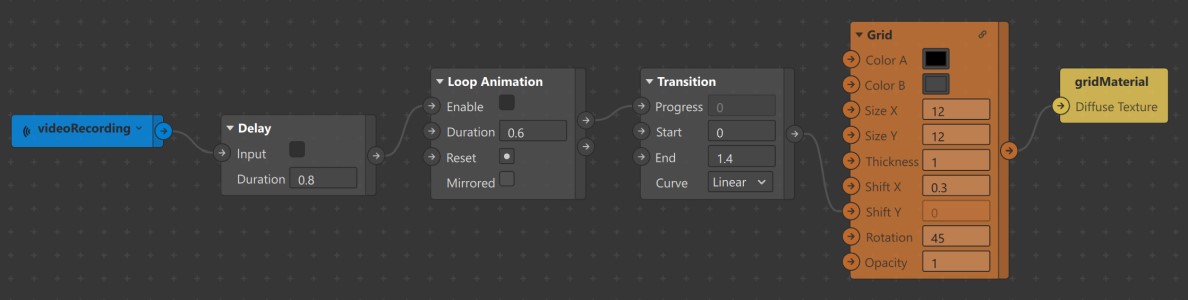
Use a Receiver patch to receive videoRecording signal and connect it to Enable input port of Loop Animation patch.
-
Use a Delay patch to enable Grid Animation after a delay 0.8 seconds from the time user starts recording video.


Circles indicate special locations on the gridPlane. When a 3D object passes over any of these locations, user has to perform the corressponding beatboxing sound to hit the object and score a point.

We will follow the same procedure discussed in the previous step to instantiate kickDrumHitCircle, hiHatHitCircle & snareHitCircle and add them as children of frontCameraPlatform/ backCameraPlatform.
/* ... Truncated Imported Modules */

(async function () {

    //=========================================================================================
    // Dynamically Instantiating Objects + Importing corresponding Materials & Scene objects.
    //=========================================================================================

    const [gridPlane, kickDrumHitCircle, hiHatHitCircle, snareHitCircle, cameraPlatformItems, gridMaterial, circleMaterial, frontCameraPlatform, backCameraPlatform, frontCameraScoreText, backCameraScoreText] = await Promise.all([

        /* ... Truncated Code */

         Scene.create("Plane", {
            "name": "kickDrumHitCircle",
        }),

        Scene.create("Plane", {
            "name": "hiHatHitCircle",
        }),

        Scene.create("Plane", {
            "name": "snareHitCircle",
        }),

        /* ... Truncated Code */

        Materials.findFirst("circleMaterial"),

        /* ... Truncated Code */

    ]);

    /* ... Truncated Code */

    //==============================================================================
    // Monitor whether the user is using front/back camera
    //==============================================================================

    CameraInfo.captureDevicePosition.monitor({ fireOnInitialValue: true }).subscribe(function (event) {

        /* ... Truncated Code */

        //Check if the objects were not instantiated before
        if (!instantiated) {

            /* ... Truncated Code */

            //Set properties & material of kickDrumHitCircle, hiHatHitCircle, snareHitCircle
            kickDrumHitCircle.transform.y = -0.2;
            kickDrumHitCircle.transform.z = -0.21;
            kickDrumHitCircle.transform.scaleX = 1.8;
            kickDrumHitCircle.transform.scaleY = 1.8;
            kickDrumHitCircle.transform.scaleZ = 1.8;
            kickDrumHitCircle.material = circleMaterial;

            hiHatHitCircle.transform.x = -0.1;
            hiHatHitCircle.transform.y = -0.2;
            hiHatHitCircle.transform.z = -0.21;
            hiHatHitCircle.transform.scaleX = 1.8;
            hiHatHitCircle.transform.scaleY = 1.8;
            hiHatHitCircle.transform.scaleZ = 1.8;
            hiHatHitCircle.material = circleMaterial;

            snareHitCircle.transform.x = 0.1;
            snareHitCircle.transform.y = -0.2;
            snareHitCircle.transform.z = -0.21;
            snareHitCircle.transform.scaleX = 1.8;
            snareHitCircle.transform.scaleY = 1.8;
            snareHitCircle.transform.scaleZ = 1.8;
            snareHitCircle.material = circleMaterial;

            //Add all the instantiated objects as a children of cameraPlatformItems

             /* ... Truncated Code */

            cameraPlatformItems.addChild(kickDrumHitCircle);
            cameraPlatformItems.addChild(hiHatHitCircle);
            cameraPlatformItems.addChild(snareHitCircle);

        }

    });

})();
At this point, your project will look like this:

Next, generate circle texture and assign it to circleMaterial.
-
Locate Circle patch in the Assets panel. Drag and Drop it inside the Patch Editor.
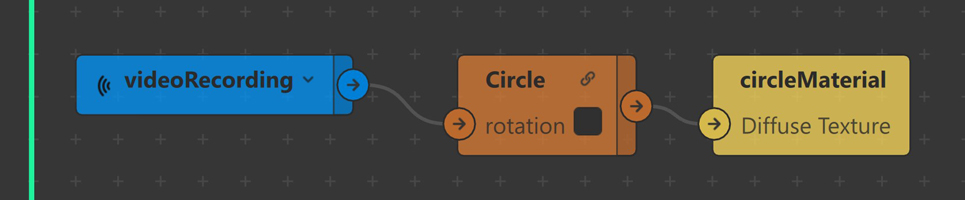
-
Connect output of Circle patch to the Diffuse Texture port of circleMaterial patch. Circle pattern will now be visible in the simulator.
-
Animate circles to rotate in Y axis as soon as the user starts recording video. For this, use videoRecording Receiver patch from the previous section. Connect the output of videoRecording Receiver patch to the rotation input port of Circle patch.


The effect uses,
- Point Light
- Directional Light
- SDF Textures to mimic 3 Spot Lights.
Let's begin by adding Point Light & Directional Light to the scene.
-
In the Scene panel, create a new Point Light object and call it pointLight.
-
Update properties of pointLight to:
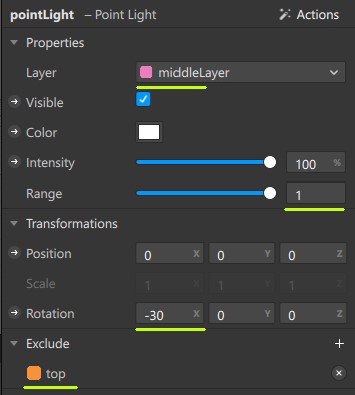
-
Create a new Directional Light object and call it directionalLight.
-
Update properties of directionalLight to

-
Select pointLight, directionalLight and change its Layer to middleLayer in the Inspector


We want the circles present on the gridPlane to glow. To acheive this, we will use Plane objects with SDF Textures applied to them.
We will instantiate three Plane objects called kickDrumHitCircleGlow, hiHatHitCircleGlowMaterial & snareHitCircleGlowMaterial and add them as children of frontCameraPlatform/ backCameraPlatform.
/* ... Truncated Imported Modules */

(async function () {

    //=========================================================================================
    // Dynamically Instantiating Objects + Importing corresponding Materials & Scene objects.
    //=========================================================================================

    const [gridPlane, kickDrumHitCircle, hiHatHitCircle, snareHitCircle, kickDrumHitCircleGlow, hiHatHitCircleGlow, snareHitCircleGlow, cameraPlatformItems, gridMaterial, circleMaterial, hiHatHitCircleGlowMaterial, snareHitCircleGlowMaterial, kickDrumCircleGlowMaterial, frontCameraPlatform, backCameraPlatform, frontCameraScoreText, backCameraScoreText ] = await Promise.all([

        /* ... Truncated Code */

        Scene.create("Plane", {
            "name": "kickDrumHitCircleGlow",
        }),

        Scene.create("Plane", {
            "name": "hiHatHitCircleGlow",
        }),

        Scene.create("Plane", {
            "name": "snareHitCircleGlow",

        }),

        /* ... Truncated Code */

        Materials.findFirst("hiHatHitCircleGlowMaterial"),
        Materials.findFirst("snareHitCircleGlowMaterial"),
        Materials.findFirst("kickDrumCircleGlowMaterial"),

        /* ... Truncated Code */

    ]);

    /* ... Truncated Code */

    //==============================================================================
    // Monitor whether the user is using front/back camera
    //==============================================================================

    CameraInfo.captureDevicePosition.monitor({ fireOnInitialValue: true }).subscribe(function (event) {

        /* ... Truncated Code */

        //Check if the objects were not instantiated before
        if (!instantiated) {

            /* ... Truncated Code */

            //Set properties & material of kickDrumHitCircleGlow, hiHatHitCircleGlow, snareHitCircleGlow
            kickDrumHitCircleGlow.transform.x = 0;
            kickDrumHitCircleGlow.transform.y = -0.2;
            kickDrumHitCircleGlow.transform.z = -0.21;
            kickDrumHitCircleGlow.transform.scaleX = 2;
            kickDrumHitCircleGlow.transform.scaleY = 2;
            kickDrumHitCircleGlow.transform.scaleZ = 2;
            kickDrumHitCircleGlow.material = kickDrumCircleGlowMaterial;

            hiHatHitCircleGlow.transform.x = -0.09;
            hiHatHitCircleGlow.transform.y = -0.2;
            hiHatHitCircleGlow.transform.z = -0.21;
            hiHatHitCircleGlow.transform.scaleX = 2;
            hiHatHitCircleGlow.transform.scaleY = 2;
            hiHatHitCircleGlow.transform.scaleZ = 2;
            hiHatHitCircleGlow.material = hiHatHitCircleGlowMaterial;

            snareHitCircleGlow.transform.x = 0.09;
            snareHitCircleGlow.transform.y = -0.2;
            snareHitCircleGlow.transform.z = -0.21;
            snareHitCircleGlow.transform.scaleX = 2;
            snareHitCircleGlow.transform.scaleY = 2;
            snareHitCircleGlow.transform.scaleZ = 2;
            snareHitCircleGlow.material = snareHitCircleGlowMaterial;

            //Add all the instantiated objects as a children of cameraPlatformItems

             /* ... Truncated Code */

            cameraPlatformItems.addChild(kickDrumHitCircleGlow);
            cameraPlatformItems.addChild(hiHatHitCircleGlow);
            cameraPlatformItems.addChild(snareHitCircleGlow);

        }

    });

})();
At this point, your project will look like this:

Next, let's generate SDF Textures.
-
Create a SDF Circle patch & Smooth Step patch.
-
Update properties of Smooth Step patch. Set,
- Edge Min to 0.4
- Edge Max to 0
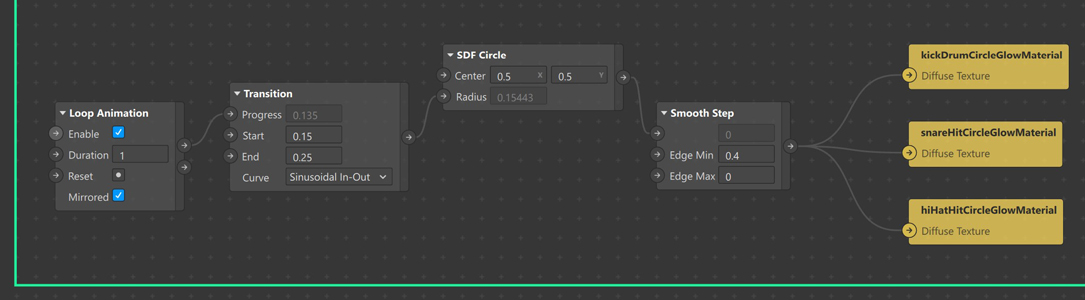
-
Connect,
- Output of SDF Circle patch to first port of Smooth Step patch.
- Output of Smooth Step patch to Diffuse Texture of kickDrumCircleGlowMaterial, hiHatHitCircleGlowMaterial, snareHitCircleGlowMaterial.
-
Create a Loop Animation patch and a Transition patch to animate Radius of SDF Circle
-
Edit values of Transition patch
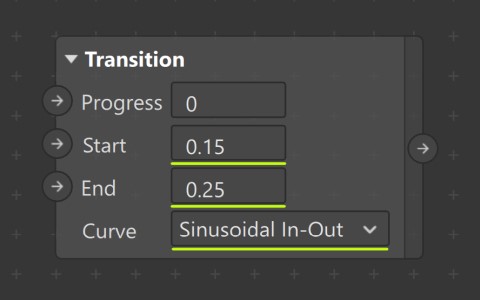
-
Connect
- Progress output of Loop Animation patch to Progress input of Transition patch.
- Output port of Transition patch to Radius port of SDF Circle patch.


At this point, your project will look like this:


The effect uses two Particle Systems to create Confetti. They are triggered from script as soon as the user unlocks a level.
-
Create two new Particle Systems objects and rename them to confettiYellow and confettiGreen.
-
In the Inspector, Set confettiYellowMaterial and confettiGreenMaterial as materials for confettiYellow and confettiGreen respectively.
-
There are several ways of configuring the Particle Systems. You can proceed with the values provided below or experiment with your own values.
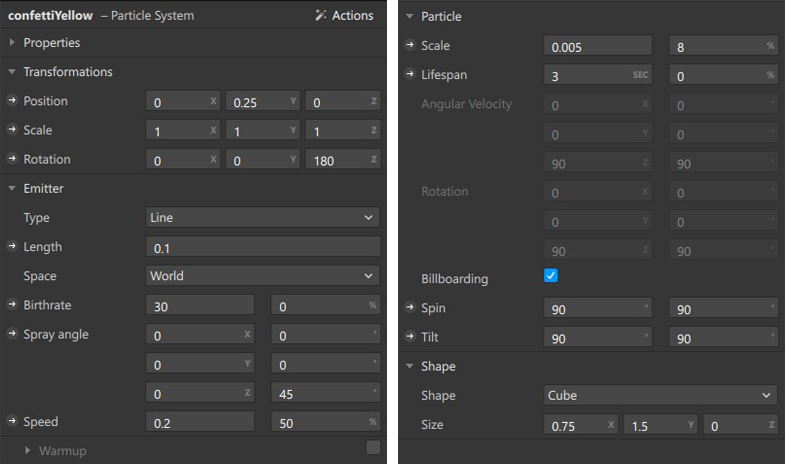
-
Once you are satisfied with the configuration of Particle Systems, set Birthrate to 0 so that it can be triggered from script as soon as user unlocks a level.

The effect uses 4 Speaker objects.
| # | Name | Usage | Source | Controlled by |
|---|---|---|---|
| 1 | userSpeaker | Playing Microphone audio | Patches |
| 2 | unlockSpeaker | Playing Level Unlock audio | unlockAudioPlaybackController through Script |
| 3 | levelMusicSpeaker | Playing Level audio | Patches |
| 4 | levelIntroSpeaker | Playing Instruction audio | Patches |
-
In the Scene panel, create a new Null Object object & call it speakers.
-
Right-click on speakers object > Add > Choose Speaker from the list. Repeat this step until you have 4 Speaker objects in total.
-
Rename Speaker objects to userSpeaker, unlockSpeaker, levelMusicSpeaker & levelIntroSpeaker.
-
With the unlockSpeaker selected, In the Inspector, change the Audio source to unlockAudioPlaybackController.
-
Audio source for the remaining speakers will be provided using patches in the next section.

-
In the Scene panel, create a new Canvas object & call it canvas.
-
Select canvas object and change its Layer to middleLayer in the Inspector.
-
Right-click on canvas object > Add > Choose Rectangle from the list. Repeat this step once again.
-
Rename Rectangle objects to progressBarRectangle & userRectangle.
-
Update properties of progressBarRectangle to:
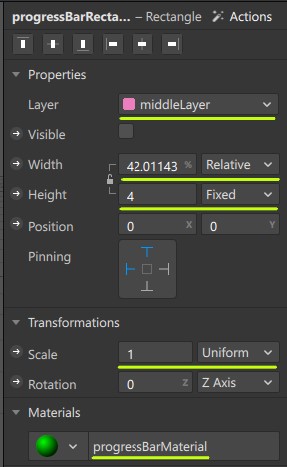
-
Uncheck the Visible property of progressBarRectangle so that it can be controlled from script.
-
Update properties of userRectangle to:
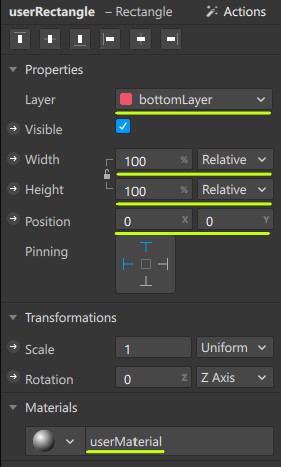


At this point, you may not notice any difference in the effect with or without the userRectangle. This is because, cameraTexture has been assigned as Texture of userMaterial. Using patches, we will be performing color manipulations to cameraTexture in the next section.

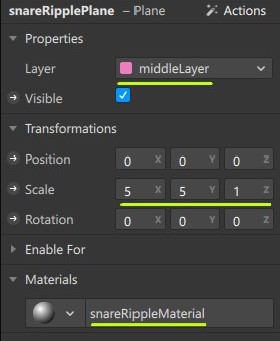
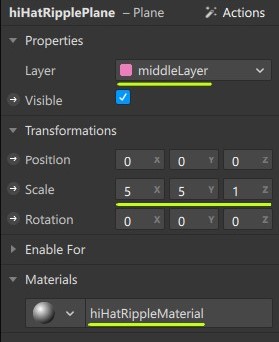
Ripple Planes consists of three Plane objects called kickDrumRipplePlane, snareRipplePlane & hiHatRipplePlane.
-
In the Scene panel, create a new Null Object object & call it ripplePlanes.
-
Right-click on ripplePlanes object > Add > Choose Plane from the list. Repeat this step thrice.
-
Rename Rectangle objects to kickDrumRipplePlane, snareRipplePlane, hiHatRipplePlane & waterDropRippleMaterial .
-
Update properties of kickDrumRipplePlane, snareRipplePlane, hiHatRipplePlane & waterDropRippleMaterial to:
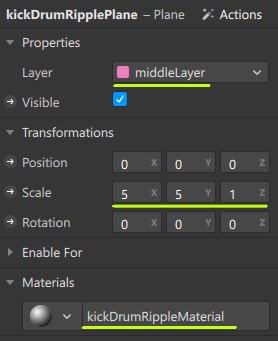
-
In the Inspector, Set kickDrumRippleMaterial, snareRippleMaterial and hiHatRippleMaterial as materials for kickDrumRipplePlane, snareRipplePlane & hiHatRipplePlane respectively. We will be assigning Textures to these material in the next section. At this point, your project will look like this:


Variables to Script :
We will be passing two types of variables from Patch Editor to Script.
-
recording is a Boolean variable that indicates whether the user has started recording video or not.
-
band1, band2, band4, band7 are a Number variables used to determine the Signal Power of Kick Drum, Snare & Hi-Hat present in Microphone Audio. Signals will be assigned to these variables in the next section.
Select Script file in the Assets Panel and create the following variables in the Inspector Panel.

Variables from Script :
Following variables received from Script.
| # | Name | Type | Purpose |
|---|---|---|---|
| 1 | currentLevel | Number | Indicates the current level the user has selected from the Native UI Picker |
| 2 | soundType | Number | Indicates the type of sound (KICK: 0, SNARE: 1, HIHAT: 2) detected in the Microphone Audio |
| 3 | rippleStatus | Boolean | Used to enable/disable Custom Ripple Animation patch. Value becomes true whenever a sound (KICK, SNARE, HIHAT) detected in the Microphone Audio exceeds the threshold value |
| 4 | playIntroChange | Boolean | Negated whenever the user selects a different level using the Native UI Picker. This variable will be used to trigeer the controller that plays Level Audio Instruction |
| 5 | levelPlayable | Boolean | Indicates whether the user has unlocked the level that is currently selected on the Native UI Picker |
Select Script file in the Assets Panel and create the following variables in the Inspector Panel.


-
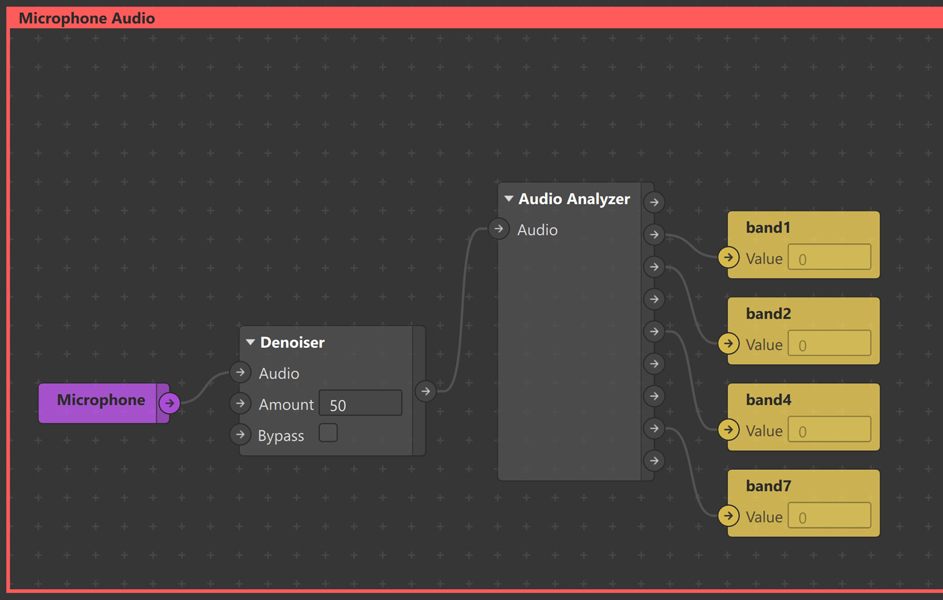
From the Scene Panel, drag and drop the Microphone object into the Patch Editor and place it inside the red Microphone Audio Comment Patch.
-
Use a Denoiser patch to reduce background noise. Set the Amount value to 50.
-
Next, connect output of Denoiser to a Audio Analyzer patch. Obtain Signal Power of Band 1, Band 2, Band 4 & Band 7 and pass them as Variables To Script.
-
Connect Audio output from Audio Analyzer patch to Audio input of Parametric Equailizer patch.
-
Set values of Parametric Equailizer patch to the following. This will boost bass frequencies of the Microphone audio without altering the treble frequencies.
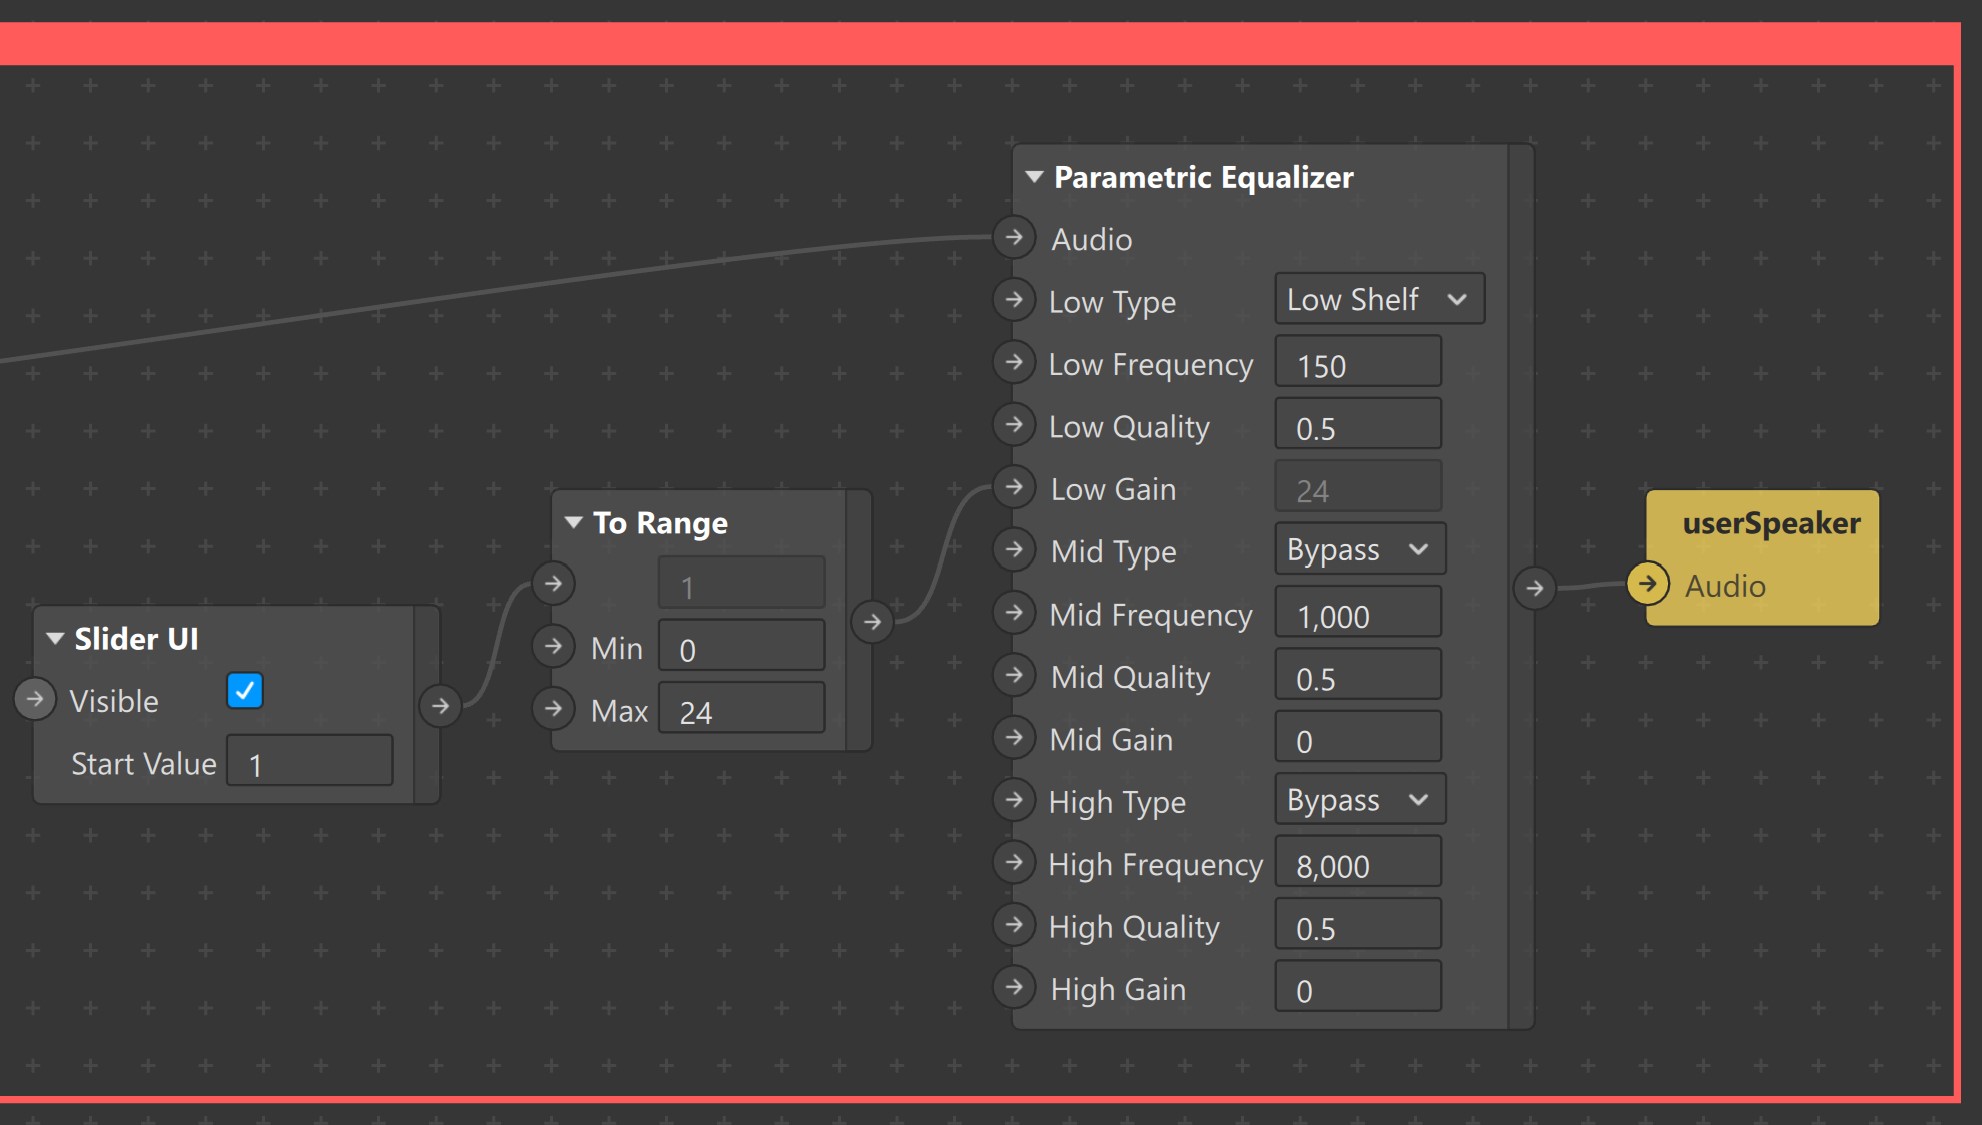
-
Add Slider UI patch and a To Range patch to control the amount of Low Gain between 0 to 24. This will allow user to decide the amount of bass boost from the Native UI slider
-
Connect output of Parametric Equailizer to Audio input of userSpeaker patch.


Add the following capabilities to your project.
-
Native UI Picker under Native UI Control.
-
Persistence (Add data to Whitelisted keys).
// Import all the required modules.

const Time = require('Time'); // To keep track of Time and trigger animations accordingly
const Audio = require('Audio'); // To play Level Unlock Audio
const Scene = require('Scene'); // To import Scene Elements
const Blocks = require('Blocks'); // To instantiate blocks
const Patches = require('Patches'); // To exchange data between to Patch Editor and Script
const NativeUI = require('NativeUI'); // To create Native UI Picker
const Textures = require('Textures'); //  To import textures required by Native UI Picker
const Animation = require('Animation'); // To Animate cubes, cylinders & tetrahedrons
const Materials = require('Materials'); // To import Materials
const Persistence = require('Persistence'); // To store max level unlocked by the user
const Diagnostics = require('Diagnostics'); // To debug code
const CameraInfo = require('CameraInfo'); // To determine whether the user is using front/back camera

(async function () {

/* ... Truncated Dynamically Instantiating Objects + Importing corresponding Materials & Scene objects. */

/* ... Truncated CameraInfo Monitoring Code */

})();
Level JSON
Level JSON is used to configure each level. It's structure is as follows.
- level_X indicates the level number or (index+1) of item selected in Native UI picker. Ex:
"level_1"- duration of the entire level indicated in milli seconds. Ex:
"duration": 38000 - minscoreText indicates the min score user requires to unlock next level. Ex:
"minscoreText": 25 - Time & Sound Letter indicates the instance in time at which the animation of a Block corresponding to the specified Sound Letter should start. Ex:
"1.0": ["k"]
- duration of the entire level indicated in milli seconds. Ex:
{
    "level_1":
    {
        "duration": 38000,
        "minscoreText": 25,
        "1.0": ["k"],
        "2.0": ["k"],
        "3.5": ["h"],
        "5.0": ["k"]
    },
    "level_2":
    {
        "duration": 29000,
        "minscoreText": 22,
        "1.0": ["k"],
        "1.7": ["k"],
        "2.0": ["s"],
        "3.0": ["k"],
        "3.7": ["k"],
        "4.0": ["s"],
        "5.0": ["k"]
    }
}
JSON data can be stored in the same script.js file or externally in different .js file which can be imported into script.js using const levelJson = require("./filename");
To add a new level, modify Level JSON and configuration of Native UI Picker.
Before proceeding to the next step, let's create containers to hold the Models(Blocks).
-
In the Scene panel, create a new Null Object object & call it frontCameraModelContainer.
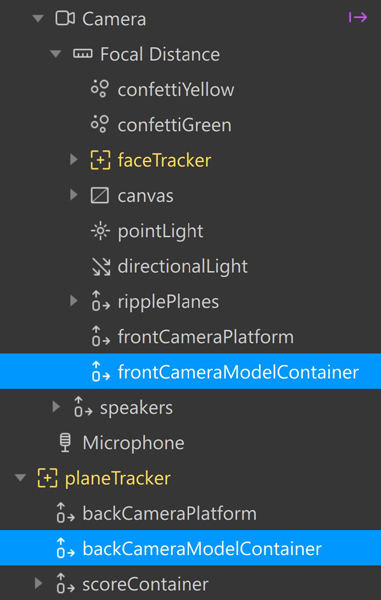
-
Repeat the previous step and create a Null Object object under Plane Tracker and call it backCameraModelContainer
-
Select both frontCameraModelContainer & backCameraModelContainer and change their Layer to middleLayer in the Inspector.

Use Promise inside the Asynchronous function to import all the required Scene objects, Textures, AudioPlaybackController, Materials and Variables passed from Patch Editor. Assign them to array of variables.
/* ... Truncated Imported Modules */

(async function () {

    /* ... Truncated Dynamically Instantiating Objects + Importing corresponding Materials & Scene objects. */

    //===============================================================================================================================
    // Import all the required Scene objects, Textures, AudioPlaybackController and Variables passed from Patch Editor
    //===============================================================================================================================

    const [band1, band2, band4, band7, frontCameraModelContainer, backCameraModelContainer, l1, l2, l3, l4, l5, l6, l7, lockTexture, recording, progressBarRectangle, confettiYellow, confettiGreen, unlockAudioPlaybackController] = await Promise.all([
        Patches.outputs.getScalar("band1"),
        Patches.outputs.getScalar("band2"),
        Patches.outputs.getScalar("band4"),
        Patches.outputs.getScalar("band7"),
        Scene.root.findFirst('frontCameraModelContainer'),
        Scene.root.findFirst('backCameraModelContainer'),
        Textures.findFirst('l1'),
        Textures.findFirst('l2'),
        Textures.findFirst('l3'),
        Textures.findFirst('l4'),
        Textures.findFirst('l5'),
        Textures.findFirst('l6'),
        Textures.findFirst('l7'),
        Textures.findFirst('lockTexture'),
        Patches.outputs.getBoolean("recording"),
        Scene.root.findFirst('progressBarRectangle'),
        Scene.root.findFirst('confettiYellow'),
        Scene.root.findFirst('confettiGreen'),
        Audio.getAudioPlaybackController('unlockAudioPlaybackController'),
    ]);

    /* ... Truncated CameraInfo Monitoring Code */

})(); In this section, you will:
-
Set up the configuration for Native UI Picker.
-
Assign textures to items of picker based on level data from PersistenceModule.
-
Subscribe to selectedIndex property of the picker.
-
Pass values from Script to Patch Editor.
/* ... Truncated Imported Modules */

(async function () {

    /* ... Truncated Promises */

    //==============================================================================
    // Native UI Picker variables
    //==============================================================================

    // Store reference to Native UI Picker
    const picker = NativeUI.picker;

    // Initialize to Level 1
    let currentSelectedIndex = 0;

    let configuration = {
        selectedIndex: 0,
        items: [
            { image_texture: l1 },
            { image_texture: lockTexture },
            { image_texture: lockTexture },
            { image_texture: lockTexture },
            { image_texture: lockTexture },
            { image_texture: lockTexture },
            { image_texture: lockTexture },
        ]
    };

    // Icons of all levels assigned to an array
    let levelIcons = [l1, l2, l3, l4, l5, l6, l7];

    // Negated whenever user selects a new item from Native UI picker
    var playIntroChange = false;

    //==============================================================================
    // Persistence variables
    //==============================================================================

    // Store a reference to the userScope
    const userScope = Persistence.userScope;

    // JavaScript object to store the data
    const data = { level: 0 };

    // Max level unlocked by the user
    var maxLevelUnlocked = 0;

    //==============================================================================
    // Fetch Max Unlocked Level from stored data
    //==============================================================================

    try {

        // Attempt to get the stored data and if successful
        const result = await userScope.get('data');

        // Assign the obtained level data to maxLevelUnlocked
        maxLevelUnlocked = parseInt(result.level.toString());

        // Loop through all the items of Native UI picker and assign respective levelIcons as textures to unlocked levels
        for (let index = 0; index <= result.level; index++) {
            configuration.items[index] = { image_texture: levelIcons[index] };
        }

    } catch (error) {

        // If not successful, then the value of maxLevelUnlocked is its default value which is 0.
        Diagnostics.log('Failed to retrieve data, ' + error);
    }

    // Configure Native UI Picker and display it
    picker.visible = true;
    picker.configure(configuration);

    //==============================================================================
    // Monitor changes to selectedIndex of picker
    //==============================================================================

    picker.selectedIndex.monitor().subscribe(function (selectedIndex) {

        // Value of playIntroChange is negated and sent to the Patch Editor
        playIntroChange = !playIntroChange;
        Patches.inputs.setBoolean("playIntroChange",playIntroChange);

        //Index of newly selected item is assigned
        currentSelectedIndex = selectedIndex.newValue;

        // Value of levelPlayable is determined based on the levels unlocked by the user and sent to the Patch Editor
        Patches.inputs.setBoolean("levelPlayable",currentSelectedIndex <= maxLevelUnlocked?true:false);
    });

    //Changes to index of newly selected item is sent to the Patch Editor
    Patches.inputs.setScalar("currentLevel", picker.selectedIndex);

    /* ... Truncated CameraInfo Monitoring Code */

})();
At this point, your project will look like this:

In this section, you will:
-
Set up Animation Driver variables of Progress Bar.
-
Monitor whether the user has started recording video and based on this
-
Reset Confetti, Score & unlockAudioPlaybackController.
-
Hide Native UI Picker.
-
Initialize ProgressBar Animation Driver & start animation.
-
/* ... Truncated Imported Modules */

(async function () {

    /* ... Truncated Promises & Variable Declaration Code */

    //==============================================================================
    // ProgressBar & Score variables
    //==============================================================================

    // timeDriver to control ProgressBar Animation
    var progressBarRectangleDrivers;

    // durationMilliseconds will be set from level data
    var progressBarRectangleDriverParameters = {
        durationMilliseconds: 0,
        loopCount: 1,
        mirror: false
    };

    var progressBarRectangleSampler;

    // Current score value
    var scoreTextValue = 0;

    /* ... Truncated Native UI Picker & PersistenceModule Code */

    //==============================================================================
    // Monitor whether the user is recording video
    //==============================================================================

    recording.monitor().subscribe(function (recordingEvent, snapshot) {

        // Value of levelPlayable is determined based on the levels unlocked by the user and sent to the Patch Editor
        Patches.inputs.setBoolean("levelPlayable",currentSelectedIndex <= maxLevelUnlocked?true:false);

        //Allow the user to proceed and play if the user has unlocked the selected level
        if( currentSelectedIndex <= maxLevelUnlocked)
        {
            //Allow user to proceed and play if the user has started recording video
            if (recordingEvent.newValue) {

            //==============================================================================
            // Reset UI & AudioPlaybackController
            //==============================================================================

            // Reset Confetti and hide them
            confettiYellow.birthrate = 0;
            confettiGreen.birthrate = 0;
            confettiYellow.hidden = true;
            confettiGreen.hidden = true;

            //Stop playing Level Unlock Music from previous levels
            unlockAudioPlaybackController.setPlaying(false);

            //Hide the Native UI Picker and rest score to 00
            picker.visible = false;
            scoreTextValue = 0;
            scoreText.text = "00";

            //==============================================================================
            // Prepare ProgressBar & start its Animation
            //==============================================================================

            // Configure the duration of progressBar to go from 100 to 0 based on the level
            progressBarRectangleDriverParameters.durationMilliseconds = levelJson["level_" + (currentSelectedIndex+1)].duration;
            progressBarRectangleDrivers = Animation.timeDriver(progressBarRectangleDriverParameters);
            progressBarRectangleSampler = Animation.samplers.linear(100, 0);
            progressBarRectangle.width = Animation.animate(progressBarRectangleDrivers, progressBarRectangleSampler)
            progressBarRectangleDrivers.reset();
            progressBarRectangleDrivers.start();

            //Unhide progressBar
            progressBarRectangle.hidden = false;

            }
        }
    });

   /* ... Truncated CameraInfo Monitoring Code */

})(); In this section, you will:
- Set up Animation Driver variables.
- Declare arrays to store references to cubeBlock, cylinderBlock, tetrahedronBlock & waterDropBlock.
/* ... Truncated Imported Modules */

(async function () {

    /* ... Truncated Promises & Variable Declaration Code */

    //==============================================================================
    // Animation variables of cubeBlock, cylinderBlock, tetrahedronBlock, waterDropBlock
    //==============================================================================

    // Blocks Animation paramters
    const timeDriverParameters = {
        durationMilliseconds: 4000,
        loopCount: 1,
        mirror: false
    };

    // Animate Blocks in Z Axis, starting at -1.8 and ending at 0.15 in 4 seconds
    const linearSampler = Animation.samplers.linear(-1.8, 0.15);

    // Array to store & access each invidual cubeBlock using index
    const cubes = [];

    // Array to store & access each invidual cylinderBlock using index
    const cylinders = [];

    // Array to store & access each invidual tetrahedronBlock using index
    const tetrahedrons = [];

    // Array to store & access each invidual waterDropBlock using index
    const droplets = [];

    /* ... Truncated Native UI Picker, PersistenceModule, Recording Monitor & CameraInfo Monitor Code*/

})(); 
In this section, you will:
-
Read levelJson data, dynamically instantiate Blocks and animate them accordingly.
-
Reset Scene Objects when a level has ended.
-
Unlock next level based on user's score and save progress using PersistenceModule.
/* ... Truncated Imported Modules */

(async function () {

    /* ... Truncated Promise & Variable Declaration Code */

    //==============================================================================
    // Time variables
    //==============================================================================

    // Interval timer used to track time
    var intervalTimer;

    //Time elapsed since the user started recording video.
    var timeNow = 0;

    // Similar to timeNow, but store time as String data, rounded to 1 decimal point
    var currentTime;

    /* ... Truncated Native UI Picker & PersistenceModule Code */

    recording.monitor().subscribe(function (recordingEvent, snapshot) {

        /* ... Truncated Code */

        if( currentSelectedIndex <= maxLevelUnlocked)
        {
            if (recordingEvent.newValue) {

             /* ... Truncated Code */

             //Initialize Time to 0
            timeNow = 0;

            //==============================================================================
            // Begin Selected Level
            //==============================================================================

            //Interval timer to execute function every 0.1 sec or 100 ms
            intervalTimer = Time.setInterval(function () {

                    //Increase time by 0.1 because the function is called every 0.1 sec
                    timeNow = timeNow + 0.1;

                    //Round off timeNow to 1 decimal point Ex:1.59 becomes 1.5
                    currentTime = timeNow.toFixed(1);

                    //Check if levelJson has any sounds at a specific time. Ex:levelJson["level_1"][1.5]
                    if (levelJson["level_" + (currentSelectedIndex+1)][currentTime]) {

                        // Loop through all the sounds present at a specific time Ex: "1.0": ["k","h"]
                        levelJson["level_" + (currentSelectedIndex+1)][currentTime].forEach(sound => {

                            let availableIndex;

                            // Based on the sound data from levelJson animate a cube/cylinder/tetrahedron.
                            switch (sound) {
                                case "k":

                                    //Dynamically Instantiate cubeBlock
                                    Blocks.instantiate('cubeBlock').then(function (block) {

                                        // Create a new TimeDriver
                                        const timeDriver = Animation.timeDriver(timeDriverParameters);

                                        // Create a new animation using the TimeDriver &  linearSampler.
                                        // Bind it to the z-position signal of the cubeBlock
                                        block.inputs.setScalar("z-position", Animation.animate(timeDriver, linearSampler))

                                        //Start the Animation
                                        timeDriver.start();

                                        //Based on the value of frontCamera, add cubeBlock as a child to frontCameraModelContainer/backCameraModelContainer
                                        frontCamera ? frontCameraModelContainer.addChild(block) : backCameraModelContainer.addChild(block);

                                        //Store referece to the newly created cubeBlock
                                        cubes.push(block)

                                        // Once the animation it completed
                                        timeDriver.onCompleted().subscribe(function (event) {

                                            //Destroy the cubeBlock
                                            Scene.destroy(block);

                                            //Remove it from the array
                                            cubes.shift()

                                        });

                                    });

                                    break;

                                case "h":

                                    Blocks.instantiate('cylinderBlock').then(function (block) {

                                        const timeDriver = Animation.timeDriver(timeDriverParameters);
                                        block.inputs.setScalar("z-position", Animation.animate(timeDriver, linearSampler))

                                        timeDriver.start();
                                        frontCamera ? frontCameraModelContainer.addChild(block) : backCameraModelContainer.addChild(block);
                                        cylinders.push(block)

                                        timeDriver.onCompleted().subscribe(function (event) {

                                            Scene.destroy(block);
                                            cylinders.shift()

                                        });

                                    });

                                    break;

                                case "s":

                                    Blocks.instantiate('tetrahedronBlock').then(function (block) {

                                        const timeDriver = Animation.timeDriver(timeDriverParameters);
                                        block.inputs.setScalar("z-position", Animation.animate(timeDriver, linearSampler))

                                        timeDriver.start();
                                        frontCamera ? frontCameraModelContainer.addChild(block) : backCameraModelContainer.addChild(block);
                                        tetrahedrons.push(block)

                                        timeDriver.onCompleted().subscribe(function (event) {

                                            Scene.destroy(block);
                                            tetrahedrons.shift()

                                        });

                                    });

                                    break;


                                case "wd":

                                    Blocks.instantiate('waterDropBlock').then(function (block) {

                                        const timeDriver = Animation.timeDriver(timeDriverParameters);
                                        block.inputs.setScalar("z-position", Animation.animate(timeDriver, linearSampler))

                                        timeDriver.start();
                                        frontCamera ? frontCameraModelContainer.addChild(block) : backCameraModelContainer.addChild(block);
                                        droplets.push(block)

                                        timeDriver.onCompleted().subscribe(function (event) {

                                            Scene.destroy(block);
                                            droplets.shift()

                                        });

                                    });

                                    break;

                            }
                        });
                    }

                    //==============================================================================
                    // End Selected Level if currentTime has exceeded the duration of the level
                    //==============================================================================

                    // Check if currentTime has crossed the duration of the selected level
                    if ((parseFloat(currentTime) * 1000) > levelJson["level_" + (currentSelectedIndex+1)].duration) {

                        //Clear Timer to end level
                        Time.clearInterval(intervalTimer);

                        //Hide the progressBar & Native UI picker
                        progressBarRectangle.hidden = true;
                        picker.visible = true;

                        // Stop the progressBar's animation
                        progressBarRectangleDrivers.stop();

                        // Check if the user has scored the minimum points required to unlock the next level
                        if (scoreTextValue >= levelJson["level_" + (currentSelectedIndex+1)].minscoreText) {

                            // Update Persistence data if the next level has been unlocked

                            try {
                                maxLevelUnlocked = currentSelectedIndex + 1;
                                data.level = maxLevelUnlocked;
                                userScope.set('data', data);

                            } catch (error) {
                                // If not successful output a failure message with the error returned
                                Diagnostics.log('Failed to store, ' + error)
                            }

                            //Assign the respective levelIcon to the unlocked level item and update the Native UI Picker
                            configuration.items[currentSelectedIndex + 1].image_texture = levelIcons[currentSelectedIndex + 1];
                            configuration.selectedIndex = currentSelectedIndex;
                            picker.configure(configuration);

                            //Play unlock level audio
                            unlockAudioPlaybackController.reset();
                            unlockAudioPlaybackController.setPlaying(true);

                            //Unhide the confetti and increase its birthrate.
                            confettiYellow.hidden = false;
                            confettiGreen.hidden = false;
                            confettiYellow.birthrate = 30;
                            confettiGreen.birthrate = 30;

                        }

                    }

                }, 100);


            } else {

                //==============================================================================
                // End selected Level if user stops recording video
                //==============================================================================

                //Clear Timer to end level
                Time.clearInterval(intervalTimer);

                //Hide the progressBar & Native UI picker
                picker.visible = true;
                progressBarRectangle.hidden = true;

                // Stop the progressBar's animation
                progressBarRectangleDrivers.stop();

                // Check if the user has scored the minimum points required to unlock the next level
                if (scoreTextValue >= levelJson["level_" + (currentSelectedIndex+1)].minscoreText) {

                    //Assign the respective levelIcon to the unlocked level item and update the Native UI Picker
                    picker.configure(configuration);

                    //Play unlock level audio
                    unlockAudioPlaybackController.reset();
                    unlockAudioPlaybackController.setPlaying(true);

                    //Unhide the confetti and increase its birthrate.
                    confettiYellow.hidden = false;
                    confettiGreen.hidden = false;
                    confettiYellow.birthrate = 30;
                    confettiGreen.birthrate = 30;

                }

            }
        }
    });

    /* ... Truncated CameraInfo Monitor Code*/

})(); In this section, you will:
-
Monitor Signal Power: Subscribe to changes in Signal Power of band1, band2, band4 & band7. Compare the Signal Power of the specific band with other bands at the given instance and receive the result as Snapshot.
-
Differentiate Sounds:Use the result from Snapshot to check for conditions and identify sound detected in the Mircrophone Audio
-
Identify Hits:A hit occurs when two conditions are satisfied:
-
User produced a sound which was differentiated by the effect.
-
Block corresponding to the sound was present on the platform at that very instance.
-
-
For every Identified hit, score is incremented.
/* ... Truncated Imported Modules */

(async function () {

    /* ... Truncated Promises & Variable Declaration Code */

    //==============================================================================
    // Monitoring Signal Power, Detecting Sounds and Hits
    //==============================================================================

    // KICK DRUM
    // Subscribe to receive events when value of band1(Kick Drum) Signal Power has exceeded threshold value (Condition A)
    band1.gt(0.75).monitor().subscribeWithSnapshot(
        {
            //Check if band1(Kick Drum) Signal Power has not exceeded threshold value (Condition B)
            // Check if band1(Kick Drum) Signal Power was greater than band4(Snare) (Condition C)
            // Check if band1(Kick Drum) Signal Power was greater than band2(Water Drop) (Condition D)
            "greaterThanSnare": band1.gt(band4),
            "snareBelowThreshold": band4.lt(0.75),
            "greaterThanWaterDrop": band1.gt(band2),
        }, function (event, snapshot) {

            // If Condition A, B, C & D are true then it is a confirmation that Kick Drum was detected.
            if (event.newValue  && snapshot.greaterThanSnare && snapshot.snareBelowThreshold && snapshot.greaterThanWaterDrop) {

                // SoundType is set to KICK & sent to the Patch Editor
                Patches.inputs.setScalar("soundType", soundType.KICK);

                //Loop through all the cubes to determine if there is a cube present on top of the platform circle at that very instance
                for (let index = 0; index < cubes.length; index++) {

                    // Obtain the position of the cubeBlock in the Z Axis
                    const z = cubes[index].outputs.getScalarOrFallback("z-position", -1).pinLastValue();

                    //Check if the cubeBlock's z values is within the platform range.
                    if (z > -0.3 && z < -0.1) {

                        //Hit is detected
                        //Update cubeBlock's "hit" variable to true to notify that it was hit.
                        //cubeBlock will use this update to perform hit animation, change visibility of items etc;
                        cubes[index].inputs.setBoolean("hit", true);

                        //Update the score
                        scoreTextValue++;
                        if (scoreTextValue < 10) {
                            scoreText.text = "0" + scoreTextValue;
                        } else {
                            scoreText.text = "" + scoreTextValue;
                        }

                        break;
                    }
                }

                //When condition Condition A, B, C & D are true, rippleStatus is set to true & sent to the Patch Editor
                Patches.inputs.setBoolean("rippleStatus", 1);

            }


            if (!event.newValue) {
                //When condition Condition A is false, rippleStatus is set to true & sent to the Patch Editor
                Patches.inputs.setBoolean("rippleStatus", 0);

            }

        });


    // SNARE
    band4.gt(0.75).monitor().subscribeWithSnapshot(
        {
            "greaterThanKickDrum": band4.gt(band1),
            "bassBelowThreshold": band1.lt(0.75),
        }, function (event, snapshot) {

            if (event.newValue && snapshot.greaterThanKickDrum && snapshot.bassBelowThreshold) {
                Patches.inputs.setScalar("soundType", soundType.SNARE);

                for (let index = 0; index < tetrahedrons.length; index++) {

                    const z = tetrahedrons[index].outputs.getScalarOrFallback("z-position", -1).pinLastValue();

                    if (z > -0.3 && z < -0.1) {

                        tetrahedrons[index].inputs.setBoolean("hit", true);

                        scoreTextValue++;
                        if (scoreTextValue < 10) {
                            scoreText.text = "0" + scoreTextValue;
                        } else {
                            scoreText.text = "" + scoreTextValue;
                        }

                        break;
                    }
                }

                Patches.inputs.setBoolean("rippleStatus", 1);
            }


            if (!event.newValue) {
                Patches.inputs.setBoolean("rippleStatus", 0);
            }

        });

    // HI-HAT
    band7.gt(0.6).monitor().subscribeWithSnapshot(
        {
            "snareBelowThreshold": band4.lt(0.75),
            "energy": band7
        }
        , function (event, snapshot) {

            if (event.newValue && snapshot.snareBelowThreshold) {

                Patches.inputs.setScalar("soundType", soundType.HIHAT);

                for (let index = 0; index < cylinders.length; index++) {

                    const z = cylinders[index].outputs.getScalarOrFallback("z-position", -1).pinLastValue();

                    if (z > -0.3 && z < -0.1) {

                        cylinders[index].inputs.setBoolean("hit", true);

                        scoreTextValue++;
                        if (scoreTextValue < 10) {
                            scoreText.text = "0" + scoreTextValue;
                        } else {
                            scoreText.text = "" + scoreTextValue;
                        }

                        break;
                    }
                }

                Patches.inputs.setBoolean("rippleStatus", 1);
            }

            if (!event.newValue) {
                Patches.inputs.setBoolean("rippleStatus", 0);
            }

        });


    // WATER DROP
    band2.gt(0.6).monitor().subscribeWithSnapshot(
        {
            "greaterThanKickDrum": band2.gt(band1),
            "greaterThanSnare": band2.gt(band4),
            "snareBelowThreshold": band4.lt(0.75),
        }
        , function (event, snapshot) {

            if (event.newValue && snapshot.greaterThanKickDrum && snapshot.greaterThanSnare && snapshot.snareBelowThreshold) {

                Patches.inputs.setScalar("soundType", soundType.WATERDROP);

                for (let index = 0; index < droplets.length; index++) {

                    const z = droplets[index].outputs.getScalarOrFallback("z-position", -1).pinLastValue();

                    if (z > -0.3 && z < -0.1) {

                        droplets[index].inputs.setBoolean("hit", true);

                        scoreTextValue++;
                        if (scoreTextValue < 10) {
                            scoreText.text = "0" + scoreTextValue;
                        } else {
                            scoreText.text = "" + scoreTextValue;
                        }

                        break;
                    }
                }

                Patches.inputs.setBoolean("rippleStatus", 1);
            }

            if (!event.newValue) {
                Patches.inputs.setBoolean("rippleStatus", 0);
            }

        });

    /* ... Truncated Native UI Picker, PersistenceModule, Recording Monitor & CameraInfo Monitor Code*/

})(); Access variables sent from script to the Patch Editor.
- Select the script file in the Assets Panel.
- In the Inspector Panel, Select Create Producer Patch.
- This will create a patch called Variables From Script. Place it inside the blue Signal Senders patch.
- Create 5 Sender Patches and rename them to currentLevel, soundType, rippleStatus, playIntroChange & levelPlayable.
- Connect each output from Variables From Script patch to the corresponding Sender Patches.

Let's create patches required to play background music of each level.

-
Create Receiver Patch to obtain value of currentLevel . Connect it to Option input port of Option Picker patch of type Text.
-
Locate the abc. m4a, def. m4a audio files present under Audio in the Assets panel. Drag and Drop them inside the Patch Editor. Connect output of each audio file patch to an input port of Option Picker.
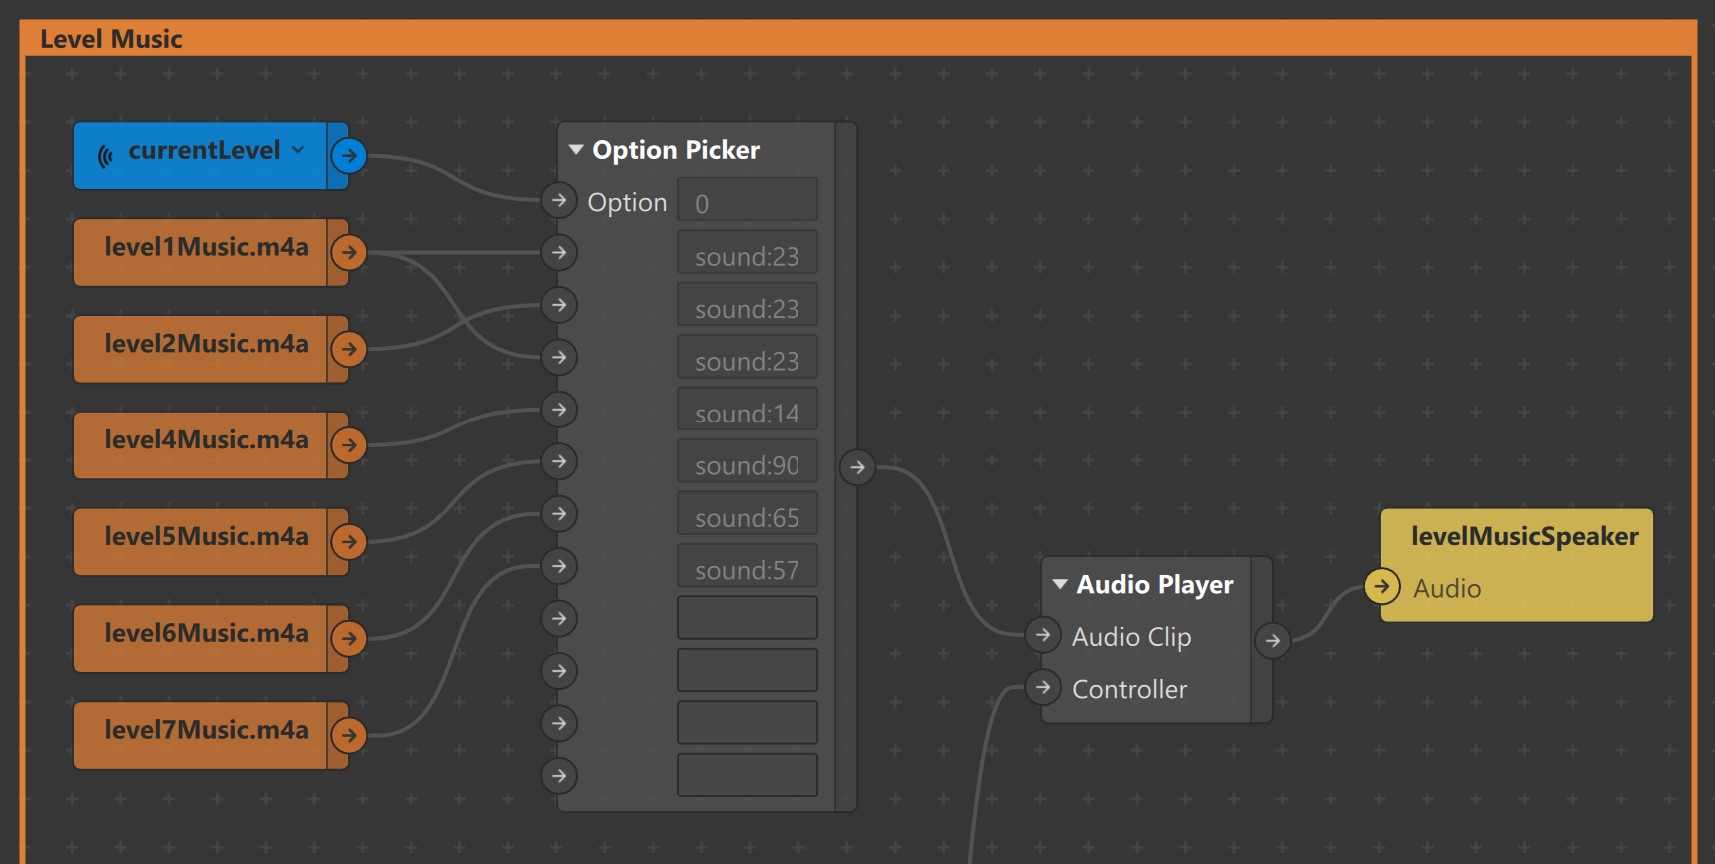
-
Connect output of Option Picker patch to Audio Clip input of a new Audio Player patch.
-
Next, create Receiver Patches to obtain values of levelPlayable and videoRecording. Use these values to Play/Stop Single-Clip Controller connected to Audio Player.
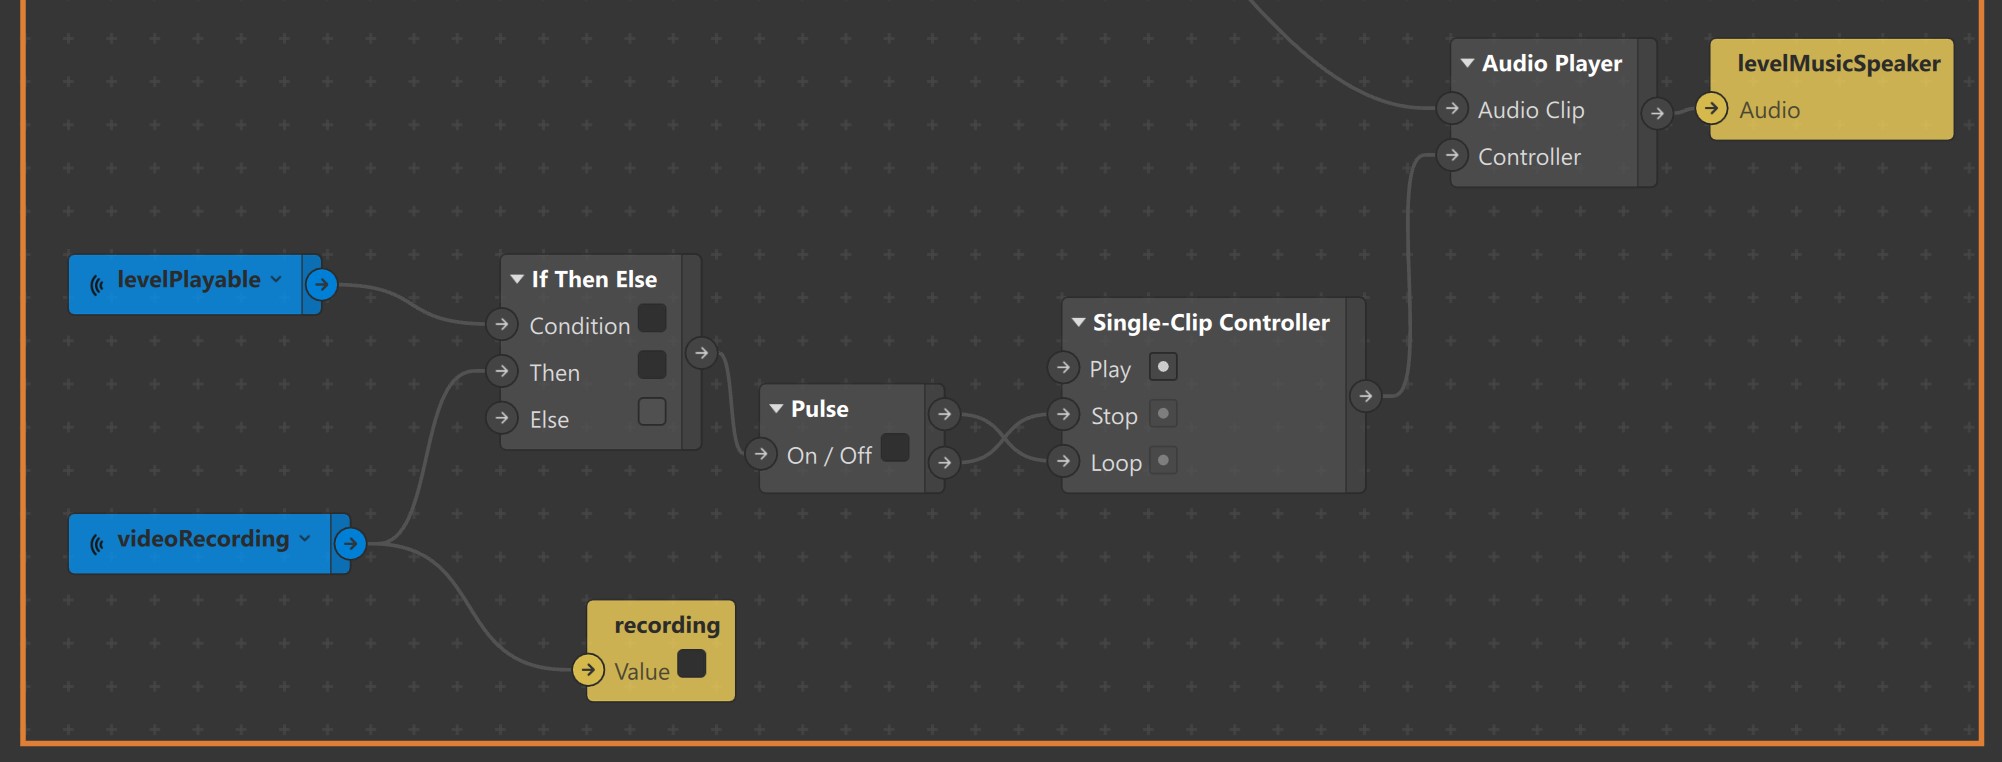
-
Connect output of Audio Player to Audio input of levelMusicSpeaker patch.
-
Pass output of videoRecording patch as a Variable To Script called recording.


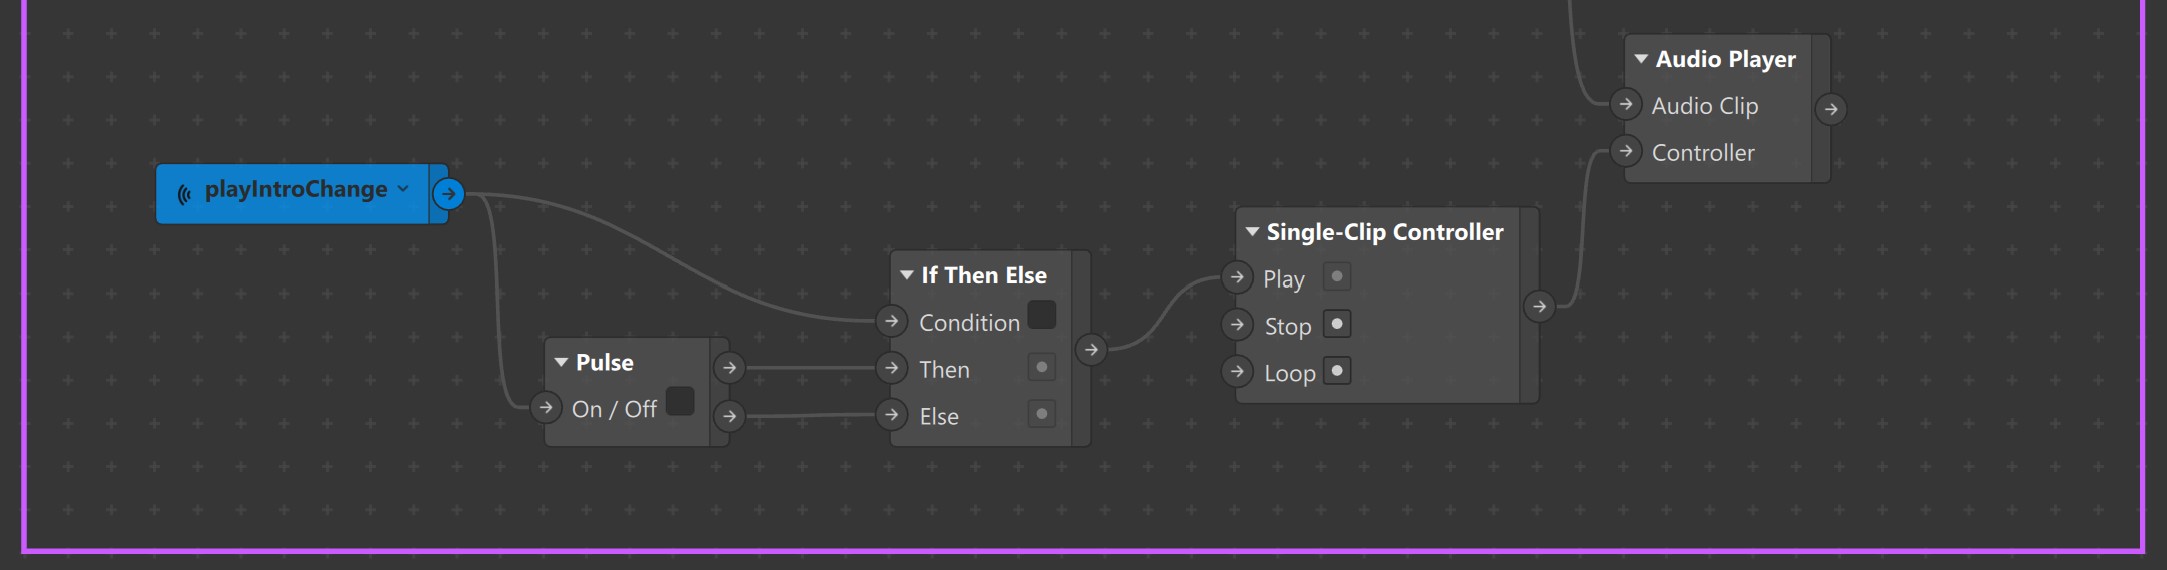
Let's create patches required to play Level Introduction Audio of unlocked levels as and when the user selects them on Picker.

-
Similar to Level Music, use currentLevel Receiver patch and Option Picker patch to pick Instruction Audio.
-
Before passing output of Option Picker patch to Audio Player, use an If Then Else patch & value of levelPlayable receiver patch to check whether the user has unlocked the selected level or not. This ensures that Instruction Audio of only the unlocked levels are played.
-
Use output from playIntroChange Receiver Patch to Play/Stop Single-Clip Controller connected to Audio Player.
-
Connect output of Audio Player to Audio input of levelIntroSpeaker patch.

Let's create patches to transform Camera Texture & Materials.

-
Locate Custom Ripple Animation patch in the Assets panel. Drag and Drop it inside the Patch Editor. Create two more copies of the same patch using Ctrl+C & Ctrl+V.

-
Set Duration of all the three Custom Ripple Animation patches to 0.7 seconds.

-
Set Color value of first, second and third Custom Ripple Animation patches to #ff55ff, #55ffff, #aaff00 and #0055ff respectively.
-
Try turning On & Off each Custom Ripple Animation patch to view them in Simulator.
-
Connect output of first, second and third Custom Ripple Animation patches to the Diffuse Texture port of kickDrumRippleMaterial, snareRippleMaterial and hiHatRippleMaterial respectively.
-
Create an Option Sender patch. Connect three of its outputs to On/Off input port of each Custom Ripple Animation patch.
-
Connect output from hitSoundType & rippleStatus Receiver patches to Option input port and Value input port respectively. This way, whenever there is a change in rippleStatus, corresponding Custom Ripple Animation will be turned On/Off based on the value of hitSoundType.
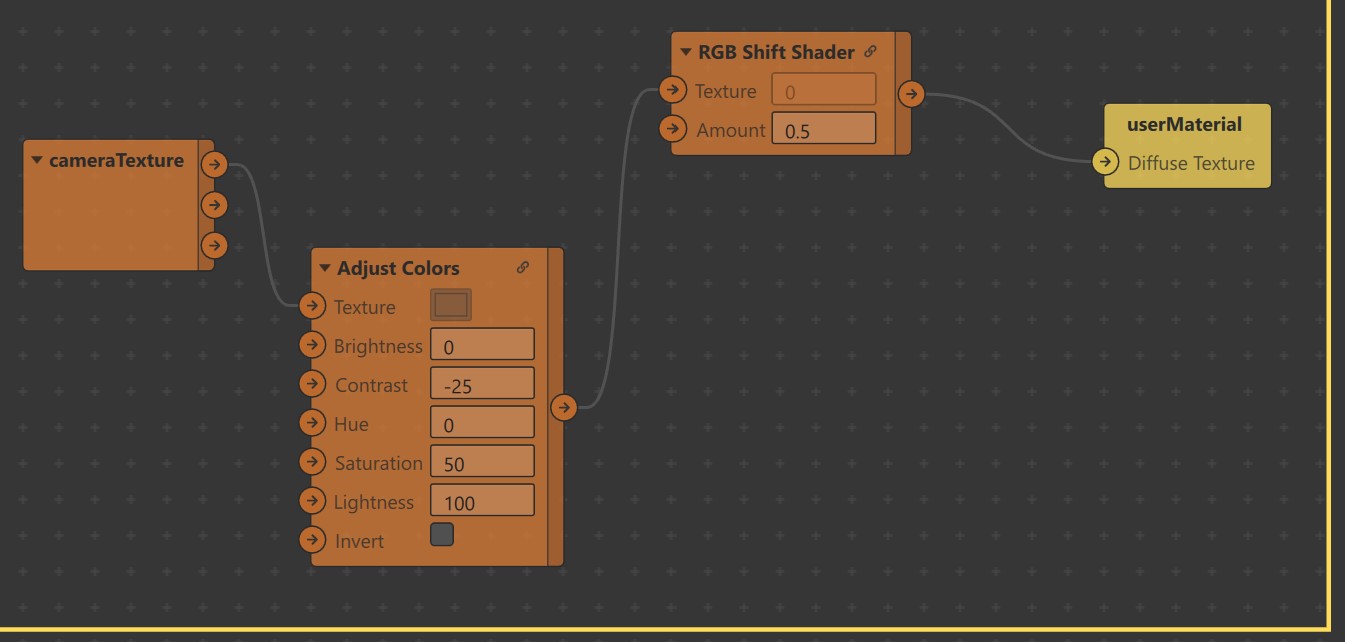
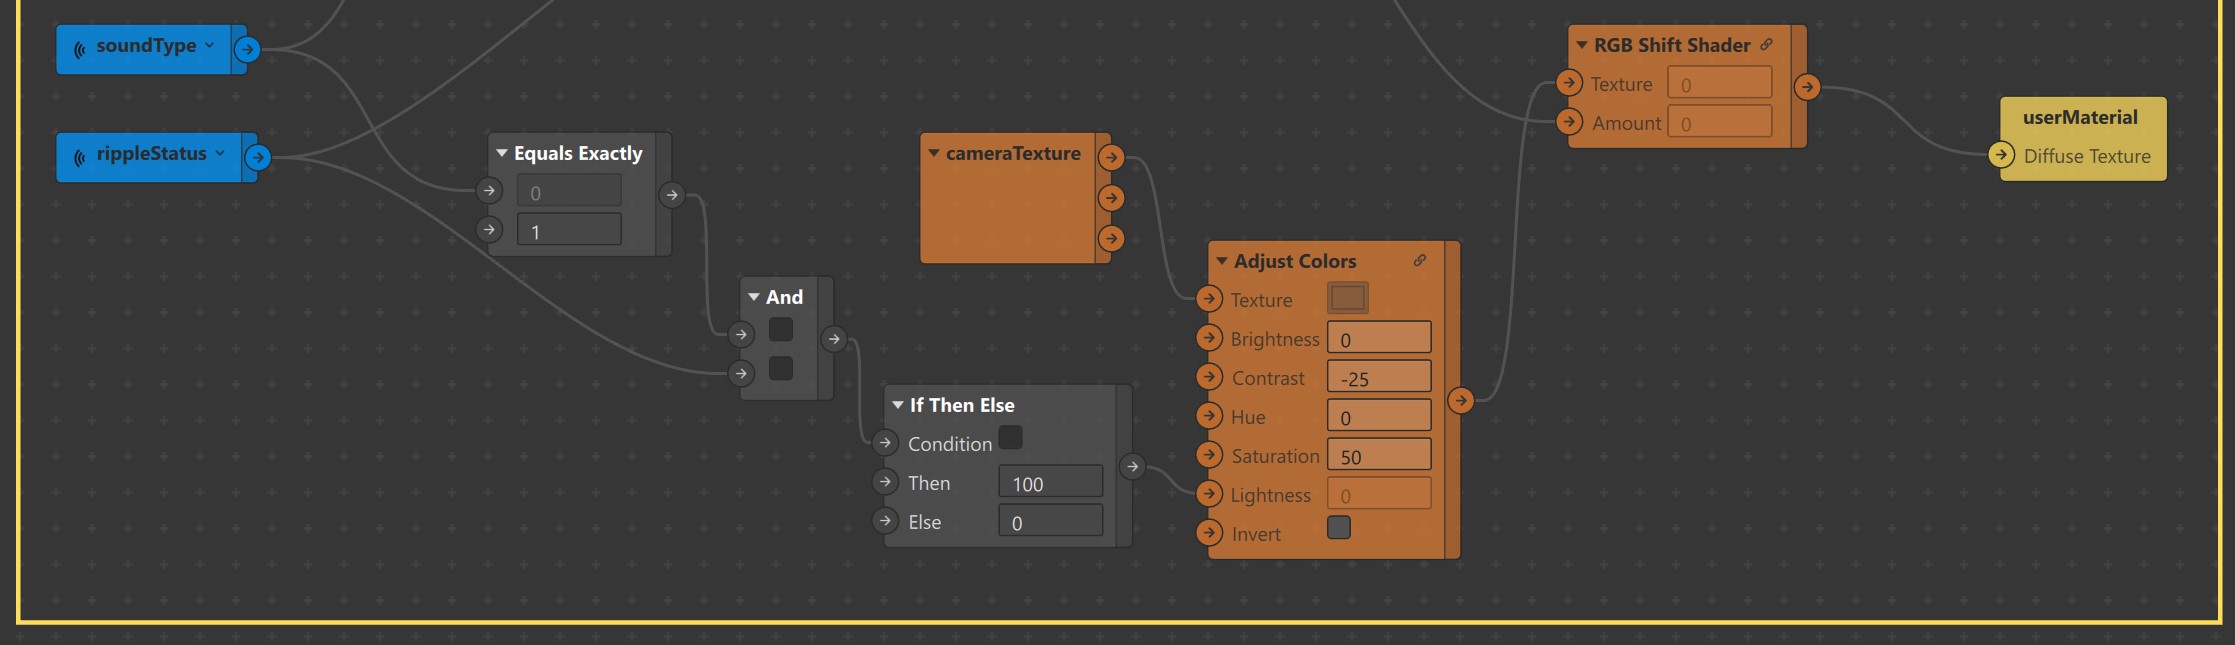
Now, perform color manipulations to cameratexture based on the values of hitSoundType & rippleStatus.
-
Locate Adjust Colors patch, RGB Shift Shader patch and cameratexture in the Assets panel. Drag and Drop them inside the Patch Editor.
-
Connect
-
Output from RGBA port of cameratexture patch to Texture input port of Adjust Colors patch.
-
Output from Adjust Colors patch to Texture input port of RGB Shift Shader patch. Set the Amount value of RGB Shift Shader to 0.
-
Output of RGB Shift Shader patch to Diffuse Texture port of userMaterial. Your simulator will now look something like this. By default, RGB Shift Shader adds contrast to cameratexture. Let's calibrate it in the next step.

-
-
Edit values of RGB Shift Shader, Set
- Contrast to -25
- Saturation to 50
-
Use values from hitSoundType & rippleStatus Receiver patches to alter the Amount in RGB Shift Shader patch. For this,
-
Use an Equals Exactly patch to check if the value of hitSoundType is 0 (Kick Drum).
-
Connect
-
Output from Equals Exactly patch to an And patch.
-
Output from rippleStatus patch to the other input port of the same And patch.
-
-
By using an If Then Else patch of type Number, check whether output from And patch is true.
-
Edit values of If Then Else patch, Set value of Then to 0.55.
-
Connect output from If Then Else patch to Amount input port of RGB Shift Shader patch.
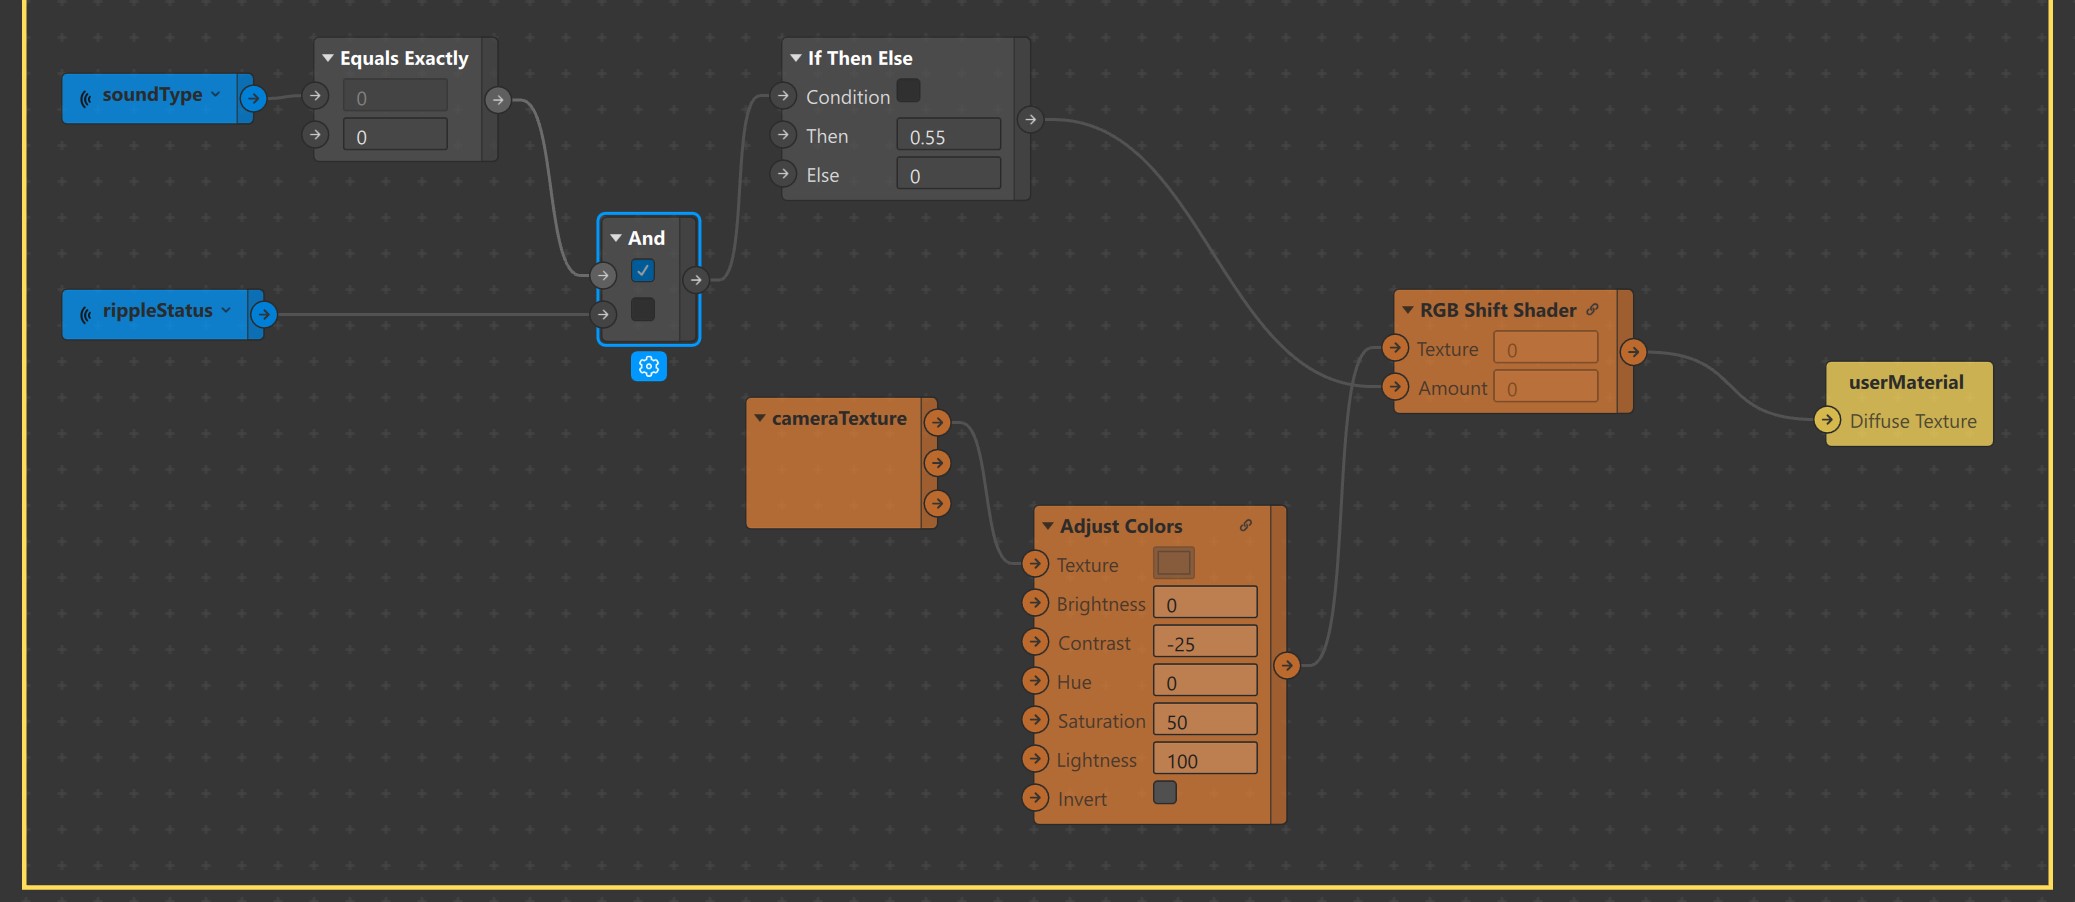
Whenever value of hitSoundType becomes 0 & rippleStatus is True, your simulator will look like this until rippleStatus changes back to False
-
-
Similarly check if the value of hitSoundType is 1 (Snare) & rippleStatus is True and use it to increase the Lightness of Adjust Colors patch to 100.
So, whenever the value of hitSoundType is 1 & rippleStatus is True, your simulator will look like this until rippleStatus changes back to False


Some cool ideas for further development
- Level JSON generation from .mp3 files using Pytorch's TorchAudio
- Recognition of sounds based on patterns 📊 in signal power of bands instead of signal values.
- Enhancement of Confettis using Sprite Sheets