| Dasher - User App |
|---|
 |
| ONLINE ACCESS SYSTEM FOR CUSTOMER AND CONSUMER MONITORING. |
| 🐞 Report a bug or 🙋♂️ request a feature |
  |
Do you want to know how your shipment is going and how long it will arrive? You just have to enter this app where you can review the travel of your shipment in real time, see the confirmation of departure and the confirmation of receipt.
Before to start you need have some requirements:
-
Node.js > v14.0.0
Node.js is a runtime environment for Javascript that allows us to use the language outside of the browser, in this case we use it to configure and run the development server.
-
npm > v6.0.0
npm is a package manager for Node.js and comes installed with it, we use it to install and manage application dependencies.
-
Git > v2.0.0
Git is a version control system for code, we use it to manage the different branches of the code.
-
Connection to internet
-
Visual Studio Code or another code editor (optional)
- Clone the repository
git clone https://github.com/Azordev/dasher-user.git
- Go to the project folder
cd dasher-user
- Install dependencies
npm install
or
yarn install
- Run
npm start
or
yarn start
After executing any of the above commands, a development server will start; generally on port 3000. You must go to your browser and enter localhost:3000 and you will have access to the project.
The project has been developed using various technologies. Some of them are:
For the front, React has been used, which is a powerful framework that allows us to interact dynamically with the DOM and encapsulate tons of functionalities through components. React Docs
Graphql:
GraphQL is a language that allows us to manipulate the data to generate efficient and fast APIs. GraphQL Docs
EsLint:
We like that our projects handle a clean code; that's why every time you commit & push, EsLint will analyze your input to make sure it complies with best practices.
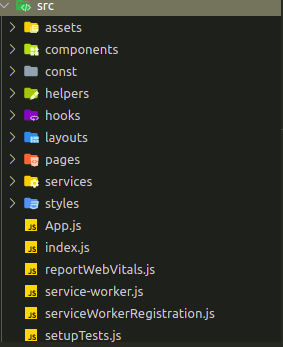
The magic of the project happens inside the src folder. It is there where you will find all the components, pages and styles.
There are some rules that apply when interacting with the project repository. This will allow us to have a standard that any developer can understand. It is important to comply with these rules so that the linting tool allows us to use the repository.
Branch:
Every time an issue is assigned to you, you must create a new branch. This can be done through the command:
git branch <name of branch>
For convenience, the branches should have a defined structure. For example, if the issue is about adding a new feature, the branch should be:
feature/#issuenumber-brief-description-of-the-feature
Suppose we have issue #12 that asks us to add a header to the main page. Then, the branch would be as follows:
feature/#12-add-header-to-main-page
If it is about solving a bug, we just have to put the word "fix" in front of it. For example:
fix/#14-remove-bad-media-queries-in-rating-component
Commits:
Like branches, commits must also follow a format. Notice how the commit message varies if it is a feature or a bug fix.
feat: added header to main page
fix: removed bad media queries in rating component
Pull Request (PR):
The PR’s are requests that as developers we make once the solution of an issue is completed and we want the code to be integrated into the master branch of the project. Before that, we must ensure that our code is fully functional and adhering to best practices.
Once we have done a commit & push in our branch, a notification with a yellow background will appear in the github repository and will ask us to continue with the PR. In the TextArea to perform the PR you will find several sections that you want to complete: A brief description of what you did, a snapshot (if applicable), the tasks that were completed and the steps to view them.
How do I create a new component?
In the component folder, create a new file with the .jsx extension. Make sure to put an appropriate name to the functionality that you are going to develop.
| Israel Laguan | |
|---|---|
| Victor Peña | |
| Emmanuel Azócar | |
| Angelica Molina | |
| Roman Rodriguez | |
| Tony Tarco | |
| Ildebrando Quinchoa | |
| Denis Osuna | |
| Jose Hernandez | |
🤝 Contributions, issues and feature requests are welcome! Feel free to check the issues page.
🤗 Give a ⭐️ if you like this project!
-
API: Powered by Google Maps
-
https://blog.logrocket.com/deep-dive-into-lefthook-react-native/
-
https://blog.logrocket.com/build-robust-react-app-husky-pre-commit-hooks-github-actions/
-
Favicon from favicon.io
-
Production deployment using Netlify
📝 This project is licensed under the Apache 2
Feel free to fork this project and improve it!


