Stay In Touch challenge
Introduction
This API was made for personnal challenge in 8 hours of work. This is a RESTful API let you find people around you.
I've built it to cover from database to deployment.
Work with NodeJS, Docker, PostgreSQL, Portainer & Nginx proxy Manager, and so on. For the details about all of the technologies I used, jump here :)
Take it as an example and not as a finished work.
The basic instructions for the challenge are the followings :
- Create an API that you can log in using jwt
- List users with pagination response
- List users within specific geo radius
I really enjoyed doing this !
Hope it helps !
Summary
- Technologies
- Requirements
- Get started
- User story
- Some Rules
- Data Models
- Endpoints
- Folder structure
- Server configuration
- Routes
- Controllers
- Server launched
- Connect database PostgreSQL
- Handle errors
- Favorite part SQL
- Authentication JWT
- API works
- Cloud RaspberryPi
- Docker and docker compose
- Migration database in Docker
- Portainer and Nginx Proxy Manager
- Domain name
- Firewall rules
- API online
- Makefile usage
- Conclusion
- Sources
Technologies
You can find below the list of technologies I used for this, maybe you are using it too !
Dependencies
-
Node JS v19.7.0
-
Express v4.18.2
-
Express-session v4.18.2
-
Dotenv v16.0.3
-
Helmet v6.0.1
-
Json Web Token v9.0.0
-
pg v8.10.0
Dev dependencies
- Typescript v4.9.5
- Concurrently v7.6.0
- Debug v4.3.4
- Eslint v8.36.0
Deployment environment
- RaspberryPi as a server
- Docker v23.0.1
- Docker compose v2
- Portainer v2.16.2
- Nginx Proxy Manager v2.9.19
Domain name
- Duckdns
Database
- PostgreSQL v15.1
- PostGis extension (PostgreSQL 11 to 15 versions only)
Tools
- pgAdmin4 v6.20
- Insomnia v2022.7.5
- Postman v10.11.1
- restClient VSCode extension
CLI terminal
- Bash v5.1.4
- Make v4.3
IDE
- VSCodium v1.76.1
OOOOOK !! Once you know all of that, let's go !
Requirements
If you want to install, deploy, use this repo, you need to have Node, Docker and Docker compose v2 installed.
For the deployment of your database you need to pull PostGis image as we want to work with spatial geometry.
You can find all the links in Sources.
Get started
In the next sections you'll find my work and reflections, thoughts and conclusions. You can add improvements, you can play with this repo.
If you find something that can help me improve my skills, you can contact me. I'm interested in any feedback.
My goal was to make it as easy as possible to work from a local startup server to deploy online, to create queries for some optimisations (because, you know, I love PostgreSQL and I need to practice!), and to see if I can improve it.
User story
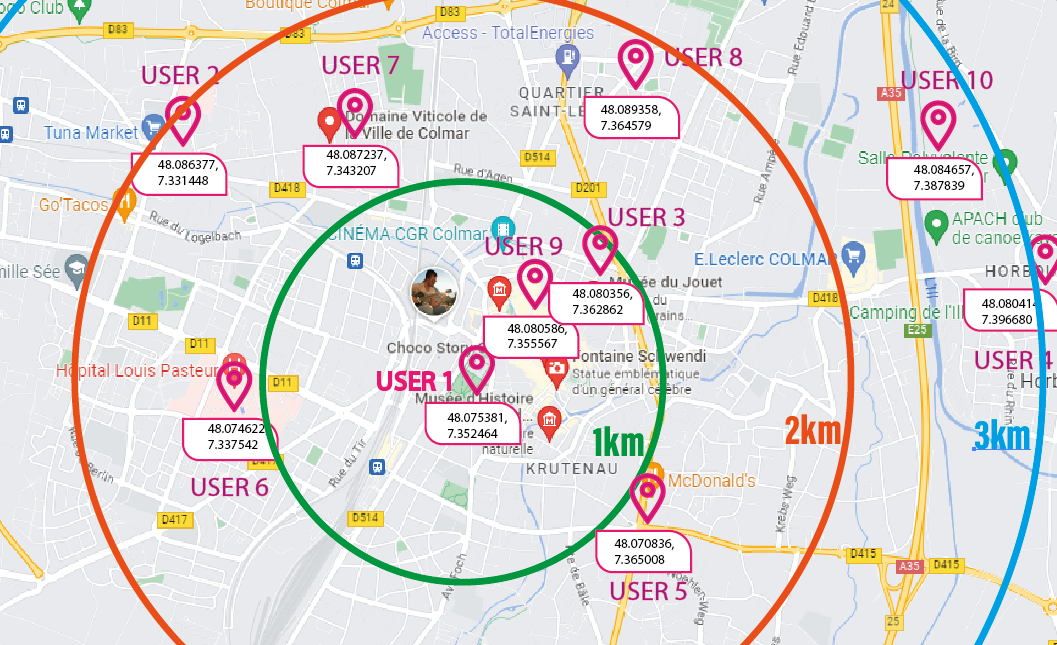
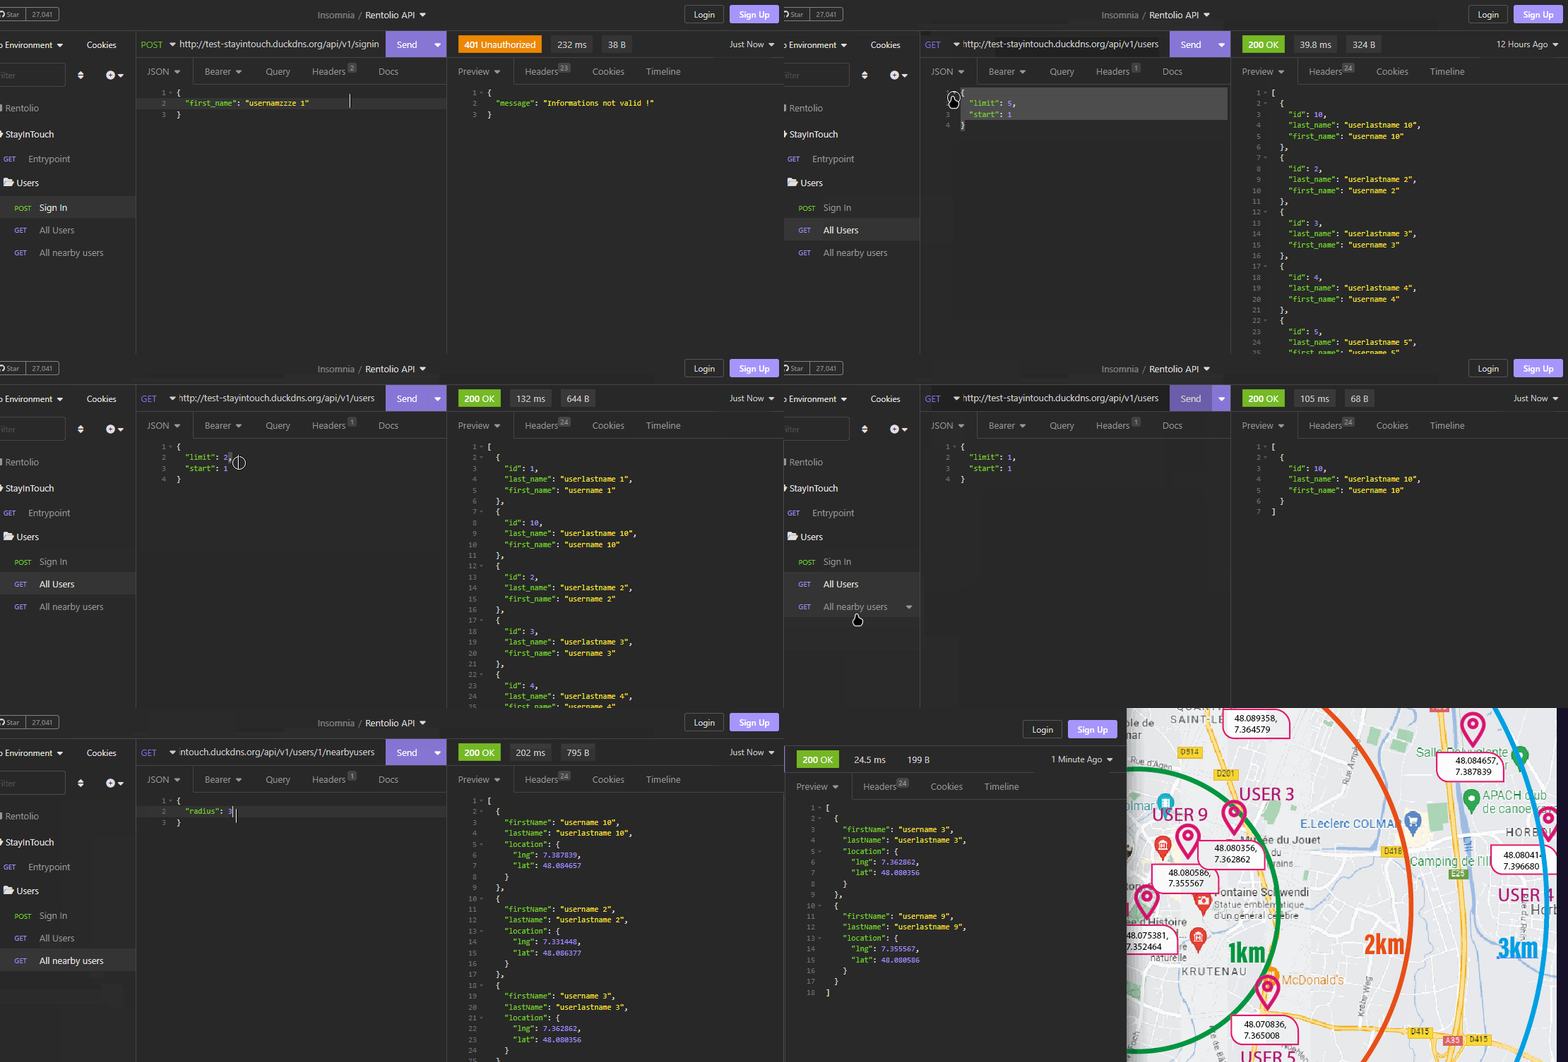
The story is as follows: As a user of the application, I want to find the nearest users around me. I can access all users, set a limit on the page and find users around me with a filter that defines the distance radius where other users are.
I've made a super drawing (haha) .. Let's see this :
Rules
For the current API there is a list of some "rules" to consider:
- The unit is only in km
- There is no limit for the radius
- User 1 is the only one, he's the admin (you can change it)
- To login, we will use only the first name for simplicity
- Only the Admin has access to this information.
Data Models
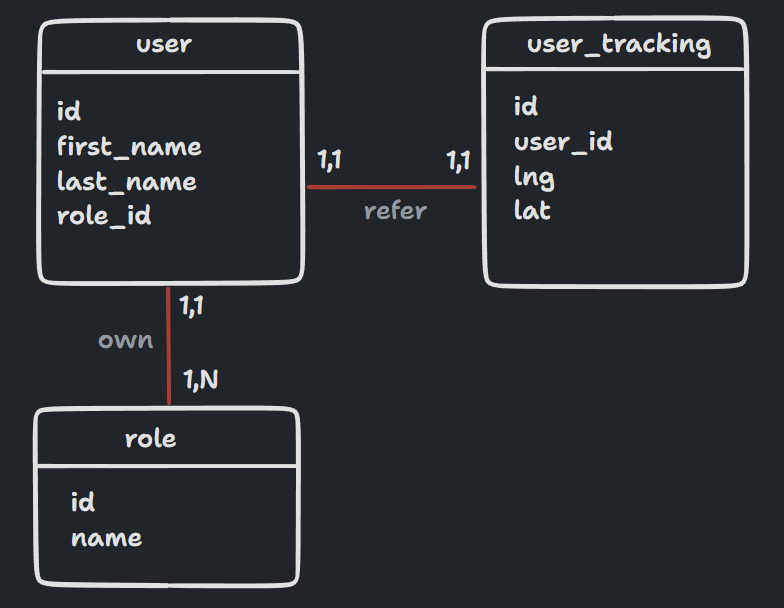
I have used the following table structure :
Endpoints
And here are the endpoints of the application:
User
/api/v1/--
| Method | Route | Description | Returns |
|---|---|---|---|
| POST | --/users/signin | User authentication | json object |
| GET | --/users | Fetch all users | json object |
| GET | --/users/:id/nearbyusers | Fetch all nearby users with a specific radius | json object |
Folder structure
You can find my folder structure here :
├── src
|  ├── app
|  |  ├── controllers
|  |  |  ├── main.ts
|  |  |  └── user.ts
|  |  ├── database
|  |  |  └── connexion.ts
|  |  ├── datamappers
|  |  |  ├── coreDataMapper.ts
|  |  |  ├── index.ts
|  |  |  └── user.ts
|  |  ├── middlewares
|  |  |  ├── auth.ts
|  |  |  └── validateToken.ts
|  |  ├── routes
|  |  |  ├── index.ts
|  |  |  ├── main.ts
|  |  |  └── user.ts
|  |  ├── services
|  |  |  ├── errorHandler.ts
|  |  |  ├── errorLoggerHandling.ts
|  |  |  └── jsonWebToken.ts
|  |  ├── Types
|  |  |  ├── custom.ts
|  |  |  └── express
|  |  |     └── module.d.ts
|  |  └── utils
|  |     └── formattedDate.ts
|  └── index.ts
├── docker-compose.yml
├── Dockerfile
├── logs
|  └── 2023-3-12.log
├── Makefile
├── package-lock.json
├── package.json
├── README.md
├── restClient.http
├── tsconfig.jsonServer configuration
You can find the details of the entrypoint here :
//~Import modules
// for environment variables
import 'dotenv/config';

// for the server
import express, { Request, Response } from 'express';
const app = express();

// for routes
import { router } from './app/routes/index.js';

// for handling errors
import { ErrorApi } from './app/services/errorHandler.js';

// protect the api
import helmet from 'helmet';
app.use(helmet());

// debug
import debug from 'debug';
const logger = debug('Entrypoint');

// Encoding parsing the body
//accept Content-type: application/json
app.use(express.json());
// accept Content-type: application/x-www-form-urlencoded
app.use(
  express.urlencoded({
    extended: false,
  })
);

//~ Cors
app.use((req : Request, res: Response, next) => {
  // Allow all connections for dev
  res.setHeader('Access-Control-Allow-Origin', '*');
  res.setHeader('Access-Control-Allow-Headers', 'Content-Type, Authorization');
  res.setHeader('Access-Control-Allow-Methods', 'GET,POST');
  res.setHeader('Access-Control-Allow-Credentials', 'true');
  // Accept credentials (cookies) sent by the client

  next();
});

import session from 'express-session';
app.use(
  session({
    saveUninitialized: false,
    resave: true,
    proxy: true,
    secret: process.env.SESSION_SECRET!,
    cookie: {
      httpOnly: true,
      secure: true, // set to false if no jwt to test
      sameSite: 'lax', // or 'strict'
      maxAge: 24 * 60 * 60 * 1000, //24 hours
      expires: new Date(Date.now() + 60 * 60 * 1000), //1 hour
    },
  })
);

//~ Router
app.use(router);

//~ Error 404 NOT Found
app.use((req, res) => {
  throw new ErrorApi(req, res, 404, `Page not found !`);
});

//~ Launch Server
const PORT = process.env.PORT ?? 3000;

app.listen(PORT, () => {
  logger(`🚀\x1b[1;35m Launch server on http://localhost:${PORT}\x1b[0m`);
});Routes
First route created to start the server:
./src/app/routes/main.ts
//~ Import Router
import { Router } from 'express';
const router = Router();

import { renderHomePage } from '../controllers/main.js';

//~ Home
router.get('/', renderHomePage);

//~ Export router
export { router };
I have divided the routes according to "themes" :
Controllers
For the main route :
./src/app/routes/main.ts
import { renderHomePage } from '../controllers/main.js';

//~ Home
router.get('/', renderHomePage);
I send :
./src/app/index.ts
//~ Import modules
import debug from 'debug';
const logger = debug('Controller');
import { Request, Response } from 'express';

//~ Controller methods
const renderHomePage = (req: Request, res: Response) => {
  try {
    return res.status(200).json({
      message: 'Welcome to API StayInTouch',
    });
  } catch (err) {
    if (err instanceof Error) logger(err.message);
  }
};

export { renderHomePage };Server launched
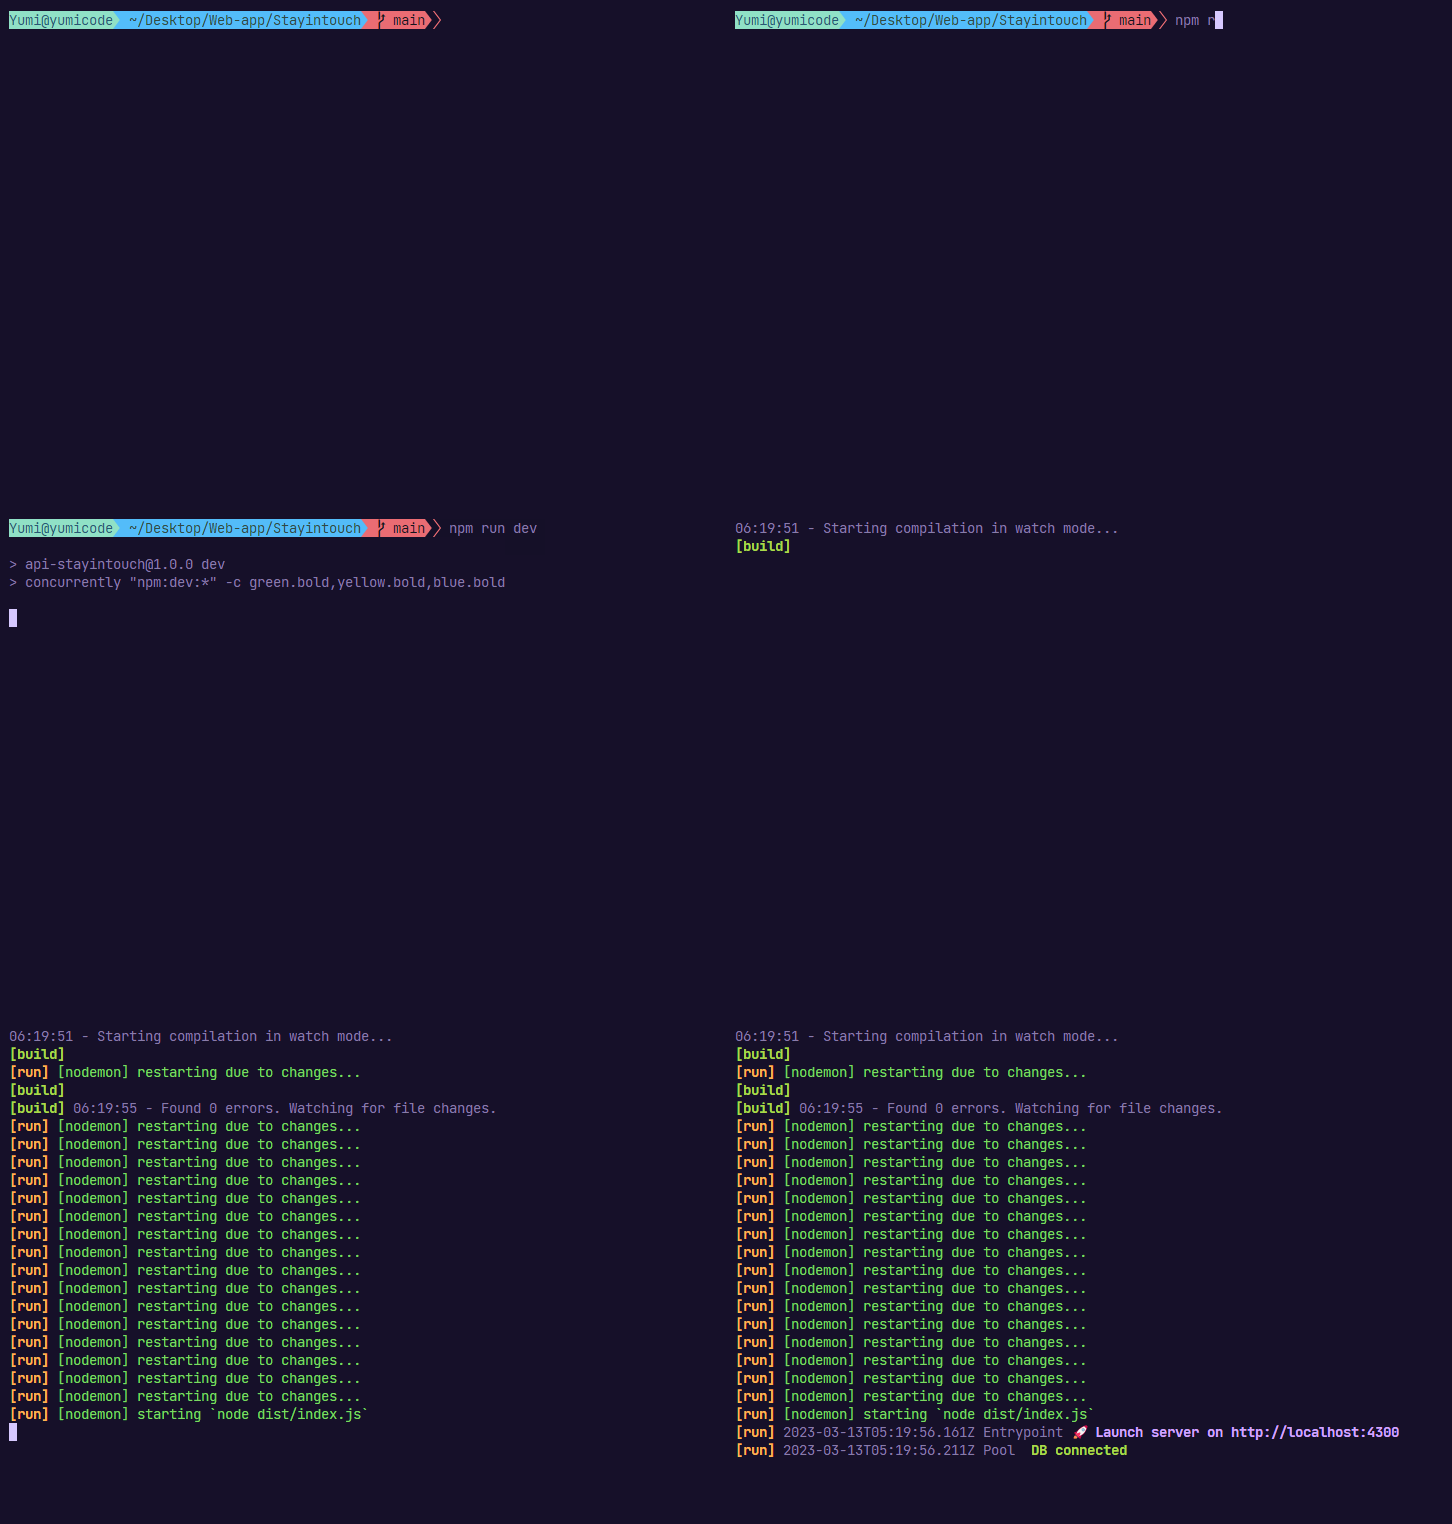
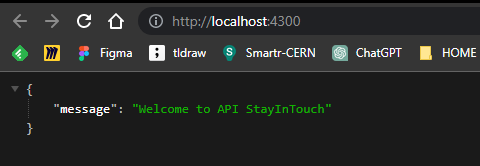
The result of this :
And tadaaa !
Connect database PostgreSQL
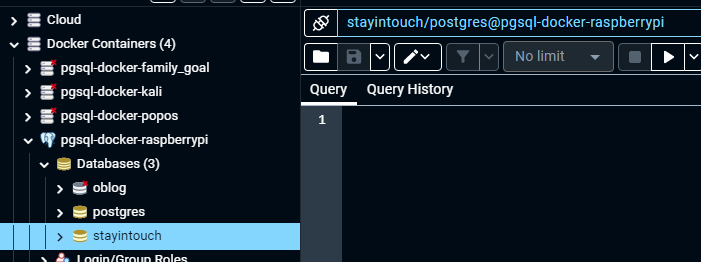
I have used my database in a Docker container that is running on my Raspberry Pi.
And connect it to pgAdmin4 :
In my Express server :
./src/app/database/connexion.ts
import pg from 'pg';
const client = new pg.Pool();

client
  .connect()
  .then(() => logger('\x1b[1;32m DB connected\x1b[0m'))
  .catch((err: Error) => logger('\x1b[1;31m DB connection failed\x1b[0m', err));
You need to create your database :
DROP DATABASE IF EXISTS stayintouch;

CREATE DATABASE stayintouch;
The .env file must contain the correct parameters:
# PGHOST=''
# PGDATABASE='stayintouch'
# PGUSER=''
# PGPASSWORD=''
# PGPORT=5432
Otherwise the connection will fail :
Handle errors
For error handling, I extend the Error object to customise my message when throwing a new error :
./src/app/services/errorHandler.ts
class ErrorApi extends Error {
  constructor(req: Request, res: Response, statusCode = 500, message: string) {
    super(message);
    res.status(statusCode).json({ message: message });

    //~ Log errors
    errorLoggerHandling(message, req, res);
  }
}
Use it :
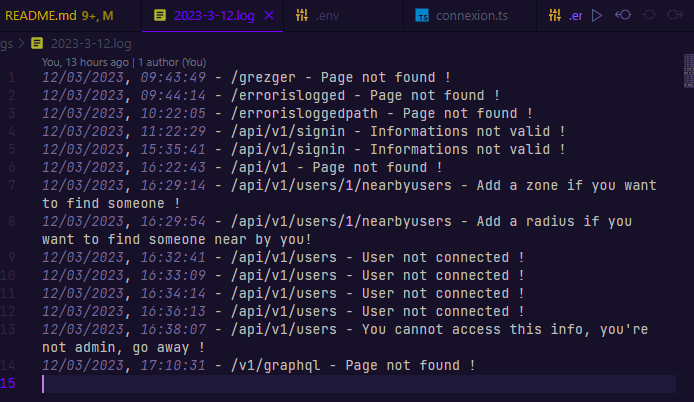
if (!userExist) throw new ErrorApi(req, res, 401, `Informations not valid !`);You can see my "errorLoggerHandling", here I wanted to log error messages (I made it for the development environment):
//~import modules
import { formattedDate } from '../utils/formattedDate.js';
import { Request, Response } from 'express';
import * as fs from 'fs';

//~ resolve __dirname
import { resolve } from 'path';
const __dirname = resolve(`.`);
// resolve will define your root file

//~ Logger
import debug from 'debug';
const logger = debug('ErrorHandling');
/**
 * Manage error
 */
function errorLoggerHandling(message: string, req: Request, res: Response) {
  const actualDate = new Date();

  // format error message : Date + url + message
  const logMessage = `${actualDate.toLocaleString()} - ${req.url} - ${message}\r`;

  // date format YYYY-MONTH-DD
  const fileName = `${formattedDate}.log`;

  // create a log and write it in your file
  fs.appendFile(`${__dirname}/logs/${fileName}`, logMessage, (error) => {
    if (error) logger(error);
  });
}

export { errorLoggerHandling };
Result :
Favourite part SQL
My favourite part : working with SQL and PostgreSQL ! I have so many things to explore, but I want to share this work with you.
Discovering PostGis
PostGIS is a spatial database extender for PostgreSQL object-relational database. It adds support for geographic objects allowing location queries to be run in SQL. (that's the intro of official website)
In this case, I wanted to use PostGis to find the closest users who are within a radius of one kilometre from me.
I need to read some documentation, and test it.
-
First, connect to the database
-
Create tables and insert some data
-
Create extension
CREATE EXTENSION postgis;- And check that it is properly installed:
stayintouch=# \dx
                                List of installed extensions
  Name   | Version |   Schema   |                        Description
---------+---------+------------+------------------------------------------------------------
 plpgsql | 1.0     | pg_catalog | PL/pgSQL procedural language
 postgis | 3.3.2   | public     | PostGIS geometry and geography spatial types and functions
The Open Geospatial Consortium provide a model for geospatial data.
My use of PostGis :
-
2D spatial geography using ST_DWithin that returns true if the geometries are within a given distance
-
Point, this is a 0-dimensional geometry that represents a single location in coordinate space
-
Result I want :
[
  {
    "firstName": "",
    "lastName": "",
    "location": {
      "lng": ,
      "lat":
    }
  },
  {
    "firstName": "",
    "lastName": "",
    "location": {
      "lng": ,
      "lat":
    }
  }
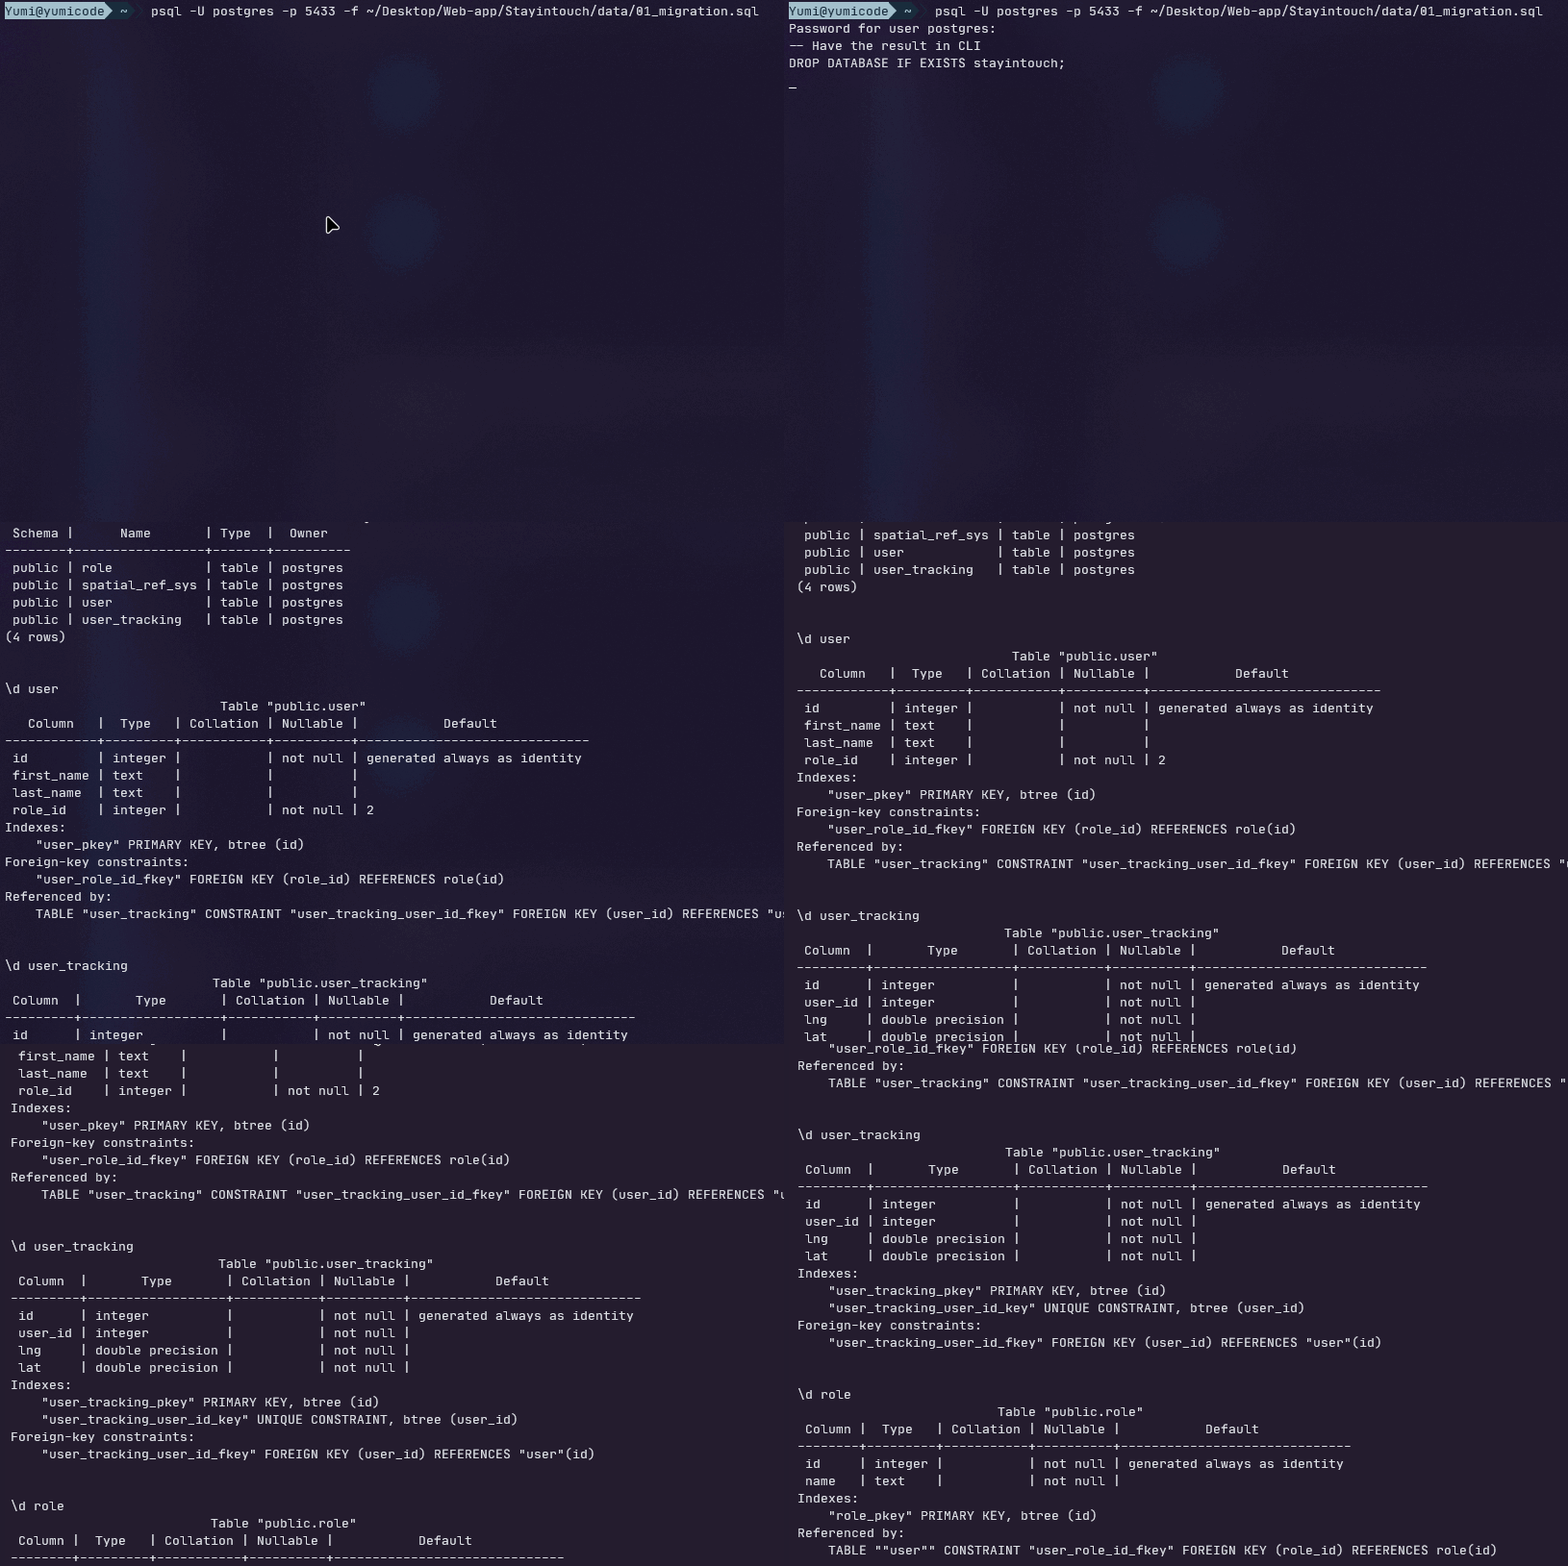
]- If you want to use the database, I've created a migration file with all the necessary queries. To use the file :
on Windows
psql -U postgres -p PORT -h HOST -f ~/PATH/TO/Stayintouch/data/01_migration.sqlon Linux
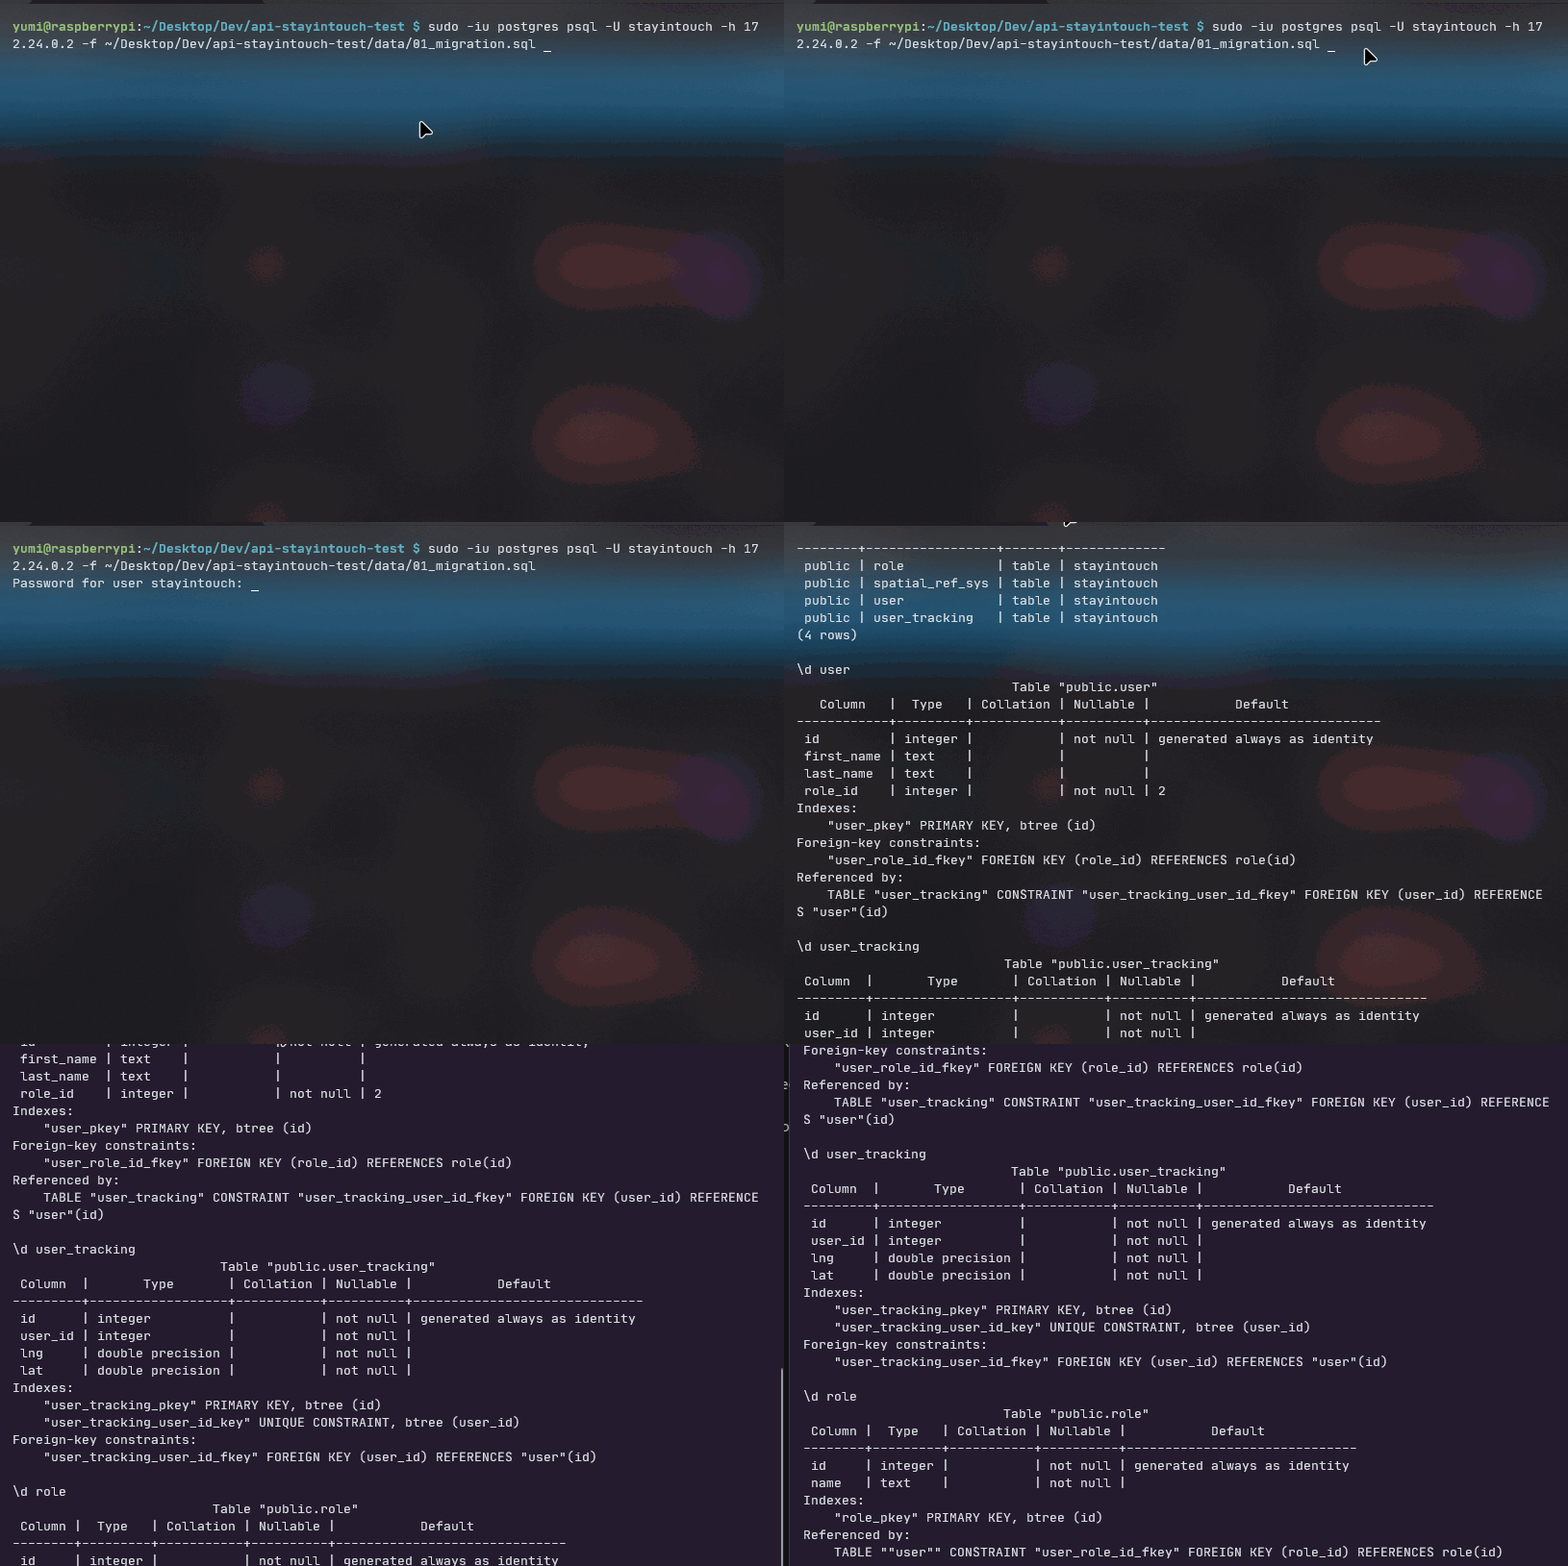
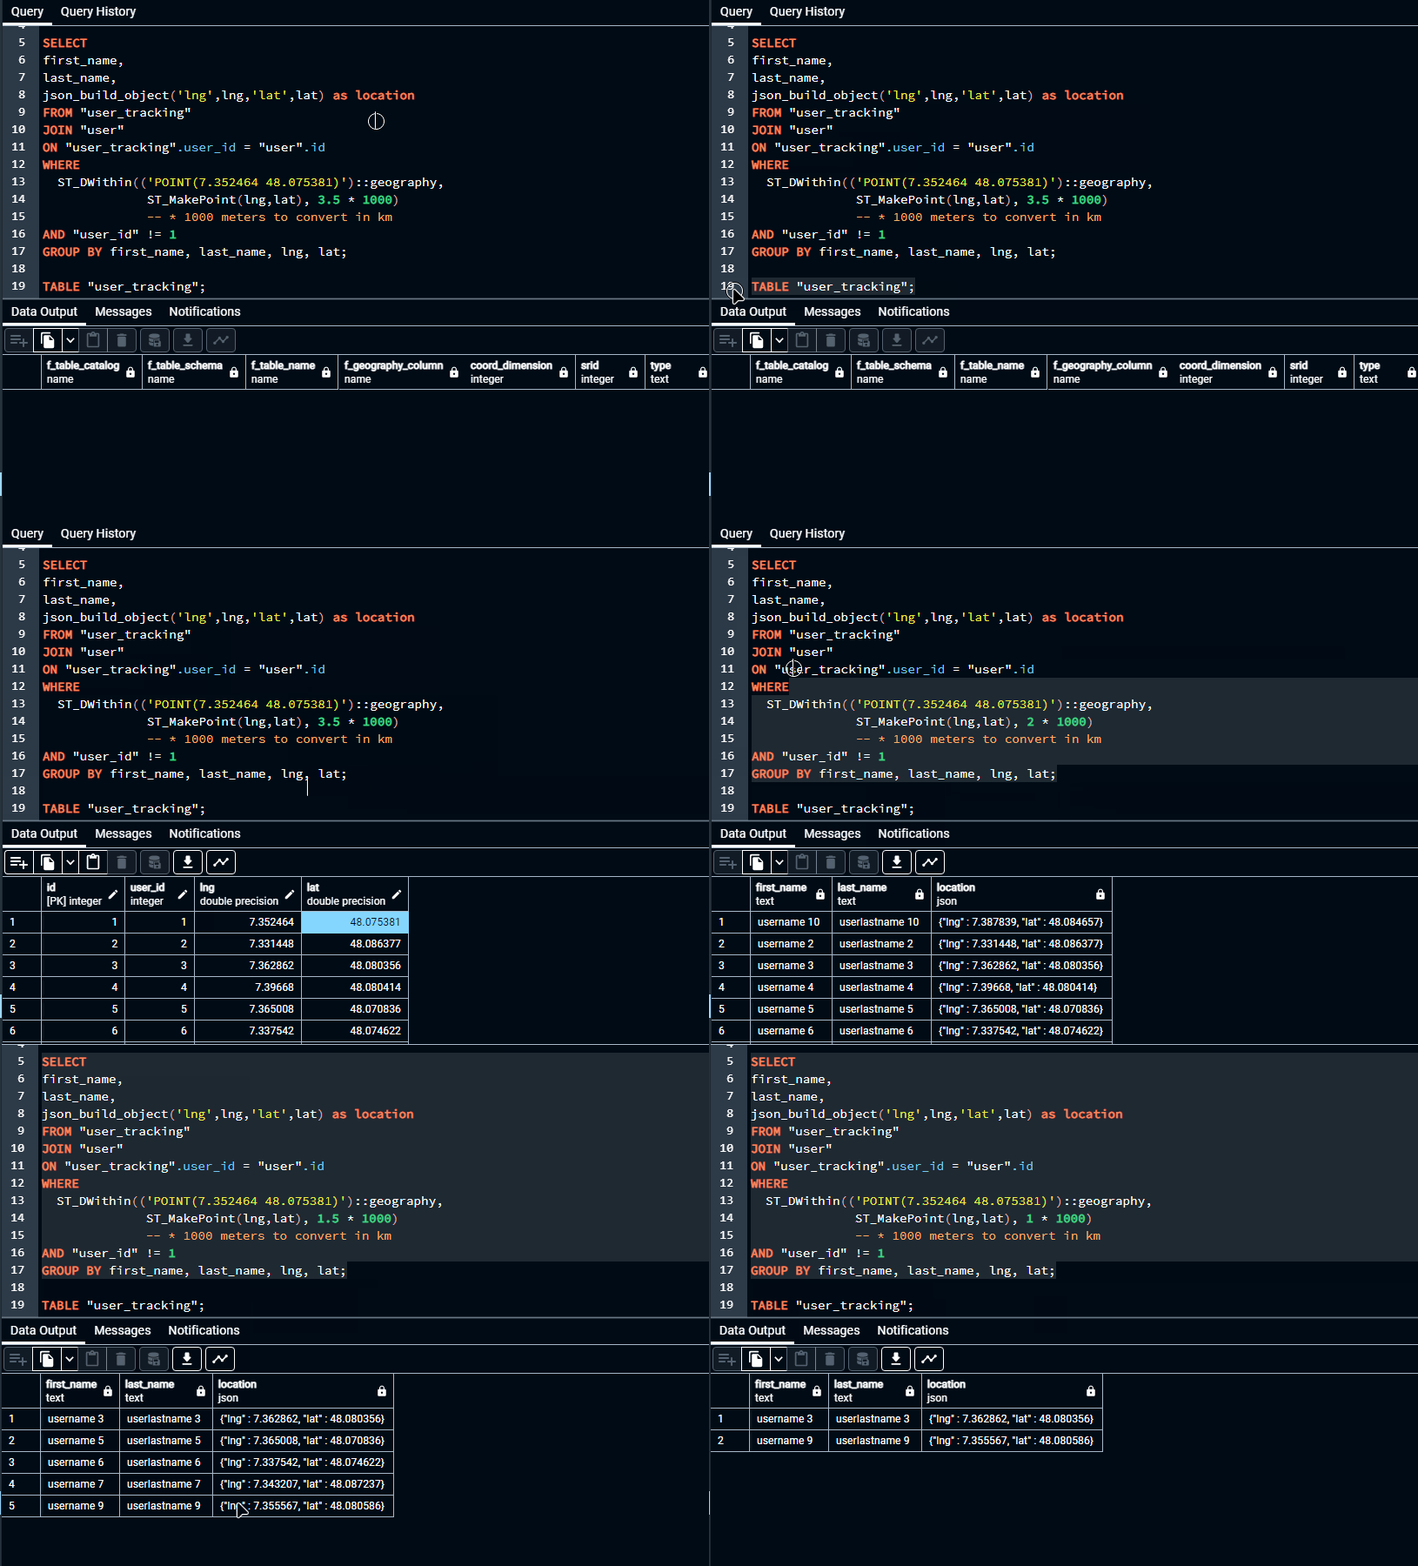
sudo -iu postgres psql -U stayintouch -h 172.24.0.2 -f ~/PATH/TO/api-stayintouch-test/data/01_migration.sqlUse the fonction from PostGis :
SELECT
first_name,
last_name,
json_build_object('lng',lng,'lat',lat) as location
FROM "user_tracking"
JOIN "user"
ON "user_tracking".user_id = "user".id
WHERE
  ST_DWithin(('POINT(7.352464 48.075381)')::geography,
              ST_MakePoint(lng,lat), 3.5 * 1000)
			  -- * 1000 meters to convert in km
AND "user_id" != 1
GROUP BY first_name, last_name, lng, lat;
Test with pgAdmin4:
And create the functions :
CREATE OR REPLACE FUNCTION find_users_by_radius(userId INT, radius NUMERIC)
RETURNS SETOF nearby_users AS $$

DECLARE
_lng DOUBLE PRECISION := (SELECT lng FROM "user_tracking" AS UT
						  WHERE UT."user_id" = userId);
_lat DOUBLE PRECISION := (SELECT lat FROM "user_tracking" AS UT
						  WHERE UT."user_id" = userId);

BEGIN
RETURN QUERY (
	SELECT
first_name,
last_name,
json_build_object('lng',lng,'lat',lat) as location
FROM "user_tracking"
JOIN "user"
ON "user_tracking".user_id = "user".id
WHERE
  ST_DWithin(('POINT('|| _lng || ' ' || _lat ||')')::geography,
              ST_MakePoint(lng,lat),radius
			 * 1000)
AND "user_id" != userId
GROUP BY first_name, last_name, lng, lat
);
END;
$$ LANGUAGE plpgsql VOLATILE;
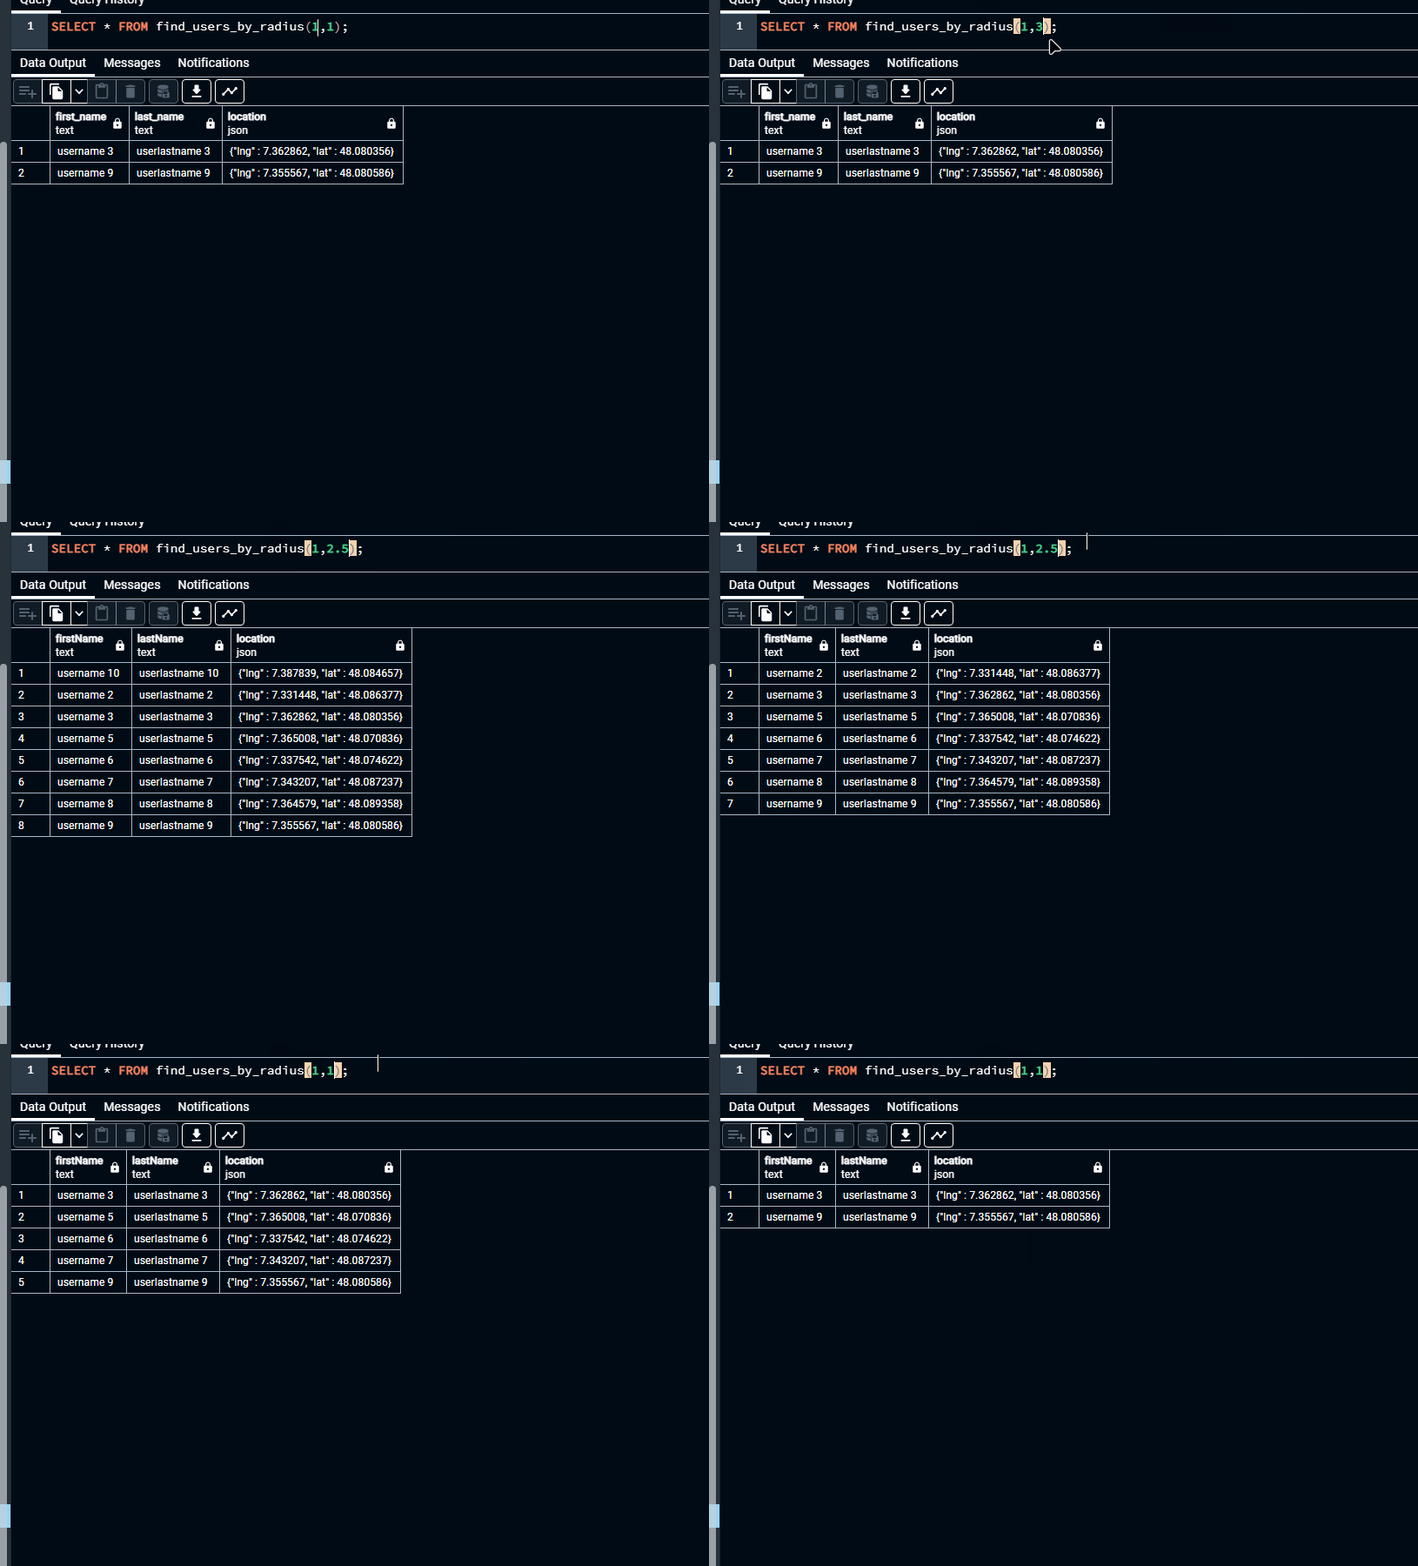
Result :
I've also created other functions to make querying in Datamapper easier :)
If you want to take a look, it's here.
And create the function in datamapper :
async findAllNearbyUsers(userId: number, radius: number) {
    if (this.client instanceof pg.Pool) {
      const preparedQuery = {
        text: `
                SELECT *
                FROM "${this.nearbyUsersFunction}"($1,$2);`,
        values: [userId, radius],
      };

      const result = await this.client.query(preparedQuery);
      return result.rows;
    }
  }
Result:
Authentication JWT
Authentication is handled by Json Web Tokens authentication, which is a standard RFC 7519 method for securely representing claims between two parties.
For this simple API, here are an example of generating access and refresh tokens :
//~  Jwt Access_Token
function generateAccessToken(user:object) {
    return jwt.sign(user, process.env.ACCESS_TOKEN_SECRET!, { expiresIn: '1d' }); // 1d => one day, 60m => 60 minutes
}

function generateRefreshToken(user:object, req:Request) {
    //* -- register refresh tokens
    req.session.refreshToken = [];
    const token = req.session.refreshToken;

    const refreshToken = jwt.sign(user, process.env.REFRESH_TOKEN_SECRET!, { expiresIn: '2d' }); // 1d => one day, 60m => 60 minutes

    token.push(refreshToken);

    return refreshToken;
}
And how to use it in the controller :
const doSignIn = async (req: Request, res: Response) => {
  try {
    const { first_name } = req.body;

    const userExist = await User.findOne(first_name);
    if (!userExist) throw new ErrorApi(req, res, 401, `Informations not valid !`);

    //~ Authorization JWT
    const accessToken = generateAccessToken({ userExist });
    const refreshToken = generateRefreshToken({ userExist }, req);
    const userIdentity = { ...userExist, accessToken, refreshToken };

    //~ Result
    return res.status(200).json(userIdentity);
  } catch (err) {
    if (err instanceof Error) logger(err.message);
  }
};
Then you can create a function to validate you token :
function validateToken(req: Request, res: Response, next: NextFunction) {
  try {
    //   get token from header
    const authHeader = req.headers['authorization'];

    if (authHeader === undefined) throw new ErrorApi(req, res, 400, 'No token found !');

    //header contains token "Bearer <token>", split the string and get the 2nd part of the array
    const accessToken = authHeader.split(' ')[1];

    jwt.verify(accessToken, process.env.ACCESS_TOKEN_SECRET!, (err: unknown, user: any) => {
      if (err) {
        throw new ErrorApi(req, res, 403, 'The token is invalid!');
      }
      req.user = user.userExist;

      req.session.token = accessToken;

      next();
    });
  } catch (err) {
    if (err instanceof Error) logger(err.message);
  }
}
And add it as a middleware on your route :
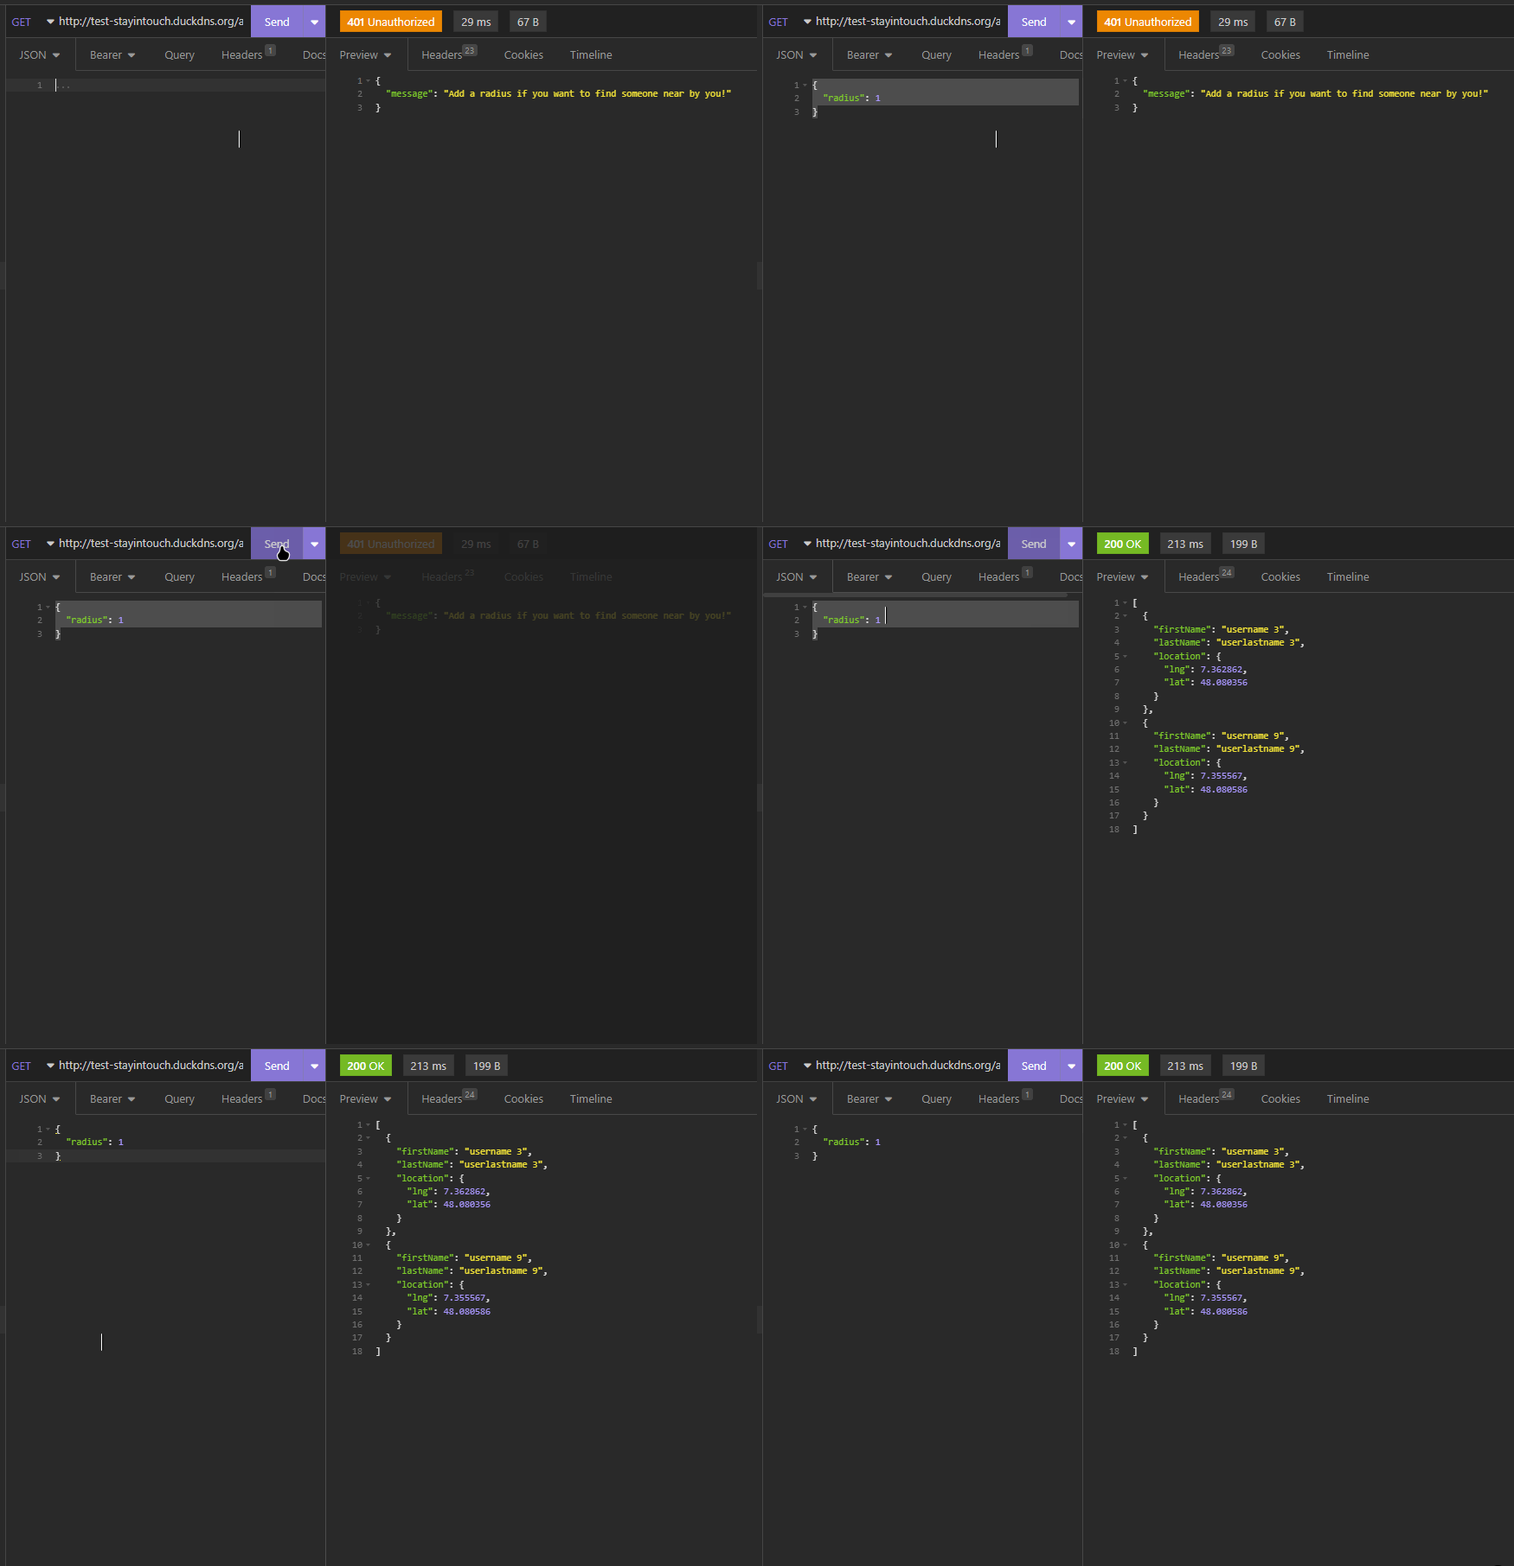
router.get('/api/v1/users/:userId(\\d+)/nearbyusers', [validateToken, auth, admin], fetchNearbyUsers);And if you want to test if it works, I've tested on Insomnia, restClient extension and Postman but here's an example with restClient :
@entryPoint = http://localhost:4300/api/v1

@accessToken = Authorization: Bearer eyJhbGciOiJIUzI1NiIsInR5cCI6IkpXVCJ9.eyJ1c2VyRXhpc3QiOnsiaWQiOjEsImZpcnN0X25hbWUiOiJ1c2VybmFtZSAxIiwibGFzdF9uYW1lIjoidXNlcmxhc3RuYW1lIDEiLCJyb2xlIjoiYWRtaW4ifSwiaWF0IjoxNjc4NjkxOTc4LCJleHAiOjE2Nzg3NzgzNzh9.xZQ09J2YueEa_p6lGtEJUk1FOa_cIg9qQwa6fKQ4s6U

GET {{entryPoint}}/users/1/nearbyusers
Content-Type: application/json
{{accessToken}}

{
  "radius": 1
}
You need to provide the Bearer token to make it work and the token must be valid.
API works
Demo with Insomnia :
Cloud RaspberryPi
To deploy, I use my RaspberryPi, which I've configured as a server.
If you have a VPS configured with Linux OS, you can follow the same steps as me.
Connect to your remote server using ssh :
ssh username@IPaddressMake sure you have given Github your ssh key and clone the repository.
Go to the folder :
cd api-stayintouch-testAnd configure the .env file to make it works :
#MY_PORT=VALUE
PORT=4300

#INFO CONNEXION DB FOR PSQL Docker
PGHOST='db-stayintouch'
PGDATABASE='stayintouch'
PGUSER='stayintouch'
PGPASSWORD='stayintouch'
PGPORT=5432


#SESSION
SESSION_SECRET=

#JWT
#Generate random token :
#launch node and copy
#require("crypto").randomBytes(64).toString("hex")
ACCESS_TOKEN_SECRET=

REFRESH_TOKEN_SECRET=

# DEBUG
DEBUG=Entrypoint,Pool,ErrorHandling,Controller,Jwt
PGHOST value is the name given in docker-compose.yml file
version: '1'
services:
  express:
    container_name: 'api-stayintouch-compose'
    build: .
    ports:
      - '4300:4300'
    volumes:
      - .:/home/server/api-stayintouch
    image: 'api-stayintouch'
    depends_on:
      - db-stayintouch # HERE THE NAME OF HOST CONTAINER OF DB
    restart: always
  db-stayintouch:
    container_name: postgres-api-stayintouch
    image: 'tobi312/rpi-postgresql-postgis:15-3.3-alpine-arm'
    ports:
      - '5435:${PGPORT}'
    environment:
      - POSTGRES_USER=${PGUSER}
      - POSTGRES_PASSWORD=${PGPASSWORD}
      - POSTGRES_DB=${PGDATABASE}
    volumes:
      - db-data:/var/lib/postgresql/data # persist data even if container shuts down
volumes:
db-data: # names volumes can be managed easier using docker-composeDocker and docker compose
I've written a Makefile to build and run my containers but you can do without it :
- Build the image :
sudo docker build --network=host -t api-stayintouch .=> Build the image from given Dockerfile and give it a name : api-stayintouch
- use docker compose to run both containers (database and api)
sudo docker compose up

# OR DETACHED MODE
sudo docker compose up -d
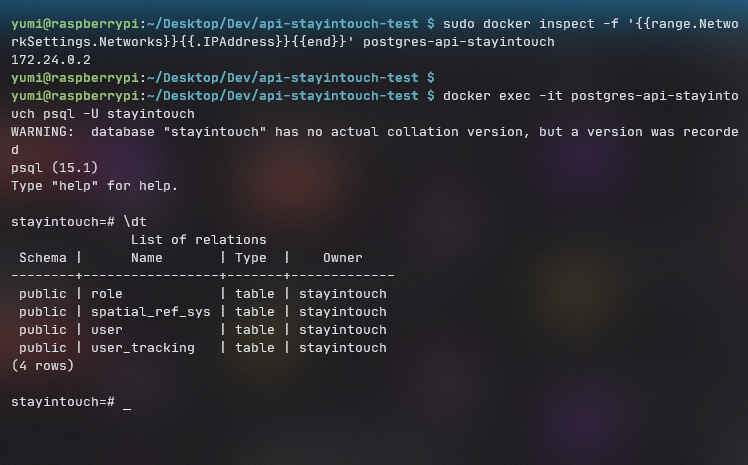
If you want to connect to your database Docker container, you can get the IP address of your container by running :
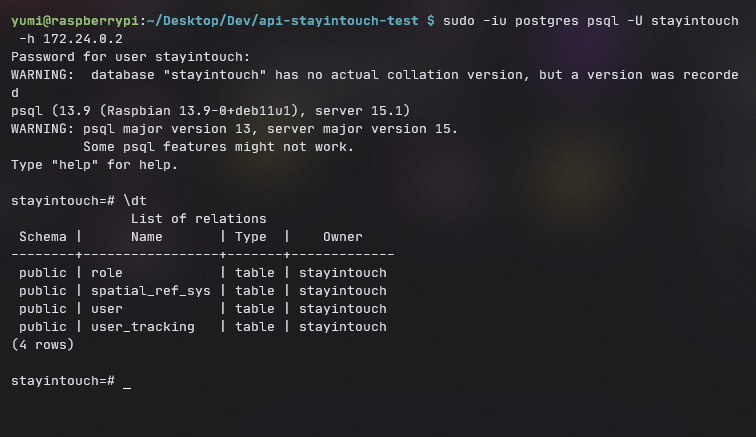
sudo docker inspect -f '{{range.NetworkSettings.Networks}}{{.IPAddress}}{{end}}' postgres-api-stayintouch- Connect to your database from the host Linux
sudo -iu postgres psql -U stayintouch -h 172.24.0.2Or with docker command using the interactive terminal flag :
sudo docker exec -it postgres-api-stayintouch psql -U stayintouchMigration database in Docker
And then you can migrate your database as showed in these steps here
Portainer and Nginx Proxy Manager
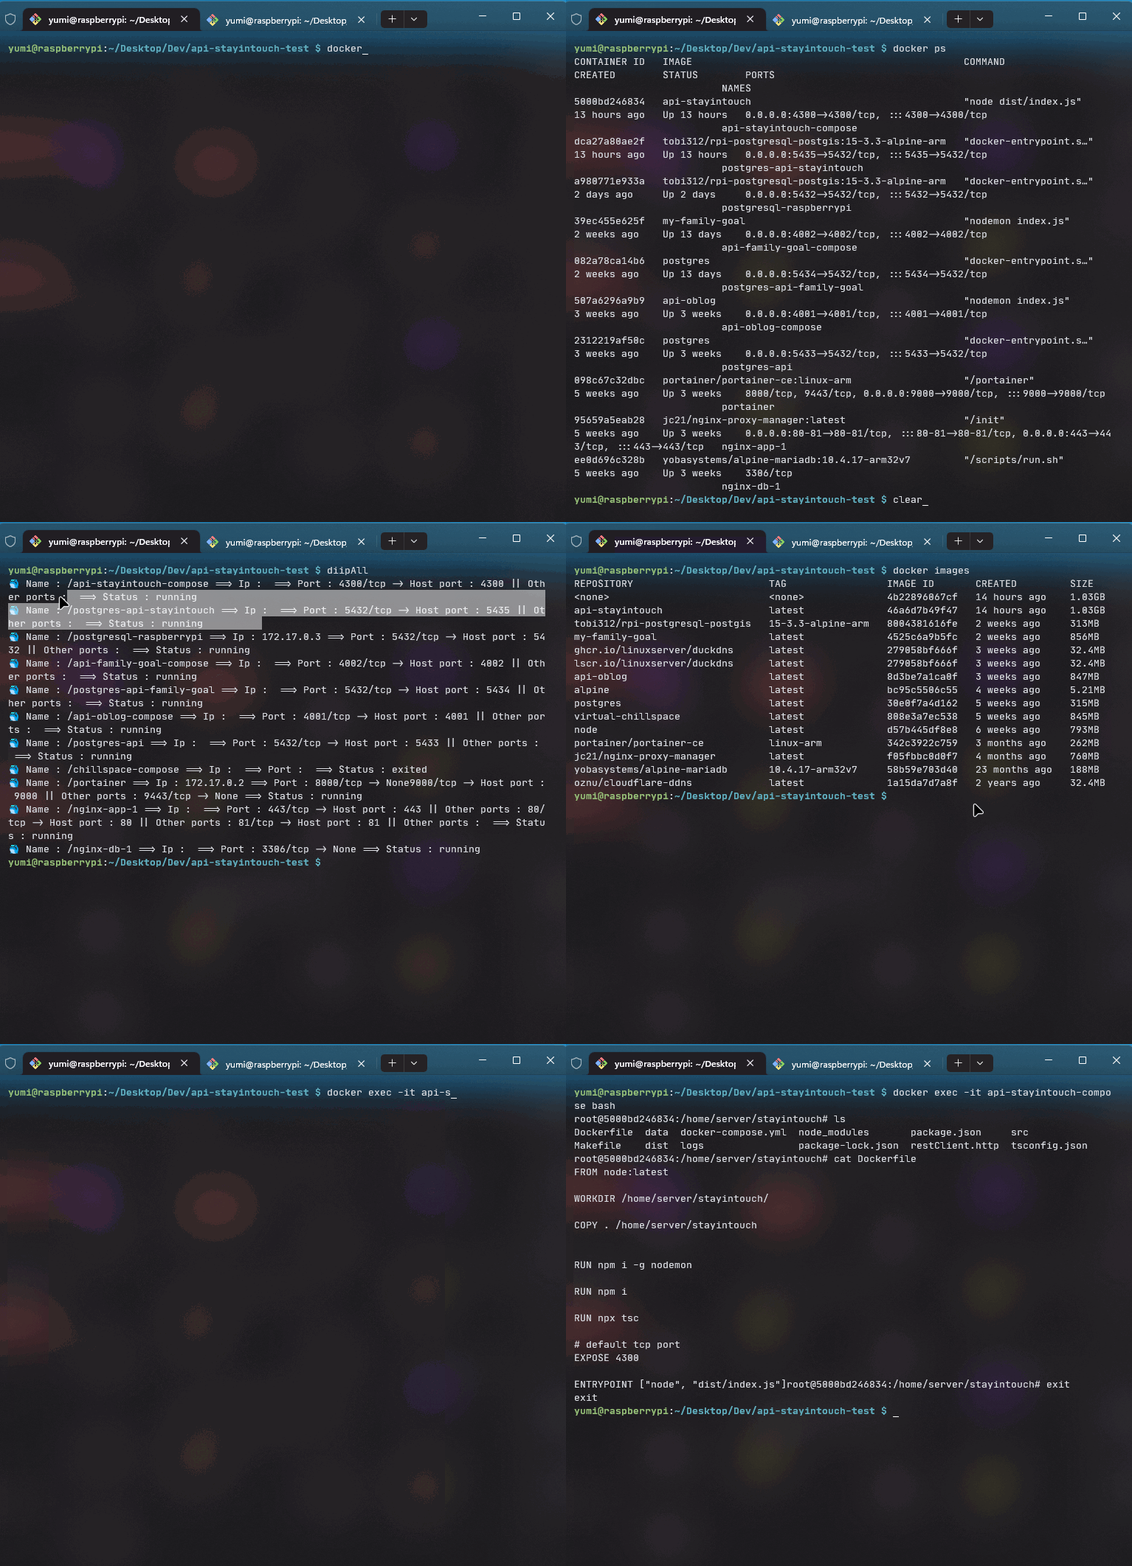
You can manage your containers with command line (demo, you can skip):
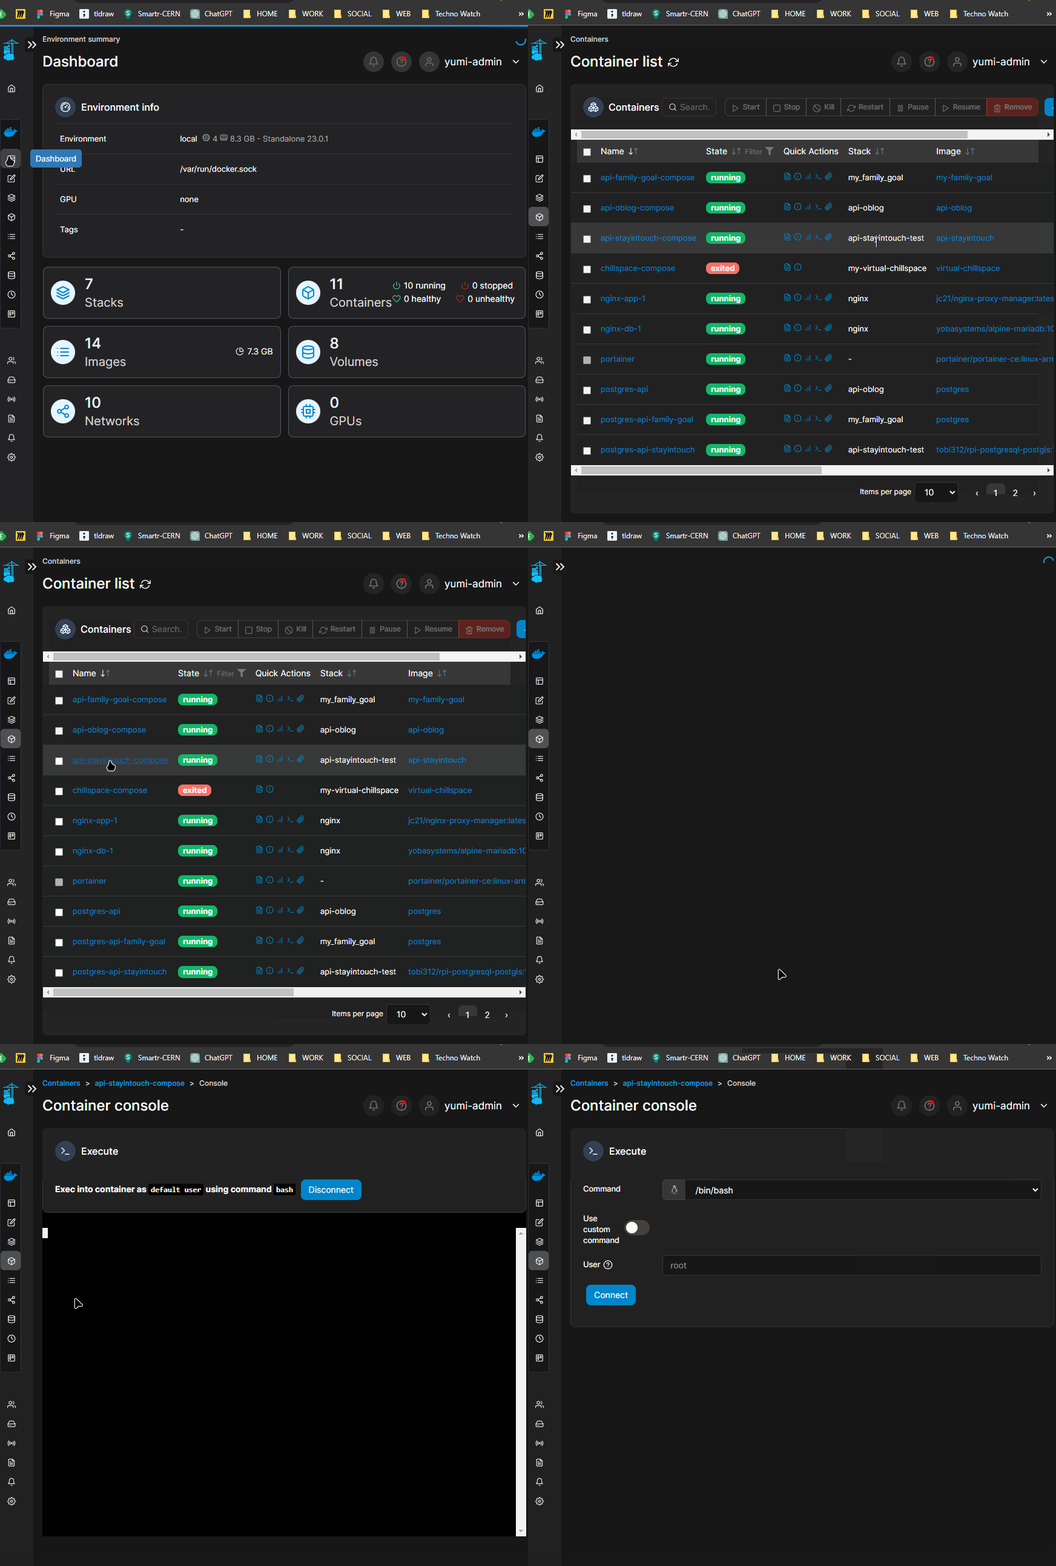
Or manage it with Portainer which is a powerful container management, I love the graphical interface :
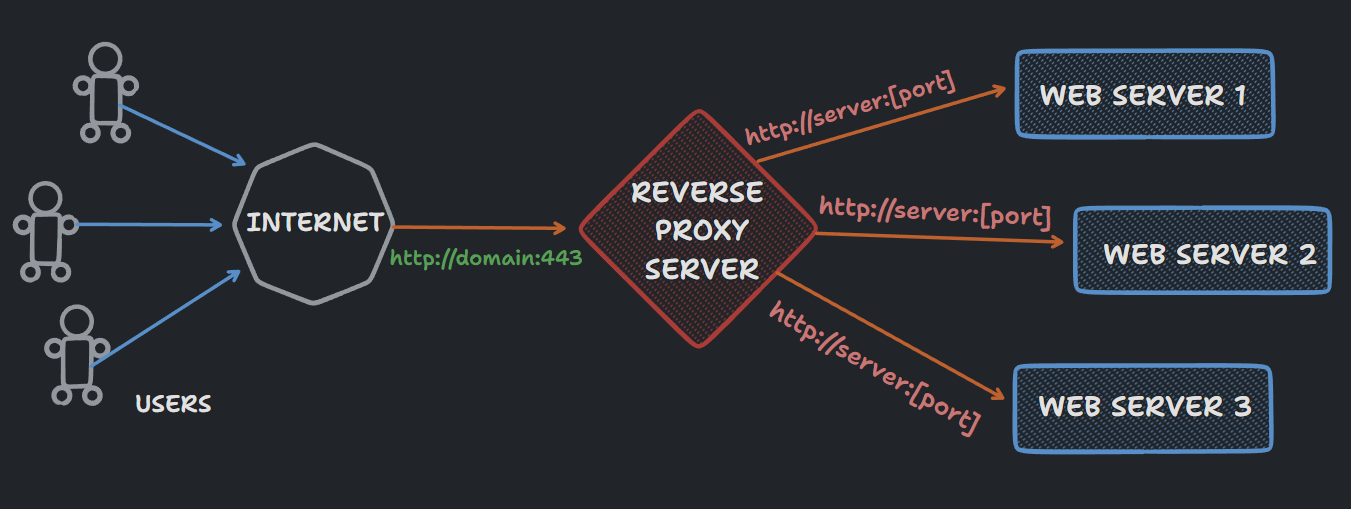
I use Nginx Proxy Manager to expose my services easily and securely using Nginx to reverse Proxy. A reverse proxy is a server that sits in front of web servers and forwards client (web browser) requests to those web servers.
Reverse proxies are implemented to help increase security, performance, and reliability.
Need a super drawing ? Let's go !
Domain name
I used DuckDNS to have a free domain name
Firewall rules
For my case, I need to open the port and add a rule with ufw (Uncomplicated Firewall (UFW) is a command-line firewall abstraction layer ):
API online
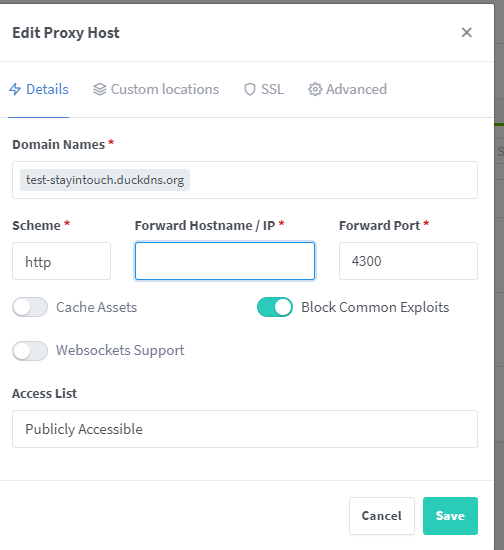
And I can link it and configure it with my Nginx Proxy Manager :
And ... the link is here !! => http://test-stayintouch.duckdns.org/
Makefile usage
If you want to use Makefile :
- Build the image
make docker-build- Use docker-compose file to run the container
make docker-compose- Use docker compose in detached mode
make docker-compose-detached- Get the ip address of the container where the api is running
make get-ip-docker-api- Get the ip address of the container where the database is running
make get-ip-docker-db- Stop the containers
make cleanConclusion
I enjoyed doing this API, I've never used PostGis before and wanted to share the complete steps to build a backend API from scratch to deployment.
Hope it can help, thank you for reading :)
Each step takes me further.
Link to summary
Sources
-
Downloads
-
Documentation
