本代码原本作者是:zhaozhen2333
此部分是我在作者原本readme的基础上进行添加的。我对原本的代码内容进行轻微的修改,以便在本地顺利的跑通。
作者给出的方法是在transforms.py中Pad类下修改成图片中的代码,但是由于我在服务器中无法调用本地的mmdet/datasets/pipelines/transforms.py中的Pad类,只会调用下载的mmdet包中内容。因此我采用自定义数据预处理模块的形式进行解决。我已经在mmcustom文件夹中添加了自定义的前处理,并且在train/config.py中将pad替换成了pad_custom。解决了kenerl小于图片长度问题。
这是作者要在transforms.py中Pad类下替换的代码。
我的修改方式:
- 添加自定义数据预处理模块。如下图:
- 在config.py中替换之前的Pad配置,如下图:
这是我本地跑通的运行环境,不一定里面的包全是用于该项目代码的,可以参考一下。
pip list
| package | version |
|---|---|
| absl-py | 1.4.0 |
| addict | 2.4.0 |
| albumentations | 1.3.0 |
| asttokens | 2.2.1 |
| attrs | 22.2.0 |
| backcall | 0.2.0 |
| cachetools | 5.3.0 |
| certifi | 2022.12.7 |
| charset-normalizer | 3.0.1 |
| click | 8.1.3 |
| click-plugins | 1.1.1 |
| cligj | 0.7.2 |
| colorama | 0.4.6 |
| contourpy | 1.0.7 |
| cycler | 0.11.0 |
| decorator | 5.1.1 |
| einops | 0.6.0 |
| executing | 1.2.0 |
| Fiona | 1.9.0 |
| flatbuffers | 23.1.21 |
| fonttools | 4.38.0 |
| GDAL | 3.4.1 |
| geopandas | 0.12.2 |
| google-auth | 2.16.0 |
| google-auth-oauthlib | 0.4.6 |
| grpcio | 1.51.1 |
| idna | 3.4 |
| imageio | 2.25.0 |
| imgaug | 0.4.0 |
| importlib-metadata | 6.0.0 |
| ipython | 8.10.0 |
| jedi | 0.18.2 |
| joblib | 1.2.0 |
| kiwisolver | 1.4.4 |
| Markdown | 3.4.1 |
| markdown-it-py | 2.2.0 |
| MarkupSafe | 2.1.2 |
| matplotlib | 3.6.3 |
| matplotlib-inline | 0.1.6 |
| mdurl | 0.1.2 |
| mmcv-full | 1.4.7 |
| mmdet | 2.22.0 |
| mmsegmentation | 0.20.2 |
| model-index | 0.1.11 |
| munch | 2.5.0 |
| networkx | 3.0 |
| numpy | 1.23.5 |
| oauthlib | 3.2.2 |
| onnxruntime-gpu | 1.8.0 |
| opencv-python | 4.7.0.68 |
| opencv-python-headless | 4.7.0.68 |
| openmim | 0.3.6 |
| ordered-set | 4.1.0 |
| packaging | 23.0 |
| pandas | 1.5.3 |
| parso | 0.8.3 |
| pexpect | 4.8.0 |
| pickleshare | 0.7.5 |
| Pillow | 9.4.0 |
| pip | 22.3.1 |
| prettytable | 3.6.0 |
| prompt-toolkit | 3.0.36 |
| protobuf | 3.20.3 |
| ptyprocess | 0.7.0 |
| pure-eval | 0.2.2 |
| pyasn1 | 0.4.8 |
| pyasn1-modules | 0.2.8 |
| pycocotools | 2.0.6 |
| Pygments | 2.14.0 |
| pyparsing | 3.0.9 |
| pyproj | 3.4.1 |
| pyshp | 2.3.1 |
| python-dateutil | 2.8.2 |
| pytz | 2022.7.1 |
| PyWavelets | 1.4.1 |
| PyYAML | 6.0 |
| qudida | 0.0.4 |
| requests | 2.28.2 |
| requests-oauthlib | 1.3.1 |
| rich | 13.3.2 |
| rsa | 4.9 |
| scikit-image | 0.19.3 |
| scikit-learn | 1.2.1 |
| scipy | 1.10.0 |
| setuptools | 59.5.0 |
| shapely | 2.0.1 |
| six | 1.16.0 |
| sklearn | 0.0.post1 |
| stack-data | 0.6.2 |
| tabulate | 0.9.0 |
| tensorboard | 2.11.2 |
| tensorboard-data-server | 0.6.1 |
| tensorboard-plugin-wit | 1.8.1 |
| terminaltables | 3.1.10 |
| threadpoolctl | 3.1.0 |
| tifffile | 2023.1.23.1 |
| timm | 0.4.12 |
| torch | 1.10.0+cu113 |
| torchaudio | 0.10.0+cu113 |
| torchvision | 0.11.0+cu113 |
| tqdm | 4.64.1 |
| traitlets | 5.9.0 |
| typing_extensions | 4.4.0 |
| urllib3 | 1.26.14 |
| wcwidth | 0.2.6 |
| Werkzeug | 2.2.2 |
| wheel | 0.37.1 |
| yapf | 0.32.0 |
| zipp | 3.12.0 |
1.根据任务需求修改可训练的配置文件out_shp/train/config.py。
2.在out_shp/train/init_images下存放数据。数据格式如下:
3.因为我需要调试代码的原因,所以我不喜欢用shell脚本。所以我是直接运行pre_for_train.py(裁图脚本)。注意:要修改里面的各种数据路径和__places__列表。 __places__列表里面存储的是每幅图像除去"_offset"后缀的文件名。例如,你的图像名为A_1984_offset.tif,则__places__为["A_1984"]。修改方式如下图所示:
修改__places__:
修改数据路径:
4.直接调用tools/train_common.py脚本来进行训练。根据任务需求修改配置参数。
5.训练完成后的最终结果形式如下图所示:
我将作者的run_shp.sh进行拆分成3部分,分别是1th_pre_for_outshp.sh,2th_run_test_py.sh和3th_single_shp_out_py.sh。其中1th_pre_for_outshp.sh分成两部分走,先跑一边sys.argv[3] == 'no',再跑一边sys.argv[3] == 'yes'。
1.将需要测试的tif数据放到/out_shp/inference/images中。注意需要坐标系为1984经纬度坐标系,最后才能叠上去。如下图所示:
2.开始准备运行1th_pre_for_outshp.sh。此步骤通过pre_for_outshp.py进行裁剪图像(遥感都是大图)。 值得注意的是,此sh需要分两步进行(我也不太清楚为啥一起跑就出问题),第一步是注释下面的部分跑一遍,来裁剪图像,并在tmp/中生成图片对应的txt文件。注释内容如下:
3.注释掉1th_pre_for_outshp.sh上面的部分,打开第二步骤中注释掉的下面部分,再跑一边。此步骤是生成图片和图片id对应的test.json。注释内容如下:
最终生成的结果如下图所示:
4.修改2th_run_test_py.sh中的config.py路径和权重路径,并运行结果。此步骤会生成两个解译结果1536-1280.bbox.json和1536-1280.segm.json。如下图所示:
5.修改3th_single_shp_out_py.sh中的places中的测试图名称。places和训练中时__places__的命名规则一致。
6.运行3th_single_shp_out_py.sh,此步骤是通过single_shp_out.py文件来拼接最终图像,最后的shp结果保存在/out_shp/inference/1536-1280/out_shp中。文件路径如下:
Our code is developed based on the mmdetection. All the our code is in the file "out_shp"
Extracting cultivated land accurately from high-resolution remote images is a basic task for precision agriculture. This work introduces our solution to iFLYTEK challenge 2021 cultivated land extraction from high-resolution remote sensing images. We established a highly effective and efficient pipeline to solve this problem. We first divided the original images into small tiles and separately performed instance segmentation on each tile. We explored several instance segmentation algorithms that work well on natural images and developed a set of effective methods that are applicable to remote sensing images. Then we merged the prediction results of all small tiles into seamless, continuous segmentation results through our proposed overlap-tile fusion strategy. We achieved first place among 486 teams in the challenge.
Index Terms: high-resolution remote sensing images, instance segmentation, cultivated land segmentation
Thanks iFLYTEK and ChangGuang Satellite.
All images and their associated annotations in the dataset can be used for academic purposes only, but any commercial use is prohibited.
dataset are available at: 链接:https://pan.baidu.com/s/1_yFbJ6nX1ovOK0_9BZ5Lrg?pwd=1234 提取码:1234
The Detailed Experimental Record: http://arxiv.org/abs/2202.10974
本地运行的环境配置是针对linux系统和2080Ti显卡,如果测试时,遇到环境配置不符合,还请再联系
-
1. pytorch安装
下载anaconda
wget https://mirrors.tuna.tsinghua.edu.cn/anaconda/archive/Anaconda3-2020.11-Linux-x86_64.sh
安装anaconda
chmod +x Anaconda3-2020.11-Linux-x86_64.sh
./Anaconda3-2020.11-Linux-x86_64.sh
创建虚拟环境torch_1_7
conda create -n torch_1_7 python=3.7
进入虚拟环境torch_1_7
conda activate torch_1_7
安装pytorchconda install pytorch=1.7.0 torchvision torchaudio cudatoolkit=10.2 -c pytorch
conda install pytorch=1.7.0 torchvision torchaudio cudatoolkit=11.0 -c pytorch
2022年10月补充: pytorch版本更新了,现在这个时间需要升级使用新版本,对于所有的10、20、30显卡安装pytorch
conda install pytorch=1.7.1 torchvision torchaudio cudatoolkit=11.0 -c pytorch
mmdetection版本也更新了,mmcv有时会不匹配,只需要更换mmcv。我们自己的代码全在out_shp里,请将out_shp放入最新版的mmdetection里面。
-
2. mmdetection安装
安装MMDetection和MIM,它会自动处理OpenMMLab项目的依赖,包括mmcv等python包
pip install openmim
mim install mmdet
可能出现找不到dist_train.sh和dist_test.sh的情况,请先运行
cd mmdetection
chmod 777 ./tools/dist_train.sh
chmod 777 ./tools/dist_test.sh
MMDetection 是一个基于 PyTorch 的目标检测开源工具箱。它是 OpenMMLab 项目的一部分。 MMDetection安装文档:快速入门文档
-
3. 必须的函数包安装
安装sklearn
pip install sklearn
安装imgaug
pip install imgaug
安装shapefile
pip install pyshp
安装tqdm
pip install tqdm
安装gdalconda install -c conda-forge gdal
conda install -c conda-forge tifffile
使用tifffile.imread(path)
安装shapely
pip install shapely
安装skimage
pip install scikit-image
-
文件说明
文件结果如图所示,请您在训练前将初赛的原始数据复制到train/init_images内,tif文件直接放在image文件夹下,shp文件直接放在label文件夹下;
测试前将复赛数据tif文件直接复制到inference/images内
-
训练过程 训练开始前,我们使用mmdetection提供的官方权重。为了方便您的训练,我们已经将其下载到mmdetection/out_shp中
cd mmdetection/out_shp
wget https://download.openmmlab.com/mmdetection/v2.0/htc/htc_x101_64x4d_fpn_dconv_c3-c5_mstrain_400_1400_16x1_20e_coco/htc_x101_64x4d_fpn_dconv_c3-c5_mstrain_400_1400_16x1_20e_coco_20200312-946fd751.pth
回到mmdetection目录开始训练,{GPU_NUM}为使用GPU的显卡个数
cd ..
source out_shp/train/run_train.sh ${GPU_NUM}
-
测试过程
需要根据根据训练的log文件,选择最佳的权重。您也可以使用我们保存的训练权重进行测试out_shp/inference/htc-600/epoch_10.pth
可进入mmdetection目录下,直接运行下面的程序,将直接生成提交结果out_shp/inference/submit_1536-1280.zipsource out_shp/inference/run_shp.sh ${GPU_NUM}
-
选择4通道tif文件的RGB三个通道输出小图数据
-
运用如下图所示的滑窗剪切图片,首先以height_stride的步长向下移动,直至达到图片的下边界,然后以width_stride向右平移一单位,继续以height_stride的步长向下移动,以剪切出小图组成数据集
-
当滑窗的下边界超出图片的下边界时,停止移动,以图片的下边界作为滑窗的下边界;当滑窗的右边界超出图片的右边界时,停止移动,以图片的右边界作为滑窗的右边界;
-
在所有滑窗中随机采样组成训练集和验证集,训练集和验证集比例为5:1
-
在训练与测试模型时,滑窗尺寸为512 x 512,height_stride与width_stride均为512 (滑窗不重叠)
-
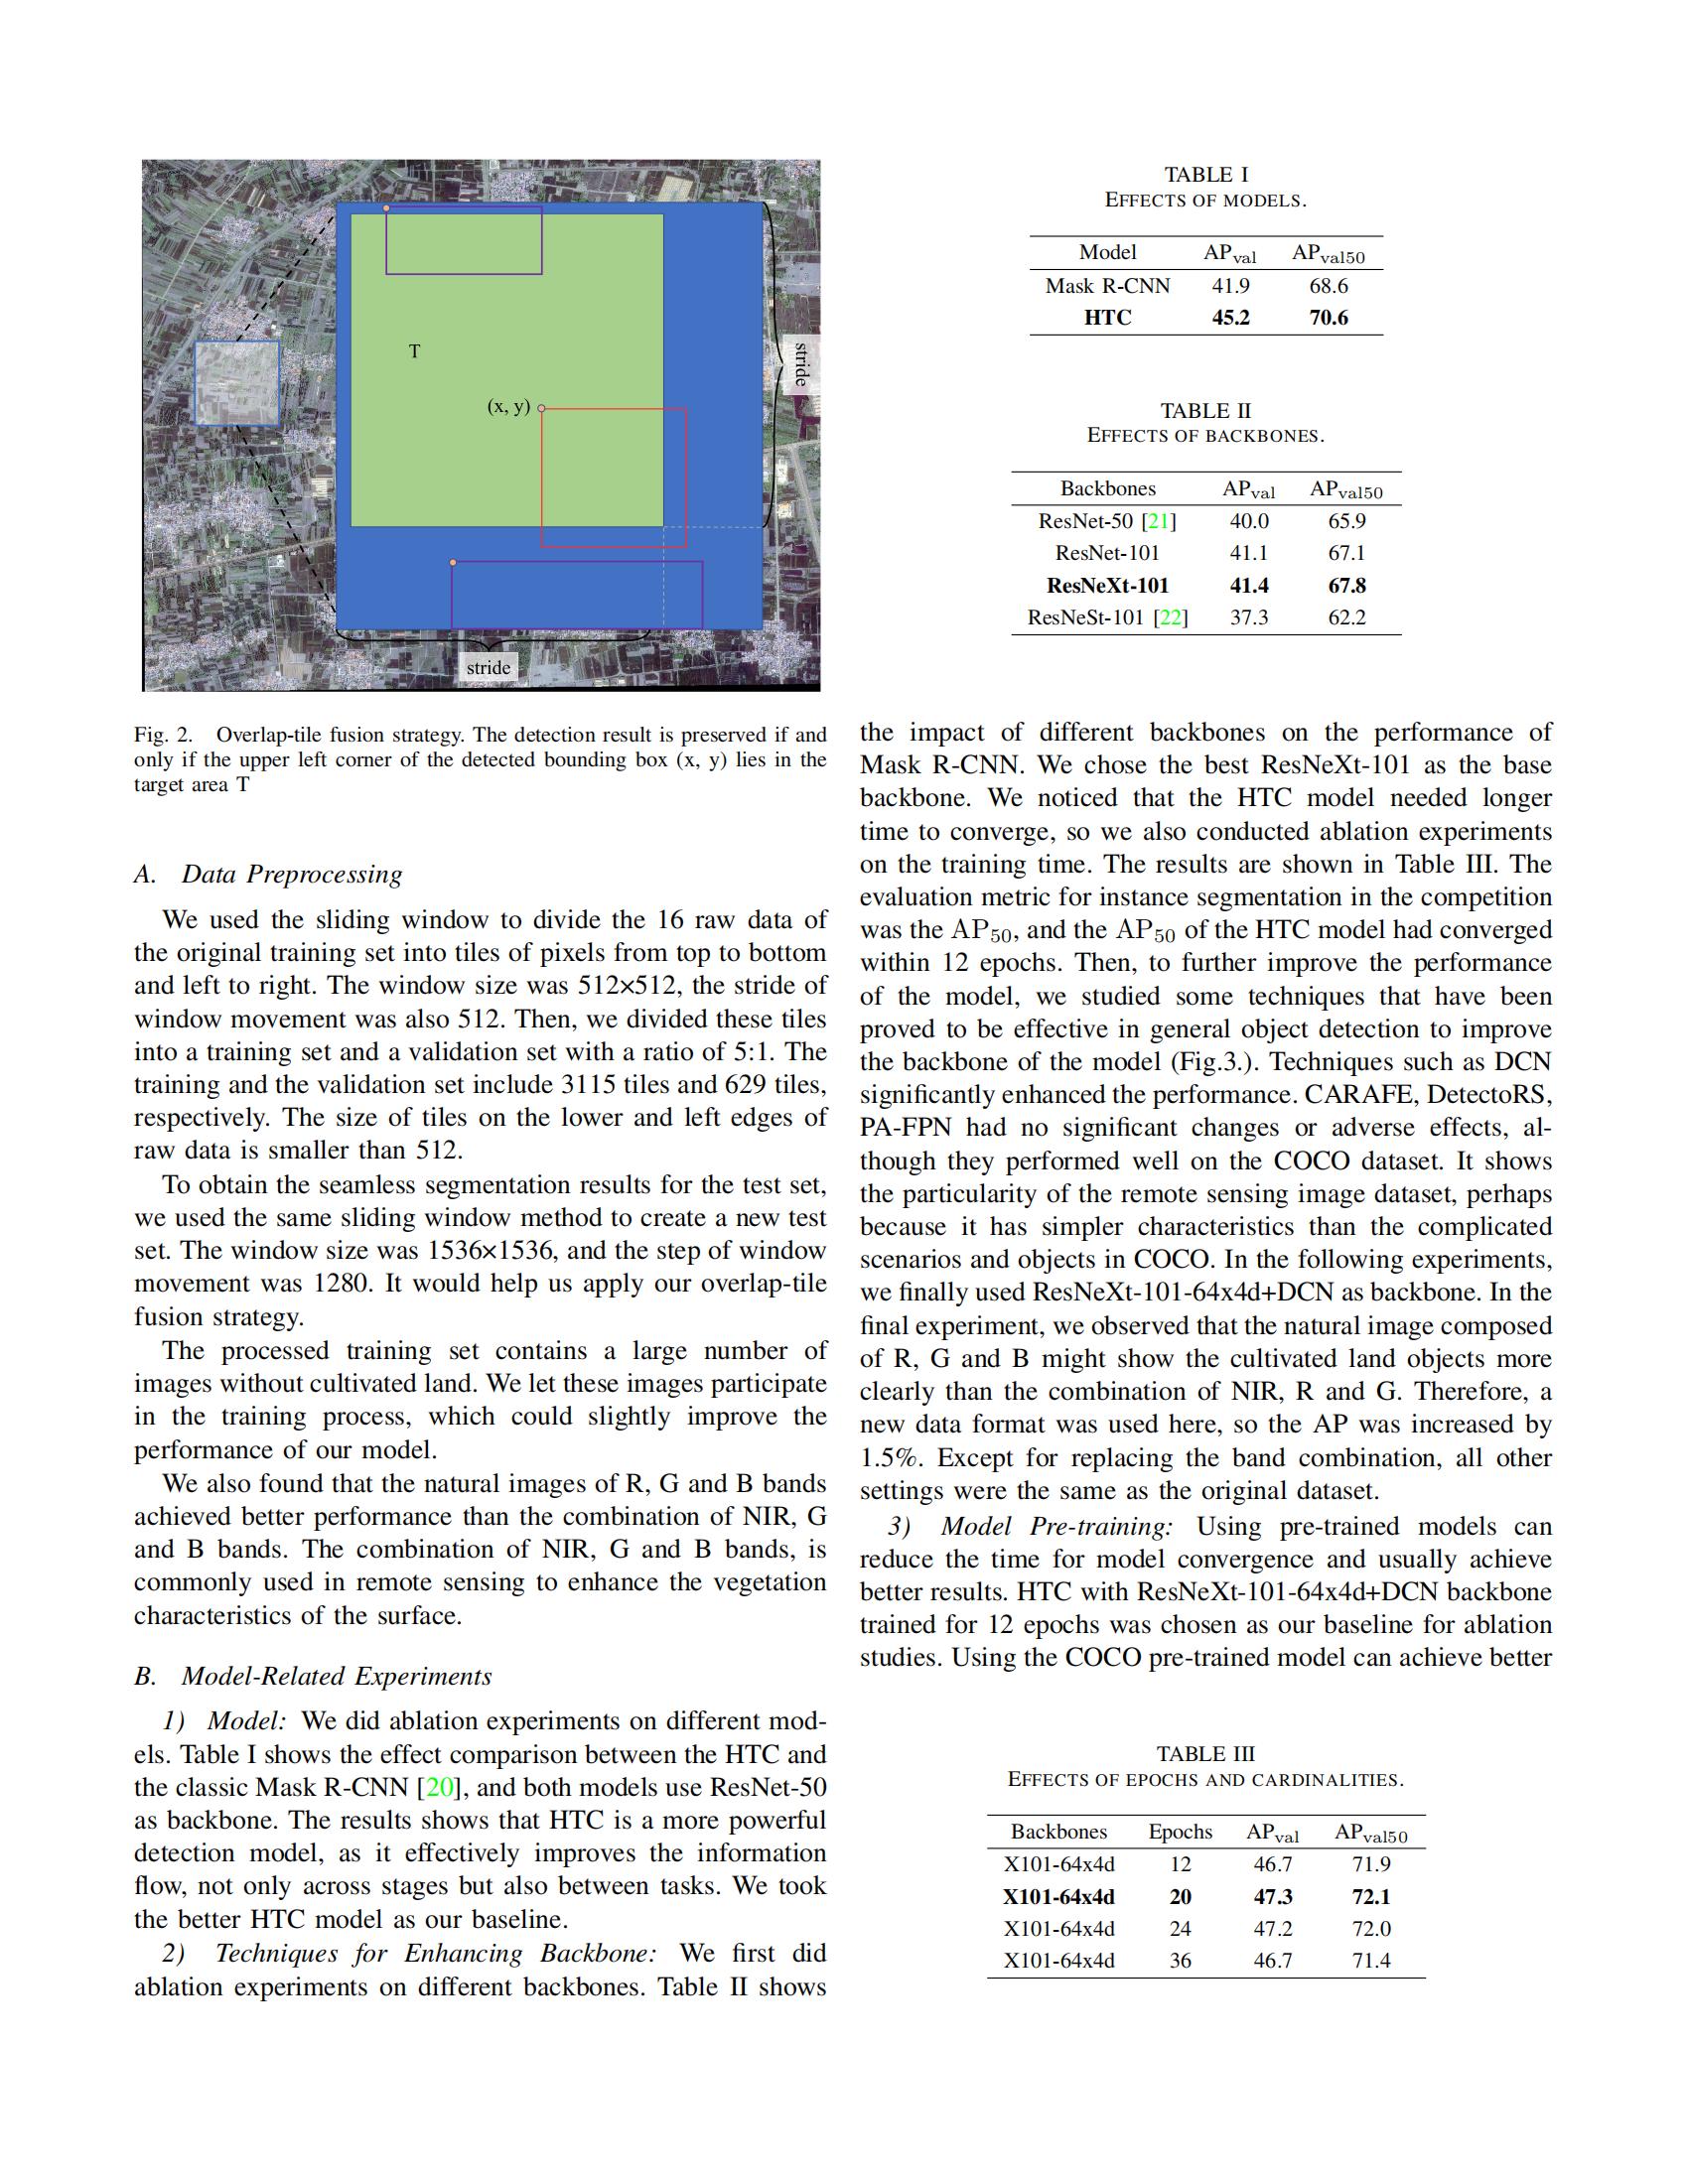
在使用模型输出提交结果时,滑窗尺寸为1536 x 1536,height_stride与width_stride均为1280,然后在后处理过程中运用边界筛选法去除图片重叠的影响
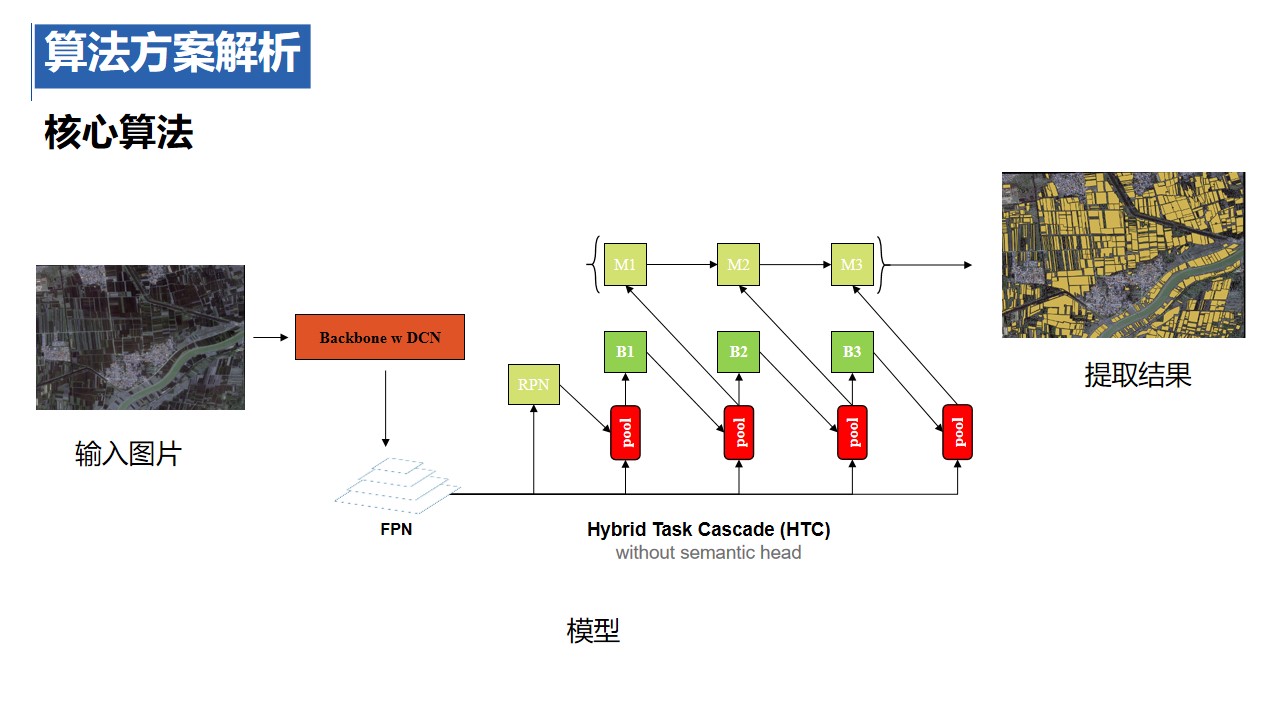
Implementation of HTC <https://arxiv.org/abs/1901.07518>
-
HTC结构将bbox回归和mask预测交织进行,在每个阶段中以多任务的方式将两者结合,增强了不同任务之间的信息流
-
在不同阶段之间,引入直接连接,将前一阶段的mask预测直接传给当前mask,增强了不同阶段之间的信息流
-
加入了一个语义分割分支,并将其与bbox分支和mask分支融合,旨在挖掘跟多的上下文信息
为了解决原始图片被剪切成各个小图时,相关的耕地目标也被切分成了多个部分的问题。我们使用了边界筛选法对预测结果进行后处理
-
1. 我们设置滑窗尺寸为1536 x 1536,height_stride与width_stride均为1280,以保证每块耕地目标至少会完整的出现在其中一个滑窗之中
-
2. 因为滑窗从上向下,从左向右剪切,当滑窗的下或右边界超出图片的下或右边界时,以图片的下边界和右边界作为滑窗的下边界和右边界, 所以在图片的下边界一行处的滑窗的框高imageHeight可能小于标准框高1536,右边界一列处的滑窗的框宽imageWidth可能小于标准框宽1536
-
3. place_offset_coord.json文件记录了每个滑窗左上角顶点的坐标(xmin,ymin),在图片的左边界处,滑窗xmin = 0,在图片的上边界处,滑窗ymin = 0。 通过(imageHeight, imageWidth, xmin, ymin)可以判断出每一个滑窗的位置
-
4. (1)我们定义基础select area为滑窗向下和向右移动一个stride形成的多边形区域,当小图中的预测mask的bbox的左上角的坐标(bboxx, bboxy)落在图中的select area中时则认为耕地目标完整出现在本滑窗中,否则认为耕地目标不完整予以舍弃。
(2)我们定义靠近滑窗左边界或上边界2个像素的区域内为error区域,如果bbox的左上角顶点落在error区域内,我们认为这个bbox内的耕地目标很大概率是被截断的、不完整的。
(3)位于原始图片的上边界和左边界的滑窗,其上边界或左边界没有来自前者的重叠图片,则不舍弃error区域;位于原始图片的下边界和右边界的滑窗,其下边界或右边界没有后续的重叠图片,则合并结果,仅减去error区域。
Top-Left:(imageHeight = 1536, imageWidth = 1536, xmin = 0, ymin = 0)
Bottom-Left:(imageHeight < 1536, imageWidth = 1536, xmin = 0, ymin ≠ 0)
Top-Right:(imageHeight = 1536, imageWidth < 1536, xmin ≠ 0, ymin = 0)
Bottom-Right:(imageHeight < 1536, imageWidth < 1536)
Left-Boundary:(imageHeight = 1536, imageWidth = 1536, xmin = 0, ymin ≠ 0)
Right-Boundary:(imageHeight = 1536, imageWidth < 1536, xmin ≠ 0, ymin ≠ 0)
Top-Boundary:(imageHeight = 1536, imageWidth = 1536, xmin ≠ 0, ymin = 0)
Bottom-Boundary:(imageHeight < 1536, imageWidth = 1536, xmin ≠ 0, ymin ≠ 0)
Midst:(imageHeight = 1536, imageWidth = 1536, xmin ≠ 0, ymin ≠ 0)
@INPROCEEDINGS{9837765,
author={Zhao, Zhen and Liu, Yuqiu and Zhang, Gang and Tang, Liang and Hu, Xiaolin},
booktitle={2022 14th International Conference on Advanced Computational Intelligence (ICACI)},
title={The Winning Solution to the iFLYTEK Challenge 2021 Cultivated Land Extraction from High-Resolution Remote Sensing Images},
year={2022},
volume={},
number={},
pages={376-380},
doi={10.1109/ICACI55529.2022.9837765}}


