This Enterprise Sidekick is build specifically as a multi-tenant, reusable and configurable sample app to share with enterprises or prospects. It focusses on the interaction between the Astra DB Vector Store and the Foundational Large Language Model as your data is the only thing that provides a Sustainable Competitive Advantage.

- 🤩 It leverages DataStax RAGStack for production-ready use of the following components:
- 🚀 The Astra DB Vector Store for Semantic Similarity search to enable Retrieval Augmented Generation
- 🧠 Short Term Memory through Astra DB to keep track of what was said and generated
- 🦜🔗 LangChain for linking OpenAI and Astra DB
- 👑 It uses Streamlit as the framework to easily create Web Applications
-
The Chatbot allows for new Content to be uploaded, Vectorized and Stored into the Astra DB Vector Database so it can be used as Context
- Through PDFs and Text files
- And through URLs, scraping web pages automatically
-
The Sidekick will turn pictures into relevant prompts
-
Integration with Langsmith for Tracing of queries, prompts and context from the Astra DB Vector Store
-
As there is No AI Without Data the Chatbot has a laserfocus on the integration of the Astra DB Vector Store with the OpenAI Chat Model with the following options:
- Enable/Disable Chat Memory
- Set Top-K for Chat Memory
- Delete the Chat Memory at any given time
- Enable/Disable the Vector Store
- Set Top-K for the Vector Store
- Select the following option as RAG strategy:
- Basic Retrieval
- Maximal Marginal Relevance
- Fusion
- Select from the following Promps:
- Short results
- Extended results
- Use a Custom Prompt
-
It uses a StreamingCallbackHandler to stream output to the screen which prevents having to wait for the final answer
Specifically for multi-tenancy and configurability the app offers:
- A configurable localization through
/customizations/localization.csvwith default languages of us_US and nl_NL. - A guided experience on-rails through
/customizations/rails.csv - A customizable
welcome pagein/customizations/welcomefor a specific organization - A customizable logo in
/customizations/logofor a specific organization
This Chatbot assumes you have access to a Github account.
And you need to gain access to the following by signing up for free:
- DataStax Astra DB (you can sign up through your Github account)
- OpenAI account (you can sign up through your Github account)
- Streamlit to deploy your amazing app (you can sign up through your Github account)
Follow the below steps and provide the Astra DB API Endpoint, Astra DB ApplicationToken and OpenAI API Key when required.
Make sure you have a vector-enabled Astra database (get one for free at astra.datastax.com)
- You will be asked to provide the API Endpoint which can be found in the right pane underneath Database details.
- Ensure you have an Application Token for your database which can be created in the right pane underneath Database details.
- Create an OpenAI account or sign in.
- Navigate to the API key page and create a new Secret Key, optionally naming the key.
- You may need to provide credit card details and deploy a sum of money on your account. Especially in order to the the GPT4 model.
Follow the steps outlined here.
Install the Python dependencies using:
pip3 install -r requirements.txt
Then update the OpenAI, AstraDB and optionally LangSmith secrets in /.streamlit/secrets.toml. There is an example provided at secrets.toml.example.
Now it's time to customize the app for your specific situation or customers.
Define credentials by adding a new username and password in the [passwords] section in /.streamlit/secrets.toml. Use the following convention:
[passwords]
the_username_for_the_user = "the password for the user"Define the UI language of the app by adding a localization code in the [languages] section in /.streamlit/secrets.toml. Use the following convention:
[languages]
the_username_for_the_user = "the language definition"
Currently en_US, nl_NL and ro_RO are supported. However it is easy to add additional languages in /customizations/localization.csv.
Create a customized welcome page in /customizations/welcome. The convention here is to create a markdown file called <username>.md. Ideally, list which files have been pre-loaded from step 6.
In case no custom welcome page is provided, the app uses default.md.
Create a customized logo in /customizations/logo. The convention here is to create an image file called <username>.svg or <username>.png.
In case no custom logo is provided, the app uses default.svg.
Create a guided experience by providing sample prompts in rails.csv. The convention here is that <username> from Step 1 is used to define the experience. Use the following convention:
username,key,value
the_username_for_the_user,1,Question prompt number 1
the_username_for_the_user,2,Question prompt number 2
another_username_for_another_user,1,Question prompt number 1
another_username_for_another_user,2,Question prompt number 2
Enable or disable the option in the app to delete all the context once loaded. Use the following convention:
[delete_option]
the_username_for_the_user = "True"
In case the above is not provides, the app will default to not enabling deleting content and their vector embeddings.
You have the option of defining a default prompt in /customizations/prompt. The convention here is to create a text file called <username>.txt.
In case no prompt is provided, the app uses default.txt and the app will default to using the 'Short results' prompt.
In case you provide a custom prompt for the user, the app will default to using that on startup.
Start up the app and pre-load relevant PDF and Text files so that the app has content that can be used as context for the questions/prompts in the next step. All this data will be loaded into a user specific collection in Astra DB defined by <username>.
You're ready to run the app as follows:
streamlit run streamlit_app.py
In addition to the pre-loaded content, a user can add additional content that will be used as context for prompts.
In this step we'll deploy your awesome app to the internet so everyone can enjoy your cool work and be amazed!
If you have not do so before, please set up your account on Streamlit. When you already have an account skip to the next step and deploy the app.
-
Head over to Streamlit.io and clikc
Sign up. Then selectContinue with Github: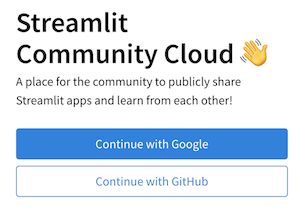
-
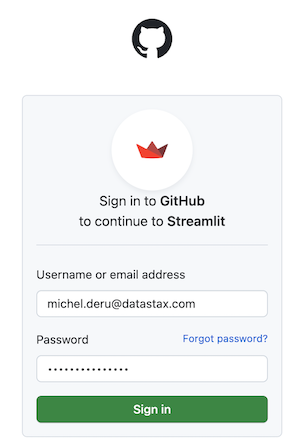
Log in using your Github credentials:
-
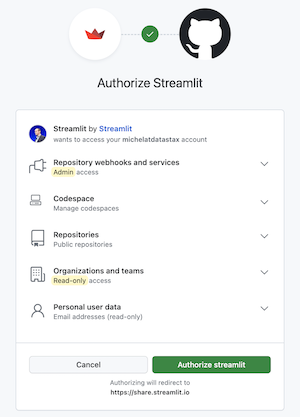
Now authorize Streamlit:
-
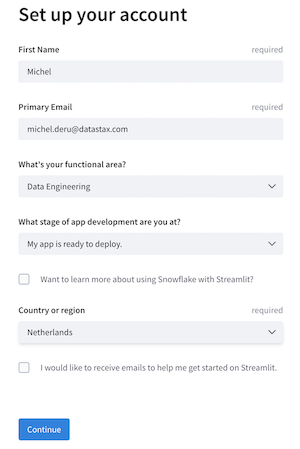
And set up your account:


On the main screen, when logged in, click New app.
-
When this is your first deployment, provide additional permissions:
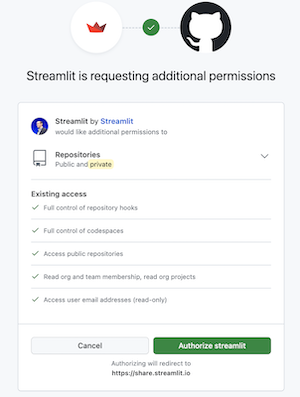
-
Now define your application settings. Use YOUR repository name, and make sure the Main file path is
streamlit_app.py. Pick a cool App URL as you'll app will be deployed to that: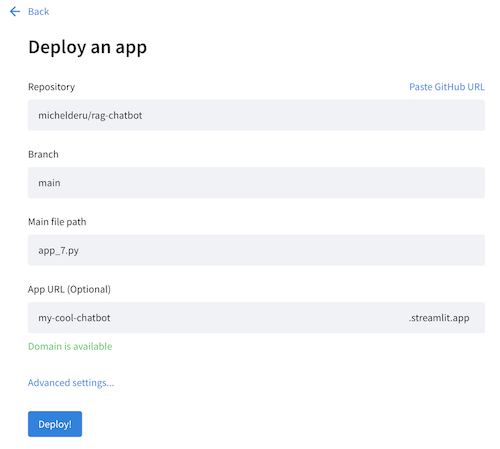
-
Click on Advanced, select
Python 3.11and copy-paste the contents from yoursecrets.tomlor define them here for the first time (see step 1).


Click Deploy! Wait for a bit and your app is online for everyone to use!
Be aware that this app is public and uses your OpenAI account which will incur cost. You'll want to shield it off by clicking Settings->Sharing in the main screen and define the email addresses that are allowed access. In order to enable this, link your Google account.
In case you want to run all of the above locally, it's useful to create a Virtual Environment. Use the below to set it up:
python3 -m venv myenv
Then activate it as follows:
# on Linux/Mac:
source myenv/bin/activate

# on Windows:
myenv\Scripts\activate.bat
Now you can start installing packages:
pip3 install -r requirements.txt
In order to check which packages have been installed:
pip3 freeze
Which you can save to requirements.txt if you want:
pip3 freeze > requirements.txt