A general-purpose, deep learning-based system to decompile an image into presentational markup. For example, we can infer the LaTeX or HTML source from a rendered image.
An example input is a rendered LaTeX formula:

The goal is to infer the LaTeX formula that can render such an image:
d s _ { 1 1 } ^ { 2 } = d x ^ { + } d x ^ { - } + l _ { p } ^ { 9 } \frac { p _ { - } } { r ^ { 7 } } \delta ( x ^ { - } ) d x ^ { - } d x ^ { - } + d x _ { 1 } ^ { 2 } + \; \cdots \; + d x _ { 9 } ^ { 2 }
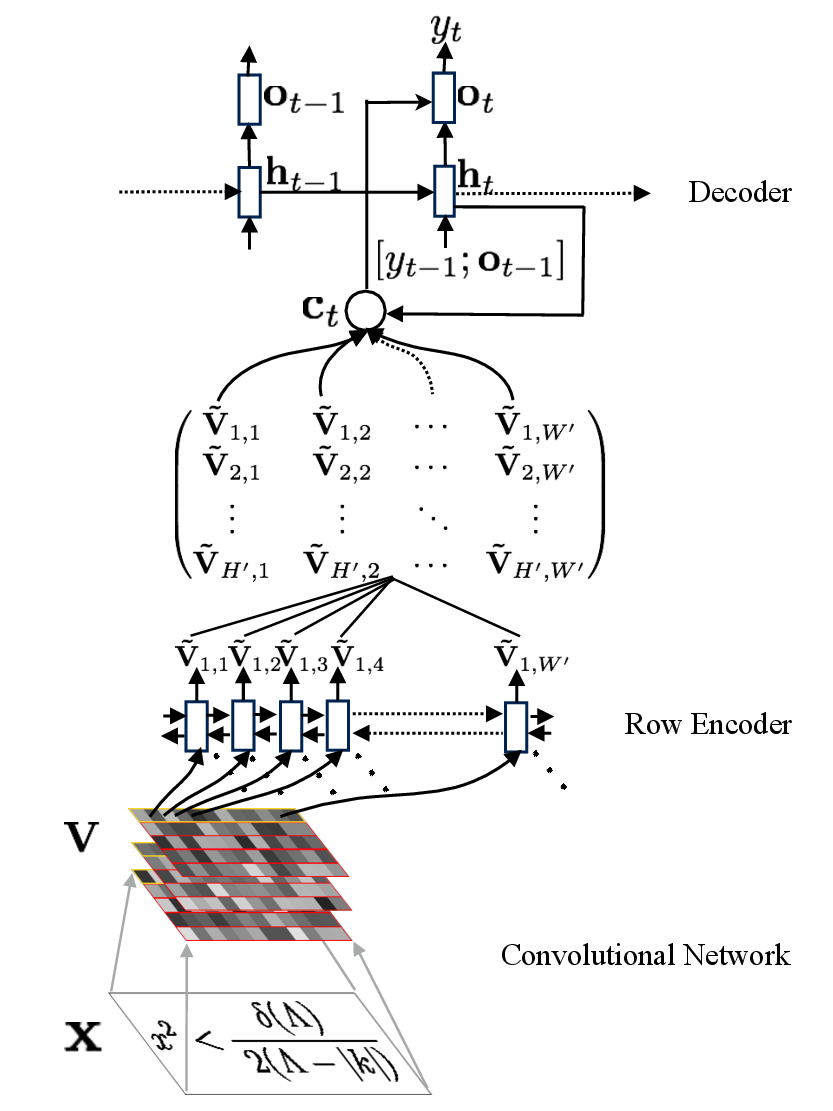
Our model employs a convolutional network for text and layout recognition in tandem with an attention-based neural machine translation system. The use of attention additionally provides an alignment from the generated markup to the original source image:
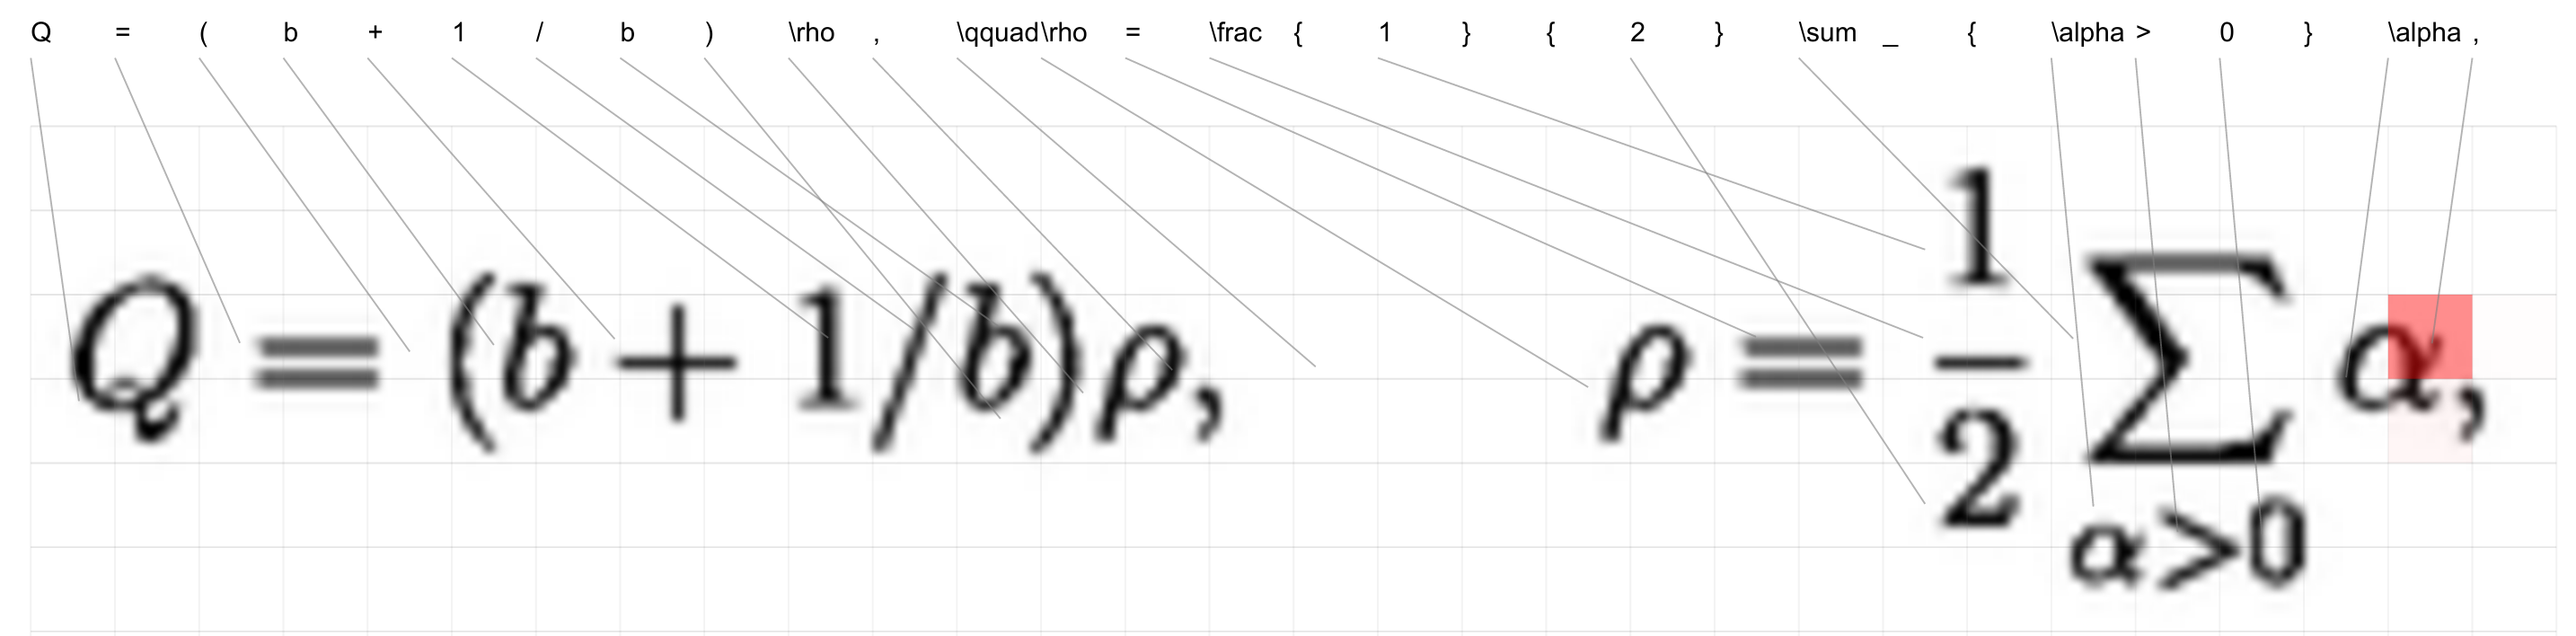
See our website for a complete interactive version of this visualization over the test set. Our paper (http://arxiv.org/pdf/1609.04938v1.pdf) provides more technical details of this model.
What You Get Is What You See: A Visual Markup Decompiler
Yuntian Deng, Anssi Kanervisto, and Alexander M. Rush
http://arxiv.org/pdf/1609.04938v1.pdf
Most of the code is written in Torch, with Python for preprocessing.
The following lua libraries are required for the main model.
- tds
- class
- nn
- nngraph
- cunn
- cudnn
- cutorch
Note that currently we only support GPU since we use cudnn in the CNN part.
Python
- Pillow
- numpy
Optional: We use Node.js and KaTeX for preprocessing Installation
pdflatex Installaton
Pdflatex is used for rendering LaTex during evaluation.
ImageMagick convert Installation
Convert is used for rending LaTex during evaluation.
Webkit2png Installation
Webkit2png is used for rendering HTML during evaluation.
Python image-based evaluation
- python-Levenshtein
- matplotlib
- Distance
wget https://im2markup.yuntiandeng.com/third_party/Distance-0.1.3.tar.gz
tar zxf Distance-0.1.3.tar.gz
cd distance; sudo python setup.py install
Perl Installation
Perl is used for evaluating BLEU score.
We assume that the working directory is im2markup throughout this document.
The task is to convert an image into its presentational markup, so we need to specify a data_base_dir storing the images, a label_path storing all labels (e.g., latex formulas). Besides, we need to specify a data_path for the training (or test) data samples. The format of data_path shall look like:
<img_name1> <label_idx1>
<img_name2> <label_idx2>
<img_name3> <label_idx3>
...
where <label_idx> denotes the line index of the label (starting from 0).
To get started with, we provide a toy Math-to-LaTex example. We have a larger dataset im2latex-100k-dataset of the same format but with much more samples, and a processed version can be found at https://im2markup.yuntiandeng.com/data/ (if you use this version, you can skip the preprocessing commands below).
The images in the dataset contain a LaTeX formula rendered on a full page. To accelerate training, we need to preprocess the images.
python scripts/preprocessing/preprocess_images.py --input-dir data/sample/images --output-dir data/sample/images_processed
The above command will crop the formula area, and group images of similar sizes to facilitate batching.
Next, the LaTeX formulas need to be tokenized or normalized.
python scripts/preprocessing/preprocess_formulas.py --mode normalize --input-file data/sample/formulas.lst --output-file data/sample/formulas.norm.lst
The above command will normalize the formulas. Note that this command will produce some error messages since some formulas cannot be parsed by the KaTeX parser.
Then we need to prepare train, validation and test files. We will exclude large images from training and validation set, and we also ignore formulas with too many tokens or formulas with grammar errors.
python scripts/preprocessing/preprocess_filter.py --filter --image-dir data/sample/images_processed --label-path data/sample/formulas.norm.lst --data-path data/sample/train.lst --output-path data/sample/train_filter.lst
python scripts/preprocessing/preprocess_filter.py --filter --image-dir data/sample/images_processed --label-path data/sample/formulas.norm.lst --data-path data/sample/validate.lst --output-path data/sample/validate_filter.lst
python scripts/preprocessing/preprocess_filter.py --no-filter --image-dir data/sample/images_processed --label-path data/sample/formulas.norm.lst --data-path data/sample/test.lst --output-path data/sample/test_filter.lst
Finally, we generate the vocabulary from training set. All tokens occuring less than (including) 1 time will be excluded from the vocabulary.
python scripts/preprocessing/generate_latex_vocab.py --data-path data/sample/train_filter.lst --label-path data/sample/formulas.norm.lst --output-file data/sample/latex_vocab.txt
For a complete set of parameters, run
th src/train.lua -h
The most important parameters for training are data_base_dir, which specifies where the images live; data_path, the training file; label_path, the LaTeX formulas, val_data_path, the validation file; vocab_file, the vocabulary file with one token per each line.
th src/train.lua -phase train -gpu_id 1 \
-model_dir model \
-input_feed -prealloc \
-data_base_dir data/sample/images_processed/ \
-data_path data/sample/train_filter.lst \
-val_data_path data/sample/validate_filter.lst \
-label_path data/sample/formulas.norm.lst \
-vocab_file data/sample/latex_vocab.txt \
-max_num_tokens 150 -max_image_width 500 -max_image_height 160 \
-batch_size 20 -beam_size 1
In the default setting, the log file will be put to log.txt. The log file records the training and validation perplexities. model_dir speicifies where the models should be saved. The default parameters are optimized for the full dataset. In order to overfit on this toy example, use flags -learning_rate 0.05, -lr_decay 1.0 and -num_epochs 30, then after 30 epochs, the training perplexity can reach around 1.1 and the validation perplexity can only reach around 17.
After training, we can load a model and use it to test on test dataset. We provide a model trained on the im2latex-100k-dataset.
mkdir -p model/latex; wget -P model/latex/ https://im2markup.yuntiandeng.com/model/latex/final-model
Now we can load the model and test on test set. Note that in order to output the predictions, a flag -visualize must be set.
th src/train.lua -phase test -gpu_id 1 -load_model -model_dir model/latex -visualize \
-data_base_dir data/sample/images_processed/ \
-data_path data/sample/test_filter.lst \
-label_path data/sample/formulas.norm.lst \
-output_dir results \
-max_num_tokens 500 -max_image_width 800 -max_image_height 800 \
-batch_size 5 -beam_size 5
Note that we do not specify a vocabulary file here, since it is already included in the model. After a while, the perplexities will be logged, and the predictions file results.txt will be put to output_dir. The format of the predicitons file is:
<img_name1>\t<label_gold1>\t<label_pred1>\t<score_pred1>\t<score_gold1>
<img_name2>\t<label_gold2>\t<label_pred>2\t<score_pred2>\t<score_gold2>
...
where \t denotes tab.
The test perplexity can be obtained after testing is finished. In order to evaluate BLEU, the following command needs to be executed.
python scripts/evaluation/evaluate_bleu.py --result-path results/results.txt --data-path data/sample/test_filter.lst --label-path data/sample/formulas.norm.lst
Note that although the predicions file contains the gold labels, since some images (e.g., too large sizes) will be ignored during testing, to make the comparison fair, we need to use the test file again and treat those that does not appear in predictions file as blank predictions.
We also provide script for evaluating text edit distance (on a token level).
python scripts/evaluation/evaluate_text_edit_distance.py --result-path results/results.txt
First, we need to render both the original formulas and the predicted formulas. This may take a bit long time. The rendering process depends on pdflatex and ImageMagick convert.
python scripts/evaluation/render_latex.py --result-path results/results.txt --data-path data/sample/test_filter.lst --label-path data/sample/formulas.lst --output-dir data/sample/images_rendered --no-replace
Afterwards, based on the rendered images, we evaluate the exact match accuracy and the image edit distance.
python scripts/evaluation/evaluate_image.py --images-dir data/sample/images_rendered/
Another example is to infer the HTML from an image of a web page. We provide a simplified dataset: web pages of size 100X100. (However, in the provided dataset, we downsample to 64X64). Note that we can use the same model parameters as the Math-to-LaTex task, the only difference here is the vocabulary.
First, download the dataset.
wget -P data/ https://im2markup.yuntiandeng.com/html/data/html_64_64_100k.tgz
cd data; tar zxf html_64_64_100k.tgz; cd ..
The training parameters is nearly identical to the Math-to-LaTex task. However, some parameters such as max_image_width need to be set to a different value for memory efficiency and convergence speed.
th src/train.lua -phase train -gpu_id 1 \
-input_feed -prealloc \
-data_base_dir data/html_64_64_100k/data/ \
-data_path data/html_64_64_100k/html_train.txt \
-vocab_file data/html_64_64_100k/html_vocab.txt \
-val_data_path data/html_64_64_100k/html_dev.txt \
-label_path data/html_64_64_100k/html_sources.txt \
-vocab_file data/html_64_64_100k/html_vocab.txt \
-max_num_tokens 100 -max_image_width 64 -max_image_height 64 \
-batch_size 100 -beam_size 1
We provide a trained model as well.
mkdir -p model/html; wget -P model/html/ https://im2markup.yuntiandeng.com/model/html/final-model
Now we are ready to test our model.
th src/train.lua -phase test -gpu_id 1 -load_model -model_dir model/html -visualize \
-data_base_dir data/html_64_64_100k/data/ \
-data_path data/html_64_64_100k/html_test.txt \
-label_path data/html_64_64_100k/html_sources.txt \
-output_dir results \
-max_num_tokens 400 -max_image_width 64 -max_image_height 64 \
-batch_size 80 -beam_size 5
The test perplexity can be obtained after testing is finished. In order to evaluate text edit distance, the following command needs to be executed.
python scripts/evaluation/evaluate_text_edit_distance.py --result-path results/results.txt
First, we need to render both the original htmls and the predicted htmls. This may take a bit long time. Note that rendering is based on webkit2png.
python scripts/evaluation/render_html.py --result-path results/results.txt --output-dir data/html_64_64_100k/images_rendered --no-replace
Afterwards, based on the rendered images, we evaluate the exact match accuracy and the image edit distance.
python scripts/evaluation/evaluate_image.py --images-dir data/html_64_64_100k/images_rendered/
Our implementation is based on HarvardNLP NMT implementation seq2seq-attn. And we would like to thank Yoon Kim and Allen Schmaltz for helpful discussions during this project.