The Microgateway is a specialized form of the WSO2 API Gateway. Its main characteristics are
- Its ability to execute in isolation without mandatory connections to other components (Key Manager, Traffic Manager, etc).
- Ability to host a subset of APIs of choice (defined on the API Publisher) instead of all.
- Immutability - if you update an API you need to re-create the container/instance, no hot deployment.
Microgateway offers you a proxy that is capable of performing security validations (OAuth, Basic Auth, Signed JWT), in-memory (local) rate limiting and operational analytics.
Following are some of its main expectations of Microgateway
- Ability to host just one or a selected set (subset) of APIs only.
- Ability to execute in complete isolation once setup, without having the need to contact the Management or Security components.
- Easy integration with CI/CD processes.
- Seamless integration with deployment automation tools and techniques.
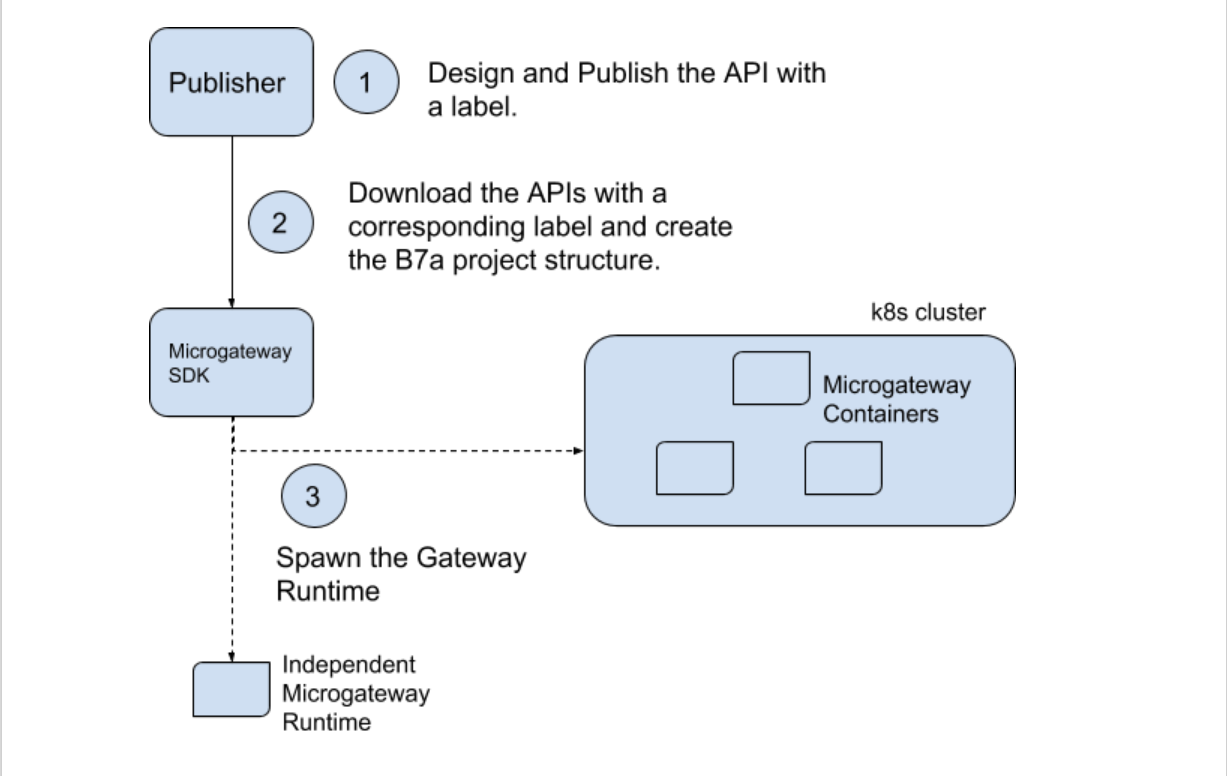
The following diagram illustrates the process of getting an API (or a selected set of APIs) to be hosted on a Microgateway.
This product will include a CLI, the B7a platform distribution and a few B7a extensions (Endpoints and Filters). The CLI will have two main responsibilities.
- Setting up a Microgateway project.
- Running the Microgateway project.
These two steps will be treated as two phases. One will first complete the setup phase and move on to the Run phase. The reason for treating them as phases is to make it possible for developers to take control of the runtime if and when required. For example, what gets run as default on a Microgateway is a simple API proxy. If a developer needs to perform some sort of an integration or change the Ballerina source files for some other reason, he could engage with the project after the setup phase and do the required modifications before the runtime is deployed.
The first step of setting up a Microgateway project includes connecting to the API Publisher (Management Layer) and downloading the relevant API artifacts (JSON representation of the APIs) of a given label. Once this step is completed it will convert the JSON representation of the APIs to B7a source files and create a single B7a project structure. The annotations that go into these source files (k8s, docker annotations, etc) are governed by a config file which the CLI can see. These generated files can optionally be managed via source management repositories (Git).
What gets downloaded/pulled?
- The JSON representation of the API files
- The subscription information of each API
- The rate limiting policies associated with each API
Once the B7a projects have been created, the next step is to run the Microgateway. Running the Microgateway project would result in the relevant project being built and run.
Following are the set of commands and arguments of the CLI included within the Microgateway SDK.
$micro-gw setup
Required
	--label, -l (the label of the APIs to download)
Optional
	--username, -u (the user performing the action. If not provided, will be prompted on first attempt)
	--password, -p (the password of the user performing the action. If not provided, will be prompted on first attempt)
	--path (The path to the workspace directory. This is mandatory when using the toolkit for the first time. Afterwards, the previously specified path will be used as the workspace path)
Example
$micro-gw setup -l accounts --path /home/user/gateway-project
Purpose
Upon execution of this command the CLI will download all APIs labeled with the corresponding label and convert each API definition
into a B7a service which acts as a secure proxy to the back-end service of the API.
All B7a source files will be created under a project directory. The name of the project will be the name of the label.
If the project already exists a warning will be prompted requesting permission to override existing source.
$micro-gw build
Build $micro-gw build
Required
	--label, -l (the label of the APIs to be build)
Example
$micro-gw build -l accounts
Purpose
Upon execution of this command the CLI will build the micro gateway distribution for the specified label.
Following is the structure of the workspace generated when running micro-gw setup command. There will be separate structures created for each label specifying with -l .
micro-gw-resources
    ├── conf
    │   └── config.toml
    └── projects
        └── <label-1>
        └── <label-2>
└── ...Following is the structure of the label generated when running micro-gw setup command under projects folder in the workspace.
└── projects
        └── <label-1>
├── conf (micro gateway dist files)
│   └── label-config.toml
├── src (Generated source files)
│   ├── endpoints.bal
│   ├── extension_filter.bal
│   ├── SampleAPI_1_0_0.bal
│   └── policies  (Generated throttling policies)
└── target
└── micro-gw-<label-1>.zipmicro-gw-<label>
├── bin (The binary scripts of the micro-gateway distribution)
│ └── micro-gw.sh
├── conf (micro gateway distribution configuration)
│ └── micro-gw.conf
├── exec (generated balx ballerina executable for the APIs)
│ └── internal.balx
└── runtimeOne the setup, build commands are executed, the source files which were generated will be built and a micro gateway distribution will be created under target folder.
../internal/target$ ls
micro-gw-internal.zip
- Unzip the micro-gw-internal.zip and run the micro-gw.sh inside the bin folder of the extracted zip using below command.
bash micro-gw.sh
micro-gw-internal/bin$ bash micro-gw.sh
ballerina: initiating service(s) in '/home/wso2/gw-workspace/micro-gw-resources/projects/internal/target/micro-gw-internal/exec/internal.balx'
ballerina: started HTTPS/WSS endpoint localhost:9095
ballerina: started HTTP/WS endpoint localhost:9090
ballerina: started HTTPS/WSS endpoint localhost:9096
