WSO2 API Manager is a full lifecycle API Management solution which has an API Gateway and a Microgateway. Istio is a service mesh solution which helps users to deploy and manage a collection of microservices. Service meshes in their native form have an “API Management Gap” that requires to be filled. These are related to exposing services to external consumers (advanced security, discovery, governance, etc), business insights, policy enforcement, and monetization. This explains how WSO2 API Manager plans to integrate with Istio and manage services deployed in Istio as APIs.
When users move towards microservice architecture from monolithic app architecture, it can result in a considerable number of fine-grained microservices. So, it was a challenge to manage all these microservices. As a solution, Istio was able to provide a platform to connect, manage and secure all these microservices while reducing the complexity of deployments. In addition, Istio includes APIs that let it integrate into any logging platform, or telemetry or policy system.
However, when users need to expose these microservices to outside in a secured controlled manner API Management comes in to picture. Most of the time we need to create APIs (for microservices) and share them with other developers who might be part of your organization or external. So API Management within service mesh solution is required to operate successfully. With this capability, the user can expose one or more services from an Istio service mesh as APIs by adding API management capabilities.
While Istio providing Data Plane and Control Plane capabilities, WSO2 API Manager provides Manage Plane capabilities to manage microservices.
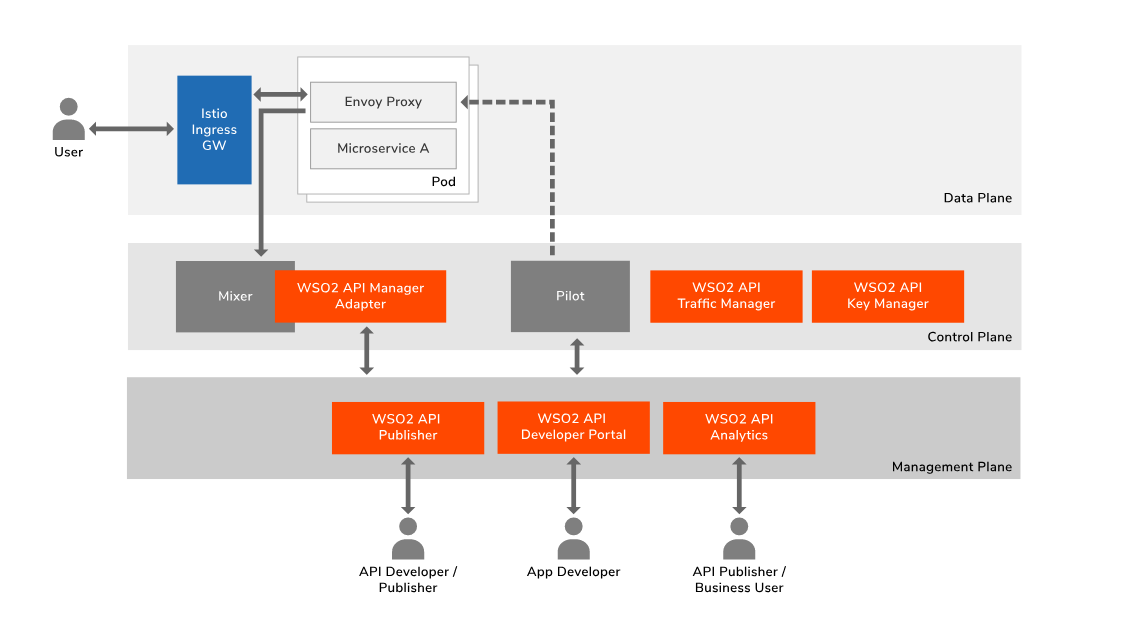
The mixer is a core Istio component which runs in the control plane of the service mesh. Mixer's plugin model enables new rules and policies to be added to groups of services in the mesh without modifying the individual services or the nodes where they run. API management policies such as authentication (by API key validation), rate-limiting, etc can be deployed and managed at API Manager without doing any changes to the actual microservice or sidecar proxy.
When need to expose this service to outside in a managed way, API developer can use WSO2 API Publisher portal to create the API by attaching necessary policies like security, rate limiting etc. The Publisher is capable of pushing all these policies into Envoy proxy via Pilot and Mixer for them to take action of policy enforcement. After publishing this API, it will appear in the WSO2 API Developer portal. Now app developer can discover these APIs and use in their application along with all the capabilities provided by developer portal like getting a subscription plan, adding application security etc. The business user can use API Analytics to get more business insights by looking at API Analytics.
Let us now see how service calls work with this solution and at which point API related quality of services gets applied. As you can see in the diagram below, when a request comes from outside it first goes to the Istio proxy (Envoy) and then it will communicate with the mixer for performing policy checks. Based on the outcome of the policy checks, the request may be routed to the service or an error should be sent back to the client. Please see the diagram and steps listed below.
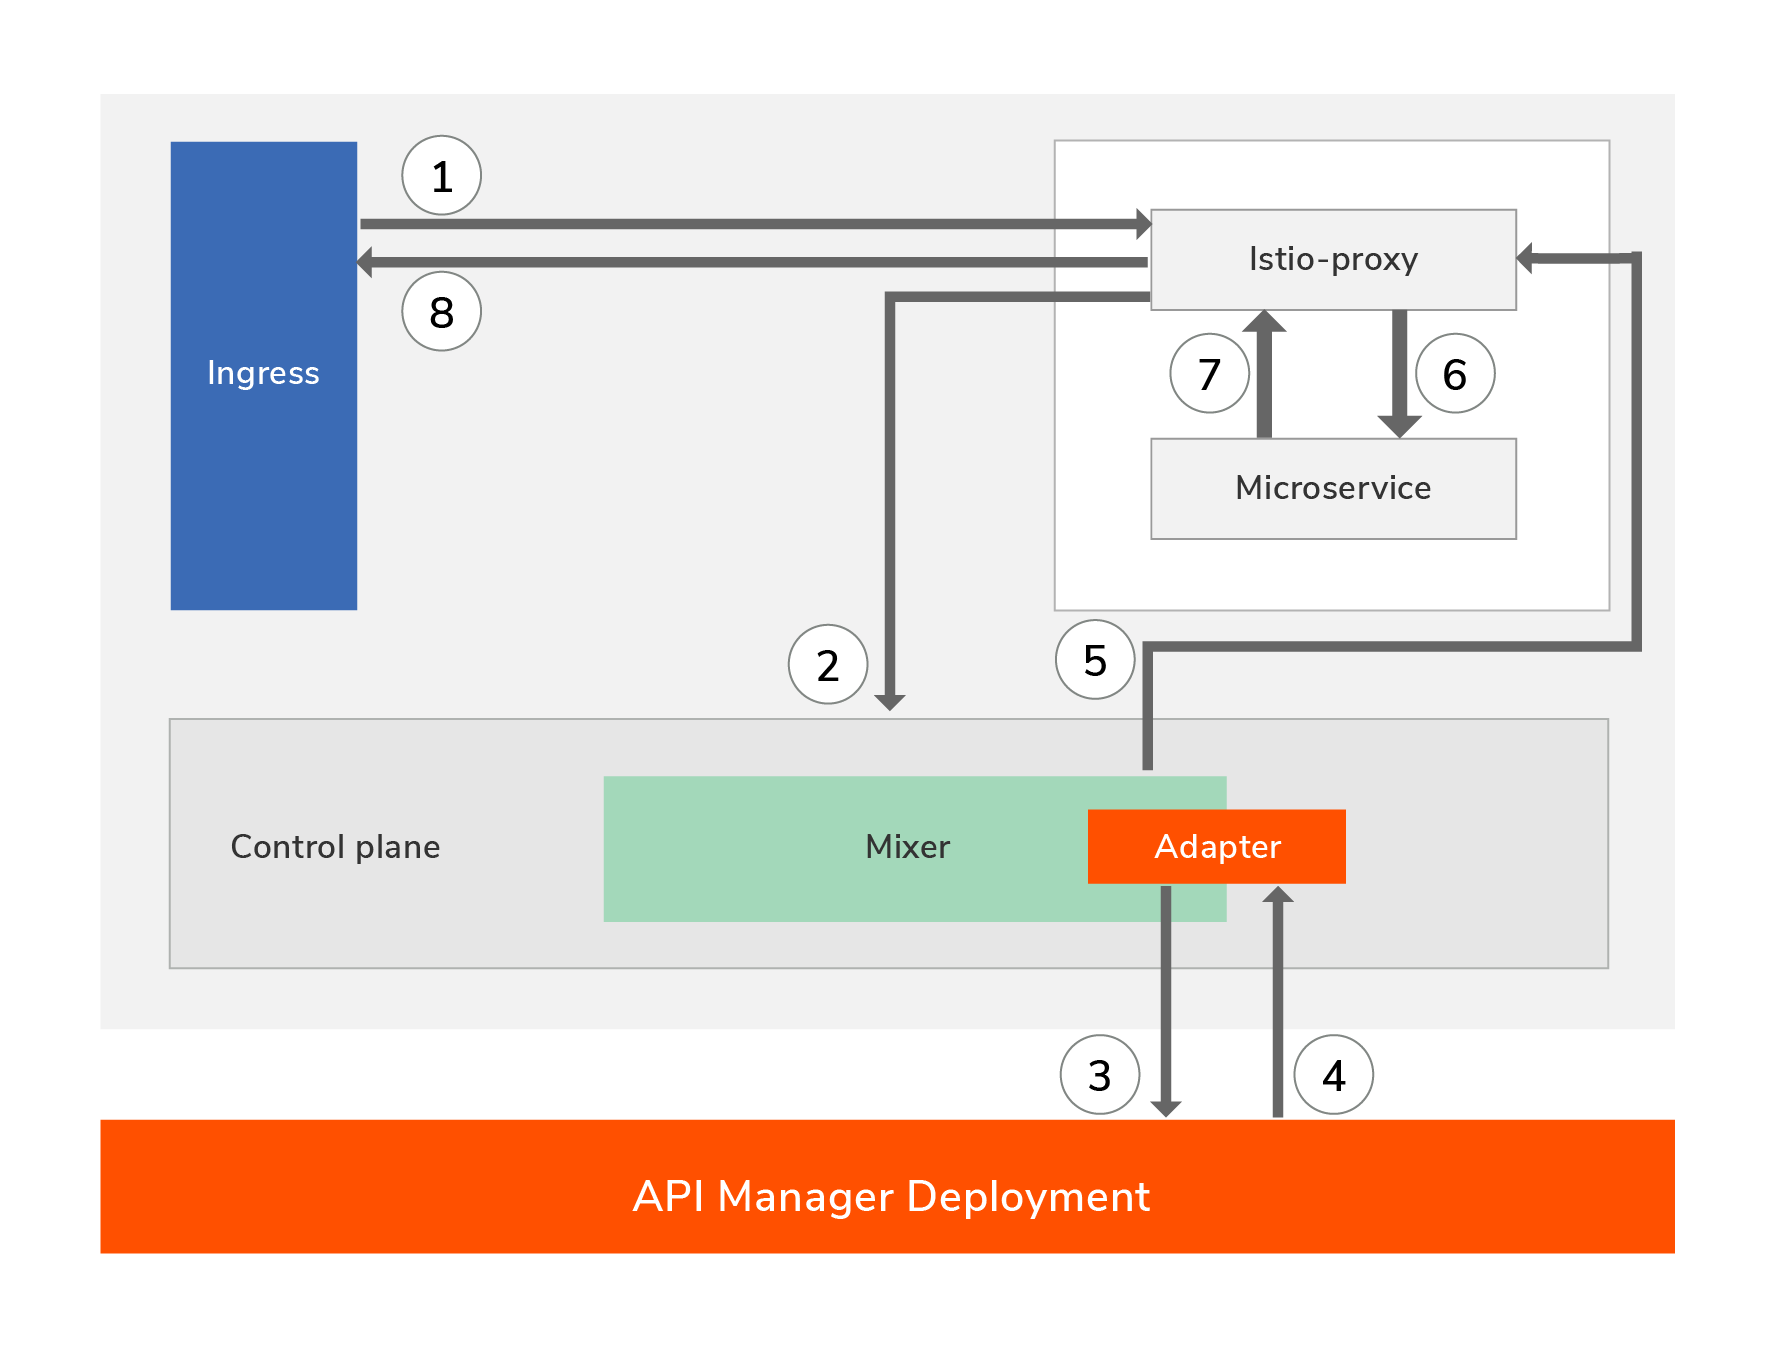
- The client sends the request to the service (Istio capture the request and redirect to the Istio-proxy). This enters the Kubernetes cluster via an ingress point.
- Proxy captures a wealth of signal and sends to the Mixer as attributes.
- Mixer adapter then calls the API Manager for various types of policy checks and verifications.
- API Manager performs the policy checks and responds back to the mixer.
- Mixer communicates the outcome of the policy checks to the Istio proxy.
- Since in this case there are no policy validation failures the request is routed to the microservice.
- The microservice executes the service logic and sends the response.
- The response is sent out to the client.
Using WSO2 adapter, users can do the following.
- Secure services with JWT and OAuth2 tokens
- Validate API subscriptions
- Validate scopes
- Use WSO2 API Manager Analytics for business insights
- WSO2 API Manager integration automates HTTPAPISpec, HTTPAPISpecBinding and rules creation for APIs
Notes:
- The docker image of the WSO2 mixer adapter is available in the docker hub.
- In the default profile of Istio installation, the policy check is disabled by default. To use the mixer adapter, the policy check has to enable explicitly. Please follow Enable Policy Enforcement
- wso2am-istio-1.0.zip contains installation artifacts to deploy in the Istio, WSO2 API Manager and WSO2 API Manager Analytics.
- Make sure the Kubernetes cluster has at least 8GB of memory.
- Deploy K8s artifacts for Analytics
kubectl apply -f install/analytics/k8s-artifacts/
- Deploy config maps for API Manager
kubectl create configmap apim-conf --from-file=./install/api-manager/resources/conf/ -n wso2
kubectl create configmap apim-lifecycles --from-file=./install/api-manager/resources/lifecycles/ -n wso2
- Deploy K8s artifacts for API Manager
kubectl apply -f install/api-manager/k8s-artifacts/
- Access WSO2 API Manager
WSO2 API Manager is exposed as NodePort service type. Hence you can use any K8s node IP to access. Add the node IP to /etc/hosts file as follows.
<K8s_NODE_IP> wso2apim
To access...
https://wso2apim:32001/publisher
- Create a K8s secret in istio-system namespace for the public certificate of WSO2 API Manager as follows.
kubectl create secret generic server-cert --from-file=./install/adapter-artifacts/server.pem -n istio-system
Note: The public certificate of WSO2 API Manager 2.6.0 GA can be found in install/adapter-artifacts/server.pem.
- Deploy the wso2-adapter as a cluster service
kubectl apply -f install/adapter-artifacts/
- Enable Istio side car injection for the default namespace if it not enabled
kubectl label namespace default istio-injection=enabled
- Deploy httpbin sample service
kubectl create -f samples/httpbin/httpbin.yaml
- Expose httpbin via Istio ingress gateway to access from outside
kubectl create -f samples/httpbin/httpbin-gw.yaml
- Access httpbin via Istio ingress gateway
curl http://${INGRESS_GATEWAY_HOST}:{INGRESS_GATEWAY_PORT}/headers
You can find INGRESS_GATEWAY_HOST and INGRESS_GATEWAY_PORT as follows. Else follow instructions in Istio guide.
- Use EXTERNAL-IP as INGRESS_GATEWAY_IP from the following command
kubectl get svc istio-ingressgateway -n istio-system

- Use the output of the above as INGRESS_GATEWAY_PORT
kubectl -n istio-system get service istio-ingressgateway -o jsonpath='{.spec.ports[?(@.name=="http2")].nodePort}'

Note: In Docker for Mac INGRESS_GATEWAY_PORT is port 80.
We are going to secure the service and this can be done with OAuth2 tokens or JWT tokens. Also, do the subscription validation for the API and scope validation for the resources.
Log into WSO2 API Manager publisher and create an API with the following details.
- API Name : HttpbinAPI
- API Context : /httpbin
- API Version : 1.0.0
- Production Endpoint : http://httpbin.default.svc.cluster.local
Add the following resources with these scopes.
| Resource | Scope |
|---|---|
| /ip | scope_ip |
| /headers | scope_headers |
| /delay/{delay} | - |
| /status/{status_code} | - |
Note:
- Make sure you provide the production endpoint for the API in the following pattern.
http://<SERVICE_NAME>.<NAMESPACE_OF_THE_SERVICE>.svc.cluster.local
- When you create an API, API Manager automatically creates and deploy Istio resources for the API.
1.) Using JWT Tokens
-
Create an application by selecting JWT for the Token Type.
-
Subscribe to the API httpbinAPI by selecting the application created
-
When generating the token, select the relevant scopes and generate an access token
When accessing the service, provide the authorization header as follows.
curl http://${INGRESS_GATEWAY_HOST}:{INGRESS_GATEWAY_PORT}/headers -H "Authorization: Bearer JWT_ACCESS_TOKEN"
2.) Using OAuth2 Tokens
-
Create an application by selecting OAuth2 for the Token Type.
-
Subscribe to the API httpbinAPI by selecting the application created
-
When generating the token, select the relevant scopes and generate an access token
When accessing the service, provide the authorization header as follows.
curl http://${INGRESS_GATEWAY_HOST}:{INGRESS_GATEWAY_PORT}/headers -H "Authorization: Bearer OAuth2_ACCESS_TOKEN"
- Access WSO2 API Manager Publisher and Store for analytics
kubectl delete -f samples/httpbin/
kubectl delete -f install/adapter-artifacts/
kubectl delete secrets server-cert -n istio-system
kubectl delete -f install/analytics/k8s-artifacts/
kubectl delete -f install/api-manager/k8s-artifacts/
kubectl delete configmap apim-conf -n wso2
kubectl delete configmap apim-lifecycles -n wso2
You can customize and deploy WSO2 Servers by following this guide.
- Figure out wso2 adapter pod name
kubectl get pods -n istio-system -l app=wso2adapter
- Browse the wso2 adapter log
kubectl logs -f <POD_NAME> -n istio-system