This guide outlines the process for creating and managing SPL Token-2022 on the Solana blockchain, focusing on the Devnet for testing purposes. Follow these steps to mint your custom SPL tokens, aptly named "Token-22", and connect your paper wallet to the Phantom Wallet for a seamless Solana blockchain experience.
Before starting, ensure you have installed the following tools:
- Solana CLI: Installation Guide 🛠️
- Node.js: Download Page 📥
- Mpl Token Metadata: Install via npm with
npm install @metaplex-foundation/mpl-token-metadata - SPL Token CLI: Follow the instructions in the Solana documentation or install it via npm with
npm install -g @solana/spl-token ts-node: Install via npm withnpm install -g ts-node
Generate a key pair that starts with a specific prefix (e.g., "KVN"). This command searches for a key pair that meets the criteria, which can take some time.
solana-keygen grind --starts-with KVN:1Rename your key pair file to KVN__________.json for easier reference.
Generate a key pair that starts with a specific prefix (e.g., "KV"). This command searches for a key pair that meets the criteria, which can take some time.
solana-keygen grind --starts-with KV:1Set the Solana CLI to use your newly generated key pair.
solana config set --keypair /path/to/KVN__________.jsonSet to Devnet
You Can Change it to devnet,testnet,mainnet-beta. (Devnet in our Case)
solana config set --url https://api.devnet.solana.comRequest an airdrop of 2 SOL to your account on the Devnet.
solana airdrop 2Create your SPL token using one of the two methods below:
Option 1: With Key Pair File
spl-token create-token -p TokenzQdBNbLqP5VEhdkAS6EPFLC1PHnBqCXEpPxuEb /path/to/KVNmDjP8vhUTCk6toCtLu5gXDurV5CJfX6JGgbrBzsJ.jsonOption 2: Recommended
spl-token create-token -p TokenzQdBNbLqP5VEhdkAS6EPFLC1PHnBqCXEpPxuEbAfter adjusting addresses and keys in mpl_token22.ts, execute it:
ts-node ./mpl_token22.tsCreate a token account and mint your desired amount of tokens you wish. Replace with your token's address:
spl-token create-account <token_address>
spl-token mint <token_address> 10000000Convert the private key from your JSON file for Phantom Wallet import:
more /path/to/KVN__________.jsonCopy the output, which is an array of numbers, to import into Phantom Wallet:
- Open Phantom Wallet and switch to Testnet mode in Settings.
- Choose to Import Private Key.
- Paste the key array, name the account, and proceed, ignore any format warning.
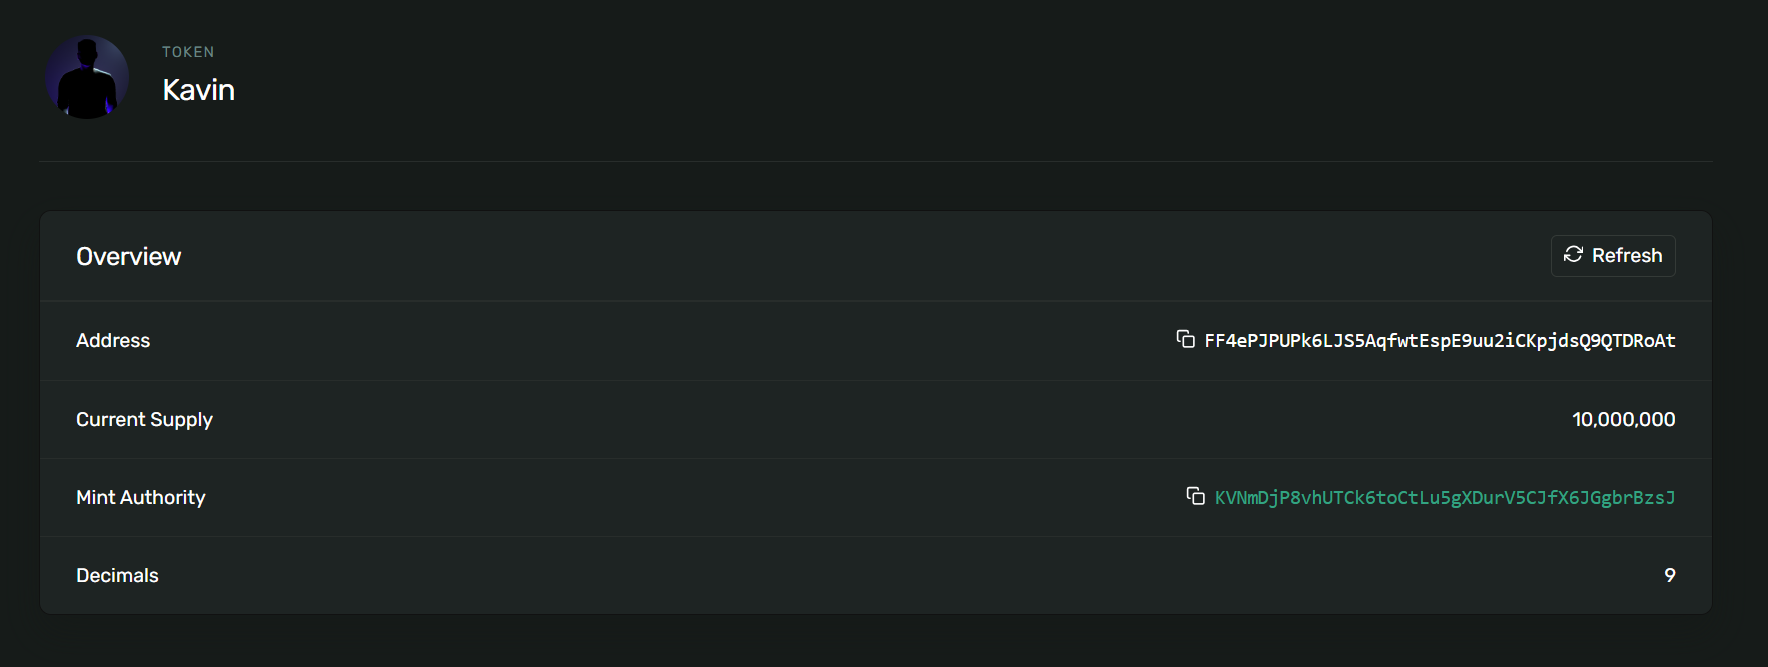
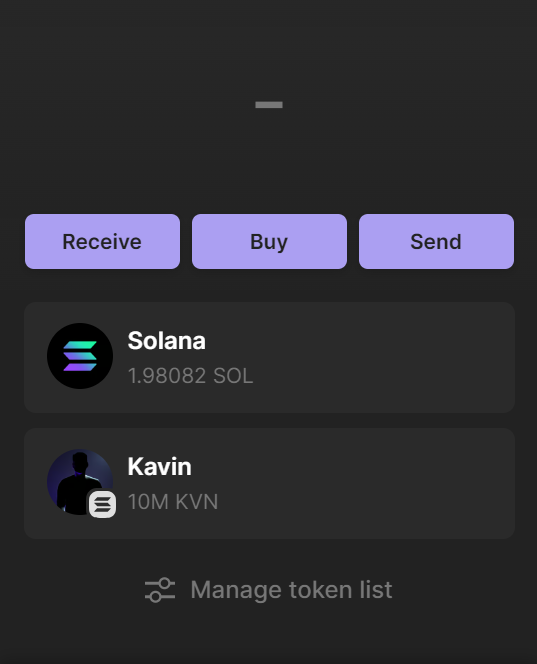
My Wallet Address : KVNmDjP8vhUTCk6toCtLu5gXDurV5CJfX6JGgbrBzsJ
Send Me Your Token After Creating 😊🥳
- Caution: Be Careful Using Mainnet,It May Cost You Original Money
- Security: Be cautious with your key pair and private keys.
- Devnet: This guide is for the Devnet.
- Phantom Wallet: Ensure your Phantom Wallet is up to date.
This project is MIT licensed.