ML-Constructive (ML-C) is the first constructive heuristics that scales efficiently using information extracted from historical TSP optimal tours. ML-C exploits machine learning (ML) to learn common patterns from known optimal solutions provided by a perfect Oracle (the Concorde optimal TSP solver). Then, such learnt ability is employed by the ML-C heuristic to construct TSP tours in two phases.
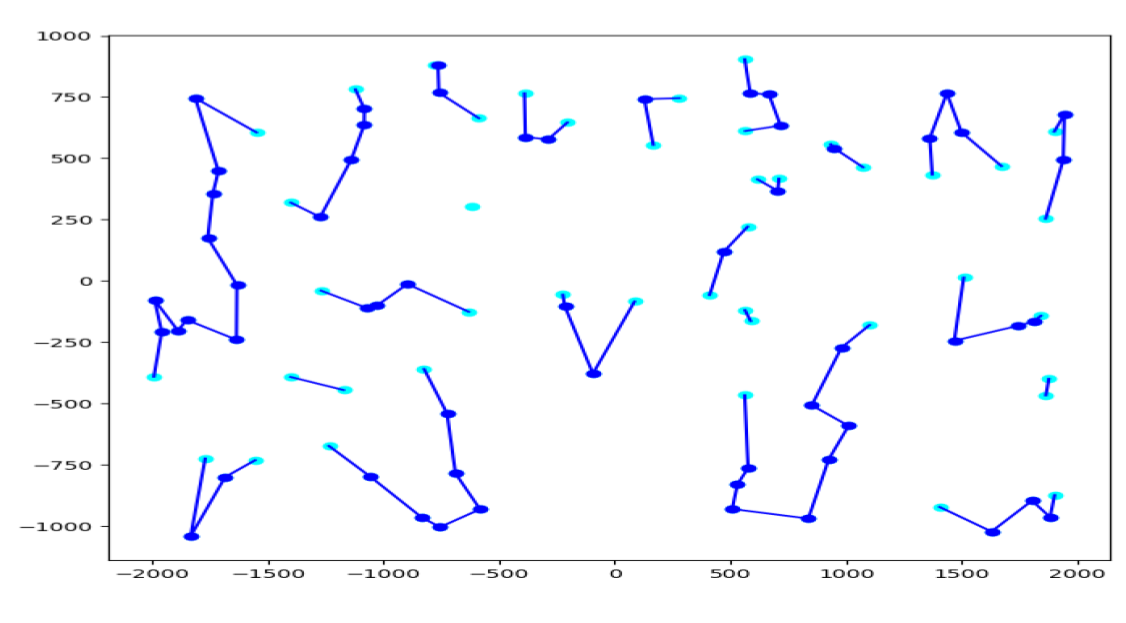
The first phase uses ML to select the most promising edges to insert in an initial fragmented solution (Figure 1). The ML choose edges from the selection of promising edges. Such selection is distinguished by the simple fact of collecting edges that are connection between vertices that are at most second closest to each other.
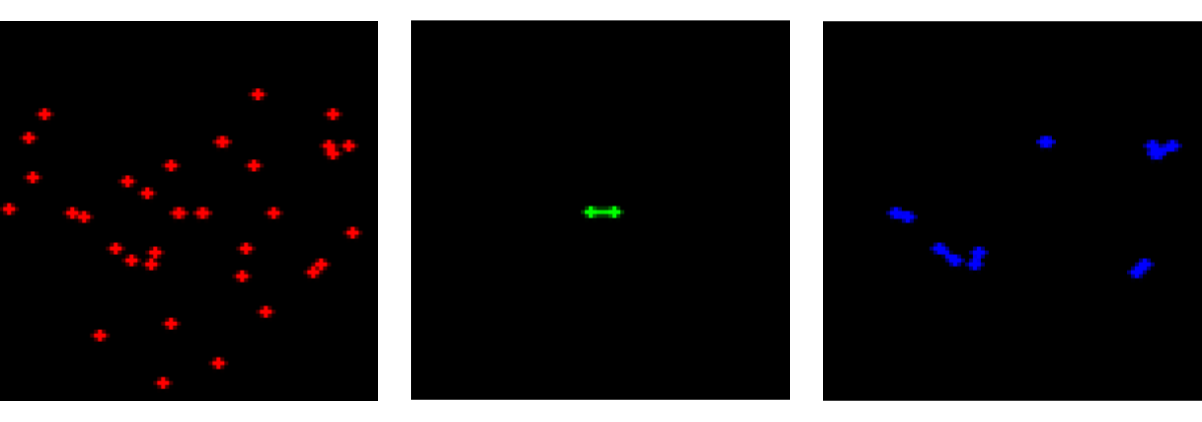
Such partial solution enables reducing the construction time for solving, meanwhile smartly selecting the most promising edges. The ML system chooses which edges to include in the solution and which not by employing image processing. Three channels are utilized to represent a local view of the problem. The first one shows the vertices in the local view, the second one shows the new edge to be inserted, while the third channel shows the existing edges available in the current partial solution. For more details we refer to Mele et al. [1].
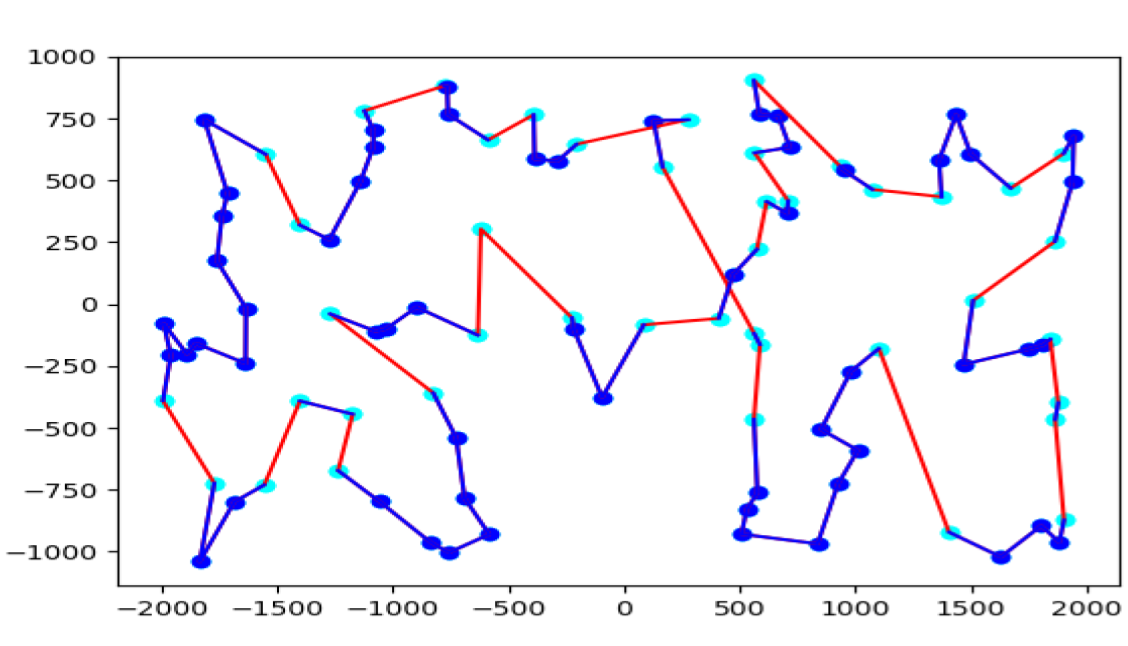
The second (and last) phase of ML-C uses the Clarke-Wright heuristic to complete the TSP tour (Figure 2). Several approaches are possible for completing the tour. In Vitali et al. [2], for example, a third phase employing local search techniques on the edges inserted during the second phase is suggested.
The approach shows good result on TSPLIB testing instances up to 1748 vertices. ML-C is effectively able to combine classical heuristic methods with machine learning by learning from small instances and scaling the knowledge to real case scenario.
For the curious readers, we suggest to look through our survey on ML approaches for the TSP [3], and an unusual example on how to combine combinatorial optimization concepts with the reward function of reinforcement learning setups for the TSP [4].
To run this application using Conda, follow these steps:
-
Install Miniconda or Anaconda: If not already installed, download and install Miniconda or Anaconda on your machine.
-
Create and Activate a New Conda Environment:
conda create --name ml_constructive python=3.8
conda activate ml_constructive
-
Install Required Libraries:
- Install PyTorch with CUDA support for GPU acceleration. Ensure the CUDA toolkit version matches your system's NVIDIA drivers.
conda install pytorch torchvision torchaudio cudatoolkit=12.3 -c pytorch
- The
libgl1-mesa-glxpackage is a library that provides support for OpenGL, which is required by some computer vision libraries like OpenCV. While Conda manages most package dependencies within its environment, system-level dependencies like OpenGL libraries might need to be installed separately on your host system. For Conda environments, OpenCV can be installed without explicitly installinglibgl1-mesa-glxas Conda packages handle these dependencies internally:conda install -c conda-forge opencv
- For packages that require a specific installation method or are not available in Conda repositories, use pip within the Conda environment. An example is
pyconcorde, which is installed via pip:pip install 'pyconcorde @ git+https://github.com/jvkersch/pyconcorde' - To install other dependencies from
requirements.txtand ensure compatibility within the Conda environment, it's recommended to first attempt installation with Conda, falling back to pip if necessary:while read requirement; do conda install --yes $requirement || pip install $requirement; done < requirements.txt
- Install PyTorch with CUDA support for GPU acceleration. Ensure the CUDA toolkit version matches your system's NVIDIA drivers.
-
CUDA Toolkit: The CUDA Toolkit provides a development environment for creating high performance GPU-accelerated applications. It includes GPU-accelerated libraries, debugging and optimization tools, a C/C++ compiler, and a runtime library to deploy your application. If you're using Conda to manage PyTorch and other GPU-accelerated libraries, Conda will install the appropriate version of
cudatoolkitfor you. However, to leverage GPU capabilities fully, ensure that your system's NVIDIA drivers are compatible with the installed CUDA version. For detailed instructions on installing CUDA and matching it with your NVIDIA drivers, visit the NVIDIA CUDA Toolkit documentation.
After setting up your Conda environment and installing the necessary libraries, you can proceed with the project-specific commands such as dataset creation, model training, and evaluation within the activated Conda environment.
Running this repository with Docker simplifies the setup process and ensures a consistent environment across different machines. Follow the instructions below to get started:
- Docker Installation: Ensure Docker is installed and running on your system. If not, download and install Docker from Docker's official website.
The Docker images for this project are hosted on Docker Hub. You can choose between the standard version or the GPU-accelerated version if you plan to utilize GPUs for training the model.
-
Standard Version:
To pull the latest version of the
umbertojr/ml-constructiveimage, execute the following command in your terminal:docker pull umbertojr/ml-constructive:latest
This command retrieves the latest image, ensuring you have the most up-to-date environment for the project. For more details about this image, visit the Docker Hub repository.
-
GPU Version: If you intend to train the model using GPUs, pull the GPU-enabled image with:
docker pull umbertojr/ml-constructive:gpu
This version is optimized for GPU utilization, enabling faster training times on supported hardware.
After pulling your chosen image, you can run it to start an interactive session, allowing direct execution of Python commands within a Bash shell.
-
Standard Environment: To launch the container with an interactive Bash shell and mount a local directory (to preserve data generated by experiments), use:
docker run -it -v /path/to/local/version1.1/:/app/ umbertojr/ml-constructive:latest bash
Replace /path/to/local/version1.1/ with the actual path to your ML-Constructive/version1.1/ directory on the host machine. This setup ensures that any data written inside the container to /app/data is saved on your host machine, maintaining the project's structure and facilitating easy access to results and datasets.
-
GPU-Enabled Environment: If utilizing GPUs, launch the container with GPU support by adding the
--gpus allflag:docker run -it --gpus all -v /path/to/local/version1.1/:/app/ umbertojr/ml-constructive:gpu bash
This command enables the Docker container to access all available GPUs on the host machine, significantly enhancing performance for GPU-accelerated tasks.
By following these steps, you can easily set up and run the application in a Dockerized environment, whether you're conducting experiments on a CPU or leveraging the power of GPUs.
To create the dataset, which takes about 3 days. The following command generates folders and files containing the data for training and evaluation. Test instances are already located in the "version1/data/test" folder.
python cli.py --operation create_instancesData generated by the above commands will be automatically saved to the mounted directory (/path/to/local/data) on your host machine. This setup allows you to preserve the data outside of the Docker container, facilitating easy access and analysis.
To reproduce the statistical results shown in Mele et al. [1], the following command is employed.
python cli.py --operation statistical_studypython cli.py --operation trainpython cli.py --operation solve_TSPLIB[1] Mele, U. J., Gambardella, L. M., and Montemanni, R. (2021). A New Constructive Heuristic driven by Machine Learning for the traveling Salesman Problem. Algorithms 2021, 14, 267. DOI:https://doi.org/10.3390/a14090267
[2] Vitali, T., Mele, U. J., Gambardella, L. M., and Montemanni, R. (2021). Machine Learning Constructives and Local Searches for the Travelling Salesman Problem. ArXiv preprint. ArXiv:https://arxiv.org/abs/2108.00938
[3] Mele, U. J., Gambardella, L. M., and Montemanni, R. (2021). Machine learning approaches for the traveling salesman problem: A survey. In 2021 The 8th International Conference on Industrial Engineering and Applications(Europe) (ICIEA 2021-Europe). Association for Computing Machinery, New York, NY, USA, 182–186. DOI:https://doi.org/10.1145/3463858.3463869
[4] Mele, U. J., Chou, X., Gambardella, L. M., and Montemanni, R. (2021). Reinforcement Learning and additional rewards for the traveling salesman problem. In 2021 The 8th International Conference on Industrial Engineering and Applications(Europe) (ICIEA 2021-Europe). Association for Computing Machinery, New York, NY, USA, 198–204. DOI:https://doi.org/10.1145/3463858.3463885
@Article{a14090267,
AUTHOR = {Mele, Umberto Junior and Gambardella, Luca Maria and Montemanni, Roberto},
TITLE = {A New Constructive Heuristic Driven by Machine Learning for the Traveling Salesman Problem},
JOURNAL = {Algorithms},
VOLUME = {14},
YEAR = {2021},
NUMBER = {9},
ARTICLE-NUMBER = {267},
URL = {https://www.mdpi.com/1999-4893/14/9/267},
ISSN = {1999-4893},
DOI = {10.3390/a14090267}
}
This project makes use of the PyConcorde library, an efficient Python wrapper for the Concorde TSP solver, which is the fastest available exact solver for the Traveling Salesman Problem (TSP). We express our sincere gratitude to the developers of PyConcorde for their efforts in creating and maintaining this valuable tool.
Additionally, we extend our thanks to NVIDIA for providing the Docker images that were instrumental in the development and execution of our GPU-accelerated experiments. The NVIDIA PyTorch Docker images (nvcr.io/nvidia/pytorch) supplied us with a robust, optimized environment for deep learning applications. Their commitment to supporting the community with high-quality, accessible tools has significantly contributed to the success of our project's computational tasks.


