
Do you have a small scale vehicle that you wish had a simple obstacle avoidence system? Do you have bunch of sensors lying around and space on your raspberry pi?
These are exactly the problems this project solves! The goal of this project is to create a data-driven algorithm that will take in data from multiple sources and sensors to output a steering value to avoid obstacles. The project is made to run in a docker which can be used by devices such as a raspberry pi.

The following instructions require a Linux distribution installed on your machine. Ubuntu 22.04 is recommended.
 sudo apt-get update
 sudo apt-get upgrade
 sudo apt-get update
 sudo apt-get install build-essential cmake git
sudo apt install gnome-terminal
sudo apt remove docker-desktop
For a complete cleanup, remove configuration and data files at $HOME/.docker/desktop, the symlink at /usr/local/bin/com.docker.cli, and purge the remaining systemd service files.
rm -r $HOME/.docker/desktop
 sudo rm /usr/local/bin/com.docker.cli
 sudo apt purge docker-desktop
Update the apt package index and install packages to allow apt to use a repository over HTTPS:
 sudo apt-get update

 sudo apt-get install \
 ca-certificates \
 curl \
 gnupg
Add Docker’s official GPG key:
 sudo mkdir -m 0755 -p /etc/apt/keyrings

 curl -fsSL https://download.docker.com/linux/ubuntu/gpg | sudo gpg --dearmor -o /etc/apt/keyrings/docker.gpg
Use the following command to set up the repository:
 echo \
"deb [arch="$(dpkg --print-architecture)" signed-by=/etc/apt/keyrings/docker.gpg] https://download.docker.com/linux/ubuntu \
"$(. /etc/os-release && echo "$VERSION_CODENAME")" stable" | \

 sudo tee /etc/apt/sources.list.d/docker.list > /dev/null
 sudo apt-get update
 sudo apt-get install ./docker-desktop-<version>-<arch>.deb
sudo adduser ubuntu docker
Login to your Docker Hub account, with filling the following credentials:
docker login -u <CID> -p <Personal Access Token> registry.git.chalmers.se/courses/dit638/students/
Next, pull the Docker image to the machine, of this particular version tag:
docker pull registry.git.chalmers.se/courses/dit638/students/2023-group-11:v1.0.2
To clone this repository, paste the following in the terminal, and navigate to the following folder:
git clone -b main git@git.chalmers.se:courses/dit638/students/2023-group-11.git

cd 2023-group-11/src
At this specific path, open two new terminal windows.
Terminal window #1: This starts the OpenDLV Camera View software.
cd assets
docker run --rm -i --init --name=opendlv-vehicle-view -v $PWD:/opt/vehicle-view/recordings -v /var/run/docker.sock:/var/run/docker.sock -p 8081:8081 chrberger/opendlv-vehicle-view:v0.0.64
Terminal window #2: This starts the H264 Decoder module, that sends the decompressed H264 frames in an ARGB format.
xhost +
docker run --rm -ti --ipc=host -e DISPLAY=$DISPLAY -v /tmp:/tmp h264decoder:v0.0.5 --cid=253 --name=img
Then, open a compatible web browser (eg. Chrome) and enter the URL "localhost:8081" to connect to the port that was defined in the initialisation of the OpenDLV-camera-view.
Terminal window #3: Once a video has started, finally, run this command in a separate third terminal.
docker run --rm -ti --ipc=host -e DISPLAY=$DISPLAY -v /tmp:/tmp registry.git.chalmers.se/courses/dit638/students/2023-group-11:v1.0.2 --cid=253 --name=img --width=640 --height=480 --verbose
The --verbose tag opens a debug window, to show a second image feed. When the flag is omitted, no debug pop-up window is shown.
Our group will follow a modified version of the git flow. This means that we will create new branches from the main branch, on which we will work. However, we will also have a branch called develop. The main branch will have only production code, and every modification (merge request from develop branch) on it will be a new release. The develop branch will have pre-production code and when features are finished they will be merged from the aforementioned individual feature branches into this branch, and progress ahead later to main once it has been thoroughly verified.
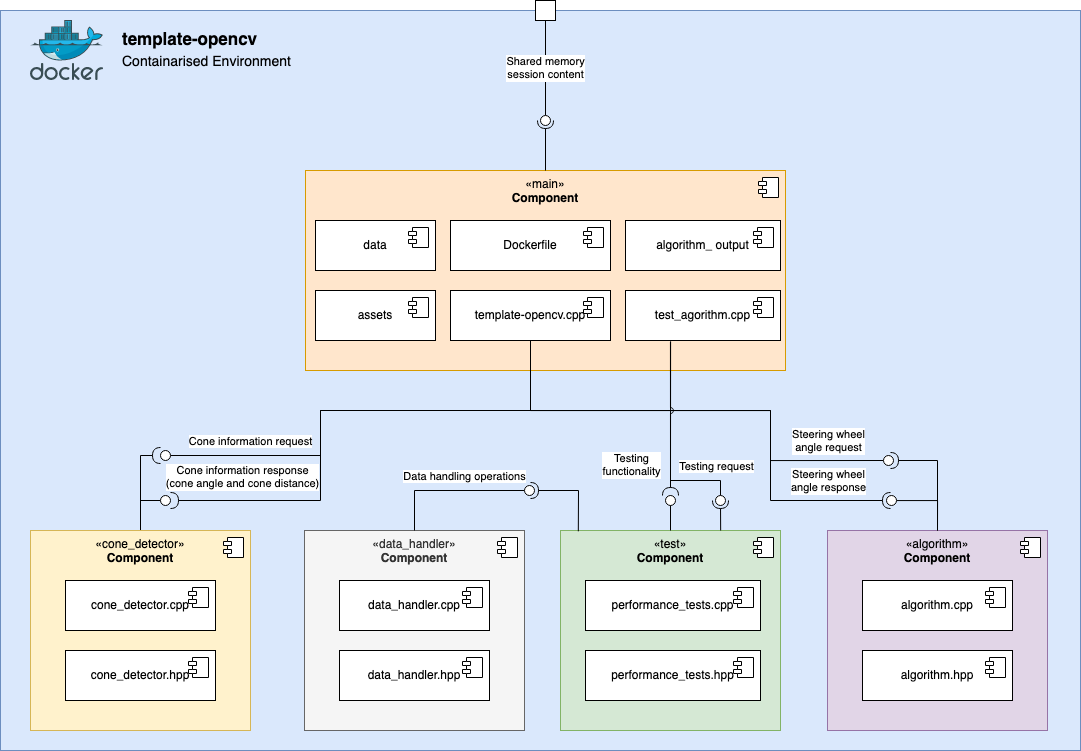
Our algorithm software depend on two other microservices.
- The h264-decoder’s main purpose is to create image frames which can be processed by our image analysis implementation, ensuring the accurate extraction of relevant information for cone detection.
- opendlv-vehicle-view is another component, as shown in the deployment diagram which can create image frames in an h264 format that can be decoded to be further processed by an algorithm to extract its relevant information.

The description for the components are as follows:
- cone_detector: frame processing with HSV filtering and object detection with the goal of detecting cones (DEPRICATED)
- data_handler: performes input and output for csv files
- test: contains various types of methods used for testing
- algorithm: contains the logic which calculates the steering wheel angle

Bugs and unexpected behaviors are handled by the team via making a new bug fix issue, if the main feature issue is closed. The same workflow is applied by starting with making a new branch and ending with merging into develop/main.
The team collectively agreed upon a procedure for new feature additions, which goes as follows:
- Pull the latest version of the project
- Checkout to a new branch
- Make changes / modifications, then commit & push
- Open a Pull Request (PR) to the develop branch
- Approval: The program should be built successfully, passed tests, and upon so, is to be reviewed by a maintainer
We will also follow test-driven development principles, in order to accurately determine that our implementation fulfills the requirements, as well as to improve code quality. This means that we will create unit tests based on the requirements and will then develop our software so that it passes all of them.
- If approved: Changes are pushed to the develop branch
Code reviews will be an important part of the workflow as well. Each merge request to develop will be carefully reviewed by at least one other team member, and meaningful feedback will be given. If the PR is not approved, changes will need to be done. Each merge request to main will close issues related to the commits added.
- A second PR is initiated, for adding approved features as an eventual official patch/release.
- Same aforementioned approval process needs to be conducted with a fellow maintainer.
- If approved: Pushed to the main branch, and a new tag, in the form of a release is created. It must follow correct versioning more than the current state, in the form vX.X.X.
lCov was used in order to measure the code coverage of our tests.
lCov
[lCov](https://wiki.documentfoundation.org/Development/Lcov) is a code coverage analysis tool for C++ code that can be used to measure the effectiveness of test suites when exercising the codebase. It works by generating reports that provide information on the percentage of code executed by the tests.All commits and pull requests follow Conventional Commits. The convention dictates that the messages will start with a keyword which specifies the type of change. It is then followed by a description of the change.
Few common keywords:
- feat = adds a new feature
- fix = fixes a bug
- docs = works on readme type documents
- ci = related to CI/CD
- test = related to tests
- ! = used in addition to other keywords to represent importance or impact of change
feat!: added markdown to textboxes
docs: added the commit & merge request conventions section to readme
The project contains four pipeline stages:
Build
- Builds the project.
- A new docker image tag is newly created under the group's container registry (can be found in Packages and Registries > Container Registry). The name of the tag should be a correctly formatted version ID of the form vX.X.X.
Test all tests are excecuted five times with the five different sample data.
- The algorithm is tested to make sure it passes the requirements set by the customers. The following are tested: Accuracy of Algorithm, Total Time Taken, and Frames per Second.
- Requirement for the accuracy tests to pass is 45% or higher.
- Requirement for time takes tests requires the algorithm output total time to be same as the total time from given sample data.
- Requirement for frames per second tests require each second to contain 10 frames for 85% of all seconds.
Plot based on passed commit and current commit, five graphs are made.
Credit:
from Chalmers Revere was used during the CI job to run the videos fully automated, with the
.gitlab-ci.yml recording values in .csv format, to automate the construction of 5 plots using gnuplot.
Release on commits to main, a release tag is given and release is uploaded to docker-hub.
The stage routines can be found in the repository's root folder, in the file .gitlab-ci.yaml.
Below is the list of developers who are actively working on this project.
- Aditya Khadkikar: @adityaa
- Anton Golubenko: @antongol
- Burak Askan: @askan
- Dragos Florinel Isar: @florinel
- Oscar Reina Gustafsson: @scarr
This project makes use of the GNU license. No contributions can be done to this project by non-maintainers.
Project is complete. Additional contributions can be accepted.
Throughout the project, we discussed different ideas that could lead into algorithm implementation, however not all ideas were used for the implementation for our final algorithm.
Our first idea was to create two instances running the same recording, where in one instance only yellow cones are detected, and in another - blue.
This idea was conceived based on the goal that we needed to determine the direction of movement of the car. We assumed that, by determining the direction of movement of the car in the beginning of the video, our algorithm would be able to distinguish whether to turn left on steep turns around the track, or right, depending on the position of the cones.
The determination of the direction of movement works by using HSV values in order to determine only blue or only yellow cones. Additionally, an invisible threshold was implemented in the middle of a frame in order to establish the middlepoint and calculate the coordinates of pixels of specific cones.
If in one instance, where blue cones are detected, the blue cones are on the left side of the screen, from the middlepoint, and on another instance, where only yellow cones are detected, the cones are on the right side of the screen from the middlepoint, then the direction of movement would be "clockwise". This is determined by boolean variables "blueOnLeft" and "yellowOnRight", which are set to true by default. Both of them have to be true or false in order to represent a "clockwise" or "counter-clockwise" directions respectively.
This implementation was not included as part of our algorithm, due to inability of it to judge the direction correctly in some cases. For example, if the car starts on the steep turn, instead of just a straight line, then the cones would be crossing the middlepoint threshold of the frame. If blue cones are supposed to be on the left side of the track, and yellow cones - on the right, then if the car starts on a steep turn, it would detect that the blue cones are on the right side as well, making a false judgement.
The second idea that we used for the algorithm consists of determining angles and distance based only on image recognition.
The angles are calculated based on lines being drawn from middlepoint of the frame to the detected cones, and then the angle is determined from the middlepoint. Moreover, the determination of distance to cones was implemented, where the distance to cones would be measured in pixels.
Consequently, in order to calculate steering angles, a specific formula was implemented as can be seen in the algorithm.cpp class. The formula takes in "normalizedDistance" and "normalizedAngle" as values that are quotients of dividing the distance and cone values by their respective maximum values. This is to get both of the values on the same scale that would simplify the calculation. Both "normalizedDistance" and "normalizedAngle" variables are multiplied by their respective weight variables. Weight variables are there to specify the priority of each normalized variable in the algorithm formula. The result of multiplication and addition of these variables then gets multiplied by maximum or minimum steering angles from "groundSteeringRequest".
This implementation is our back-up implementation for the project.
The third idea includes using angular velocity reading. We have used "angularVelocityReading" values of x, y and z in order to look for a pattern that would match steering angles from "groundSteeringRequest".
We have found that values of z-axis follow the steering angles very closely. According to our understanding, the values of z-axis represent rotational acceleration of the car, hence if the steering angles are steep, therefore the z value would be on the higher end of the axis, which also true for negative values of steering wheel angles and z-axis.
Since there was a pattern that z-axis values and steering wheel angles from "groundSteeringRequest" were following, we decided to multiply the value of z by some constant, that would closely resemble the values of steering wheel angles, and that constant is 0.003.
After coming up with that formula, testing the accuracy of the algorithm with performance tests and plotting our steering wheel angles against steering wheel angles from "groundSteeringRequest", we selected this implementation as our main and final implementation for the project.