本图像处理软件,我使用了 C++ 丰富的第三方开源库,如 OpenCV 、 Qt 来制作,实现了打开图像文件、显示图像、存储处理后图像,对图像进行灰度化、二值化(阈值可调)、3×3 均值滤波、3×3 中值滤波、拉普拉斯 4 领域锐化、边缘检测、直方图计算与显示功能;视频图像处理功能,可以对每帧视频帧进行灰度化并保存;检测视频中人脸面部并覆盖标记,采用 OpenCV 中 harrcascade 检测框架检测人脸,并实时覆盖。并且 UI 界面较为美观易用。通过这次图像工程课程设计的实践,我巩固了数字图像处理的知识,熟练应用了各个第三方开源库,为之后的数字图像处理的深入学习打下了基础。
这个项目是我大三写的,现在回顾已经非常粗糙,分享出来一方面希望可以帮助初学者,另一方面希望能让同学们可以从目前大学中普遍毫无价值的形式主义作业中解脱出来,更加高效地学习优质计算机知识和主流编程技术,一起发扬开源精神,感受互联网技术的美好愿景。
图像工程课程设计
要求学生以《数字图像处理》课程中所讲授的知识,采用 Visual studio, QT 等开发环境,结 OpenCV 开源图像处理库设计并实现一个简易的数字图像处理软件。
一、课程设计主要内容
1、实现一个基础的图像处理软件(C,D 档) 基本功能要求:能打开图像文件、显示图像、存储处理后图像,有对图像进行灰度化、二值化(阈值可调)、3×3 均值滤波、3×3 中值滤波、拉普拉斯 4 领域锐化、边缘检测、以及直方图计算与显示功能。参考《数字图像处理》课程教学资料、OpenCV 文档以及《OpenCV 4 计算机视觉项目实战(第二版)》Chapter 4,可以采用自编函数或 OpenCV 中相关函数实现。
其它要求:
可以选择 C++/Java/Python/Javascript 语言以及相应的开发环境开发桌面/WEB/移动 APP/小程序。
在开发环境中项目或工程名称要求:DIPCD_学生姓名的拼音(不含空格)有菜单、工具条,支持快捷键,自己设计的图标(借助美图秀秀、Photoshop 等);主窗口标题含有自己学号和姓名。
需利用消息提示对话框,并含有“关于本软件对话框(标注自己姓名学号)”,消息对话框图标要求自己定制。
2、带有视频图像处理功能(在 1 的基础上选做,B 档):可以对每帧视频帧进行灰度化、二值化、3×3 均值滤波、3×3 中值滤波、拉普拉斯 4 邻域锐化操作,测试视频时长不少于 10 秒,视频也可以采用直接访问自身笔记本摄像头形式。参考《数字图像处理》课程教学资料、OpenCV 文档以及《OpenCV 4 计算机视觉项目实战(第二版)》Chapter 4,可以采用自编函数或 OpenCV 中的相关函数实现。
3、附加功能(在 2 的基础上选做任意一个,A 档)
A. 对图像实现基于颜色空间变换的图像增强。将 RGB 图像转换到 HIS/HSV 颜色空间,对亮度进行灰度增强,然后再转换回 RGB 空间。参考 OpenCV 文档,以及《OpenCV 4 计算机视觉项目实战(第二版)》中 Chapter 4.5。
B. 对图像实现频率域图像增强。在将图像从空域转换频率域,在频率域实现图像的平滑或锐化,然后再从频率域转换回空间域。参考 OpenCV 中频率域处理相关知识。以及[P04 图像的快速傅里叶变换及其应用] (https://www.bilibili.com/video/BV1mp4y1X73u/)
C. 视频中检测人脸面部并覆盖面具。采用 OpenCV 中 harrcascade 检测框架检测人脸并实时覆盖面具。参考 OpenCV 文档以及《OpenCV 4 计算机视觉项目实战(第二版)》Chapter 7。
D. 视频中使用高斯混合方法检测前景目标。采用 OpenCV 中的高斯混合方法对背景进行建模,从而采用背景减法检测前景目标对象。参考 OpenCV 文档以及《OpenCV 4 计算机视觉项目实战(第二版)》Chapter 8。
E. 视频中构建交互式对象跟踪器。随意挑选一个对象后,自动提取颜色特征,并在视频中自动跟踪此颜色对象。参考 OpenCV 文档以及《OpenCV 4 计算机视觉项目实战(第二版)》Chapter 9。
F. 对图像使用 Tesseract 进行文本识别。结合 OpenCV 与 Tesseract 光学字符识别库进行文字分割与识别。参考 OpenCV 文档以及《OpenCV 4 计算机视觉项目实战(第二版)》Chapter 10、11。
G. 图像或视频中使用 YOLO 实现实时对象检测。在 OpenCV 中使用深度学习对象检测模型 YOLO,实现图像或视频中实时对象检测。参考 OpenCV 文档以及《OpenCV 4 计算机视觉项目实战(第二版)》Chapter 12。
源代码:
- DIPCD_DengLei.h:
#pragma once

#include <QtWidgets/QMainWindow>
#include "ui_DIPCD_DengLei.h"

#include <QLabel>
#include <QMainWindow>
#include <QFileDialog>
#include <opencv2/core/core.hpp>
#include <opencv2/highgui/highgui.hpp>
#include <opencv2/opencv.hpp>
#include <opencv2/imgproc/imgproc.hpp>
#include <vector>

using namespace cv;

// 对应的是 ui 文件中的类
namespace Ui
{
    class DIPCD_DengLeiClass;
}

class DIPCD_DengLei : public QMainWindow
{
    Q_OBJECT

    public:
    explicit DIPCD_DengLei(QWidget* parent = nullptr);
    ~DIPCD_DengLei();

    private:
    Ui::DIPCD_DengLeiClass* ui;
    Mat image;
    Mat gray;
    Mat binary;
    Mat meanFiltering3x3;
    Mat medianFiltering3x3;
    Mat sharpeningOfLaplace4;
    Mat edgeDetection;
    Mat histImage;

    private:
    QImage MatToQImage(const cv::Mat& mat);    // MAT类型 转为 QImage类型
    void display_MatInQT(QLabel* label, cv::Mat mat);    // MAT 对象用 QT显示

    private slots:
    // 打开文件
    void on_action_openFile_triggered();

    // 保存文件
    void on_action_savaFile_triggered();

    // 关闭文件
    void on_action_quitFile_triggered();

    // 灰度化
    void on_action_grayscale_triggered();

    // 二值化
    void on_action_binarization_triggered();

    // 3×3 均值滤波
    void on_action_3x3meanFiltering_triggered();

    // 3×3 中值滤波
    void on_action_3x3medianFiltering_triggered();

    // 拉普拉斯 4 领域锐化
    void on_action_sharpeningOfLaplace4_triggered();

    // 边缘检测
    void on_action_edgaDetection_triggered();

    // 直方图计算与显示
    void on_action_histogramCalculationAndDisplay_triggered();

    // 撤销处理
    void on_action_undoProcessing_triggered();

    // 视频灰度化
    void on_action_grayscaleVideo_triggered();

    // 人脸识别
    void on_action_faceRecognition_triggered();
};- DIPCD_DengLei.cpp:
#include "stdafx.h"
#include "DIPCD_DengLei.h"
#include <QMessageBox>

using namespace std;

DIPCD_DengLei::DIPCD_DengLei(QWidget* parent)
    : QMainWindow(parent),
    ui(new Ui::DIPCD_DengLeiClass)
{
    ui->setupUi(this);
    ui->action_openFile->setEnabled(true);
    ui->action_savaFile->setEnabled(false);
    ui->action_quitFile->setEnabled(false);
    ui->action_grayscale->setEnabled(false);
    ui->action_binarization->setEnabled(false);
    ui->action_3x3meanFiltering->setEnabled(false);
    ui->action_3x3medianFiltering->setEnabled(false);
    ui->action_sharpeningOfLaplace4->setEnabled(false);
    ui->action_edgaDetection->setEnabled(false);
    ui->action_histogramCalculationAndDisplay->setEnabled(false);
    ui->action_undoProcessing->setEnabled(false);

    // 设置窗口标题
    setWindowTitle("图像处理工具 作者:20101330邓磊");

    // 给显示的窗口设置图标
    setWindowIcon(QIcon(".\\Resource Files\\图像处理.ico"));
    //setWindowIcon(QIcon(".\\Resource Files\\大户爱.ico"));

    // 退出
    connect(ui->action_quit, &QAction::triggered, this, &DIPCD_DengLei::close);

    //说明文档
    connect(ui->action_documentation, &QAction::triggered, this, [=]()
        {
            QIcon* icon = new QIcon(".\\Resource Files\\图像处理.ico");
            QMessageBox message(QMessageBox::Information, tr("说明文档"), tr("此软件的具体帮助请查阅:图像处理工具说明文档.md\n此软件的项目部署运行说明请查阅:ReadMe.md"));
            message.setWindowIcon(*icon);
            QPushButton* okbutton = (message.addButton(tr("确定"), QMessageBox::AcceptRole));
            message.exec();
        });

    //联系作者
    connect(ui->action_contactAuthor, &QAction::triggered, this, [=]()
        {
            QIcon* icon = new QIcon(".\\Resource Files\\图像处理.ico");
            QMessageBox message(QMessageBox::Information, tr("联系作者"), tr("学号:20101330\n姓名:邓磊\n昵称:末影小黑xh\n\nQQ:1735350920\n开源**:https://my.oschina.net/MYXHcode\n稀土掘金:https://juejin.cn/user/2907545284124903/posts\nCSDN:https://blog.csdn.net/qq_40734758?type=blog\n哔哩哔哩:https://b23.tv/foSt7Zw"));
            message.setWindowIcon(*icon);
            QPushButton* okbutton = (message.addButton(tr("确定"), QMessageBox::AcceptRole));
            message.exec();
        });
}

DIPCD_DengLei::~DIPCD_DengLei()
{
    delete ui;
}

// MAT类型 转为 QImage类型
QImage DIPCD_DengLei::MatToQImage(const cv::Mat& mat)
{
    // 8 位无符号,信道数 = 1
    if (mat.type() == CV_8UC1)
    {
        QImage image(mat.cols, mat.rows, QImage::Format_Indexed8);

        // 设置颜色表(用于将颜色索引转换为 q Rgb值)
        image.setColorCount(256);
        for (int i = 0; i < 256; i++)
        {
            image.setColor(i, qRgb(i, i, i));
        }

        // 复制输入 Mat
        uchar* pSrc = mat.data;
        for (int row = 0; row < mat.rows; row++)
        {
            uchar* pDest = image.scanLine(row);
            memcpy(pDest, pSrc, mat.cols);
            pSrc += mat.step;
        }
        return image;
    }

    // 8 位无符号,信道数 = 3
    else if (mat.type() == CV_8UC3)
    {
        // 复制输入 Mat
        const uchar* pSrc = (const uchar*)mat.data;

        // 创建与输入 Mat 尺寸相同的 QImage
        QImage image(pSrc, mat.cols, mat.rows, (int)mat.step, QImage::Format_RGB888);
        return image.rgbSwapped();
    }
    else if (mat.type() == CV_8UC4)
    {
        //qDebug() << "CV_8UC4";
        // 复制输入 Mat
        const uchar* pSrc = (const uchar*)mat.data;

        // 创建与输入 Mat 尺寸相同的 QImage
        QImage image(pSrc, mat.cols, mat.rows, (int)mat.step, QImage::Format_ARGB32);
        return image.copy();
    }
    else
    {
        //qDebug() << "错误:Mat 无法转换为 QImage.";
        return QImage();
    }
}

// MAT 对象用 QT显示
void DIPCD_DengLei::display_MatInQT(QLabel* label, Mat mat)
{
    label->setPixmap(QPixmap::fromImage(MatToQImage(mat)).scaled(label->size(), Qt::KeepAspectRatio, Qt::SmoothTransformation));
}

// 打开文件
void DIPCD_DengLei::on_action_openFile_triggered()
{    // 调用窗口打开文件
    ui->label_showOriginalImage->clear();
    ui->label_showProcessImage->clear();
    QString filename =
        QFileDialog::getOpenFileName(this, tr("打开图像"),
            ".",
            tr("Image file(*.png *.jpg *.bmp)"));

    image = imread(filename.toLocal8Bit().data());
    if (image.data)
    {
        ui->action_savaFile->setEnabled(true);
        ui->action_quitFile->setEnabled(true);
        ui->action_grayscale->setEnabled(true);
        ui->action_binarization->setEnabled(true);
        ui->action_3x3meanFiltering->setEnabled(true);
        ui->action_3x3medianFiltering->setEnabled(true);
        ui->action_sharpeningOfLaplace4->setEnabled(true);
        ui->action_edgaDetection->setEnabled(true);
        ui->action_histogramCalculationAndDisplay->setEnabled(true);
        ui->action_undoProcessing->setEnabled(true);

        // 通过 label 方式显示图片
        display_MatInQT(ui->label_showOriginalImage, image);
    }
}

// 保存文件
void DIPCD_DengLei::on_action_savaFile_triggered()
{
    if (image.data)
    {
        QString savePath;
        savePath = QFileDialog::getSaveFileName(0, "请选择图片保存路径", ".\\Image Files", "jpg(*.jpg);;png(*.png);;bmp(*.bmp);;所有文件(*.*)");

        if ((!savePath.isNull()) || (!savePath.isEmpty()))
        {
            const QPixmap saveImgage = ui->label_showProcessImage->pixmap();
            saveImgage.save(savePath);

            QIcon* icon = new QIcon(".\\Resource Files\\图像处理.ico");
            QMessageBox message(QMessageBox::Information, tr("提示"), tr("保存图片成功!"));
            message.setWindowIcon(*icon);
            QPushButton* okbutton = (message.addButton(tr("确定"), QMessageBox::AcceptRole));
            message.exec();
        }
    }
    else
    {
        QIcon* icon = new QIcon(".\\Resource Files\\图像处理.ico");
        QMessageBox message(QMessageBox::Information, tr("提示"), tr("保存图片失败!"));
        message.setWindowIcon(*icon);
        QPushButton* okbutton = (message.addButton(tr("确定"), QMessageBox::AcceptRole));
        message.exec();
    }
}

// 关闭文件
void DIPCD_DengLei::on_action_quitFile_triggered()
{
    if (image.data)
    {
        ui->action_savaFile->setEnabled(false);
        ui->action_grayscale->setEnabled(false);
        ui->action_binarization->setEnabled(false);
        ui->action_3x3meanFiltering->setEnabled(false);
        ui->action_3x3medianFiltering->setEnabled(false);
        ui->action_sharpeningOfLaplace4->setEnabled(false);
        ui->action_edgaDetection->setEnabled(false);
        ui->action_histogramCalculationAndDisplay->setEnabled(false);
        ui->action_undoProcessing->setEnabled(false);

        ui->label_showOriginalImage->clear();
        ui->label_showProcessImage->clear();

        image.release();
        gray.release();
        binary.release();
        meanFiltering3x3.release();
        medianFiltering3x3.release();
        sharpeningOfLaplace4.release();
        edgeDetection.release();
    }
}

// 灰度化
void DIPCD_DengLei::on_action_grayscale_triggered()
{
    ui->label_showProcessImage->clear();

    if (image.data)
    {
        // 灰度化
        cvtColor(image, gray, COLOR_BGR2GRAY);
        // 通过 label 方式显示图片
        display_MatInQT(ui->label_showOriginalImage, image);
        display_MatInQT(ui->label_showProcessImage, gray);
    }
    else
    {
        QIcon* icon = new QIcon(".\\Resource Files\\图像处理.ico");
        QMessageBox message(QMessageBox::Information, tr("提示"), tr("处理图片失败!"));
        message.setWindowIcon(*icon);
        QPushButton* okbutton = (message.addButton(tr("确定"), QMessageBox::AcceptRole));
        message.exec();
    }
}

// 二值化
void DIPCD_DengLei::on_action_binarization_triggered()
{
    ui->label_showProcessImage->clear();

    if (image.data)
    {
        // 获取 int 类型 阈值数据
        int thresholdValue = 0;

        QInputDialog* inputDialog = new QInputDialog(this);
        inputDialog->setOkButtonText(tr("确定"));
        inputDialog->setCancelButtonText(tr("取消"));

        thresholdValue = inputDialog->getInt(this, "提示", "请输入图片二值化的阈值:(范围为 0 ~ 255 之间)", 155, 0, 255, 1);

        // 二值化
        threshold(image, binary, thresholdValue, 255, THRESH_BINARY_INV);

        // 通过 label 方式显示图片
        display_MatInQT(ui->label_showOriginalImage, image);
        display_MatInQT(ui->label_showProcessImage, binary);
    }
    else
    {
        QIcon* icon = new QIcon(".\\Resource Files\\图像处理.ico");
        QMessageBox message(QMessageBox::Information, tr("提示"), tr("处理图片失败!"));
        message.setWindowIcon(*icon);
        QPushButton* okbutton = (message.addButton(tr("确定"), QMessageBox::AcceptRole));
        message.exec();
    }
}

// 3×3 均值滤波
void DIPCD_DengLei::on_action_3x3meanFiltering_triggered()
{
    ui->label_showProcessImage->clear();

    if (image.data)
    {
        // 3×3 均值滤波
        blur(image, meanFiltering3x3, Size(3, 3));
        // 通过 label 方式显示图片
        display_MatInQT(ui->label_showOriginalImage, image);
        display_MatInQT(ui->label_showProcessImage, meanFiltering3x3);
    }
    else
    {
        QIcon* icon = new QIcon(".\\Resource Files\\图像处理.ico");
        QMessageBox message(QMessageBox::Information, tr("提示"), tr("处理图片失败!"));
        message.setWindowIcon(*icon);
        QPushButton* okbutton = (message.addButton(tr("确定"), QMessageBox::AcceptRole));
        message.exec();
    }
}

// 3×3 中值滤波
void DIPCD_DengLei::on_action_3x3medianFiltering_triggered()
{
    ui->label_showProcessImage->clear();

    if (image.data)
    {
        // 3×3 中值滤波
        medianBlur(image, medianFiltering3x3, 3);
        // 通过 label 方式显示图片
        display_MatInQT(ui->label_showOriginalImage, image);
        display_MatInQT(ui->label_showProcessImage, medianFiltering3x3);
    }
    else
    {
        QIcon* icon = new QIcon(".\\Resource Files\\图像处理.ico");
        QMessageBox message(QMessageBox::Information, tr("提示"), tr("处理图片失败!"));
        message.setWindowIcon(*icon);
        QPushButton* okbutton = (message.addButton(tr("确定"), QMessageBox::AcceptRole));
        message.exec();
    }
}

// 拉普拉斯 4 领域锐化
void DIPCD_DengLei::on_action_sharpeningOfLaplace4_triggered()
{
    ui->label_showProcessImage->clear();

    if (image.data)
    {
        // 拉普拉斯 4 领域锐化
        Laplacian(image, sharpeningOfLaplace4, CV_16S, 1, 1, 0, BORDER_DEFAULT);
        // 通过 label 方式显示图片
        display_MatInQT(ui->label_showOriginalImage, image);
        display_MatInQT(ui->label_showProcessImage, sharpeningOfLaplace4);
    }
    else
    {
        QIcon* icon = new QIcon(".\\Resource Files\\图像处理.ico");
        QMessageBox message(QMessageBox::Information, tr("提示"), tr("处理图片失败!"));
        message.setWindowIcon(*icon);
        QPushButton* okbutton = (message.addButton(tr("确定"), QMessageBox::AcceptRole));
        message.exec();
    }
}

// 边缘检测
void DIPCD_DengLei::on_action_edgaDetection_triggered()
{
    ui->label_showProcessImage->clear();

    if (image.data)
    {
        // 边缘检测
        Canny(image, edgeDetection, 150, 100, 3);
        // 通过 label 方式显示图片
        display_MatInQT(ui->label_showOriginalImage, image);
        display_MatInQT(ui->label_showProcessImage, edgeDetection);
    }
    else
    {
        QIcon* icon = new QIcon(".\\Resource Files\\图像处理.ico");
        QMessageBox message(QMessageBox::Information, tr("提示"), tr("处理图片失败!"));
        message.setWindowIcon(*icon);
        QPushButton* okbutton = (message.addButton(tr("确定"), QMessageBox::AcceptRole));
        message.exec();
    }
}

// 直方图计算与显示
void DIPCD_DengLei::on_action_histogramCalculationAndDisplay_triggered()
{
    Mat src, dst;
    src = image;

    if (image.data)
    {
        // 将多通道图像分为单通道图像
        // 单通道图像 vector
        std::vector<Mat> bgr_planes;
        split(src, bgr_planes);

        // 直方图参数
        int histSize = 256;
        float range[] = {0, 256};
        const float* histRanges = {range};
        Mat b_hist, g_hist, r_hist;

        // 求出直方图的数据
        calcHist(&bgr_planes[0], 1, 0, Mat(), b_hist, 1, &histSize,
            &histRanges, true, false);
        calcHist(&bgr_planes[1], 1, 0, Mat(), g_hist, 1, &histSize,
            &histRanges, true, false);
        calcHist(&bgr_planes[2], 1, 0, Mat(), r_hist, 1, &histSize,
            &histRanges, true, false);

        // 画出直方图
        int hist_h = 400;
        int hist_w = 512;
        int bin_w = hist_w / histSize;    // 直方图的步数

        Mat histImage(hist_w, hist_h, CV_8UC3, Scalar(0, 0, 0));

        // 将数据归一化到直方图的图像尺寸中来
        normalize(b_hist, b_hist, 0, hist_h, NORM_MINMAX, -1, Mat());
        normalize(g_hist, g_hist, 0, hist_h, NORM_MINMAX, -1, Mat());
        normalize(r_hist, r_hist, 0, hist_h, NORM_MINMAX, -1, Mat());

        // 0-255 的像素值,画出每个像素值的连线
        //注意:图像中的坐标是以左上角为原点向右下方延伸
        for (int i = 1; i < histSize; ++i)
        {
            line(histImage, Point((i - 1) * bin_w, hist_h - cvRound(b_hist.at<float>(i - 1))),
                Point(i * bin_w, hist_h - cvRound(b_hist.at<float>(i))), Scalar(0, 0, 255), 2, LINE_AA);
            line(histImage, Point((i - 1) * bin_w, hist_h - cvRound(g_hist.at<float>(i - 1))),
                Point(i * bin_w, hist_h - cvRound(g_hist.at<float>(i))), Scalar(0, 255, 0), 2, LINE_AA);
            line(histImage, Point((i - 1) * bin_w, hist_h - cvRound(r_hist.at<float>(i - 1))),
                Point(i * bin_w, hist_h - cvRound(r_hist.at<float>(i))), Scalar(255, 0, 0), 2, LINE_AA);
        }

        // 通过 label 方式显示图片
        display_MatInQT(ui->label_showOriginalImage, image);
        display_MatInQT(ui->label_showProcessImage, histImage);
    }
    else
    {
        QIcon* icon = new QIcon(".\\Resource Files\\图像处理.ico");
        QMessageBox message(QMessageBox::Information, tr("提示"), tr("处理图片失败!"));
        message.setWindowIcon(*icon);
        QPushButton* okbutton = (message.addButton(tr("确定"), QMessageBox::AcceptRole));
        message.exec();
    }
}

// 撤销处理
void DIPCD_DengLei::on_action_undoProcessing_triggered()
{
    if (image.data)
    {
        ui->label_showProcessImage->clear();
    }
}

// 视频灰度化
void DIPCD_DengLei::on_action_grayscaleVideo_triggered()
{
    QString filename =
        QFileDialog::getOpenFileName(this, tr("打开视频"),
            ".",
            tr("Video file(*.mp4 *.avi)"));

    String fileName = filename.toStdString();

    QString savePath;
    String fileOut;

    if ((!filename.isNull()) || (!filename.isEmpty()))
    {
        savePath = QFileDialog::getSaveFileName(0, "请选择视频保存路径", ".\\Video Files\\recorded.mp4", "mp4(*.mp4);;avi(*.avi);;所有文件(*.*)");
    }

    if ((!savePath.isNull()) || (!savePath.isEmpty()))
    {
        fileOut = savePath.toStdString();
    }
    else
    {
        return;
    }

    VideoCapture inVid(fileName);

    Mat inFrame, outFrame;
    const char winIn[] = "Grabbing...", winOut[] = "Recording...";
    double fps = 30;    // 每秒的帧数

    // 打开摄像头,具体设备文件需先查看,参数为 0,则为默认摄像头
    if (!inVid.isOpened())
    {    // 检查错误
        cout << "错误相机未就绪!\n";
        return;
    }

    // 获取输入视频的宽度和高度
    int width = (int)inVid.get(CAP_PROP_FRAME_WIDTH);
    int height = (int)inVid.get(CAP_PROP_FRAME_HEIGHT);
    cout << "width = " << width << ", height = " << height << endl;

    VideoWriter recVid(fileOut, VideoWriter::fourcc('X', 'V', 'I', 'D'), fps, Size(width, height), 0);

    if (!recVid.isOpened())
    {
        cout << "错误视频文件未打开!\n";
        return;
    }

    // 为原始视频和最终视频创建两个窗口
    namedWindow(winIn);
    namedWindow(winOut);

    while (true)
    {
        // 从摄像机读取帧(抓取并解码)以流的形式进行
        inVid >> inFrame;

        if (inFrame.empty())
        {
            inVid.release();
            break;
        }
        // 将帧转换为灰度
        cvtColor(inFrame, outFrame, COLOR_BGR2GRAY);

        // 将帧写入视频文件(编码并保存)以流的形式进行
        recVid << outFrame;

        imshow(winIn, inFrame);    // 在窗口中显示帧
        imshow(winOut, outFrame);    // 在窗口中显示帧

        if (waitKey(1000 / fps) >= 0)
        {
            break;
        }
    }

    inVid.release();    // 关闭摄像机
    QIcon* icon = new QIcon(".\\Resource Files\\图像处理.ico");
    QMessageBox message(QMessageBox::Information, tr("提示"), tr("保存视频成功!\n保存路径:.\\Video Files\\recorded.mp4"));
    message.setWindowIcon(*icon);
    QPushButton* okbutton = (message.addButton(tr("确定"), QMessageBox::AcceptRole));
    message.exec();
}

// 人脸识别
void DIPCD_DengLei::on_action_faceRecognition_triggered()
{
    String faceCascadeName = ".\\Resource Files\\haarcascade_frontalface_alt.xml";
    String eyesAscadeName = ".\\Resource Files\\haarcascade_eye.xml";
    String mouthCascadeName = ".\\Resource Files\\haarcascade_mcs_mouth.xml";

    void faceRecongize(cv::CascadeClassifier faceCascade, cv::CascadeClassifier eyesCascade, cv::CascadeClassifier mouthCascade, cv::Mat frame);

    cv::VideoCapture* videoCap = new cv::VideoCapture;

    cv::CascadeClassifier faceCascade;
    cv::CascadeClassifier eyesCascade;
    cv::CascadeClassifier mouthCascade;

    // 加载脸部分类器文件
    if (!faceCascade.load(faceCascadeName))
    {
        std::cout << "加载 faceCascadeName 失败。" << std::endl;
        return;
    }

    // 加载眼睛部分分类器文件
    if (!eyesCascade.load(eyesAscadeName))
    {
        std::cout << "加载 eyesAscadeName 失败。" << std::endl;
        return;
    }

    // 加载嘴部分类器文件
    if (!mouthCascade.load(mouthCascadeName))
    {
        std::cout << "加载 mouthCascadeName 失败。" << std::endl;
        return;
    }

    // 打开摄像机
    videoCap->open(0);

    if (!videoCap->isOpened())
    {
        videoCap->release();
        std::cout << "打开摄像头失败。" << std::endl;
        return;
    }

    std::cout << "开放式摄像机成功。" << std::endl;

    while (true)
    {
        cv::Mat frame;

        // 读取视频帧
        videoCap->read(frame);

        if (frame.empty())
        {
            videoCap->release();
            return;
        }

        // 进行人脸识别
        faceRecongize(faceCascade, eyesCascade, mouthCascade, frame);

        // 窗口进行展示
        imshow("Face recognition (Press Enter to exit)", frame);

        //等待回车键按下退出程序
        if (cv::waitKey(30) == 13)
        {
            cv::destroyAllWindows();
            return;
        }
    }

    system("pause");
    return;
}

// 面部协调
void faceRecongize(cv::CascadeClassifier faceCascade, cv::CascadeClassifier eyesCascade, cv::CascadeClassifier mouthCascade, cv::Mat frame)
{
    std::vector<cv::Rect> faces;

    // 检测人脸
    faceCascade.detectMultiScale(frame, faces, 1.1, 2, 0 | cv::CASCADE_SCALE_IMAGE, cv::Size(30, 30));

    for (int i = 0; i < faces.size(); i++)
    {
        // 用椭圆画出人脸部分
        cv::Point center(faces[i].x + faces[i].width / 2, faces[i].y + faces[i].height / 2);
        ellipse(frame, center, cv::Size(faces[i].width / 2, faces[i].height / 2), 0, 0, 360, cv::Scalar(255, 0, 255), 4, 8, 0);

        cv::Mat faceROI = frame(faces[i]);
        std::vector<cv::Rect> eyes;

        // 检测眼睛
        eyesCascade.detectMultiScale(faceROI, eyes, 1.1, 2, 0 | cv::CASCADE_SCALE_IMAGE, cv::Size(30, 30));
        for (int j = 0; j < eyes.size(); j++)
        {
            // 用圆画出眼睛部分
            cv::Point eye_center(faces[i].x + eyes[j].x + eyes[j].width / 2, faces[i].y + eyes[j].y + eyes[j].height / 2);
            int radius = cvRound((eyes[j].width + eyes[j].height) * 0.25);
            circle(frame, eye_center, radius, cv::Scalar(255, 0, 0), 4, 8, 0);
        }

        cv::Mat mouthROI = frame(faces[i]);
        std::vector<cv::Rect> mouth;

        // 检测嘴部
        mouthCascade.detectMultiScale(mouthROI, mouth, 1.1, 2, 0 | cv::CASCADE_SCALE_IMAGE, cv::Size(30, 30));
        for (int k = 0; k < mouth.size(); k++)
        {
            //用长方形画出嘴部
            cv::Rect rect(faces[i].x + mouth[k].x, faces[i].y + mouth[k].y, mouth[k].width, mouth[k].height);
            rectangle(frame, rect, cv::Scalar(0, 255, 0), 2, 8, 0);
        }

        // 检测到两个眼睛和一个嘴巴, 可认为检测到有效人脸
        if (eyes.size() >= 2 && mouth.size() >= 1)
        {
            // 人脸上方区域写字进行标识
            cv::Point centerText(faces[i].x + faces[i].width / 2 - 40, faces[i].y - 20);
            cv::putText(frame, "face", centerText, cv::FONT_HERSHEY_SIMPLEX, 1, cv::Scalar(0, 0, 255), 2);
        }
    }
}- main.cpp:
#include "stdafx.h"
#include "DIPCD_DengLei.h"
#include <QtWidgets/QApplication>

int main(int argc, char* argv[])
{   // 应用程序类,在一个 Qt 应用程序中,该对象只有一个
    QApplication a(argc, argv);

    // 窗口对象
    DIPCD_DengLei w;

    // 显示窗口
    w.show();

    // 阻塞函数,程序进入了事件循环
    return a.exec();
}- DIPCD_DengLei.ui:
<?xml version="1.0" encoding="utf-8"?>
<ui version="4.0">
<class>DIPCD_DengLeiClass</class>
<widget class="QMainWindow" name="DIPCD_DengLeiClass">
<property name="geometry">
<rect>
<x>0</x>
<y>0</y>
<width>1276</width>
<height>726</height>
</rect>
</property>
<property name="minimumSize">
<size>
<width>640</width>
<height>360</height>
</size>
</property>
<property name="font">
<font>
<pointsize>9</pointsize>
<bold>true</bold>
</font>
</property>
<property name="windowTitle">
<string>图像处理工具 作者:20101330邓磊</string>
</property>
<widget class="QWidget" name="centralWidget">
<widget class="QLabel" name="label_author">
<property name="geometry">
<rect>
<x>1110</x>
<y>560</y>
<width>171</width>
<height>41</height>
</rect>
</property>
<property name="text">
<string>作者:20101330邓磊</string>
</property>
</widget>
<widget class="QLabel" name="label_originalImage">
<property name="geometry">
<rect>
<x>130</x>
<y>20</y>
<width>69</width>
<height>20</height>
</rect>
</property>
<property name="text">
<string>原图像</string>
</property>
</widget>
<widget class="QLabel" name="label_processImages">
<property name="geometry">
<rect>
<x>680</x>
<y>30</y>
<width>69</width>
<height>20</height>
</rect>
</property>
<property name="text">
<string>处理图像</string>
</property>
</widget>
<widget class="QLabel" name="label_imageProcessingTools">
<property name="geometry">
<rect>
<x>10</x>
<y>550</y>
<width>141</width>
<height>51</height>
</rect>
</property>
<property name="text">
<string>图像处理工具</string>
</property>
</widget>
<widget class="QLabel" name="label_showOriginalImage">
<property name="geometry">
<rect>
<x>130</x>
<y>70</y>
<width>461</width>
<height>461</height>
</rect>
</property>
<property name="frameShape">
<enum>QFrame::Box</enum>
</property>
<property name="lineWidth">
<number>2</number>
</property>
<property name="text">
<string />
</property>
</widget>
<widget class="QLabel" name="label_showProcessImage">
<property name="geometry">
<rect>
<x>680</x>
<y>70</y>
<width>461</width>
<height>461</height>
</rect>
</property>
<property name="frameShape">
<enum>QFrame::Box</enum>
</property>
<property name="lineWidth">
<number>2</number>
</property>
<property name="text">
<string />
</property>
</widget>
</widget>
<widget class="QMenuBar" name="menuBar">
<property name="geometry">
<rect>
<x>0</x>
<y>0</y>
<width>1276</width>
<height>25</height>
</rect>
</property>
<property name="font">
<font>
<pointsize>9</pointsize>
<bold>false</bold>
</font>
</property>
<widget class="QMenu" name="menu_file">
<property name="title">
<string>文件</string>
</property>
<addaction name="action_openFile" />
<addaction name="action_savaFile" />
<addaction name="action_quitFile" />
<addaction name="separator" />
<addaction name="action_quit" />
</widget>
<widget class="QMenu" name="menu_imageProcessing">
<property name="title">
<string>图像处理</string>
</property>
<addaction name="action_grayscale" />
<addaction name="action_binarization" />
<addaction name="action_3x3meanFiltering" />
<addaction name="action_3x3medianFiltering" />
<addaction name="action_sharpeningOfLaplace4" />
<addaction name="action_edgaDetection" />
<addaction name="action_histogramCalculationAndDisplay" />
</widget>
<widget class="QMenu" name="menu_tool">
<property name="title">
<string>工具</string>
</property>
<addaction name="action_undoProcessing" />
</widget>
<widget class="QMenu" name="menu_help">
<property name="title">
<string>帮助</string>
</property>
<addaction name="action_documentation" />
</widget>
<widget class="QMenu" name="menu_about">
<property name="title">
<string>关于</string>
</property>
<addaction name="action_contactAuthor" />
</widget>
<widget class="QMenu" name="menu_videoProcessing">
<property name="title">
<string>视频处理</string>
</property>
<addaction name="action_grayscaleVideo" />
<addaction name="action_faceRecognition" />
</widget>
<addaction name="menu_file" />
<addaction name="menu_imageProcessing" />
<addaction name="menu_videoProcessing" />
<addaction name="menu_tool" />
<addaction name="menu_help" />
<addaction name="menu_about" />
</widget>
<widget class="QToolBar" name="mainToolBar">
<property name="font">
<font>
<pointsize>9</pointsize>
<bold>true</bold>
</font>
</property>
<property name="toolButtonStyle">
<enum>Qt::ToolButtonTextUnderIcon</enum>
</property>
<attribute name="toolBarArea">
<enum>TopToolBarArea</enum>
</attribute>
<attribute name="toolBarBreak">
<bool>false</bool>
</attribute>
<addaction name="action_openFile" />
<addaction name="action_savaFile" />
<addaction name="action_quitFile" />
<addaction name="separator" />
<addaction name="action_undoProcessing" />
<addaction name="separator" />
<addaction name="action_grayscale" />
<addaction name="action_binarization" />
<addaction name="action_3x3meanFiltering" />
<addaction name="action_3x3medianFiltering" />
<addaction name="action_sharpeningOfLaplace4" />
<addaction name="action_edgaDetection" />
<addaction name="action_histogramCalculationAndDisplay" />
<addaction name="separator" />
<addaction name="action_grayscaleVideo" />
<addaction name="action_faceRecognition" />
<addaction name="separator" />
<addaction name="action_documentation" />
<addaction name="separator" />
<addaction name="action_contactAuthor" />
<addaction name="action_quit" />
</widget>
<widget class="QStatusBar" name="statusBar" />
<action name="action_openFile">
<property name="icon">
<iconset>
<normaloff>Resource Files/openFile.svg</normaloff>Resource Files/openFile.svg
</iconset>
</property>
<property name="text">
<string>打开文件</string>
</property>
<property name="shortcut">
<string>Ctrl+O</string>
</property>
</action>
<action name="action_quitFile">
<property name="icon">
<iconset>
<normaloff>Resource Files/quitFile.svg</normaloff>Resource Files/quitFile.svg
</iconset>
</property>
<property name="text">
<string>关闭文件</string>
</property>
<property name="shortcut">
<string>Ctrl+C</string>
</property>
</action>
<action name="action_grayscale">
<property name="text">
<string>灰度化</string>
</property>
<property name="iconText">
<string>图像灰度化</string>
</property>
<property name="shortcut">
<string>Ctrl+G</string>
</property>
</action>
<action name="action_binarization">
<property name="text">
<string>二值化</string>
</property>
<property name="shortcut">
<string>Ctrl+B</string>
</property>
</action>
<action name="action_3x3meanFiltering">
<property name="text">
<string>3×3 均值滤波</string>
</property>
<property name="iconText">
<string>均值滤波</string>
</property>
<property name="shortcut">
<string>Ctrl+M</string>
</property>
</action>
<action name="action_3x3medianFiltering">
<property name="text">
<string>3×3 中值滤波</string>
</property>
<property name="iconText">
<string>中值滤波</string>
</property>
<property name="shortcut">
<string>Ctrl+Shift+M</string>
</property>
</action>
<action name="action_sharpeningOfLaplace4">
<property name="text">
<string>拉普拉斯 4 领域锐化</string>
</property>
<property name="iconText">
<string>领域锐化</string>
</property>
<property name="shortcut">
<string>Ctrl+S</string>
</property>
</action>
<action name="action_edgaDetection">
<property name="text">
<string>边缘检测</string>
</property>
<property name="shortcut">
<string>Ctrl+E</string>
</property>
</action>
<action name="action_histogramCalculationAndDisplay">
<property name="text">
<string>直方图计算与显示</string>
</property>
<property name="iconText">
<string>直方图</string>
</property>
<property name="shortcut">
<string>Ctrl+Shift+H</string>
</property>
</action>
<action name="action_savaFile">
<property name="icon">
<iconset>
<normaloff>Resource Files/savaFile.svg</normaloff>Resource Files/savaFile.svg
</iconset>
</property>
<property name="text">
<string>保存文件</string>
</property>
<property name="shortcut">
<string>Ctrl+S</string>
</property>
</action>
<action name="action_undoProcessing">
<property name="icon">
<iconset>
<normaloff>Resource Files/undoProcessing.svg</normaloff>Resource Files/undoProcessing.svg
</iconset>
</property>
<property name="text">
<string>撤销处理</string>
</property>
<property name="shortcut">
<string>Ctrl+Z</string>
</property>
</action>
<action name="action_documentation">
<property name="icon">
<iconset>
<normaloff>Resource Files/documentation.svg</normaloff>Resource Files/documentation.svg
</iconset>
</property>
<property name="text">
<string>说明文档</string>
</property>
<property name="shortcut">
<string>Ctrl+H</string>
</property>
</action>
<action name="action_contactAuthor">
<property name="icon">
<iconset>
<normaloff>Resource Files/contactAuthor.svg</normaloff>Resource Files/contactAuthor.svg
</iconset>
</property>
<property name="text">
<string>联系作者</string>
</property>
<property name="shortcut">
<string>Ctrl+A</string>
</property>
</action>
<action name="action_quit">
<property name="icon">
<iconset>
<normaloff>Resource Files/quit.svg</normaloff>Resource Files/quit.svg
</iconset>
</property>
<property name="text">
<string>退出</string>
</property>
<property name="shortcut">
<string>Ctrl+Q</string>
</property>
</action>
<action name="action_grayscaleVideo">
<property name="text">
<string>灰度化</string>
</property>
<property name="iconText">
<string>视频灰度化</string>
</property>
<property name="shortcut">
<string>Ctrl+Shift+G</string>
</property>
</action>
<action name="action_faceRecognition">
<property name="text">
<string>人脸识别</string>
</property>
<property name="shortcut">
<string>Ctrl+F</string>
</property>
</action>
</widget>
<layoutdefault spacing="6" margin="11" />
<resources>
<include location="DIPCD_DengLei.qrc" />
</resources>
<connections />
</ui>互联网开源精神需要大家一起互相交流学习,互相支持奉献。欢迎大家与我友好交流。
加我 QQ 好友获取所有项目源码和项目文档,感谢大家的支持!
C++
Windows 11、Visual Studio 2022 、Qt Creator
Open CV 库、Qt 库 、harrcascade 检测框架
以《数字图像处理》课程中所讲授的知识,采用 Visual Studio、Qt 等开发环境,结合 OpenCV 开源图像处理库设计并实现一个简易的数字图像处理软件。
加深对数字图像处理的理解,熟练使用 OpenCV 的各种图像处理功能。
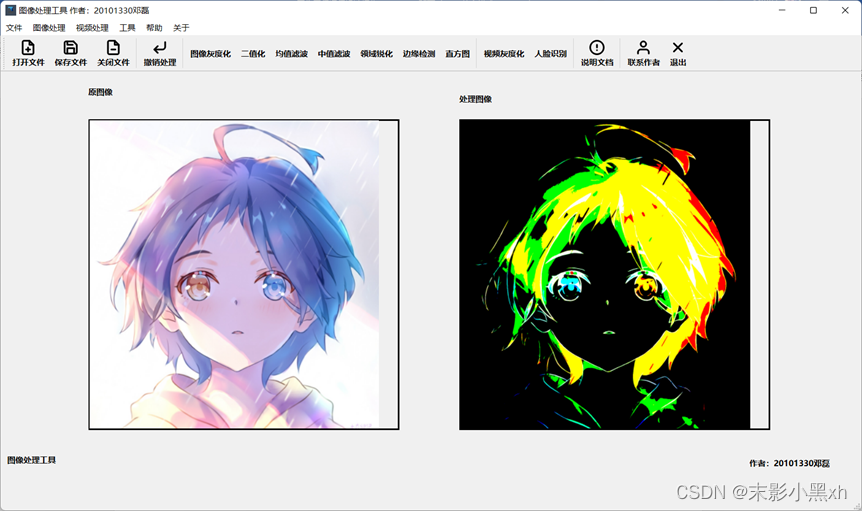
本图像处理软件的基本功能如下:
打开图像文件、显示图像、存储处理后图像,对图像进行灰度化、二值化(阈值可调)、3×3 均值滤波、3×3 中值滤波、拉普拉斯 4 领域锐化、边缘检测、直方图计算与显示功能。
视频图像处理功能,可以对每帧视频帧进行灰度化并保存。
检测视频中人脸面部并覆盖标记,采用 OpenCV 中 harrcascade 检测框架检测人脸,并实时覆盖。
本图像处理软件为 C++ 语言开发的桌面界面程序。
能实现打开图像文件、显示图像、存储处理后图像的基本功能。能实现对图像进行灰度化、二值化(阈值可调)、3×3 均值滤波、3×3 中值滤波、拉普拉斯 4 领域锐化、边缘检测、直方图计算与显示的图像处理功能。
能实现视频图像处理功能,可以对每帧视频帧进行灰度化并保存。
能实现检测视频中人脸面部并覆盖标记,采用 OpenCV 中 harrcascade 检测框架检测人脸,并实时覆盖。
在开发环境中项目或工程名称要求:DIPCD_学生姓名的拼音(不含空格);有菜单、工具条,支持快捷键,自己设计的图标(借助美图秀秀、Adobe Photoshop 等);主窗口标题含有自己学号和姓名;利用消息提示对话框,显示软件的帮助、关于等信息。
菜单栏部分:包含的框体有文件、图像处理、视频处理、工具、帮助、关于。
每个菜单(模块)对应的功能:
- 文件:包括打开文件,保存文件,关闭文件以及退出。
- 图像处理:包括灰度化,二值化,3×3 均值滤波,3×3 中值滤波,拉普拉斯 4 领域锐化,边缘检测,直方图计算与显示。
- 视频处理:包括灰度化,人脸识别。
- 工具:撤销处理,重置图片到未处理状态。
- 帮助:说明文档,关于本软件信息。
- 关于:联系作者,关于本人信息。
- 工具栏部分:包含以上功能的对于按钮,并有按钮图标。
- 图像显示部分:左面显示原图像,右面显示处理后的图像。
首先窗口界面的实现运用了 Qt Creator 进行页面搭建,随后采用 Visual Studio 2022 在 main.cpp 中进行代码编写,实现主函数运行后窗口的显示。
其次是在 DIPCD_DengLei.cpp 文件中编写主窗口中每个功能所对应的触发事件,包括菜单栏,工具栏按钮的对应槽函数。
最后编写对应的每个功能的实现函数,采用 OpenCV 库中封装的方法,直接对读取的图像和视频进行处理与保存,实现起来非常方便,运行起来十分高效。
额外运用了 OpenCV 中 harrcascade 检测框架,检测视频中人脸面部,并实时覆盖标记。
以下是软件功能结构图。

以下是关键代码部分。
灰度化:
// 灰度化
void DIPCD_DengLei::on_action_grayscale_triggered()
{
    ui->label_showProcessImage->clear();

    if (image.data)
    {
        // 灰度化
        cvtColor(image, gray, COLOR_BGR2GRAY);
        // 通过 label 方式显示图片
        display_MatInQT(ui->label_showOriginalImage, image);
        display_MatInQT(ui->label_showProcessImage, gray);
    }
    else
    {
        QIcon* icon = new QIcon(".\\Resource Files\\图像处理.ico");
        QMessageBox message(QMessageBox::Information, tr("提示"), tr("处理图片失败!"));
        message.setWindowIcon(*icon);
        QPushButton* okbutton = (message.addButton(tr("确定"), QMessageBox::AcceptRole));
        message.exec();
    }
}
直方图计算与显示:
// 直方图计算与显示
void DIPCD_DengLei::on_action_histogramCalculationAndDisplay_triggered()
{
    Mat src, dst;
    src = image;

    if (image.data)
    {
        // 将多通道图像分为单通道图像
        // 单通道图像 vector
        std::vector<Mat> bgr_planes;
        split(src, bgr_planes);

        // 直方图参数
        int histSize = 256;
        float range[] = {0, 256};
        const float* histRanges = {range};
        Mat b_hist, g_hist, r_hist;

        // 求出直方图的数据
        calcHist(&bgr_planes[0], 1, 0, Mat(), b_hist, 1, &histSize,
            &histRanges, true, false);
        calcHist(&bgr_planes[1], 1, 0, Mat(), g_hist, 1, &histSize,
            &histRanges, true, false);
        calcHist(&bgr_planes[2], 1, 0, Mat(), r_hist, 1, &histSize,
            &histRanges, true, false);

        // 画出直方图
        int hist_h = 400;
        int hist_w = 512;
        int bin_w = hist_w / histSize;    // 直方图的步数

        Mat histImage(hist_w, hist_h, CV_8UC3, Scalar(0, 0, 0));

        // 将数据归一化到直方图的图像尺寸中来
        normalize(b_hist, b_hist, 0, hist_h, NORM_MINMAX, -1, Mat());
        normalize(g_hist, g_hist, 0, hist_h, NORM_MINMAX, -1, Mat());
        normalize(r_hist, r_hist, 0, hist_h, NORM_MINMAX, -1, Mat());

        // 0-255 的像素值,画出每个像素值的连线
        //注意:图像中的坐标是以左上角为原点向右下方延伸
        for (int i = 1; i < histSize; ++i)
        {
            line(histImage, Point((i - 1) * bin_w, hist_h - cvRound(b_hist.at<float>(i - 1))),
                Point(i * bin_w, hist_h - cvRound(b_hist.at<float>(i))), Scalar(0, 0, 255), 2, LINE_AA);
            line(histImage, Point((i - 1) * bin_w, hist_h - cvRound(g_hist.at<float>(i - 1))),
                Point(i * bin_w, hist_h - cvRound(g_hist.at<float>(i))), Scalar(0, 255, 0), 2, LINE_AA);
            line(histImage, Point((i - 1) * bin_w, hist_h - cvRound(r_hist.at<float>(i - 1))),
                Point(i * bin_w, hist_h - cvRound(r_hist.at<float>(i))), Scalar(255, 0, 0), 2, LINE_AA);
        }

        // 通过 label 方式显示图片
        display_MatInQT(ui->label_showOriginalImage, image);
        display_MatInQT(ui->label_showProcessImage, histImage);
    }
    else
    {
        QIcon* icon = new QIcon(".\\Resource Files\\图像处理.ico");
        QMessageBox message(QMessageBox::Information, tr("提示"), tr("处理图片失败!"));
        message.setWindowIcon(*icon);
        QPushButton* okbutton = (message.addButton(tr("确定"), QMessageBox::AcceptRole));
        message.exec();
    }
}
视频灰度化:
// 视频灰度化
void DIPCD_DengLei::on_action_grayscaleVideo_triggered()
{
    QString filename =
        QFileDialog::getOpenFileName(this, tr("打开视频"),
            ".",
            tr("Video file(*.mp4 *.avi)"));

    String fileName = filename.toStdString();

    QString savePath;
    String fileOut;

    if ((!filename.isNull()) || (!filename.isEmpty()))
    {
        savePath = QFileDialog::getSaveFileName(0, "请选择视频保存路径", ".\\Video Files\\recorded.mp4", "mp4(*.mp4);;avi(*.avi);;所有文件(*.*)");
    }

    if ((!savePath.isNull()) || (!savePath.isEmpty()))
    {
        fileOut = savePath.toStdString();
    }
    else
    {
        return;
    }

    VideoCapture inVid(fileName);

    Mat inFrame, outFrame;
    const char winIn[] = "Grabbing...", winOut[] = "Recording...";
    double fps = 30;    // 每秒的帧数

    // 打开摄像头,具体设备文件需先查看,参数为 0,则为默认摄像头
    if (!inVid.isOpened())
    {    // 检查错误
        cout << "错误相机未就绪!\n";
        return;
    }

    // 获取输入视频的宽度和高度
    int width = (int)inVid.get(CAP_PROP_FRAME_WIDTH);
    int height = (int)inVid.get(CAP_PROP_FRAME_HEIGHT);
    cout << "width = " << width << ", height = " << height << endl;

    VideoWriter recVid(fileOut, VideoWriter::fourcc('X', 'V', 'I', 'D'), fps, Size(width, height), 0);

    if (!recVid.isOpened())
    {
        cout << "错误视频文件未打开!\n";
        return;
    }

    // 为原始视频和最终视频创建两个窗口
    namedWindow(winIn);
    namedWindow(winOut);

    while (true)
    {
        // 从摄像机读取帧(抓取并解码)以流的形式进行
        inVid >> inFrame;

        if (inFrame.empty())
        {
            inVid.release();
            break;
        }
        // 将帧转换为灰度
        cvtColor(inFrame, outFrame, COLOR_BGR2GRAY);

        // 将帧写入视频文件(编码并保存)以流的形式进行
        recVid << outFrame;

        imshow(winIn, inFrame);    // 在窗口中显示帧
        imshow(winOut, outFrame);    // 在窗口中显示帧

        if (waitKey(1000 / fps) >= 0)
        {
            break;
        }
    }

    inVid.release();    // 关闭摄像机
    QIcon* icon = new QIcon(".\\Resource Files\\图像处理.ico");
    QMessageBox message(QMessageBox::Information, tr("提示"), tr("保存视频成功!\n保存路径:.\\Video Files\\recorded.mp4"));
    message.setWindowIcon(*icon);
    QPushButton* okbutton = (message.addButton(tr("确定"), QMessageBox::AcceptRole));
    message.exec();
}
人脸识别:
// 人脸识别
void DIPCD_DengLei::on_action_faceRecognition_triggered()
{
    String faceCascadeName = ".\\Resource Files\\haarcascade_frontalface_alt.xml";
    String eyesAscadeName = ".\\Resource Files\\haarcascade_eye.xml";
    String mouthCascadeName = ".\\Resource Files\\haarcascade_mcs_mouth.xml";

    void faceRecongize(cv::CascadeClassifier faceCascade, cv::CascadeClassifier eyesCascade, cv::CascadeClassifier mouthCascade, cv::Mat frame);

    cv::VideoCapture* videoCap = new cv::VideoCapture;

    cv::CascadeClassifier faceCascade;
    cv::CascadeClassifier eyesCascade;
    cv::CascadeClassifier mouthCascade;

    // 加载脸部分类器文件
    if (!faceCascade.load(faceCascadeName))
    {
        std::cout << "加载 faceCascadeName 失败。" << std::endl;
        return;
    }

    // 加载眼睛部分分类器文件
    if (!eyesCascade.load(eyesAscadeName))
    {
        std::cout << "加载 eyesAscadeName 失败。" << std::endl;
        return;
    }

    // 加载嘴部分类器文件
    if (!mouthCascade.load(mouthCascadeName))
    {
        std::cout << "加载 mouthCascadeName 失败。" << std::endl;
        return;
    }

    // 打开摄像机
    videoCap->open(0);

    if (!videoCap->isOpened())
    {
        videoCap->release();
        std::cout << "打开摄像头失败。" << std::endl;
        return;
    }

    std::cout << "开放式摄像机成功。" << std::endl;

    while (true)
    {
        cv::Mat frame;

        // 读取视频帧
        videoCap->read(frame);

        if (frame.empty())
        {
            videoCap->release();
            return;
        }

        // 进行人脸识别
        faceRecongize(faceCascade, eyesCascade, mouthCascade, frame);

        // 窗口进行展示
        imshow("Face recognition (Press Enter to exit)", frame);

        //等待回车键按下退出程序
        if (cv::waitKey(30) == 13)
        {
            cv::destroyAllWindows();
            return;
        }
    }

    system("pause");
    return;
}
面部协调:
// 面部协调
void faceRecongize(cv::CascadeClassifier faceCascade, cv::CascadeClassifier eyesCascade, cv::CascadeClassifier mouthCascade, cv::Mat frame)
{
    std::vector<cv::Rect> faces;

    // 检测人脸
    faceCascade.detectMultiScale(frame, faces, 1.1, 2, 0 | cv::CASCADE_SCALE_IMAGE, cv::Size(30, 30));

    for (int i = 0; i < faces.size(); i++)
    {
        // 用椭圆画出人脸部分
        cv::Point center(faces[i].x + faces[i].width / 2, faces[i].y + faces[i].height / 2);
        ellipse(frame, center, cv::Size(faces[i].width / 2, faces[i].height / 2), 0, 0, 360, cv::Scalar(255, 0, 255), 4, 8, 0);

        cv::Mat faceROI = frame(faces[i]);
        std::vector<cv::Rect> eyes;

        // 检测眼睛
        eyesCascade.detectMultiScale(faceROI, eyes, 1.1, 2, 0 | cv::CASCADE_SCALE_IMAGE, cv::Size(30, 30));
        for (int j = 0; j < eyes.size(); j++)
        {
            // 用圆画出眼睛部分
            cv::Point eye_center(faces[i].x + eyes[j].x + eyes[j].width / 2, faces[i].y + eyes[j].y + eyes[j].height / 2);
            int radius = cvRound((eyes[j].width + eyes[j].height) * 0.25);
            circle(frame, eye_center, radius, cv::Scalar(255, 0, 0), 4, 8, 0);
        }

        cv::Mat mouthROI = frame(faces[i]);
        std::vector<cv::Rect> mouth;

        // 检测嘴部
        mouthCascade.detectMultiScale(mouthROI, mouth, 1.1, 2, 0 | cv::CASCADE_SCALE_IMAGE, cv::Size(30, 30));
        for (int k = 0; k < mouth.size(); k++)
        {
            //用长方形画出嘴部
            cv::Rect rect(faces[i].x + mouth[k].x, faces[i].y + mouth[k].y, mouth[k].width, mouth[k].height);
            rectangle(frame, rect, cv::Scalar(0, 255, 0), 2, 8, 0);
        }

        // 检测到两个眼睛和一个嘴巴, 可认为检测到有效人脸
        if (eyes.size() >= 2 && mouth.size() >= 1)
        {
            // 人脸上方区域写字进行标识
            cv::Point centerText(faces[i].x + faces[i].width / 2 - 40, faces[i].y - 20);
            cv::putText(frame, "face", centerText, cv::FONT_HERSHEY_SIMPLEX, 1, cv::Scalar(0, 0, 255), 2);
        }
    }


通过此次图像工程课程设计,我进一步感受到了数字图像处理知识给人们带来的便利,了解各种图像处理的主流框架,其中让我印象最深刻的就是 OpenCV 库,我们可以轻松的调用里面的函数实现各种各样的图像处理,无需自行编写算法,直接调用函数,修改参数,即可完成图像处理的需求,同时搭配上 Qt 框架轻松完成图形化界面的软件开发,最后使用 windeployqt 依赖项添加工具和 Enigma Virtual Box 程序打包软件将项目代码快速打包成 exe 可执行应用程序,总之希望在今后的学习编程中更加深入的掌握数字图像处理的各种知识。
C++
Windows 11、Visual Studio 2022 、Qt Creator
Open CV 库、Qt 库 、harrcascade 检测框架
本图像处理工具项目代码使用 windeployqt 依赖项添加工具和 Enigma Virtual Box 程序打包软件将项目代码快速打包成 exe 可执行应用程序,可直接打开 DIPCD_Deng_Dei.exe 可执行应用程序运行。