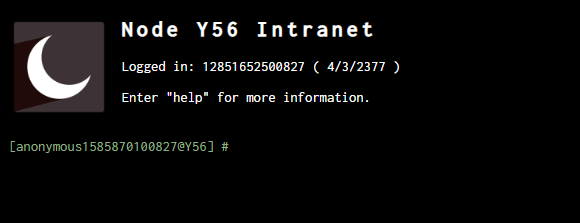
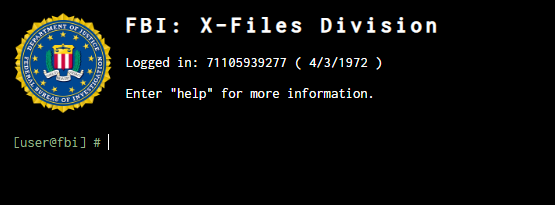
This is a simple, read-only, terminal experience for tabletop RPGs. You can fork the project and change the code for your own configurations, like terminal name (or sector/station/node if sci-fi), image and messages.
The database is a simple JSON structured file.
You can host it on github pages for a free and fast experience and can share the link for your friends and players to use.
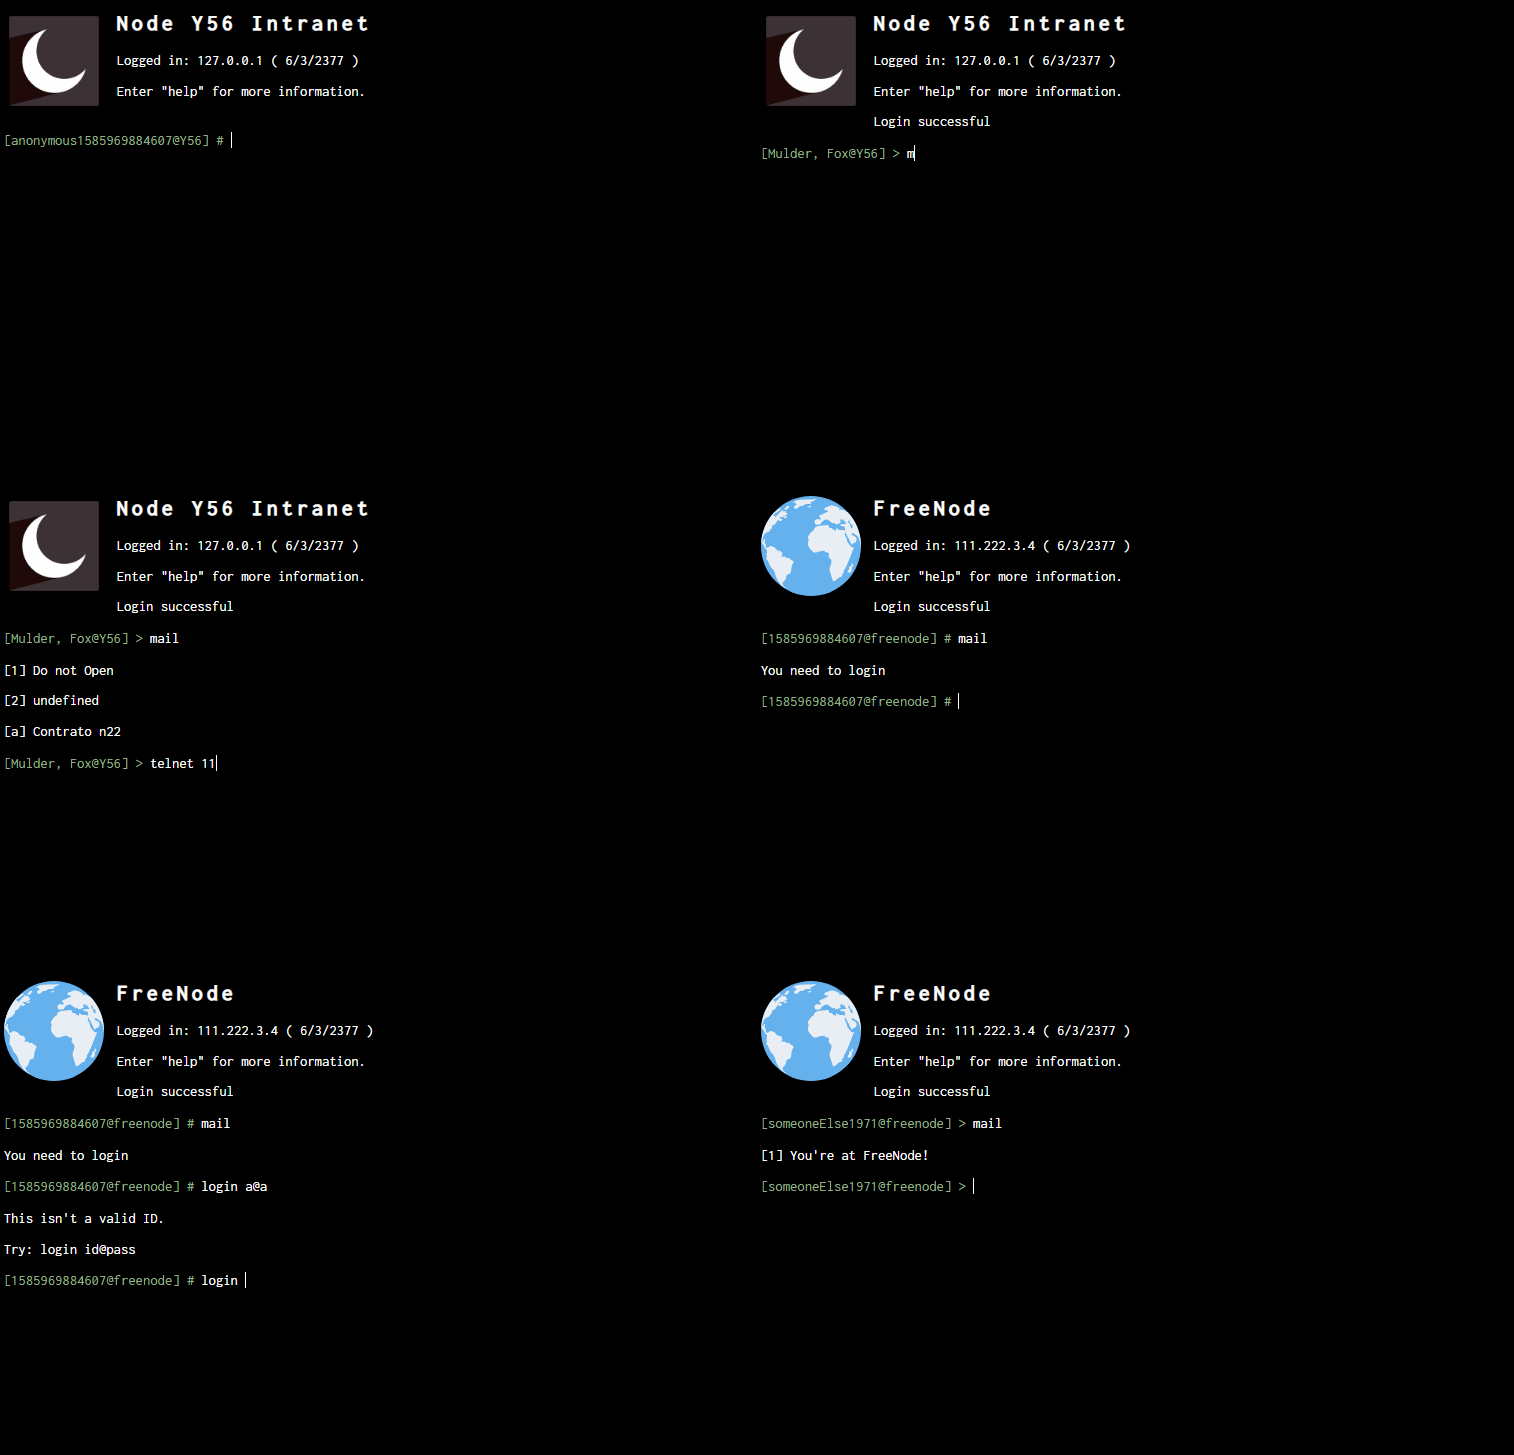
You can now configure and access extra servers at network.json to login via telnet. Each server will treat their respective users (and mail messages) separatedly.
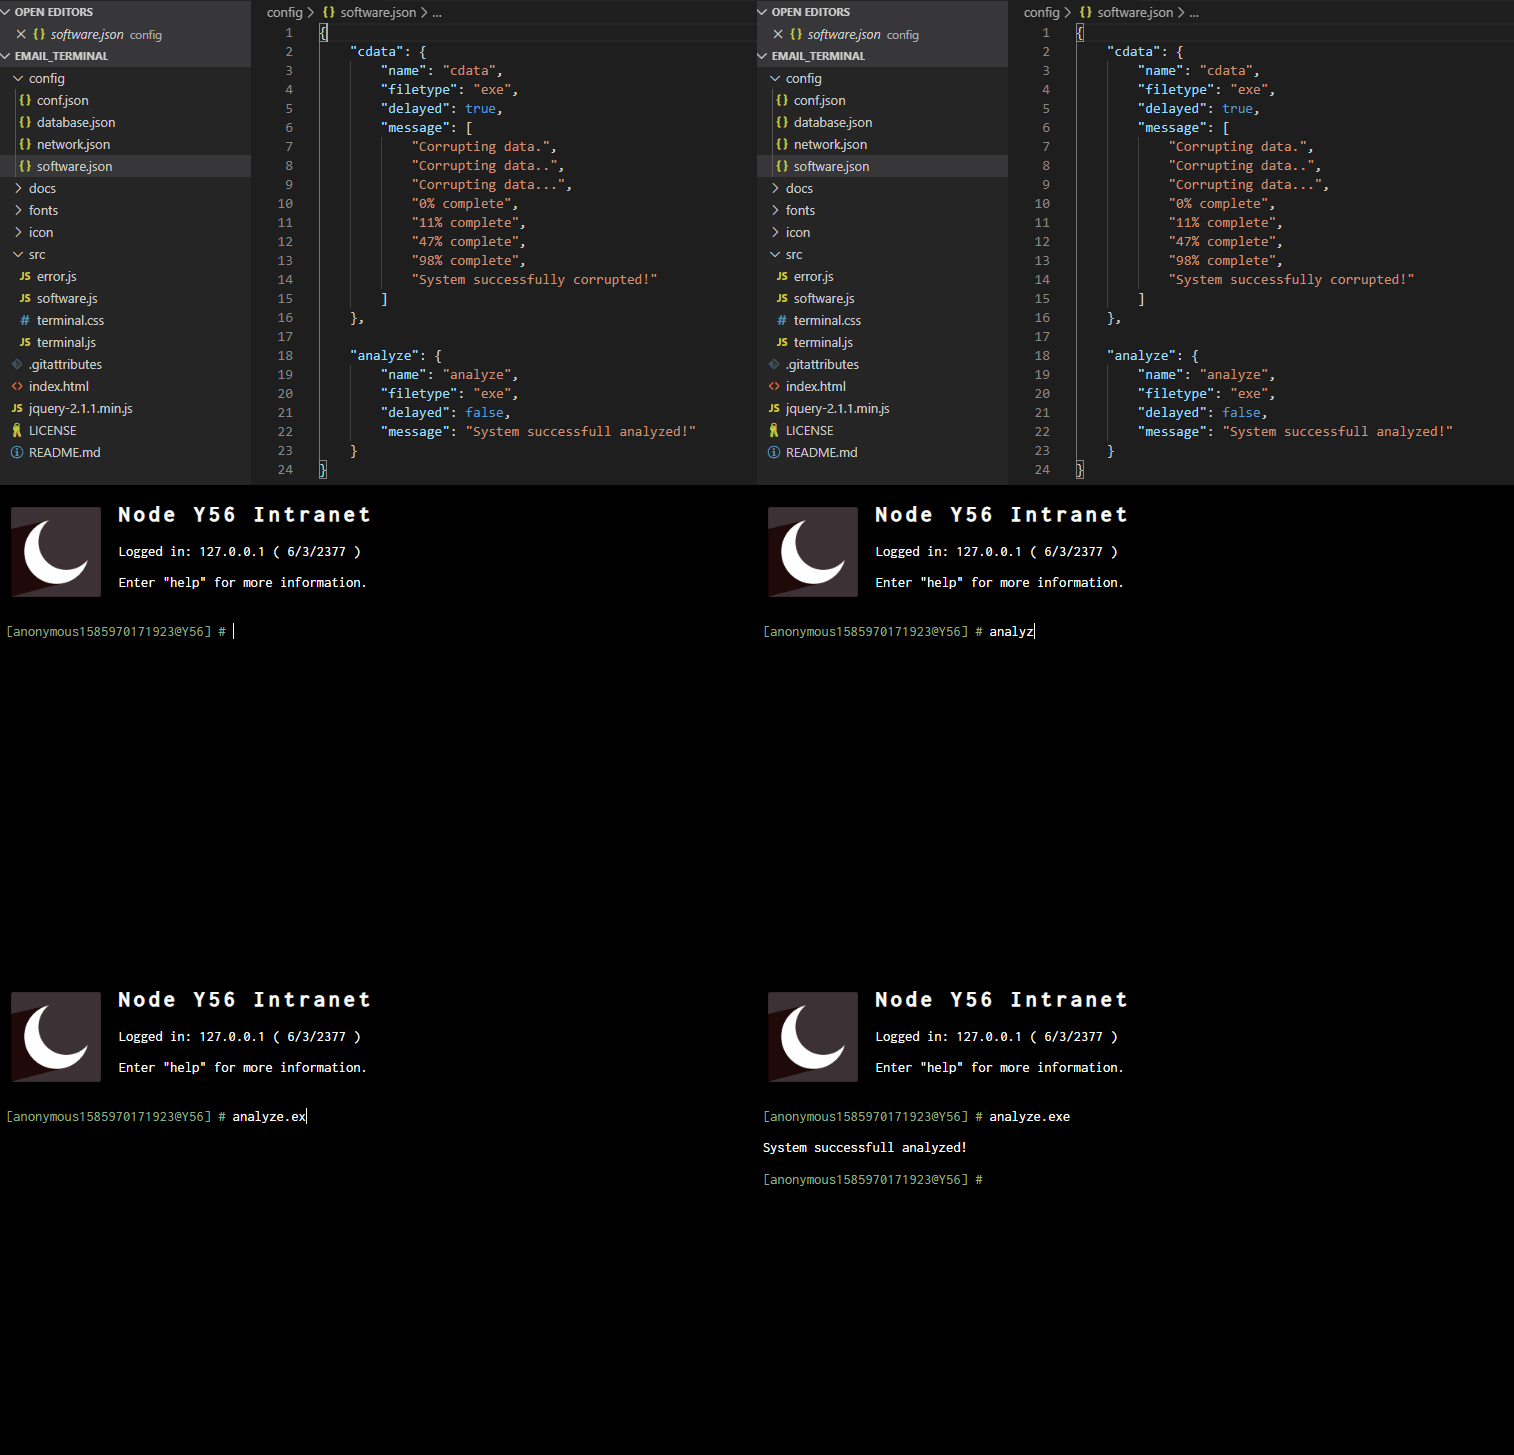
You can now configure custom software at software.json to use it. They're just simple simulations but I hope you enjoy it!
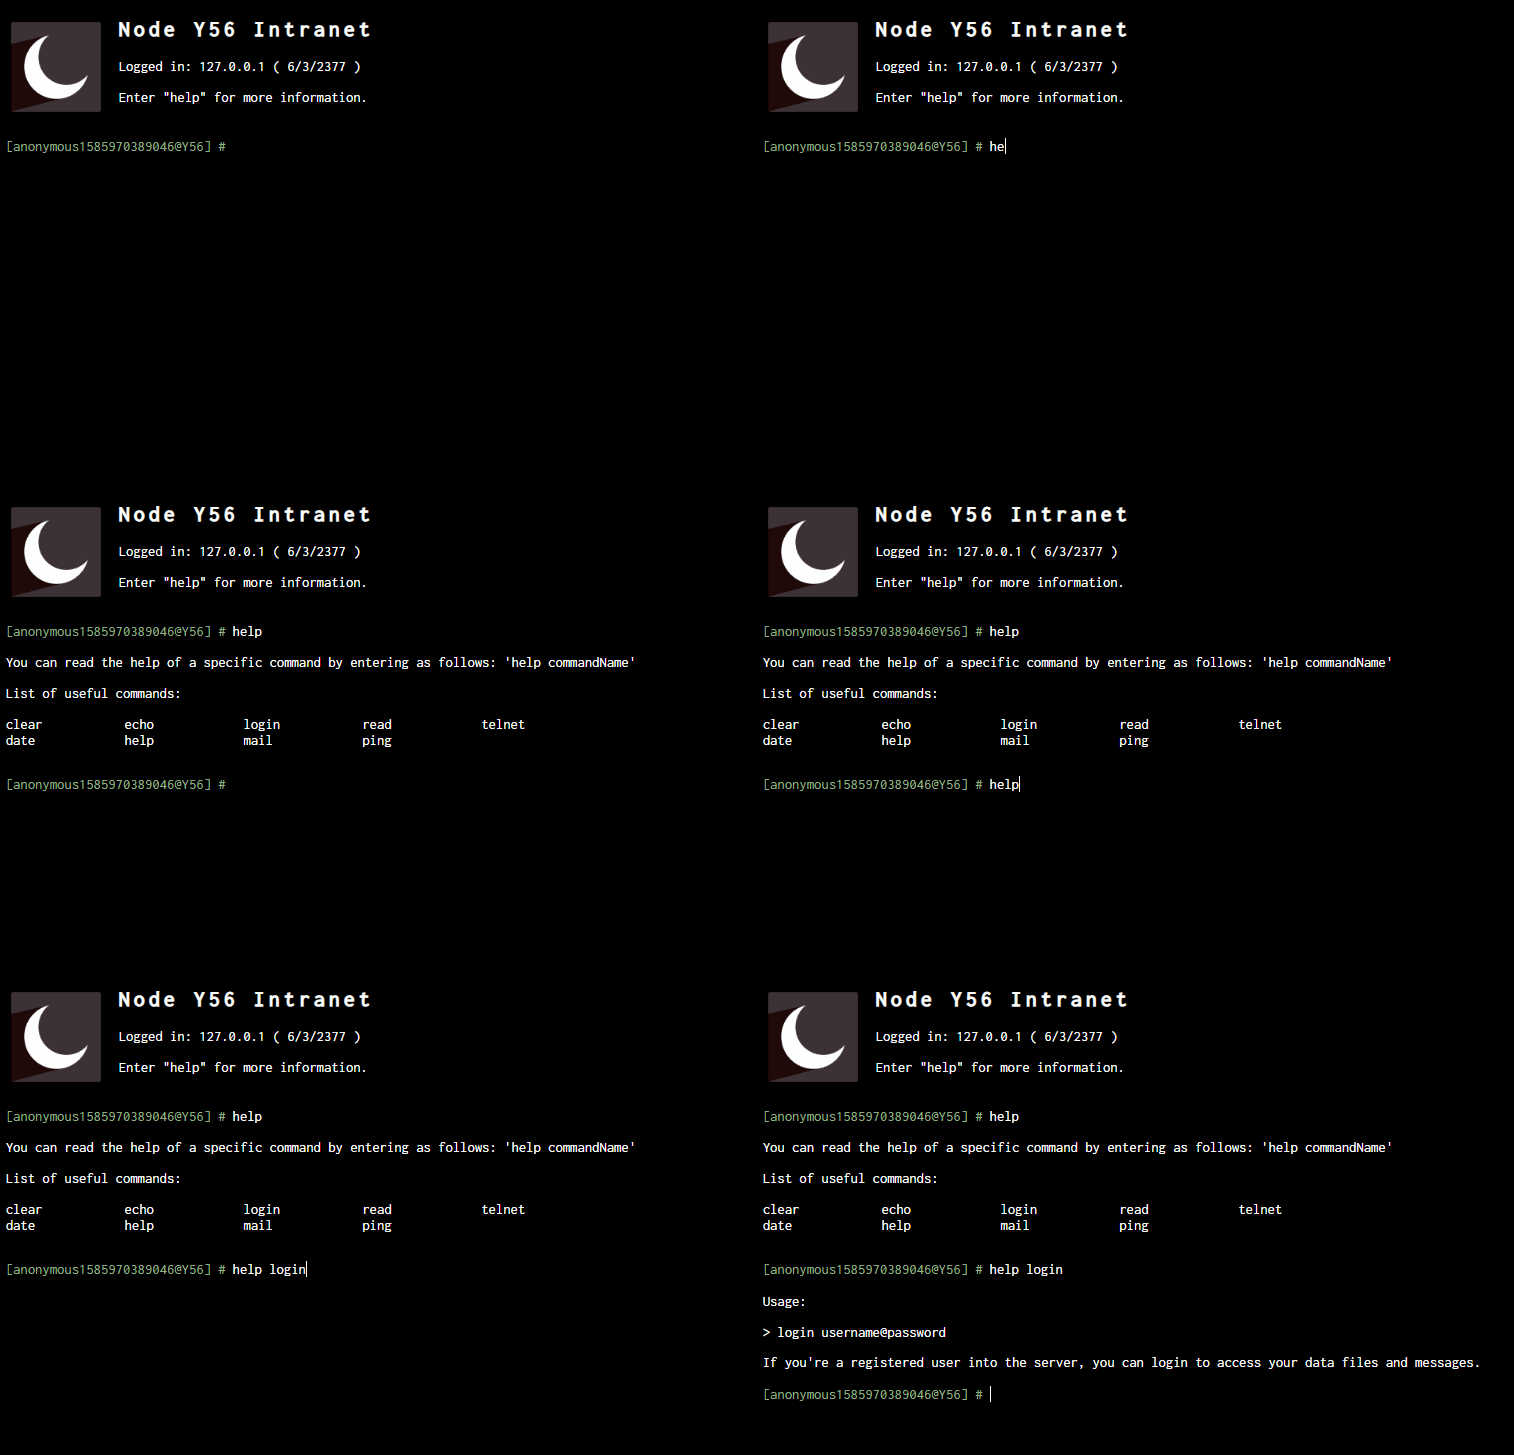
The help command has been improved. You can now show further help instructions for internal commands.
You can upload it to Github Pages or try it on your computer. You will find instructions for both options below.
You will want to customize the terminal depending of the game setting you're playing. You just have to edit the conf.json file. Both conf.json and database.json customization files are in the config folder.
More configuration files will be added when more functionality shows up.
The basic configuration is what you need to change for customize your terminal. You can change the terminal year date, the server name, a customized icon, the terminal identification (this is what is written just before of the mouse cursor), as well as the default user name (normally will be "user", but can be whatever you want) and if you want a random number to be displayed right in front of the default username. Note however that once you login to the server the username will change.
{
    "year": "2377",
    "serverAddress": "127.0.0.1",
    "serverName": "Node Y56 Intranet",
    "iconName": "Moon-icon.png",
    "terminalID": "Y56",
    "defaultUser": "anonymous",
    "randomSeed": true
}
{
"year": "1972",
"serverAddress": "127.0.0.1",
"serverName": "FBI: X-Files Division",
"iconName": "fbi.png",
"terminalID": "fbi",
"defaultUser": "user",
"randomSeed": false
}The database.json file is where you will perform most editions at.
The basic structure of the file (and the emails) is as follows:
key -> id, password, user, mail.
- id: is the username identificantion for login
- password: is the password necessary to login
- userName: this is the name of the player character (if the terminal is where he check his emails) or the name of a npc (if he's hacking into someone else's terminal)
- mail: a array containing the following (key -> from, title, body)
-
- from: who send the message
-
- title: what you will see when listing the messages at terminal
-
- body: the actual message. You can break line by entering a double space ' '.
The first key in the root doesn't matter since you'll be using the id field for the username (in the example bellow I've user a simple "1" for the first character), so if you want you can name it as the character name or the player name, but the key in the mail will be used to access the correct message with the read command function.
If you're using Traveller, I suggest you to name the id as the UPP of the character/NPC (as I did in the example), but any string will work.
You can register as many users and mail messages as you want, you just need to put a comma , right after the correct enclosing }. If you're in trouble you can check a basic JSON tutorial, it's easy.
{
    "1": {
        "id": "8A73B5",
        "password": "trustno1",
        "userName": "Mulder, Fox",
        "mail": {
            "1": {
                "from": "Traveller",
                "title": "Do not Open",
                "body": "Lorem ipsum dolor sit amet, consectetur adipiscing elit, sed do eiusmod tempor incididunt ut labore et dolore magna aliqua.  Ut enim ad minim veniam, quis nostrud exercitation ullamco laboris nisi ut aliquip ex ea commodo consequat."
            },
            "2": {
                "from": "Software",
                "title": "undefined",
                "body": "001100101 011000101 0110 10 01001 01 01110 1001010101"
            },
            "a": {
                "from": "Josephus A. Miller",
                "title": "Contrato n22",
                "body": "Sector: X11.  Objective: Investigate the sewers and report only to me.  Reward: 22 MCr."
            }
        }
    }
}This is where you can configure new servers to be accessed via telnet command. Each server will have a distinct user list, mail messages and server files. That is, you can't access data of a user configured on database.json while you're at another server.
{
    "freenode": {
        "serverAddress": "111.222.3.4",
        "serverName": "FreeNode",
        "iconName": "world.svg",
        "terminalID": "freenode",
        "defaultUser": "",
        "randomSeed": true,

        "serverFiles": {
            "1": ["f.txt", "foobar"]
        },

        "userList": {
            "debug": {
                "id": "x",
                "password": "x",
                "userName": "someoneElse1971",
                "mail": {
                    "1": {
                        "from": "anon4562314",
                        "title": "You're at FreeNode!",
                        "body": "Freenode my boy....  Freenode."
                    }
                }
            }
        }
    }
}This is where you can create your own software. At the moment you can just create simple software that will output some messages simulating an operation. After setting everything up you can just use it as name.filetype (i.e. cdata.exe).
{
    "cdata": {
        "name": "cdata",
        "filetype": "exe",
        "delayed": true,
        "message": [
            "Corrupting data.",
            "Corrupting data..",
            "Corrupting data...",
            "0% complete",
            "11% complete",
            "47% complete",
            "98% complete",
            "System successfully corrupted!"
        ]
    },

    "analyze": {
        "name": "analyze",
        "filetype": "exe",
        "delayed": false,
        "message": "System successfull analyzed!"
    }
}The main functions are the mail and read terminal operations.
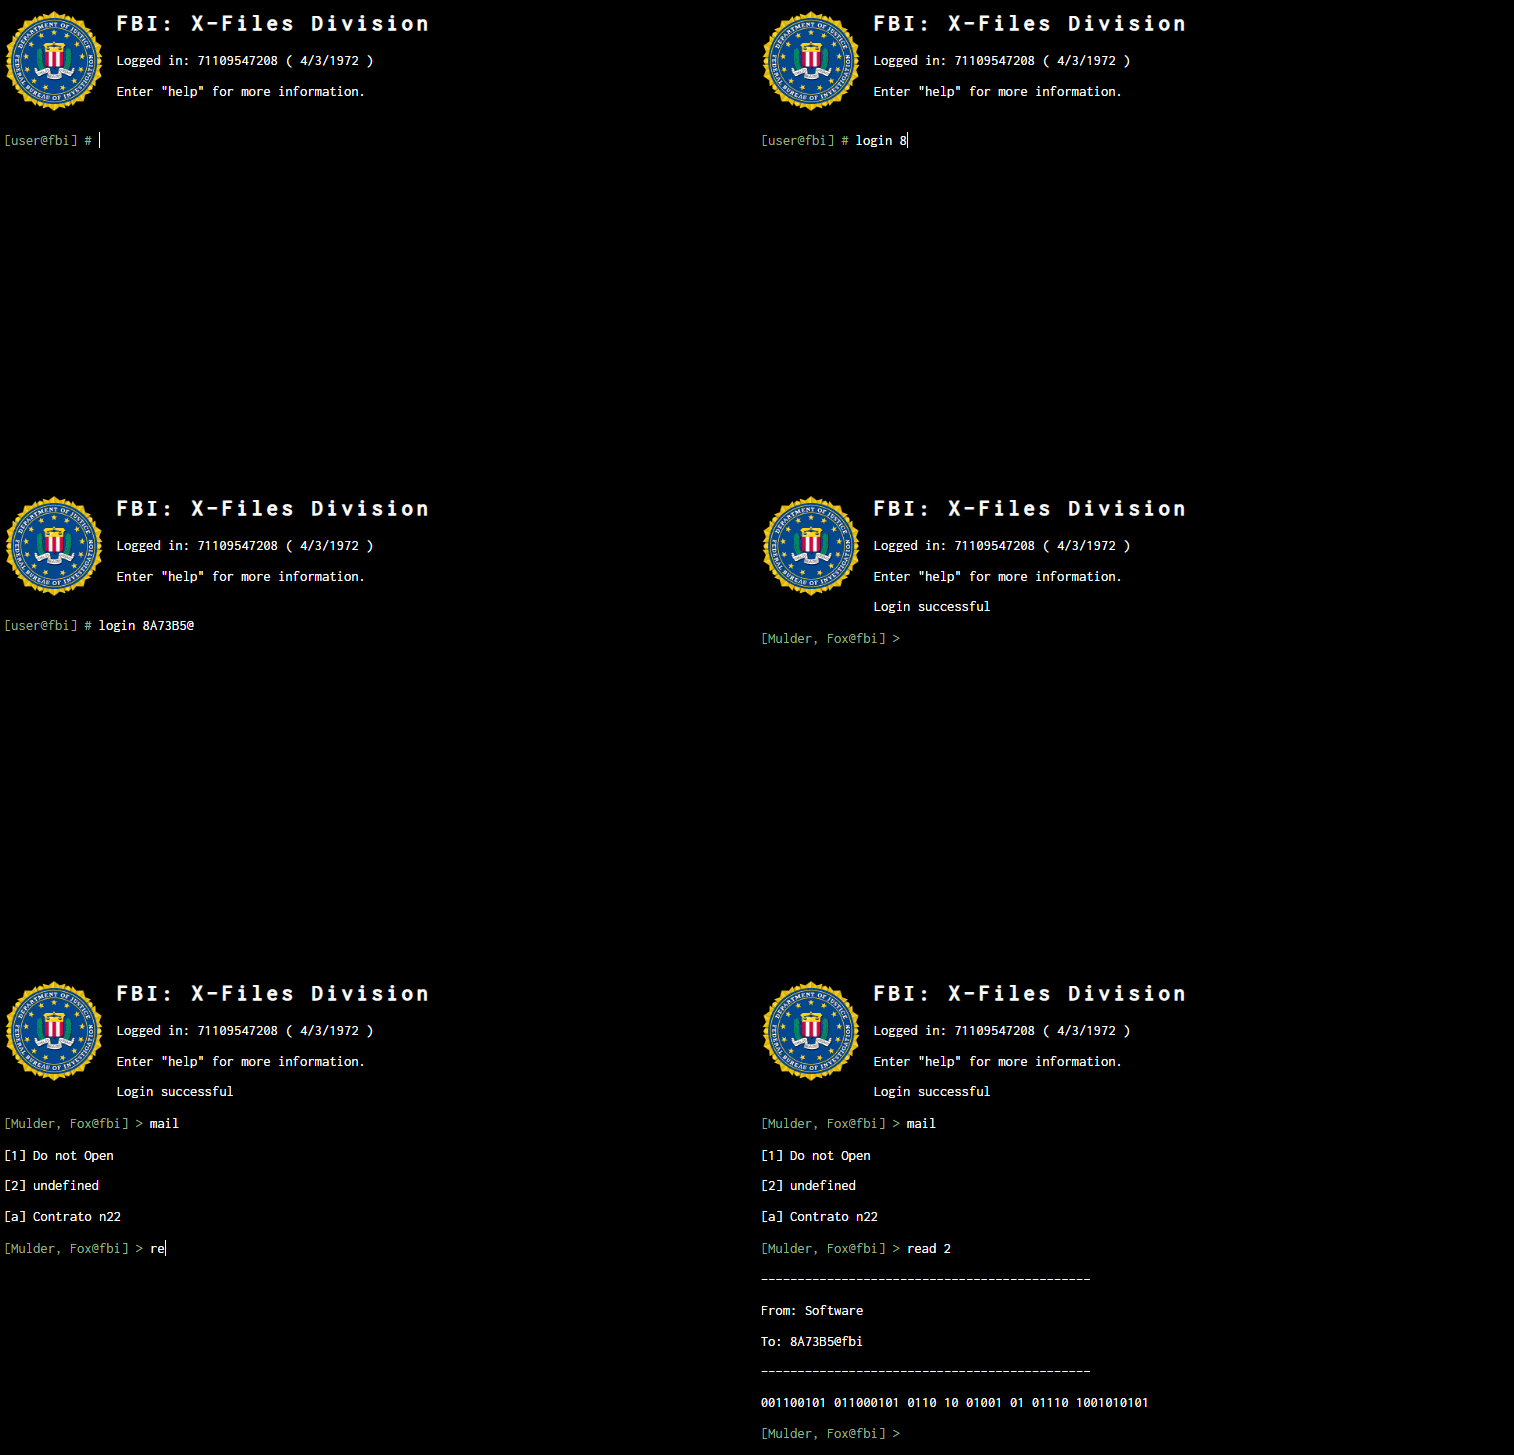
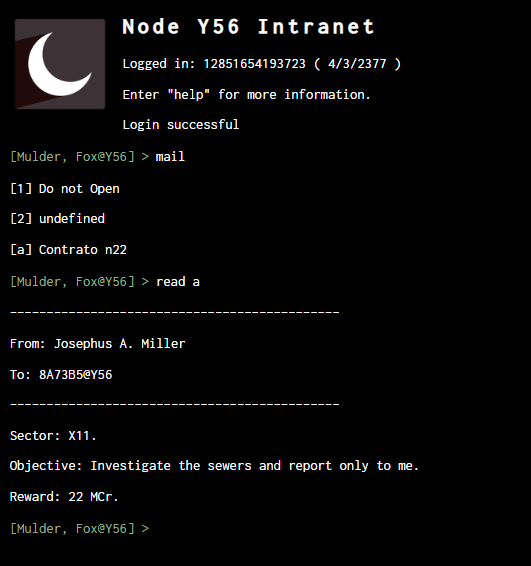
Once you login, you can write down the mail function to list the user emails and you can read those mails you want by entering the index code (a number, a letter, or a string).
As a simple terminal emulation, you can't delete mails or mark as read. We maybe can work it out in the future, but those basic functions are enough to send some cool mysterious mails to your player's agents or if a character hacked into a company to investigate a clue or something.
To login you need to enter user@password
Note the change in the terminal username
How to list and read mails
You can try help to see a list of other functions disponible. The clear function may be a useful one.
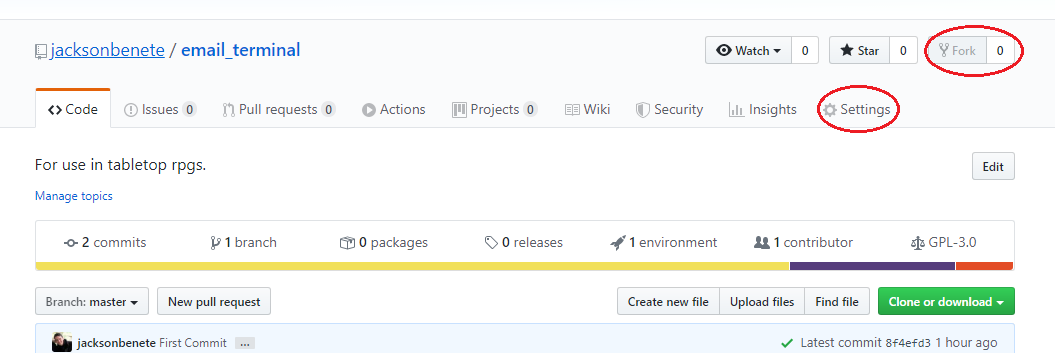
As I've said, you can use Github Pages to do that for you. If you're not used to Github, first create a github user by registering in Github, so you can "fork" the project to your account by accessing the project page email_terminal and by clicking in the "fork" button.
Note that those two in red are the only two steps you need to take to put your terminal up and running. You need to click the Fork button, and after some seconds, the project will be there as one of your own repositories, and then you will click in the Settings button.
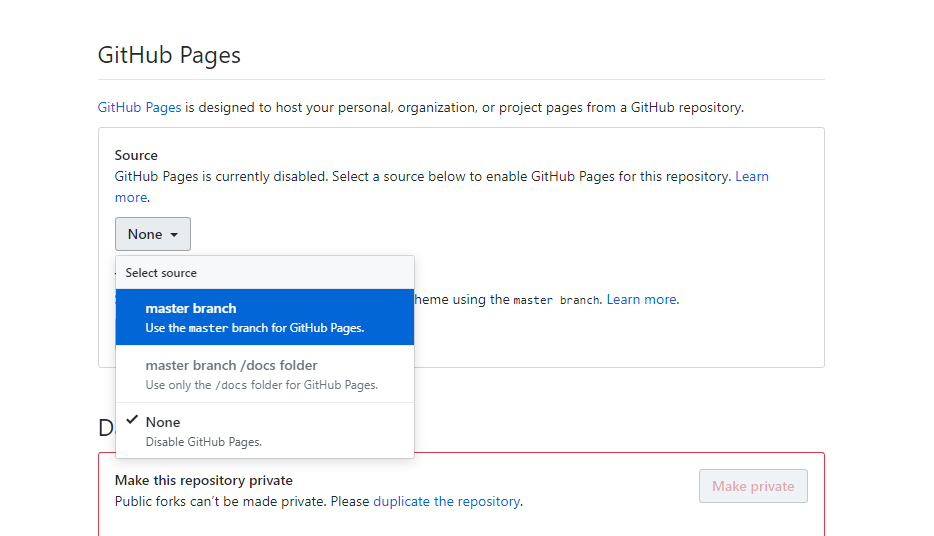
In the settings page, you will roll until Github Pages and will select the source as the master branch.
After some seconds, you will be able to access your terminal at username.github.io/email_terminal (i.e. jacksonbenete.github.io/email_terminal).
Note that, you can create multiple repositories and name those repositories in the Settings for each of your game tables, that way you can have one terminal ready for each setting (or for each organization your players will hack into), ex:
- username.github.io/spacestationX22
- username.github.io/PenTexCorp
- etc
You just need to share the correct link with your players and wait for them to read the clues and investigate.
If you're testing this on your computer you'll need to install a http-server because isn't possible to open files for security reasons, and you need that for the ajax to work to access the database file. It will work without problems once it is forked and running as a github page.
npm install http-server -gRun it as http-server C:\location\to\app or just http-server if you're inside the directory. You can access it on 127.0.0.1:8080 in your browser. If you're debbuging it consider to go to "Network" in the Inspector and disable the cache.
That's really a simple terminal emulation, as I've said. But, there is some things that could be also good to explore, like the creation of some local files or executable programs for the players to interact with.
If you want to, drop some ideas into my github repository or send me some messages at reddit u/jacksonbenete and we can work out something else.
- Base code inspired by @AndrewBarfield, https://codepen.io/AndrewBarfield HTML5 Web Terminal.
- Moon-icon.png by: http://www.iconarchive.com/show/christmas-shadow-2-icons-by-pelfusion/Moon-icon.html and www.pelfusion.com
- tech.jpg icon by: https://favpng.com/png_user/GreatCthulhu
- cmd.png icon by: https://www.flaticon.com/br/packs/seo-and-web-5
- vision.svg icon by: https://www.flaticon.com/free-icon/company-vision_1465429
- world.svg icon by: https://www.flaticon.com/authors/turkkub
- fbi.png icon by: https://iconscout.com/contributors/icon-mafia
- (non-free) DNA icon by: https://www.iconfinder.com/icons/378473/dna_icon
