![]()
FastAPI ASGI based model serving with GitHub workflow for deployment in a remote AI cluster.
- As an example, this server is running a text summarization inference API under the path
/summarization, and a short question-answering API under the path/qa - The summarization model facebook/bart-large-cnn requires 2 available IPUs.
- The question-answering model distilbert-base-cased-distilled-squad requires 2 IPUs.
- API documentation generated by Swagger under the path operation
/docs.
- Deploy automatically from GitHub
- Environment configuration
- Models configuration
- (debug) Launch the server from a VM
- How to serve new models
- This repository shows an example of how you might deploy a server with GitHub. We encourage you to build on this example to create a service that meets the security and resiliancy requirements of your application.
- Using GitHub actions with secrets can bring security risks. It is important to review GitHub actions parameters and who can trigger them. Be careful of any modification brought to .github/ssh/action.yml, or any new action you introduce that uses GitHub secrets. For instance, secrets should never be logged or saved in an artifact file. Recommended read for good practises: https://engineering.salesforce.com/github-actions-security-best-practices-b8f9df5c75f5/
- The Graphcore PyTorch base Docker image used in this example is subject to Graphcore Container License Agreement.
- You need to set up a VM with IPUs in GCore and to open the port you wish to deploy the server on.
- From GitHub, use the button "Use this template" to create a new repo from it.
- Follow the Configuration steps to set up the deployment environment.
- Use the workflows to deploy:
In this repository, there are 2 simple GitHub workflows for deployment:
.github/workflows/deploy.yml: (manually triggered) Build and deploy the artifact on the remote server - Sensitive information are configured via GitHub Secrets..github/workflows/stop.yml: (manually triggered) Stop the container on the remote server.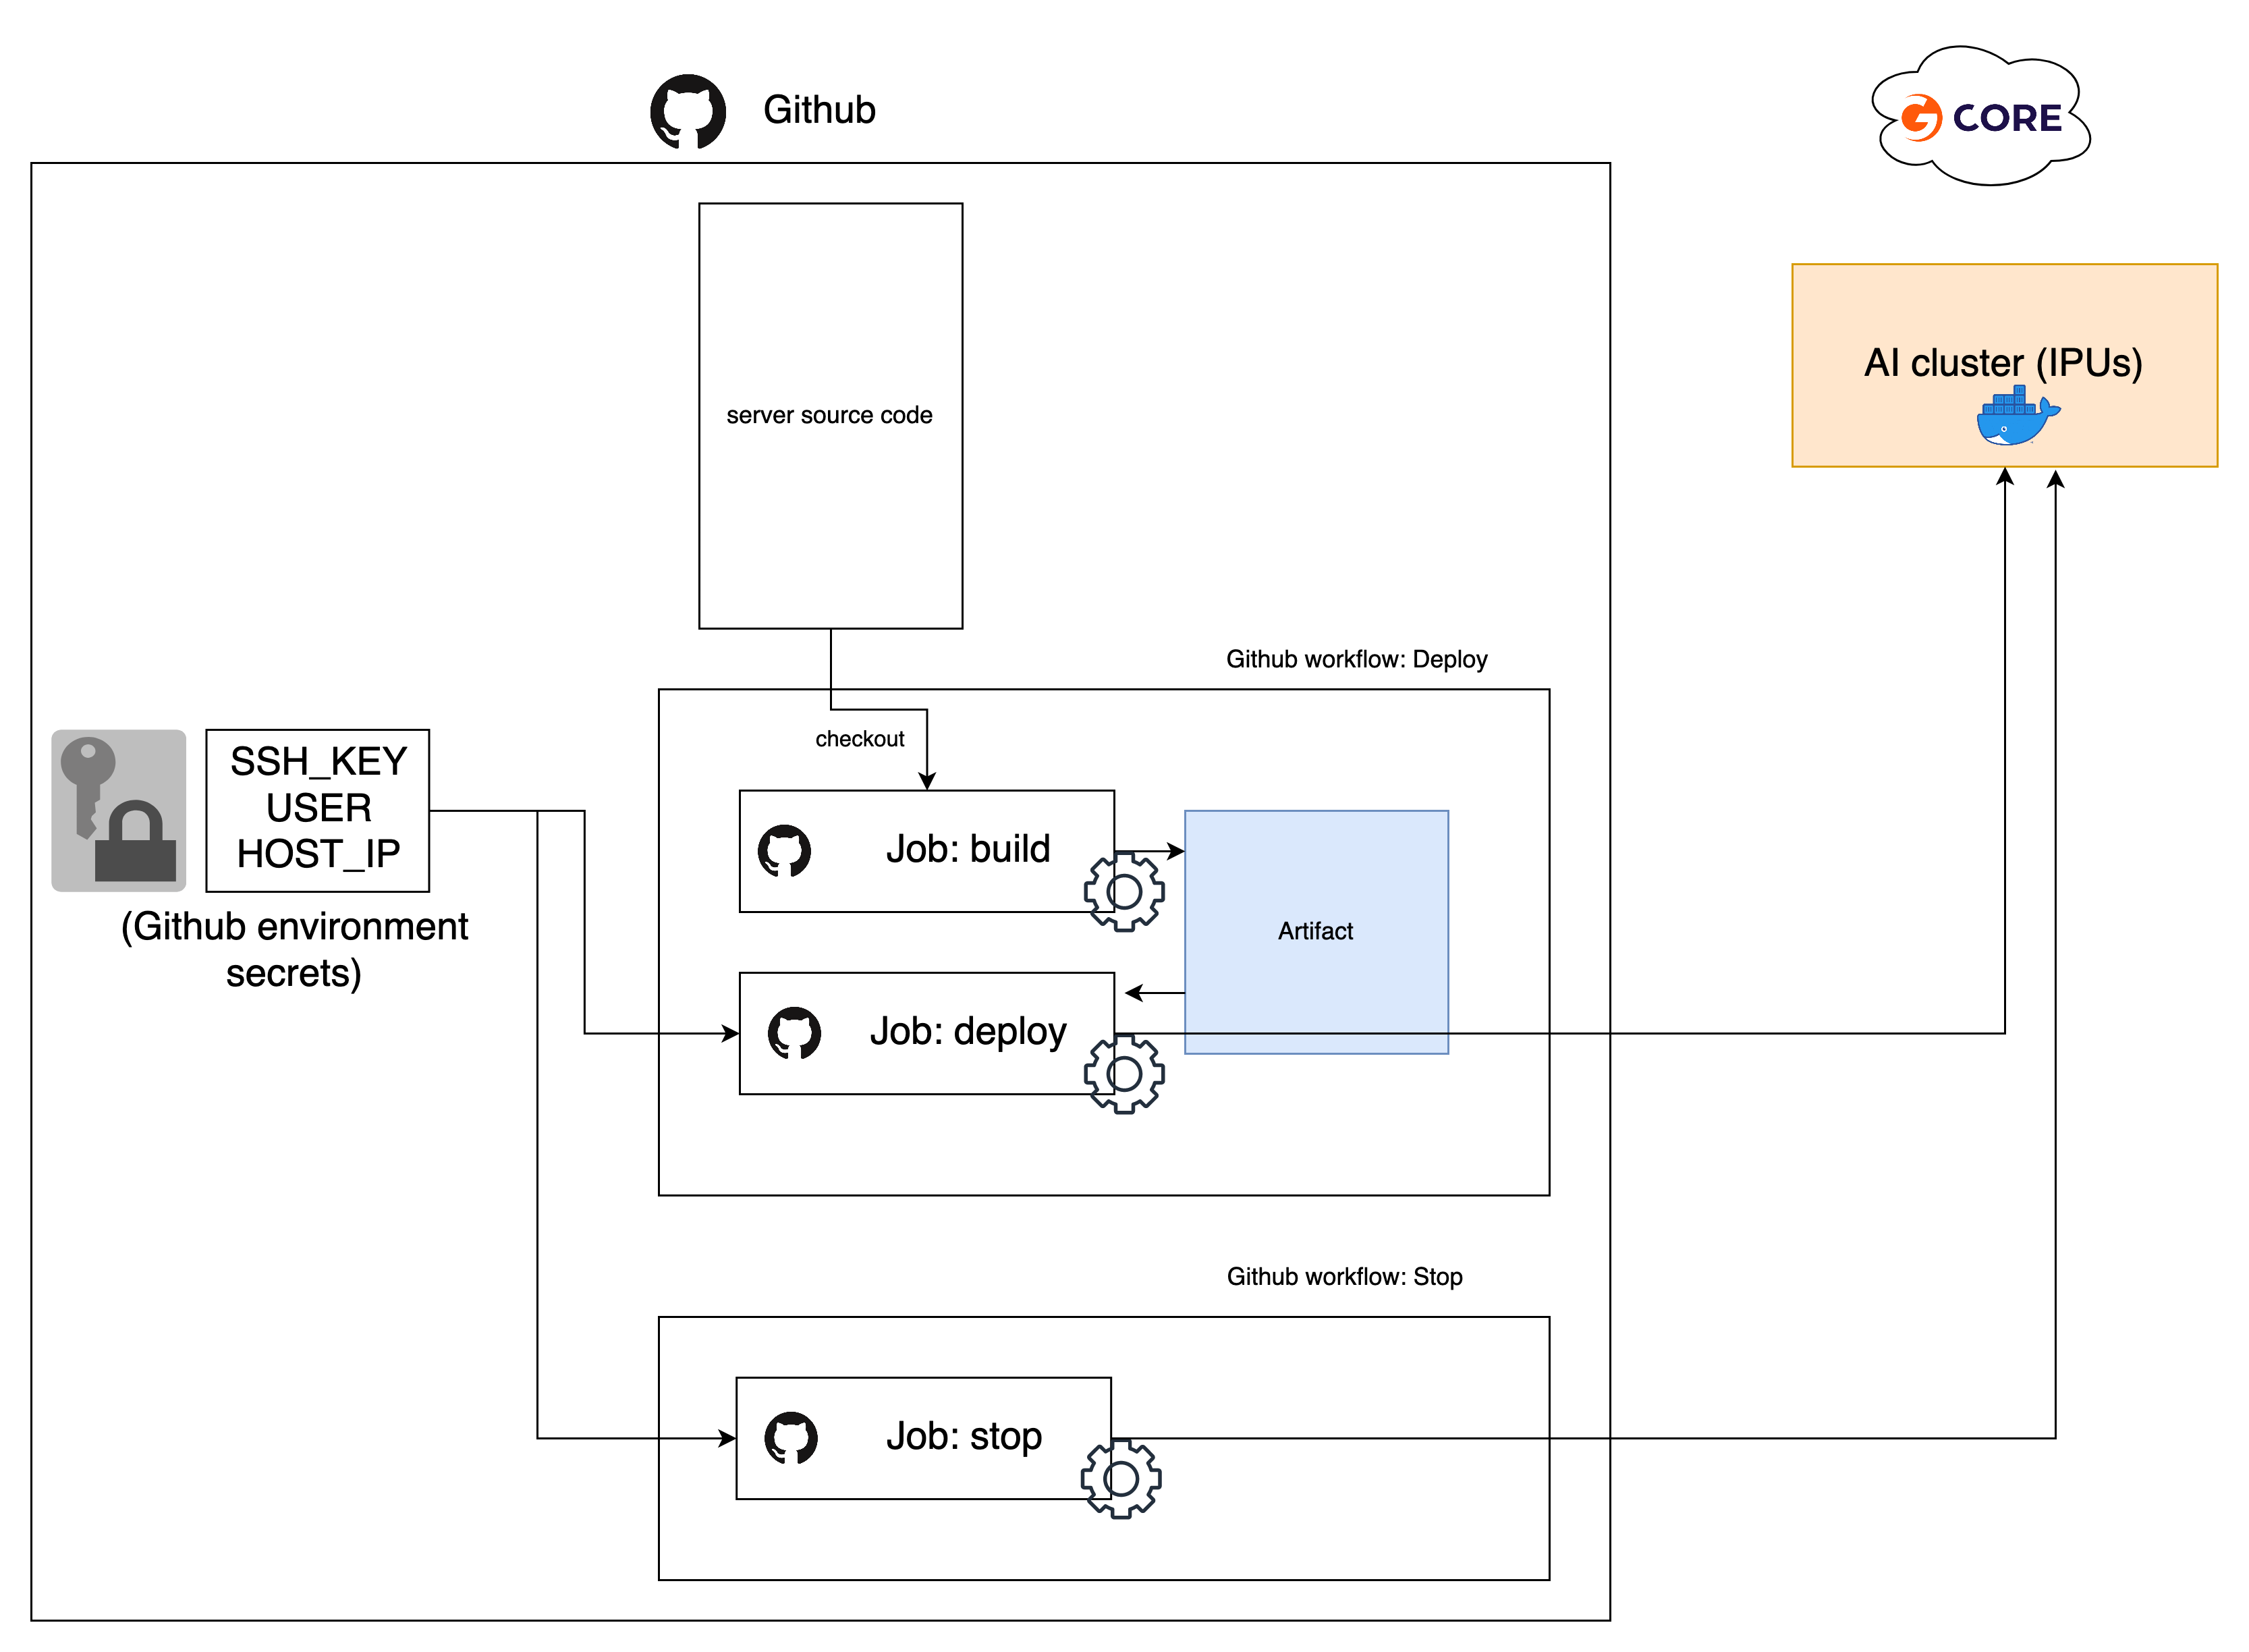

To trigger these workflows, go under the repository Action tab to see workflows list on the left.
- Click on
Deploy, then use the buttonRun workflow. The server should take ~5 minutes before being ready. You should now be able to access the server and check the API documentation athttp://HOST_IP:SERVER_PORT/docs - To stop the server, click on
Stop, then use the buttonRun workflow.
The deployment workflow is using an example GitHub environment named GCore-deployment-demo.
- Configure a new GitHub environment named
GCore-deployment-demounder the repositorySettings(or modify the workflow files according to your environment name). - The deployment scripts require SSH access to the VM, it is recommended to generate a new set of keys just for this purpose and to authorise it on your VM.
(To authorize a new SSH key on GCore VM, add the public key to
~/.ssh/authorized_keys) - Add 3 GitHub encrypted secrets:
SSH_KEY,USERandHOST_IPat the environment level or at the repository level.
- The encrypted secrets must contain the following:
SSH_KEY: content of the private keyUSER: Gcore VM usernameHOST_IP: Gcore VM IP address
-
The server should be configured via the .env file at the root of this repository. It contains:
COMPOSE_PROJECT_NAME: Name of the containerSERVER_PORT: Port where your server will be accessibleSERVER_NUM_WORKERS: Number of Uvicorn workersSERVER_MODELS: List and configuration of models to run (see Model Configuration section)SERVER_WAIT_TIMEOUT: Timeout for server start (in seconds)POPTORCH_LOG_LEVEL: Log level for the underlying Graphcore's Poptorch framework (ERR, INFO, DEBUG)
Syntax of SERVER_MODELS environmental variable:
SERVER_MODELS='[
    ...
    {
        "model":"name of the directory where model is stored",
        "replicas":"number of replicas to run"
    },
    {
        "model":"name of the directory where model is stored"
    },
    ...
]'
Note that:
- variable value has to be single quoted
replicassetting defaults to 1 replica if not set- although the example has new lines for clarity it is advised to keep value of
SERVER_MODELSwithout whitespaces, most means of passing environmental variable with spaces will not work
When debugging, you may want to skip the deployment workflow and just run the server manually from your VM. You can use the following steps:
- After logging to your VM, clone the repo:
$ git clone https://github.com/graphcore/api-deployment$ cd api-deployment
- Run the deployment script, this will handle the container setup and run it:
$ .github/scripts/run_server_docker_start.sh
- To stop you can use:
$ .github/scripts/run_server_docker_stop.sh
To serve a new model, the main steps are the following:
1 - Add a Python file new_model.py in src/models/ containing your model
- The server will look for a
classnamedPipeline - All the inference operations must go in the
__call__()method - inputs and return values should be
Dict - You should also define a method
compile(self)with no extra arguments, the execution of this function should trigger the IPU compilation.
ex: my_model.py
class Pipeline:
    def __init__(self, args):
        # Various parameters initialisation

    def __call__(self, inputs: Dict) -> Dict:
        # pre-processing,
        # model call,
        # etc ..
        prediction_dict = ...
        return prediction_dict

    def compile(self):
        # compilation logic goes here, for instance
        # if your model is compiled on the first call:

        # dummy_inputs_dict = {"text":"Just a test"}
        # self(dummy_inputs_dict)
        # ...
        return
By implementing this interface, your new model will now be available as new_model
(the name of the file that contains this Pipeline class) as a new IPUWorker.
2 - Create the API for this new model. In src/server.py:
@app.post("/new_model", response_model=NMResponse, include_in_schema = "new_model" in model_names)
def run_nm(model_input: NM):
    data_dict = model_input.dict()
    w.workers["new_model"].feed(data_dict)
    result = w.workers["new_model"].get_result()
    return {
        "results": result["prediction"]
    }
In this simple example, our path operation is /new_model. We create the function run_nm() and use FastAPI decorator
@app.post() to make it receive POST requests. Using include_in_schema boolean parameter will enable or disable this path given the list of model we configure.
Now, we can see we have 2 types describing our input and outputs: NM and NMResponse. These should be defined in src/api_classes.py. These use Pydandic BaseModel. It will be used to automatically to match the json fields from the HTTP request and response. For instance:
class NM(BaseModel):
    input_1: str
    input_2: str

class NMResponse(BaseModel):
    results: str
In this example, NM contains two fields, it can automatically be converted to Dict when calling model_input.dict().
These are the 2 most important lines:
w.workers["new_model"].feed(data_dict)
result = w.workers["new_model"].get_result()
The first one will select our "new_model" IPUWorker from the IPUWorkerGroup and feed the data dict to its input queue.
The second one will retrieve the results from the IPUWorker output queue.
Finally , return the results as a Dict to match NMResponse format.
Here we supposed our model prediction is available under the dict key result["prediction"].
3 - Edit your config.
By default the server is not configured yet to run your model.
To add it you can either: modify the default config in src/config.py and add it to models list.
Or temporary, modify the .env file variable SERVER_MODELS (or just set the environment variable SERVER_MODELS) to add your model name "new_model" to the list. (You should make sure you have enough IPUs available to run all the models in the list).
4 - Now if you run the server and go to the http://IP_ADDRESS:PORT/docs url, you should be able to see and test your new API !