Open Sesame is a platform intended to make contributing to open source less intimidating by matching first-time contributors to experienced mentors.
This platform makes use of the React framework. In order to provide React functionality while allowing for non-React HTML and JS
in other areas of the web app, React is loaded and run on a page-by-page basis (see projects.html for an example of this).
- Be sure to replace all script tags with the React development scripts to the minified production versions when the platform is being deployed to production. These script tags are all clearly commented in each HTML page that makes use of React.
This platform makes use of React's JSX. In order to use JSX, a preprocessor must run before the application is run or deployed.
Note: Must be in the directory containing package.json while working with npm
The initial setup (only needs to be run once):
npm install
Before running a development server or deploying to production:
npm run jsx-preprocessor
- There is a nifty shortcut included that runs the JSX preprocessor and then immediately starts the development server from the cloud shell. Use this by running
npm run dev-server. - For every directory containing React components, there exists a subdirectory called
jsx-processed, which contains the JS files that have had their JSX parsed by the preprocessor. These are the JS files that should be imported with script tags.
The GitHub API is used on the backend (within Java Servlets) to get public information about repositories and users. The servlets make use of the Java GitHub API, which makes working with the GitHub API much easier.
Please use the helper class GitHubGetter while using the GitHub API. Do not create your own instances of the GitHub class.
import org.kohsuke.github.GitHub;
import com.google.opensesame.github.GitHubGetter;

GitHub gitHub = GitHubGetter.getGitHub();To increase the hourly GitHub API rate limit, please update the environment variables in appengine-web.xml with the credentials of an OAuth application's client ID and client secret. This must be done for production. The GitHubGetter will still work without credentials, but there will be significantly reduced hourly API rate limits, and a warning will be printed in the console.
<env-variables>
  <env-var name="GITHUB_CLIENT_ID" value="CLIENT_ID_HERE" />
  <env-var name="GITHUB_CLIENT_SECRET" value="CLIENT_SECRET_HERE" />
</env-variables>The configurations for linters and Continuous intigeration GitHub Actions run on this project can be found in the LintingAndTestingCI.yaml file.
By Default, GitHub makes it so that any commit made by an Action will not trigger a new workflow (essentially, Linters are not run on linted code). To bypass this, any action that makes a commit must use a Personal Access Token when run. Further infomation can be found here.
Action dependencies are Cached to speed up CI according to the GitHub Actions Cacheing tutorial found here.
NOTE: A proposed PR must pass all CI checks or it will be prevented from merging with Master.
The job labeled BuildAndTest in the LintingAndTestingCI.yaml file handles building and testing during Continuous Integration. This job runs the npm run verify command in package.json. npm run verify is a command that runs all the available tests in this repo and builds the OpenSesame Platform with the available code.
The job labeled JavaFormat in the LintingAndTestingCI.yaml file handles Java Linting. This job formats Java code to meet Google Style Guide standards. Any changes made by this linter are committed with the message "Google Java Format". This Action was built using the Google Java Format GitHub Action.
We use ESLint to lint our JavaScript code. OpenSesame's version of ESLint
runs using the rules defined in our .eslitrc file (google and react style guide standards).
The job labeled ESLint in the LintingAndTestingCI.yaml file handles JavaScript Linting. This job performs two main steps:
-
Run the locally installed ESLint Linter (ESLint is a part of OpenSesame's dependencies). The local linter is set to format code with the
--fixoption. Any ESLint errors and warnings that can't be fixed with the--fixoption are annotated in the file changes PR tab. -
Commit changes made during the previous step(1) with the git-auto-commit-action. Commits are made with the message "Apply ESLint Changes".
Run the local ESLint JavaScript linter with:
$ npm install eslint  # if not installed already.
$ ./node_modules/eslint/bin/eslint.js <file or folder>
or
$ npm run js-lint # runs on all OpenSesame js filesThe tests can be run with the command npm test. The tests are also automatically run when using the npm run dev-server command to start a development server.
JavaScript unit testing is done with Jest. Along with Jest, additional functionality is added with:
- jest-dom for testing the DOM.
- React Testing Library for testing React.
Java unit testing is done with JUnit 4.
To add another JS test, simply add a JS file that ends with .test.js (ex: script.test.js) and it will automatically be run by Jest.
To add another Java test, add a Java file to the testing directory src/test/java/. Be sure to follow the Java conventions for package directory structure, for example if you're testing a package in com.google.opensesame.github, the test should be placed in the directory src/test/java/com/google/opensesame/github.
User signup consists of three parts:
- Website authentication (a user creates an account on our website)
- This is done using the Users API
- In the future this could be migrated to the Firebase Admin SDK or similar OAuth-based authentication API such that GitHub authentication and website authentication could become a single step.
- GitHub authentication (a user verifies ownership of a GitHub account, which is then linked with the account on our website)
- This is done using Firebase Authentication with GitHub OAuth
- An access token is granted to the user, which is then sent to the server during the profile creation step and verified on the backend.
- Once the access token is verified, the user has proven ownership of that GitHub account, and it is then stored by ID in the website profile.
- Profile creation (a user with an authorized account can add more information about themselves, such as interest tags)
- After a user completes website authentication, they are redirected to a form for profile creation.
- GitHub authentication is completed during profile creation.
A user is only considered to have an account on Open Sesame if they have completed all three steps outlined above.
When deploying Open Sesame to GCP, please follow these steps:
- Replace all imported JS scripts with their production counterparts. The individual instructions for each script will be located above the script tags in the HTML files where they are imported. This includes but is not limited to the React and PropType scripts.
- Look over the codebase TODOs and disable code that is intended to be disabled for production.
- Add the associated GitHub organization's
client-idandclient-secretto the App Engine environment variables located inopen-sesame/src/main/webapp/WEB-INFto increase the GitHub rate limit of the application. - Add the GCP project ID to the
pom.xmlfile. - Deploy!
In the past, our developers have run into random issues building the codebase. If all else fails while troubleshooting, try the following commands;
$ npm install
$ mvn cleanPlease refer to this resource to learn more about what each project directory should be used for, and take a look at this section of the Maven getting started guide to see how the project naming scheme affects directory structure.
The only data OpenSesame intends to store in Datastore is data that can’t be sourced from GitHub. Getting Data directly from GitHub allows us avoid issues where OpenSesame data is out of sync with GitHub.
When Data is sent to the front-end, we plan to conditionally populate Information sourced from GitHub. Conditional population of GitHub data will help us conserve our limited API calls.
As a naming convention, Java Files that end in Entity refer to Objectify enabled classes that represent data as it is stored in datastore. Java files that end in Data refer to classes that represent data that is sent to the frontend. Data classes are directly serialized to the JSON that is retreived when GET requests are sent to the various OpenSesame Java servlets.
for example, If X is an aspect of our website with unique data that we plan to store in Datastore. We will handle it with an Objectify enabled XEntity Java class. If X also requires data from GitHub, we will have an additional XData Java class that builds on XEntity by populating its fields using the GitHub API. XData can then be converted to a JSON with the Gson Library and sent to the frontend using the XServlet.
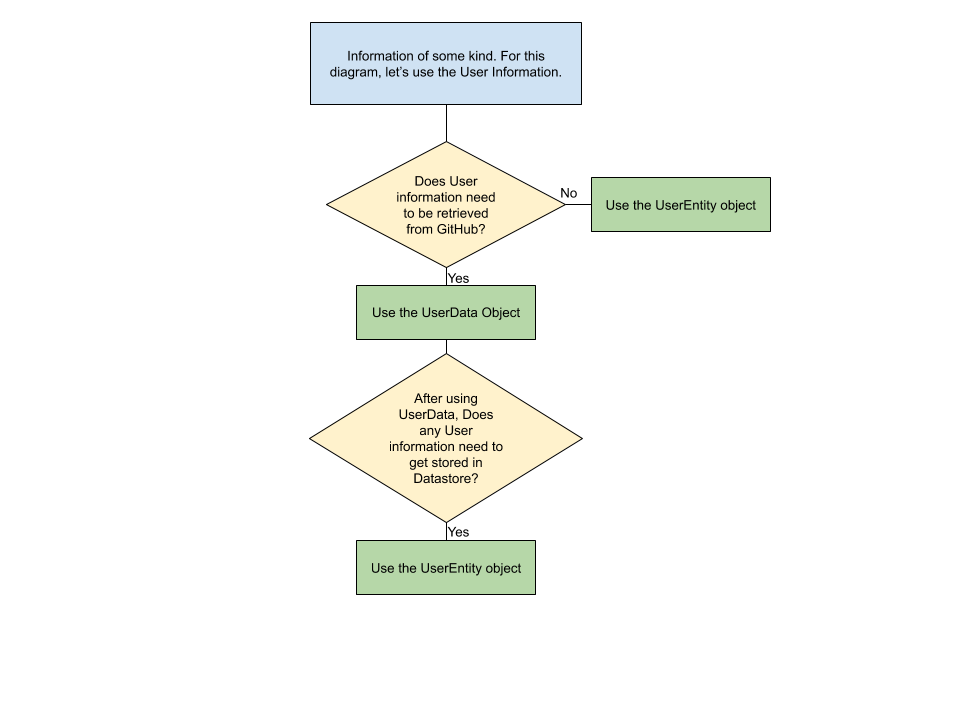
This convention allows us to manipulate data on the backend without having to waste API calls if there is no need to.