This Gatsby plugin helps you subscribe new email addresses to a Mailchimp email list. Mailchimp does not provide much direction on making clientside requests so the setup to achieve this with a static website (i.e. Gatsby) can be cumbersome.
What this plugin does is scan your gatsby-config for your MC settings. Then, once you import and invoke the addToMailchimp method in your React component, it makes a jsonp request of the email/attributes to MC's server using your settings.
If you are still on Gatsby v1.x, you need to use an old version of this plugin. There were a lot of changes made in Gatsby v2 that will cause this plugin so make sure to use the correct version of this plugin if you are still on Gatsby v1.
Simply update your package.json to:
"gatsby-plugin-mailchimp": "https://github.com/benjaminhoffman/gatsby-plugin-mailchimp.git#gatsby-v1",There are three steps involved to getting started:
- add this plugin to your repo
- In the root directory of your Gatsby project, run the following command in your terminal:
$ yarn add gatsby-plugin-mailchimp - or if using Gatsby v2:
$ yarn add https://github.com/benjaminhoffman/gatsby-plugin-mailchimp.git#gatsby-v2
- In the root directory of your Gatsby project, run the following command in your terminal:
- include your Mailchimp settings in your
gatsby-config.jsfile - import the
addToMailchimpfunction to subscribe emails to your MC list
You need to provide this plugin with your Mailchimp account and list details in order for it to know which endpoint to save the email address to. Follow these directions:
In your gatsby-config.js file, add the following code to the plugin section:
plugins: [
  ...
  {
    resolve: 'gatsby-plugin-mailchimp',
    options: {
      endpoint: '', // see instructions section below
    },
  },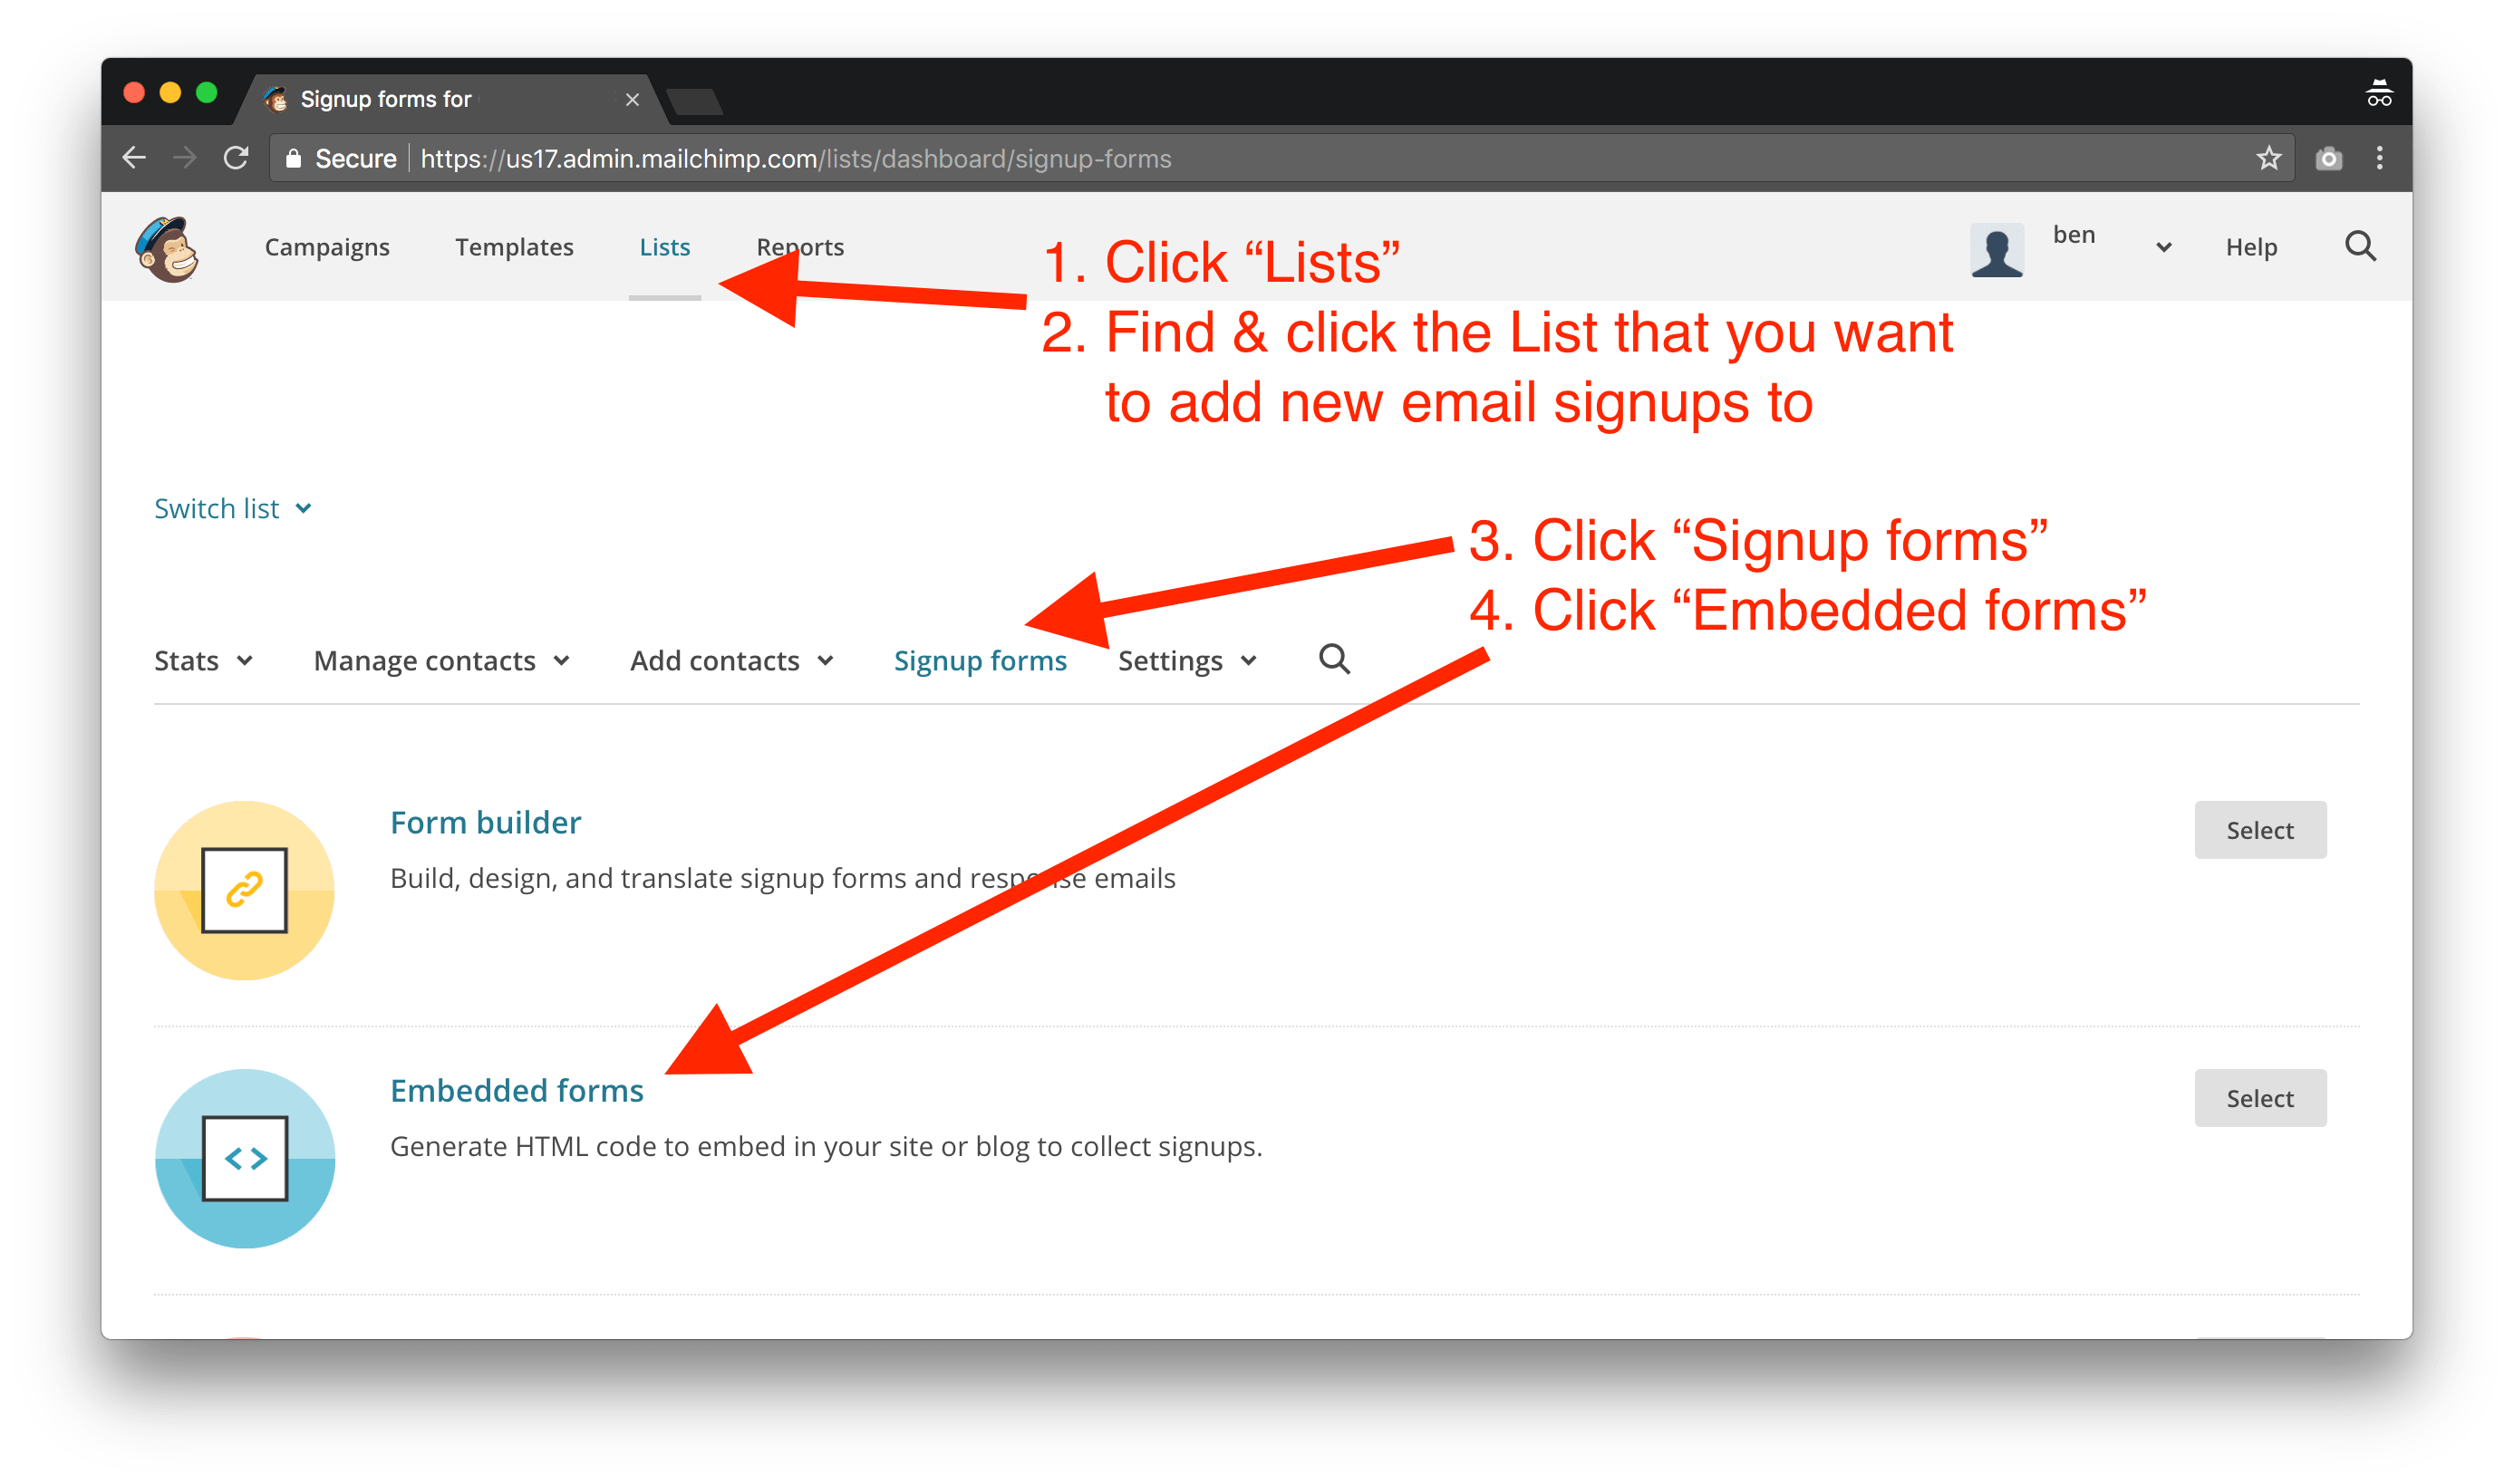
]- Login to your Mailchimp account
- Click "Lists" tab at the top
- Locate the Mailchimp list you want to save email addresses to
- Click that list
- Click the subtab "Signup forms"
- Click "Embedded forms"
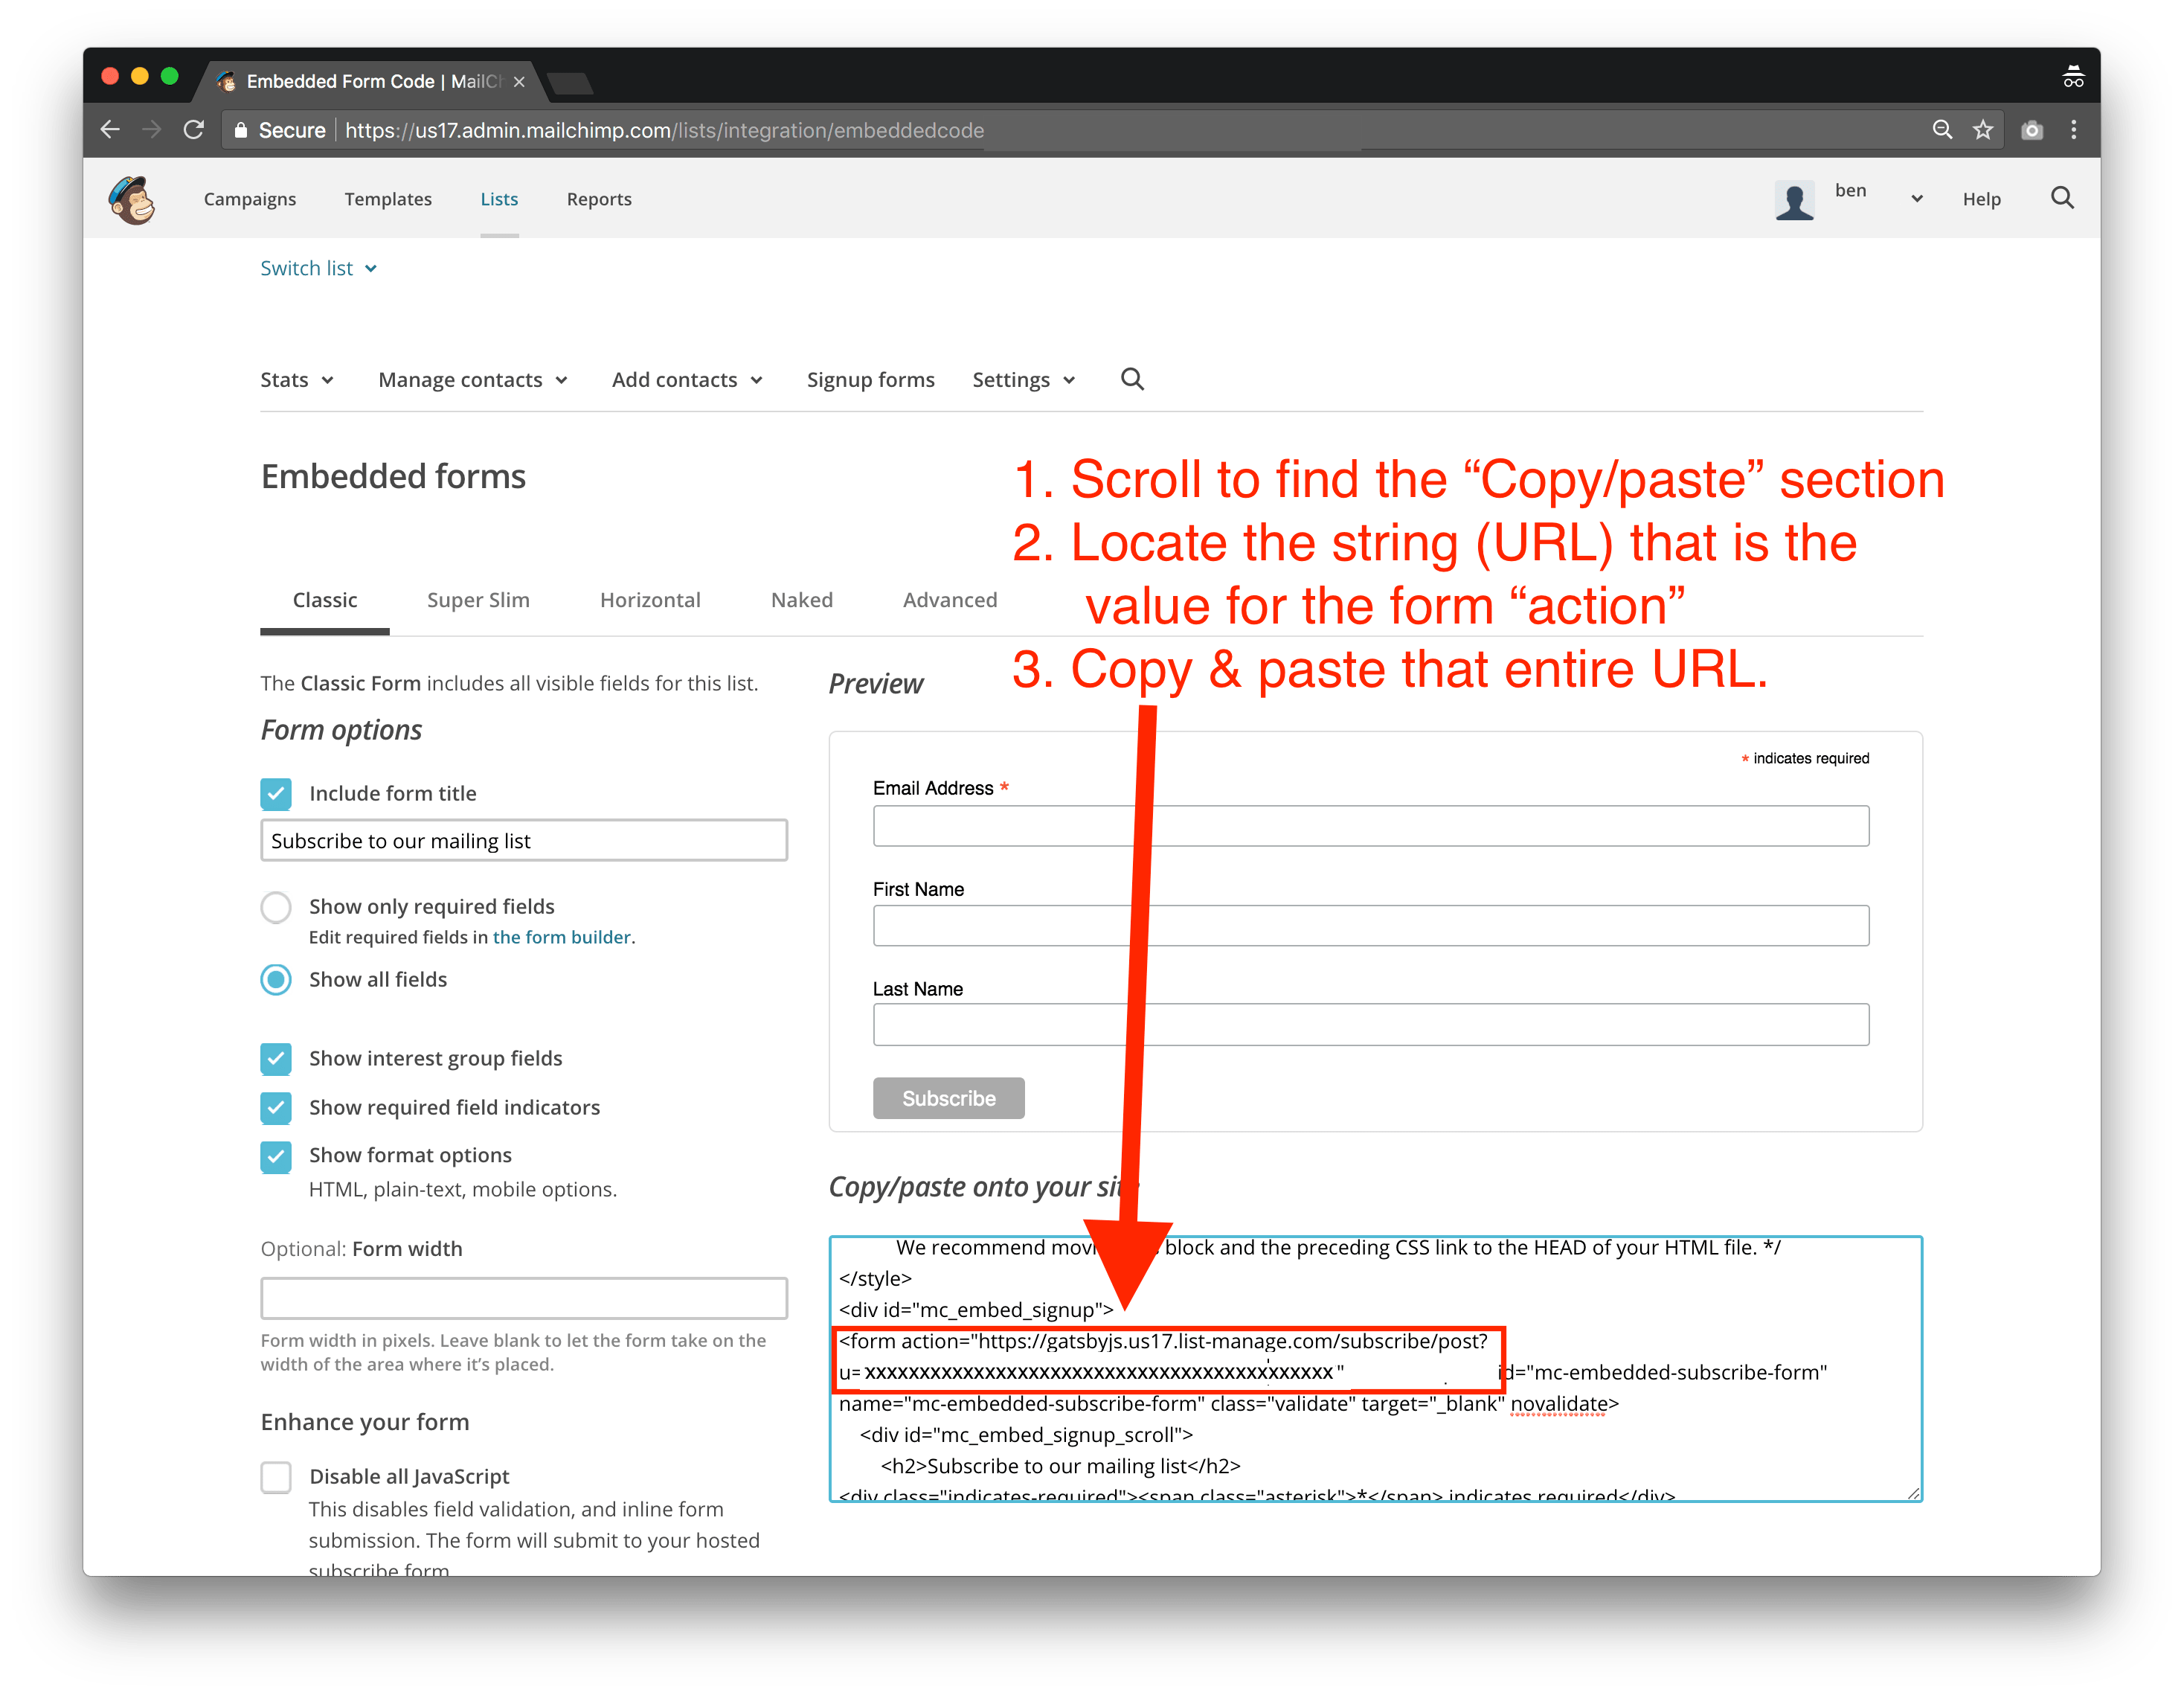
- Scroll down to the section with all the HTML code
- Locate the HTML form element. Copy the entire URL listed under the form "action" attribute*
- Paste that URL into your
gatsby-configʼsoption.endpointfield
- Usually this URL value will look something like: https://example.us10.list-manage.com/subscribe/post?u=b9ef2fdd3edofhec04ba9b930&id=3l948gkt1d
... that's all!
This plugin exports one method -- addToMailchimp -- that accepts two params: email and listFields, where email is a valid email string and listFields is an object of attributes youʼd like to save with the email address. More detailed instructions below.
Navigate to the file where you collect email addresses (ie, the file you want to import this plugin into). When a user submits a form and includes at least their email address, invoke the addToMailchimp method like you would any other method. Here is an example:
import addToMailchimp from 'gatsby-plugin-mailchimp'
...

export default class MyGatsbyComponent extends React.Component {
  // Since `addToMailchimp` returns a promise, you
  // can handle the response in two different ways:

  // Note that you need to send an email & optionally, listFields
  // these values can be pulled from React state, form fields,
  // or wherever.  (Personally, I recommend storing in state).

  // 1. via `.then`
  _handleSubmit = e => {
    e.preventDefault();
    addToMailchimp(email, listFields) // listFields are optional if you are only capturing the email address.
    .then(data => {
      // I recommend setting data to React state
      // but you can do whatever you want (including ignoring this `then()` altogether)
      console.log(data)
    })
    .catch(() => {
      // unnecessary because Mailchimp only ever
      // returns a 200 status code
      // see below for how to handle errors
    })
  }

  // 2. via `async/await`
  _handleSubmit = async (e) => {
    e.preventDefault();
    const result = await addToMailchimp(email, listFields)
    // I recommend setting `result` to React state
    // but you can do whatever you want
  }

  render () {
    return (
      <form onSubmit={this._handleSubmit(email, {listFields})}>
        ...
      </form>
    )
  }
}This plugin returns a promise that resolves to the object that is returned by Mailchimpʼs API. The Mailchimp API will always return a status of 200. In order to know if your submission was a success or error, you must read the returned object, which has a result and msg property:
{
  result: string // either `success` or `error` (helpful to use this key to update your state)
  msg: string // a user-friendly message indicating details of your submissions (usually something like "thanks for subscribing!" or "this email has already been added")
}To see an example usage, look no further than Gatsbyʼs website. Here are some helpful links:
- Add Mailchimp settings via gatsby-config (link)
- Use React state to show success, error, and sending messages in the UI (link)
-
email address: pass in the email as normal (ie,
you@gmail.com). Do not encode or transform the email, as our plugin will do that for you! -
listFields: many times you want to collect more than just an email address (first/last name, birthday, page pathname). I like to store this info in React state and pass it in as list fields. See below.
-
I like to save the returned data to React state so I can then display a success/error message to the user.
-
There is a current known issue (#15) where this plugin does not work if the Mailchimp List has reCAPTCHA enabled. This setting should be turned off for everything to function properly.
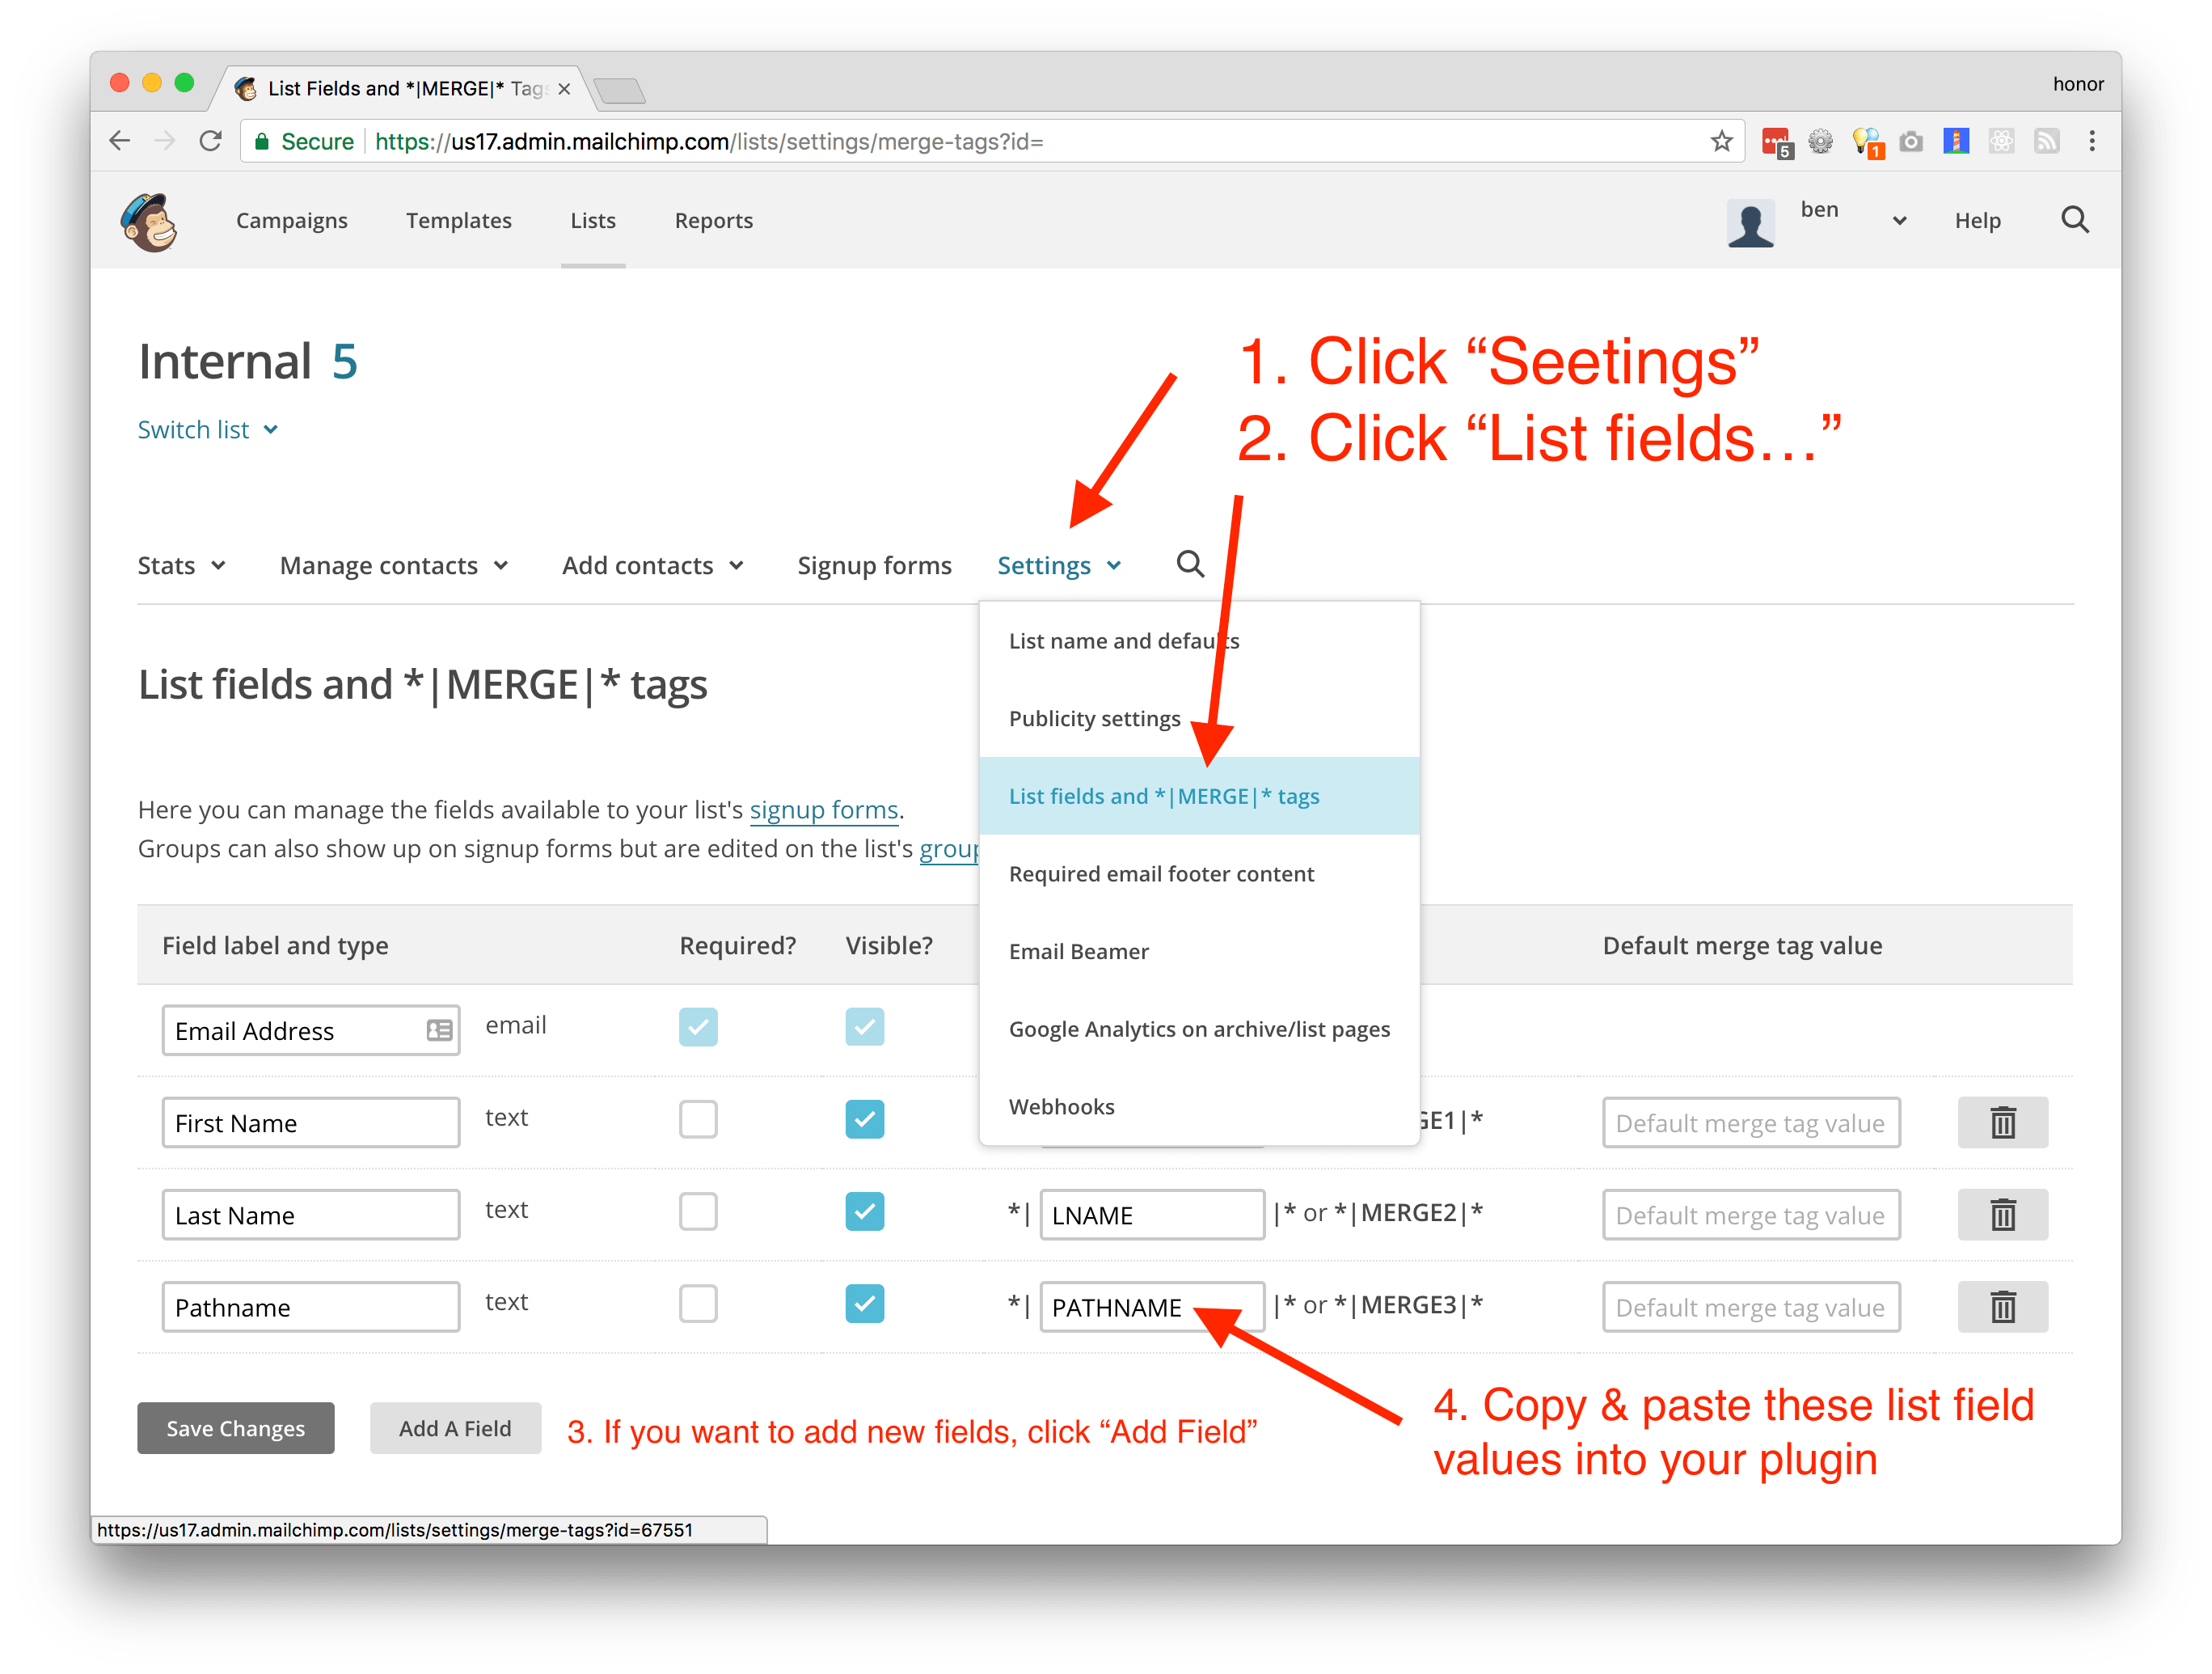
Sometimes you want to send to Mailchimp more than just an email address. Itʼs very common to also send a first name, last name, pathname, etc. Honestly, you can send whatever you want to store alongside the email address. Instructions below on how to create new list fields but once youʼve set them up in Mailchimp, you send them alongside the email like this:
addToMailchimp('email@example.com', {
  PATHNAME: '/blog-post-1',
  FNAME: 'Ben',
  LNAME: 'Bordeaux'
  ...
})To setup or modify Mailchimp list fields, navigate to your MC list, click "Settings", then click "List fields". Then add, remove, or edit fields as you wish. Make sure to update your addToMailchimp listFields object after youʼve made changes in Mailchimp.
3.0.0
- uses
gatsby-nodeand Webpack DefinePlugin to extract your Mailchimp API key during compile time only, set it to global, then use it to make the http request. Previously, we were importing your entiregatsby-configfile
2.0.0
- return a promise, not string, from an error'd http request
- ensure MC endpoint is valid
- create basic MC field form (name, email, submit button)
- spec