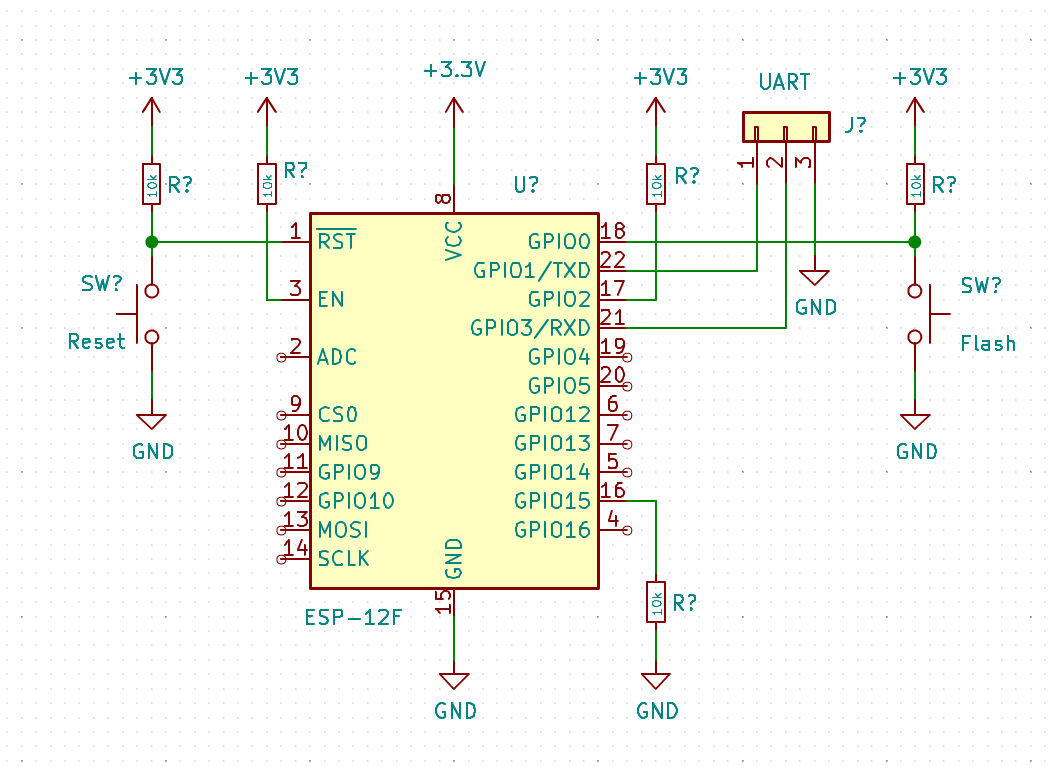
These notes should work for both WeMos Mini boards as well as for the following simple ESP12F circuitry suitable even for breadboard:
However in the case of WeMos board there is no need to manually change RESET and GPIO0 levels and to use before and after parameters in esptool. All the switching between running mode and programming mode will be done done using DTR/RTS of integrated USB-to-Serial chip.
- Switch the board to running mode: set high level on GPIO0 pin
- Connect Minicom to device serial port with 115200 8N1 settings
- Enable carriage return using CTRL-A U control sequence
- Reset device: toggle low level on RST pin
Ai-Thinker Technology Co. Ltd.
ready- Run AT commands pressing Enter and then CTRL-J after each command:
AT
OK

AT+GMR
AT version:0.60.0.0(Jan 29 2016 15:10:17)
SDK version:1.5.2(7eee54f4)
Ai-Thinker Technology Co. Ltd.
May  5 2016 17:30:30
OK- Switch the board to programming mode: set low level on GPIO0 pin
- Reset the board: toggle low level on RST pin
- Run esptool to get chip parameters: reset chip between each command
$ sudo esptool.py --port /dev/ttyUSB0 --before no_reset_no_sync --after no_reset chip_id
esptool.py v2.6
Serial port /dev/ttyUSB0
Connecting...
Detecting chip type... ESP8266
Chip is ESP8266EX
Features: WiFi
MAC: 60:01:94:02:a9:f9
Uploading stub...
Running stub...
Stub running...
Chip ID: 0x0002a9f9
Staying in bootloader.
$ sudo esptool.py --port /dev/ttyUSB0 --before no_reset_no_sync --after no_reset read_mac
esptool.py v2.6
Serial port /dev/ttyUSB0
Connecting...
Detecting chip type... ESP8266
Chip is ESP8266EX
Features: WiFi
MAC: 60:01:94:02:a9:f9
Uploading stub...
Running stub...
Stub running...
MAC: 60:01:94:02:a9:f9
Staying in bootloader.NodeMCU project provides an excellent documentation, so no need to go into much details here. In brief, do the following steps to build and flash firmware image to WeMos D1 mini board:
- Get firmware source code
$ git clone https://github.com/nodemcu/nodemcu-firmware.git- Customize NodeMCU firmware image Edit app/include/user_modules.h
- Build firmware Build NodeMCU firmware:
$ make- Flash firmware Switch device into programming mode and NodeMCU firmware
$ sudo ./tools/toolchains/esptool.py --port /dev/ttyUSB0 write_flash -fm dio -fs 32m 0x00000 bin/0x00000.bin 0x10000 bin/0x10000.binUsing luatool:
$ sudo luatool.py --port /dev/ttyUSB0 --src test.lua --dest test.lua -b 115200Using nodemcu-tool:
$ sudo nodemcu-tool upload init.lua
$ sudo nodemcu-tool upload test.lua -n main.luaCreate image content list
$ cat script.img
import init.lua init.lua
import test.lua test.lua
import nrf24.lua nrf24.lua
Generate spiffs image
$ spiffsimg -f fs.img -S ${FLASH_SIZE} -U ${SPIFFS_SIZE} -r script.imgFlash spiffs image to device
$ sudo /home/matsi/bin/esptool.py --port /dev/ttyUSB0 write_flash -fm dio -fs ${FLASH_SIZE} ${SPIFFS_OFFSET} fs.img