Python code for cnn-supervised classification of remotely sensed imagery with deep learning - part of the Deep Riverscapes project
Supervised classification is a workflow in Remote Sensing (RS) whereby a human user draws training (i.e. labelled) areas, generally with a GIS vector polygon, on a RS image. The polygons are then used to extract pixel values and, with the labels, fed into a supervised machine learning algorithm for land-cover classification. The core idea behind CNN-Supervised Classification (CSC) is to replace the human user with a pre-trained convolutional neural network (CNN). Once a CNN is trained, CSC starts by running the trained CNN on an image. This results in a tiled image classifation. Then CCC runs a second phase where the CNN-derived tiled classification is reformed into a lable raster and used to train and run a more shallow machine learning algorithm but only on the image pixels of that given image making the result more customised to the specific radiometric properties of the image. The output is a pixel-level clasification for land-cover. We have experimented with Random Forests and Multi Layer Perceptrons (MLP) and found that the MLP gives better results. Development of the CSC workflow was done in the context of fluvial remote sensing and aimed at improving the land-cover clasification of the type of imagery obtained from drone surveys of river corridors. Our test dataset is compiled from high resolution aerial imagery of 11 rivers. It has 1 billion labelled pixels for training and another 4 billion labelled pixels for validation. If we train 11 CNN models, 1 for each river, then validate these CNN models only with the validation images of their repective rivers, we obtain an overall pixel-weighted F1 score of 94%. If we train a single CNN with the data from 5 rivers, we find that the resulting CSC workflow can predict classes of the other 6 rivers (true out of sample data never seen during CNN training) with an overall pixel-wieghted F1 sore of 90%. See citation below.
A short video introduction of CC-Supervised Classification, aimed at a wide non-specialist audience, can be found here. Note that the video uses the former name of the method: Self-Supervised Classification.
- Keras (we use TensorFlow-GPU v1.14 as the backend)
- Scikit-Learn
- Imbalanced-Learn toolbox
- Scikit-Image
- Pandas
This code is currently in the development stage and intended for research purposes. The coding structure is naive and not optimised for production. The process is not yet designed to output class rasters for new unclassified images and expects every image to have an accompanying class raster (i.e. a label image) for either training or for validation.
After installing dependencies, the code can be tested with the instructions, data and a NASNet Mobile base model provided in the sample_data folder.
Once the code functions, users can use the base NASNet Mobile provided and/or download the pre-trained models from the data repository found here. The NASNet_Models.zip file contains a base model for NASNet Large which can be trained with the imagery and labels provided in the data repository or to new data. NASNet_Models.zip also contains a set of pre-trained NASNet Mobile models which can be used to run 'CnnSupervisedClassification.py' with the 1100+ images provided in the repository and used in the work cited below. Due to file sizes, pre-trained NASNet Large models for all rivers are not provided.
It is assumed that the data comes in the format that typically results from an airborne survey such as: root_number.jpg. We recommend that the data be structured as: RiverName_Number.jpg. The number must be at least 4 digits (RiverName_0022.jpg), but can be more if nessesary (exampe 5-digit, RiverName_12345.jpg). The associated classification is expected to have the same filename but with a prefix of 'SCLS_' and a tif format (SCLS_RiverName_0022.tif). The default number of land-cover classes in the code and in the label data found on the repository is 5: water, dry sediment, green vegetation, senescent vegetation and paved roads. Users can alter the number of classes for other studies as needed. However, all the code and models function by tiling the input imagery in sub-images of 50x50 pixels.
Once image data is organised, the script TrainCNN.py can be used to train the NASNet Large or mobile architectures with pretrained weights as downloaded. User options are at the start. Elements marked 'Path' or 'Empty' need to be edited. Multiple rivers can be included in the same folder, they will be separated based on the River Names included in the image file names (see above). On first running, it is recommended to set the ModelTuning variable to True and run the tuning procedure for the CNN. This will output a figure and the correct number of tuning epochs can be set as the point where the loss and accuracy of the validation data begin to diverge from the loss and accuracy of the training data. Once this is established, the script must be run again with ModelTuning set to False and the correct value for Tuning. This will save the model with a .h5 extension and it will also save a class key as a small csv file. Once these options are edited in the code no switches are required. e.g. :
TrainCNN
will work from an Ipython console and:
python C:\MyCode\TrainCNN.py
will execute the script from a prompt provided the code path is correct. The easiest option is to use Spyder to edit, save and execute the directly from the editor (Hotkey: F5). Note that in this case you must be sure that dependencies are correctly installed for use by Spyder. You may need to re-install another version of Spyder in the TensorFlow environment.
Once a trained CNN model is in place, CSC performance can be evaluated with CnnSupervisedClassification.py. The images to test must follow the same naming convention and all have an existing set of manual labels as used in the CNN training phase above. Again variables currently set to 'Path' or 'Empty' must be edited in the code. The CSC is currently set to use a Multilayer Perceptron (MLP) to perform the phase 2, pixel-level, classification. In this phase, the CNN classification output for a specific image will be used as training data for that specific image. The script will execute and output performance metrics for each image. csv files with a CNN_ prefix give performance metrics for the CNN model with F1 scores and support (# of pixels) for each class. MLP_ files give the same metrics for the final CSC result after the application of the MLP. A 4-part figure will also be output showing the original image, the existing class labels, the CNN classification and the final CSC classification labelled either MLP. Optionally, a saved class raster can also be saved to disk for each processed image.
CnnSupervisedClassification
will work from an Ipython console and:
python C:\MyCode\CnnSupervisedClassification.py
will execute the script from a prompt provided the code path is correct. The easiest option remains the use Spyder to edit, save and execute the directly from the editor (Hotkey: F5).
 Figure 1. Sample 4-part output
IMPORTANT: The CNN-Supervised Classification script will use the specified CNN to classify all the images in the PredictPath folder. Users needing to apply a specific CNN to a specific river dataset should save the imagery from separate rivers in separate folders.
The CSC execution will result 3 files per classified image: separate classification score files for for the CNN and MLP stages and an image file showing the input image, the validation data, the CNN classification (used sas training data for the next step) and the MLP (or RF) classification. CompileClassificationReports.py can be edited and executed in a similar way and will output a single csv file whose format is intended for use with Pandas and Seaborn for visualisation.
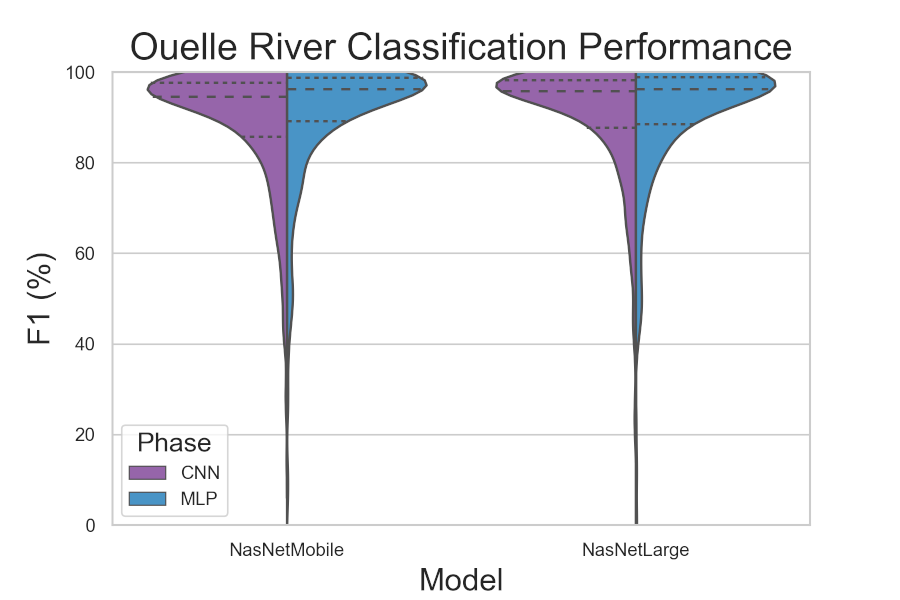 Figure 2. Sample of results as violin plots. Here we show the outputs for the Ouelle river in Canada
The script CnnSupervisedClassificadtion_PyQGIS.py uses PyQGIS code to integrate the CSC process with QGIS. It is assumed that this will be used with single, presumably large, orthoimages that are geocoded.
We recommend using the long term release of QGIS (currently 3.4). Additionnal Python libraries can be installed in the QGIS Python 3 environment with pip. Start the OSGEO4W shell as an administrator and proceed as follows:
- type: py3_env (this will pass commands to the Python 3 environment, used in the console)
- pip install the same packages as above, include version specifications in the pip command. It is recommended to use the GPU version of tensorflow.
- Downgrade the h5py library to version 2.9. This is needed to avoid a version clash.
- If using the GPU version of tensorflow, we need to locate CUDA dlls. Open QGI and open Settings>options>System
- In Environments, append the CUDA locations to the PATH variable. These should replicate the paths set in windows during CUDA and cudnn installation. NOTE: this can be a delicate process, any mistake may require a complete re-install of QGIS.
Add your orthoimage as a raster layer in QGIS. Open the Python console and there open the CnnSupervisedClassification_PyQGIS script. Fill the user parameters on lines 75 to 85 of the script and execute. Geocoded class rasters for both the CNN (prefixed with CLASS_CNN_) and CNN+MLP stage (prefixed with CLASS_CSC_) of CSC will be displayed in QGIS and saved to disk. If you have specified a validation dataset in the form of a raster (line 79). Some classification metrics and a confusion matrix will be displayed in the Python console..
- Patrice E. Carbonneau, University of Durham, e-mail
- Toby P. Breckon, University of Durham
- James T. Dietrich, University of Northern Iowa
- Steven J. Dugdale, University of Nottingham
- Mark A. Fonstad, University of Oregon
- Hitoshi Miyamoto, Shibaura Institute of Technology
- Amy S. Woodget, Loughborough University
This work is currently in the process of publication where a full description of parameters will be available. The current best citation is:
Carbonneau et al, 2019, Generalised classification of hyperspatial resolution airborne imagery of fluvial scenes with deep convolutional neural networks. Geophysical Research Abstracts, EGU2019-1865, EGU General Assembly 2019.
This poster is available here