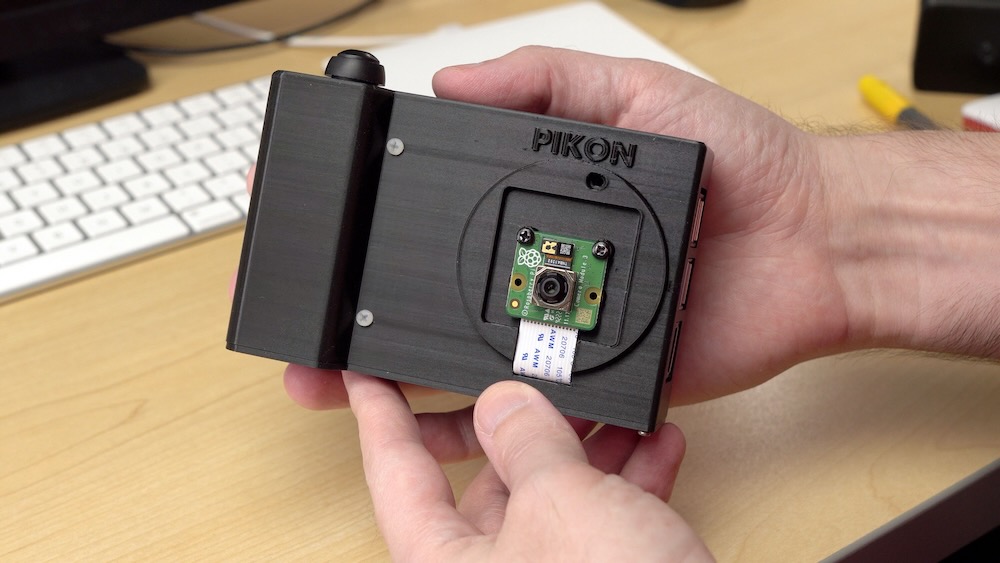
This project has the files and information required to build a compact and portable Raspberry Pi camera.
The project is based around the Pi Camera v3, which has autofocus and a 12 megapixel sensor, but any compatible camera module can work (including Arducam's higher-resolution or autofocus cameras).
It is most definitely a work in progress, and you will probably need to do a little extra work to get your own Pi Camera going.
Inspiration:
If you run into any problems, or have suggestions for improving the design, assembly, or code to run the camera, plase feel free to open an issue.
I posted a video detailing the assembly and testing of this camera project on YouTube: https://www.youtube.com/watch?v=1EIFfln3Kxs.
- Raspberry Pi 4 model B (2 GB RAM or better)
- Raspberry Pi Camera Module 3 (Other camera modules should work too!)
- SanDisk Extreme 128GB microSD card
- Waveshare 3.5" TFT GPIO LCD
- Twidec 12mm momentary push button
- 2x4 2.54mm Female Headers
- USB-C battery bank and USB-C cable for powering the Pi
- Screws and nuts:
- M2.5x12mm x4, with a nut for each screw (for Pi)
- M2.5x4mm (screw) x4 (for front camera attachment)
- M2x5mm x2 (for bottom plate)
You can basically duck-tape together the rig if you squish the camera cable in between the Pi and the Waveshare screen, and tape the button somewhere. But that's not very elegant.
So instead, I adapted the 'PIKON' design from Kevin McAleer, and modified it to fit the 12mm pushbutton for the shutter, and a Pi Camera v3 instead of the HQ camera.
More tweaks to the 3D case design should be made, to make it a little more organic/comfortable, and to better fit the parts (especially if we can get an 18650 rechargeable battery in there!).
For now, the current version of the case is split into two parts: the main enclosure, and the bottom cover. You can find the STL files inside the enclosure directory.
- Solder the 12mm pushbutton leads onto the first and last pin on one of the 2x4 female headers. (In my setup, I have one lead going to a ground pin, and the other to GPIO pin 21. Your setup may vary, depending on how you attach the pushbutton.)
- Route the camera module cable in through the slit on the front of the enclosure.
- Screw the camera module into the enclosure using M2.5 4mm screws. (Note: These screws will embed themselves into the PCB a little as you screw them in.)
- Insert the Raspberry Pi into the enclosure, with the ports facing out the left side.
- Screw the Raspberry Pi into the four standoffs using M2 12mm screws threaded from the outside, held in place with nuts on the inside on top of the Pi.
- Plug the camera module cable into the Pi's Camera CSI connector, making sure the exposed pins face the port side of the board.
- Plug the pre-soldered pushbutton header into the GPIO pins so the two connections go to ground and GPIO pin 21. Gently bend the connecting wires so they do not push against the display.
- Install the Waveshare GPIO TFT display on the GPIO header. The display should be fixed directly on top of the Pi 4 model B itself.
- Gently tuck the camera module cable behind the display.
- Screw the bottom plate onto the enclosure with 2 M2 screws.
Flash the latest version of Raspberry Pi OS (64-bit preferred) to a fresh microSD card, and insert the microSD card into your Pi, and boot it up.
I did all my configuration over SSH, but you could plug in an external HDMI display and a keyboard, and configure it that way too.
In a Terminal window or via SSH, run:
sudo raspi-config
- Under 'System Options', go to the 'Boot / Auto Login' settings and choose 'Desktop auto-login'.
- Under 'Display Options', go to 'Screen Blanking' and choose 'No'.
- Reboot the Pi when asked.
If using a different model display, be sure to look up the instructions for that display. In my case, I read through Waveshare's documentation for the 3.5" LCD (A). To set up the display:
git clone https://github.com/waveshare/LCD-show.gitcd LCD-showchmod +x LCD35-show./LCD35-show
Running this script destructively changes the /boot/config.txt file, though, and will break the ability to use the Camera Module v3. So you need to edit your /boot/config.txt file and make sure the configuration matches the config.txt file included in this repository.
Copy over the contents of this repo's config.txt file, then reboot the Pi.
You should see the Pi boot into Raspberry Pi OS, logged in on the desktop.
The Pi is now ready to be used as a camera. Either via SSH, or with a keyboard and mouse plugged into the Pi itself, test that the camera is working:
libcamera-hello -t 0 --autofocus-mode continuous
That should pop up a preview window, and show the camera feed live on the display. If you don't see a feed, press Ctrl + C to exit, and then run the same command, with --qt-preview on the end.
When operating the camera over SSH, the Pi will not know what display to use for previews. You need to explicitly use 'Display 0' so previews appear on the 3.5" display:
export DISPLAY=:0
To make the camera work as a camera, with the pushbutton taking an image, copy the camera.py file into your home directory, and make it executable:
chmod +x camera.py
Then test that it's working by running:
./camera.py
A preview window should appear on the screen, and if you click the button, it should take a picture, placing it inside ~/Pictures.
Instructions for making the camera start at system boot using systemd will be added soon.
MIT
