You want to make a pull request to an open-source project? You don't know how to do it?
This guide will show you how to make a contribution (modifying code, adding things in the docs...) to an open source project that you don't own.
You've read the guide already and you just want the commands? Jump here.
You want some tips to have your pull request merged faster? Jump here.
- You know how to use git, at least you know what is a commit and a branch and a few basic commands.
- You know which project you want to work on. In this guide, we'll assume that it's an open source project that you don't control and that the repository is hosted on GitHub. For example, it could be Cython, the Windows terminal or Tensorflow.
- You know what modifications you want to do. What I mean is you know which files you want to modify and which lines.
In here, as example, we'll say that your GitHub username is my_pretty_username and that you want to make a pull request to this repository: github.com/gabrieldemarmiesse/getting_started_open_source
You can follow the tutorial and make dummy pull requests to this repository. Think of it as a sandbox, it's made to learn, so no worries if you mess up! (Actually, you can't mess it up, because only I have the write permissions on it.)
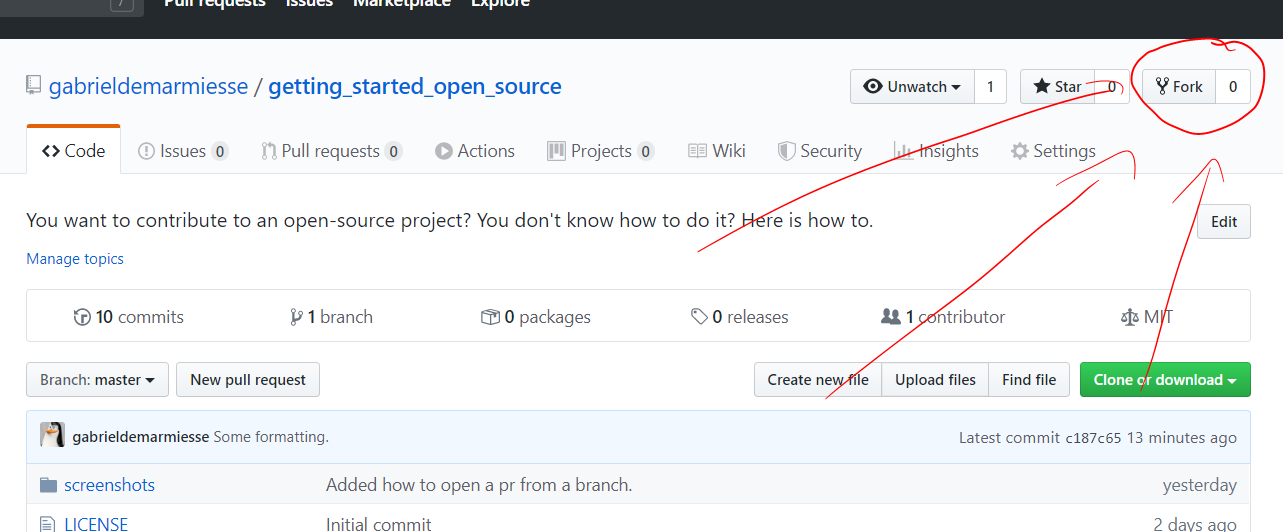
First head to the page of the project, in my example, https://github.com/gabrieldemarmiesse/getting_started_open_source . If you look at the top right of the page, you'll see a button called "Fork":
Click on it and create your fork. It will redirect you to your fork.
In short, a fork is a copy of a repository. In our case:
- https://github.com/gabrieldemarmiesse/getting_started_open_source is upstream.
- https://github.com/my_pretty_username/getting_started_open_source is the fork.
The fork is one of your repositories. Since it's your own repository now, you can pull and push as much as you want. When people talk about a fork, they also talk about the upstream repository (original repository). You'll see later how to update your fork with commits from the upstream repository.
You now have your fork under your username: https://github.com/my_pretty_username/getting_started_open_source . You'll use it to work since you can push and pull with it. Click on the green "Clone" button (of your fork, not the upstream repository) and use it to clone locally. For example, in your case, you can do:
git clone https://github.com/my_pretty_username/getting_started_open_source.gitto clone with HTTPS or
git clone git@github.com:my_pretty_username/getting_started_open_source.gitto clone it with SSH.
It's never a good idea to work on the master branch. It'll become clear why once you start doing your second pull request. So let's make a new one:
cd ./getting_started_open_source
git checkout -b my_pretty_branch_for_pr_1
git status
You're now on the new branch my_pretty_branch_for_pr_1 and ready to work!
Remember: one branch = one pull request. The branch name doesn't have to be the name of your pull request, so no worries if your branch name is bad or not very descriptive.
Find the file you want to modify and modify it. Change the code, etc... I won't detail here how to run the test suite as it's optional in open source projects. Especially if the modification is small. A server will run some tests for you anyway. So let's go on.
This is quite simple:
git add .
git commit
git push
If you go to your fork, you'll see that your branch is now there (you can click on the branch button to see).
Now head to the original(upstream) repository. Click on the tab "Pull requests", you should see a banner saying something like
my_pretty_username:my_pretty_branch_for_pr1 (one minute ago).
Compare & pull request
Click the green button and you'll be able to review the diff, add a title to your pull request and add a description.
Don't worry, you'll be able to modify the pull request (title, descriptions and add commits) later on if needed.
GitHub has a special syntax that can be used.
Let's say your pull request fixes an issue. You believe that this issue should be closed once your pull request is merged. Let's say it's the issue number 354. Then, somewhere in the description, write:
fixes #354
GitHub will detect this syntax. Once your pull request is merged, the issue 354 will be automagically closed. Use this system to save the project maintainer some of his/her time!
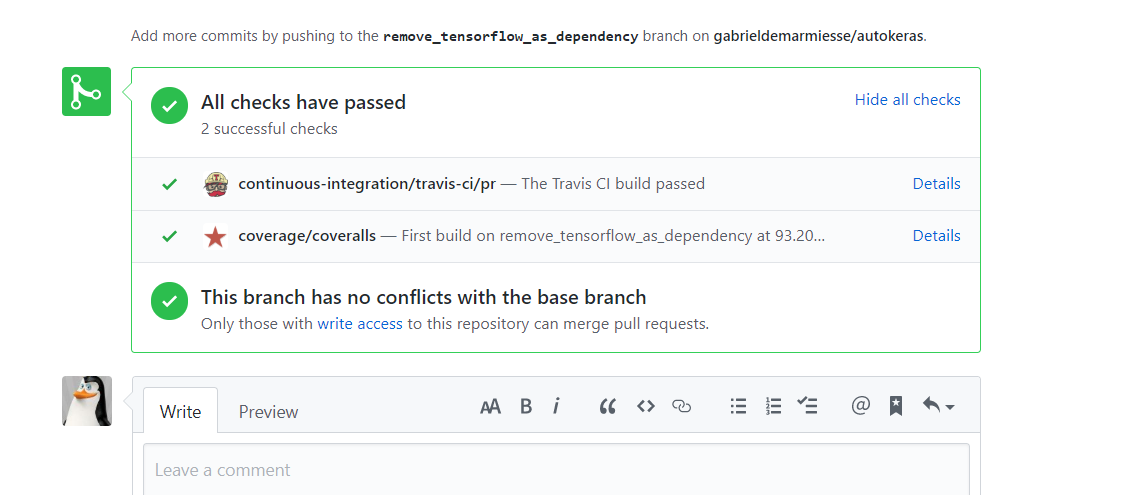
Every time you open a pull request or add a commits to it, it will trigger tests in a CI system.
You can see the CI and the logs at the bottom of the pull request:
If the CI is failing, you can see why by checking the logs. For that, click on "Details".
CI stands for "Continuous integration". It's a system that runs on a server. It watches your git repository closely.
Every time you add a commit to the repository, or every time a pull request is opened, the CI system will spawn a fresh new virtual machine, clone the repository, checkout to the commit that was just added and runs many tests. It then reports the result.
There are nowadays many CI providers: Travis CI, CircleCI, Azure pilelines, Github actions...
The pull request is now done, but there is still the code review. You might need to wait for a few days until a maintainer reviews your code.
Once the maintainer does, if everything is good, you'll get some thanks and your pull request will be merged.
If the maintainer asks for changes (which is frequent), you need to modify the code. In this case do not open another pull request. As was said earlier, one branch = one pull request. You just need to do:
git checkout my_pretty_branch_for_pr_1In case you were not on this branch already.
Then do the requested code modifications and do:
git add .
git commit
git push
The commit will be added to the branch. You should see it appear in the pull request page. You'll also trigger the continuous integration system again with this new commit.
Repeat step 8 until your pull request is merged!
Your first pull request was merged. Maybe you think it was easier than you thought and you'd like to do it again.
You may be very tempted to delete your fork and redo steps 1 to 8 again. There is obviously a better solution... Here is the setup that you need to do only once. All your future pull requests will be easier to make now.
If you remember, we said earlier that working on the master branch wasn't a good idea. You'll understand why now. We need the local master branch to be in sync with the upstream master branch.
Some commits have been added to the upstream master branch. To pull them locally, you need to add the upstream repo as a remote. To do that, head to the upstream repository, click on "Clone this repository" and select HTTPS. Then execute the command:
git remote add upstream THE_UPSTREAM_URL_HEREThen:
git remote -vTo read the output:
upstream= The upstream (original) repository.origin= Your fork.
By default, if you use git push and git pull, it'll still use origin. We want to change that for the master branch. We want the master branch to be in sync with upstream and not origin so that you can always work with the latest version of the code:
git fetch upstream
git checkout master
git branch --set-upstream-to upstream/master
git status
Now, to get the latest commits added to the upstream repository, just do:
git checkout master
git pullIt's identical to step 3
git checkout -b my_pretty_branch_for_pr_2
# do your work here
git add .
git commit
git push
Now go to the upstream repository web page, click on "Pull requests" and click on the button "Compare & pull request".
I believe it's easy to understand what to do at this point. But just in case, here are the commands to execute to make a third pull request, given that you followed all the previous steps:
git checkout master
git pull                 # get the latest changes
git checkout -b my_pretty_branch_for_pr_3
# do your work here
git add .
git commit
git push
Go to the upstream repo web page and click on "Compare & pull request".
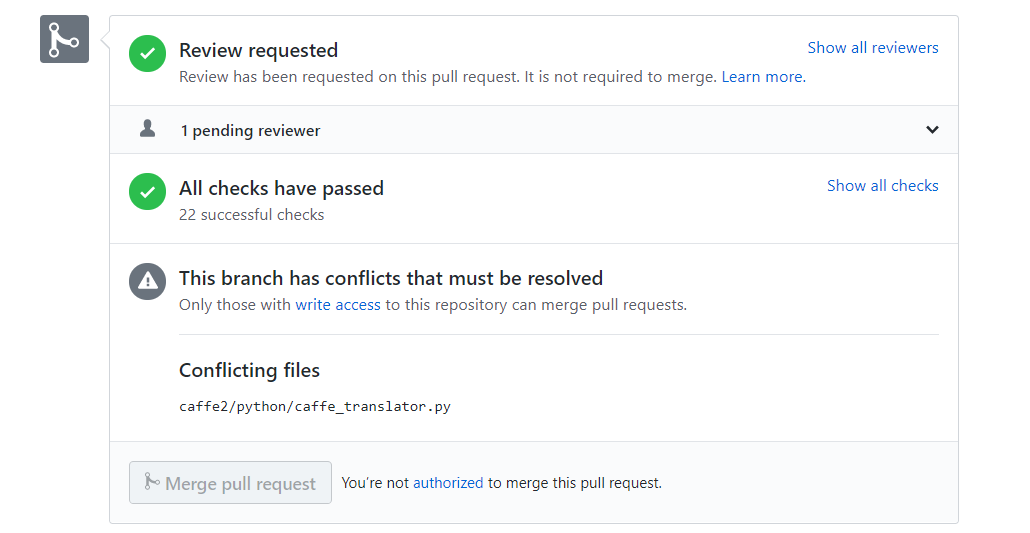
Sometime, you'll see this status on your pull request:
It's a merge conflict. What does it mean for you?
You made modifications on some lines on your branch. Since you opened the pull request, some other commits were added to the master branch.
The problem here is that the commits added to the master branch modified the same lines as your pull request.
Hence GitHub can't merge your commits. It doesn't know who to trust: you or the master branch?
It's your job to clarify the situation. The maintainer won't fix those conflicts for you. The best the maintainer can do is to tell you that you have merge conflicts (GitHub doesn't notify you automatically with an email, it's quite frustrating).
We assume that you've follow the section Sync your local master branch with the upstream master branch.
git checkout master
git pull
git checkout my_pretty_branch_with_merge_conflicts
git merge master
Here Git will tell you that you have merge conflicts. To fix it, open your IDE/text editor. All IDEs have tools to help you fix conflicts. Most text editors have tools too. Just google:
How to fix git conflicts with MY_IDE_OR_TEXT_EDITOR_HERE
And you'll find out how to fix them.
Once your conflicts are fixed, do:
git add .
git commit
git push
If everything worked, you should then see a nice green sign on your pull request:
I hope this small guide helps. If something isn't clear, open an issue or make a pull request!
How I would setup my local git repo if I were to work on tensorflow/addons:
git clone git@github.com:gabrieldemarmiesse/addons.git
cd addons
git remote add upstream https://github.com/tensorflow/addons.git
git fetch upstream
git branch --set-upstream-to upstream/master
git pull

# Let's do work
git checkout -b my_feature_1
git add .
git commit
git push

# Let's work on something else
git checkout master
git pull  # get the latest updates
git checkout -b my_feature_2
git add .
git commit
git pushLet's get practical. You made a pull request, do you want to wait a day for the review, three days or a week? Even a month?
I think you prefer to wait only a day to make a review round. The best is to make pull request which take only a few hours to get merged. Here is how to:
Add a link to the issue you're fixing.
If your pull request comes out of thin air, a reviewer won't understand why you do this pull request and will put it on his/her todo list instead of doing it now (procrastination).
The pull request which makes the maintainer feel good. He can just drop "LGTM" and click merge. Easy. Don't worry about it too much. It's directly linked to your programming skills and your understanding of the project you're contributing to. It gets better with time.
TL;DR: Split your pull request into smaller (independant) pull requests, as much as you can.
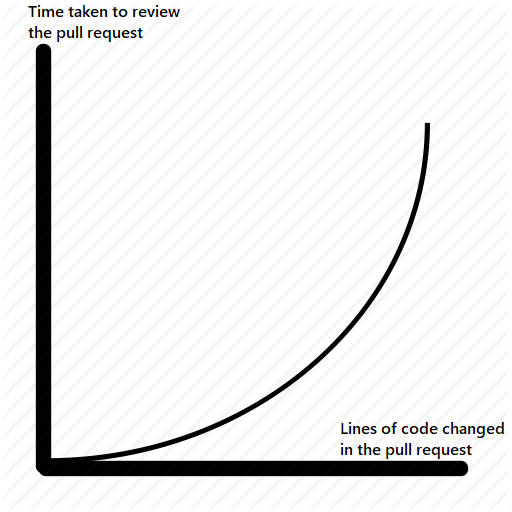
Let's take a second to look at this very serious graph, made after making and reviewing hundreds of pull requests:
Source: trust me bro
Why is it exponential? There are three main reasons, and they add up:
- It's like a big function
Let's say you want to fully understand a piece of code which is a hundred lines long. If it's in a single function, how much time do you think it will take you? Now let's say that the code is splitted into 3 functions. It's going to be much faster to understand.
The main reason is that there are less moving pieces. The time to understand a function is exponential to the number of variables/number of lines in it. After a while it just becomes impossible. It doesn't fit in your short-term memory.
- Reviewers are lazy
Like all programmers.
They see a short pull request, with a few lines changed... and they jump on it. They don't even have to correct anything. They just type the famous LGTM they click merge. And done.
They see a very big pull request, hundreds of lines of code changed, and they think "well, I'll need to sit in front of my computer for around an hour to do that. I can't even split it. I have to do the full review at once...". And they think "Let's just pretend I didn't see this pull request, another maintainer will do it.".
- Parallel processing
If the project you're contributing too have multiple maintainers, and each of them allocates half an hour per day to do code review... Do you think your pull request of 150 lines (~45min of code review) will get reviewed this day?
Now let's say that you make 3 independant pull requests of 50 lines each? Each of the maitainers will take care of one. And in a day everything is merged :)
Those three reasons add up. Keep in mind, a pull request of 5 lines takes 2~3 hours to be merged to a normal open source project (some reviewers will read it and merge it on their phone in the commute, because it takes one minute to review). Do 500 lines... Well, I hope you're ready to wait months.
I'll say it one more time:
Split your pull requests!


