oauthserver是一个基于Spring Boot Oauth2的完整的独立的Oauth2 Server微服务。仅仅需要创建相关数据表,修改数据库的连接信息,你就可以得到一个Oauth2 Server微服务。
Oauth2 Client通常是要被保护的资源,例如app接口。配套的Oauth2 Client示例可以在这里找到https://github.com/jeesun/qbankserver。
支持的关系型数据库:
- PostgreSQL
- MySQL
- Oracle
已实现的功能:
- token保存到关系型数据库;
- 获取token时,username允许传用户名、手机号或者邮箱;
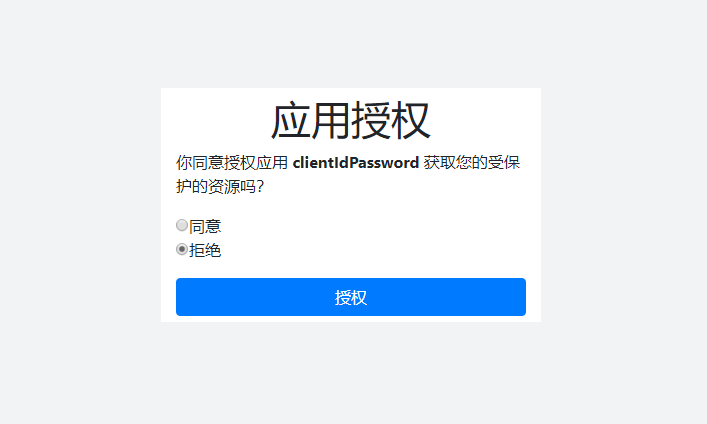
- 自定义登录页面和授权页面,token获取支持密码模式和授权码模式;
- 集成druid,并开启druid监控,访问http://localhost:8182/druid,用户名simon,密码19961120;
- 集成Mybatis,以及插件:通用Mapper,PageHelper;
- 集成swagger2,并配置非全局、无需重复输入的header参数(token),访问http://localhost:8182/swagger-ui.html,全局Authorize的值为"Bearer "+"access_token",注意"Bearer"和"access_token"之间有一个空格;
- 集成Redis缓存,默认使用Ehcache缓存,若要切换成Redis缓存,请查看
application.yml缓存配置注释; - 集成阿里大鱼(需要安装阿里大鱼jar,安装方法:运行src/main/resources/jars/install.bat);
- 代码生成器,运行
com/simon/common/code/CodeGenerator.java的main方法进行代码生成,代码生成器的配置在code-gen.properties。可生成Model、Mapper、Repository、Service、ServiceImpl、Controller。
请下载与Spring Boot对应版本的oauthserver:
| Spring Boot version | oauthserver version |
|---|---|
| 1.x.x | 1.x.x |
| 2.x.x | 2.x.x |
- 使用v2.x版本,需要修改数据表oauth_client_details的clicent_secret列的值,从明文secret改为经过Scrypt加密的字符串$2a$11$uBcjOC6qWFpxkQJtPyMhPOweH.8gP3Ig1mt27mGDpBncR7gErOuF6;
- oauthserver v1.2.0添加了阿里大鱼的发送验证码功能,需要阿里大鱼的jar,安装方法:运行src/main/resources/jars/install.bat。
- 默认使用MySQL数据库连接配置,更新MySQL连接配置以支持utf8mb4编码;
- 新增BaseController,解决接口的时间类型传输问题;
- 默认开启mybatis二级缓存;
- 新增字典表t_dict_type和t_dict_type_group,新增字典工具类DictUtil;
- 更新MySQL建表语句。
更多历史更新日志查看CHANGE_LOG.md
- PostgreSQL
请执行src/main/resources/schema-pg.sql,完成数据表的创建和测试数据的导入。 - MySQL
请执行src/main/resources/schema-mysql.sql,完成数据表的创建和测试数据的导入。 - Oracle
请执行src/main/resources/schema-oracle.sql,完成数据表的创建和测试数据的导入。
- PostgreSQL
连接信息在application-pg.yml里。修改完数据库连接信息后,还需要设置application.yml的spring.profiles.active=pg。 - MySQL
连接信息在application-mysql.yml里。修改完数据库连接信息后,还需要设置application.yml的spring.profiles.active=mysql。 - Oracle
连接信息在application-oracle.yml里。修改完数据库连接信息后,还需要设置application.yml的spring.profiles.active=oracle。
数据库连接信息的配置项username和password可以经过jasypt加密,也可以直接填明文。若要使用jasypt加密,加密密钥由jasypt.encryptor.password配置,你可以使用test目录下的UtilTests工具得到加密字符串。
现在,一切已准备就绪。运行项目,当程序成功启动时,即表明你已配置成功。
com.simon.common.config.OAuthSecurityConfig.java的clients配置如下:
@Override
public void configure(ClientDetailsServiceConfigurer clients) throws Exception {
    clients.inMemory()
            .withClient("clientIdPassword")
            .secret("$2a$11$uBcjOC6qWFpxkQJtPyMhPOweH.8gP3Ig1mt27mGDpBncR7gErOuF6") //明文secret
            .scopes("read,write,trust")
            .authorizedGrantTypes("authorization_code", "refresh_token", "password", "client_credentials")
            .authorities("ROLE_ADMIN", "ROLE_USER")
            .accessTokenValiditySeconds(7200)//access_token有效期为2小时
            .refreshTokenValiditySeconds(5184000)//refresh_token有效期为2个月60天
            .autoApprove(false);
    //clients.jdbc(dataSource);
}
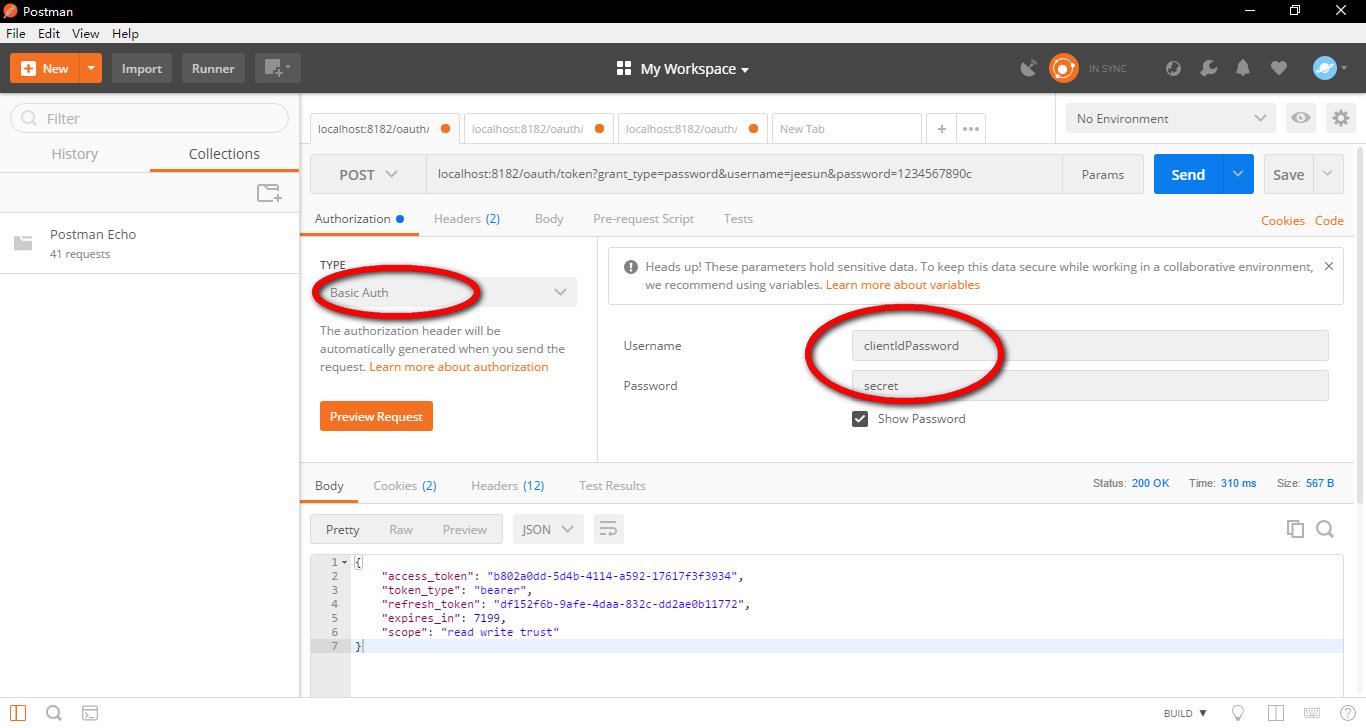
token相关的接口,都需要进行Basic Oauth认证。
如下图所示:

1、根据用户名和密码获取access_token
POST http://localhost:8182/oauth/token?grant_type=password&username=jeesun&password=1234567890c
成功示例
status=200,返回的json数据:
{
    "access_token": "ca582cd1-be6c-4a5a-82ec-10af7a8e06eb",
    "token_type": "bearer",
    "refresh_token": "c24a6143-97c8-4642-88b9-d5c5b902b487",
    "expires_in": 3824,
    "scope": "read write trust"
}
失败示例
- 用户名错误
status=400,返回的json数据:
{
    "code": 400,
    "message": "用户名不存在",
    "data": null
}- 密码错误
status=400,返回的json数据:
{
    "code": 400,
    "message": "密码错误",
    "data": null
}- 账号被封enabled=false
status=400,返回的json数据:
{
    "code": 400,
    "message": "您已被封号",
    "data": null
}
2、检查access_token
GET http://localhost:8182/oauth/check_token?token=ca582cd1-be6c-4a5a-82ec-10af7a8e06eb
成功示例
即使用户被封enabled=false,access_token未过期仍然可用。
status=200,返回的json数据:
{
    "aud": [
        "oauth2-resource"
    ],
    "exp": 1524507296,
    "user_name": "jeesun",
    "authorities": [
        "ROLE_ADMIN",
        "ROLE_USER"
    ],
    "client_id": "clientIdPassword",
    "scope": [
        "read",
        "write",
        "trust"
    ]
}
失败示例
access_token已过期
status=400,返回的json数据:
{
    "code": 400,
    "message": "Token无法识别",
    "data": null
}
3、根据refresh_token获取新的access_token
成功示例
status=200,返回的json数据:
{
    "access_token": "690ecd7d-f2b7-4faa-ac45-5b7a319478e8",
    "token_type": "bearer",
    "refresh_token": "c24a6143-97c8-4642-88b9-d5c5b902b487",
    "expires_in": 7199,
    "scope": "read write trust"
}
失败示例
用户被封enabled=false
status=401,返回的json数据:
{
    "code": 401,
    "message": "用户已失效",
    "data": null
}
4、根据授权码获取token
POST http://localhost:8182/oauth/authorize?response_type=code&client_id=clientIdPassword&scope=read&redirect_uri=http://www.baidu.com

同意授权,跳转到https://www.baidu.com/?code=jgA1h3,jgA1h3就是授权码。
使用授权码获取token:
POST http://localhost:8182/oauth/token?grant_type=authorization_code&code=jgA1h3&redirect_uri=http://www.baidu.com
成功示例
status=200,返回的json数据:
{
    "access_token": "ca582cd1-be6c-4a5a-82ec-10af7a8e06eb",
    "token_type": "bearer",
    "refresh_token": "c24a6143-97c8-4642-88b9-d5c5b902b487",
    "expires_in": 3824,
    "scope": "read write trust"
}接口参数添加locale,值为语言区域,例如zh_CN,zh_CH,en_US。
app获取到token信息后,需要保存token信息和请求时间。在传access_token之前,需要检查access_token是否过期。为了减少后台压力,检查access_token是否过期应该是在app本地完成。通过token的keyexpires_in(剩余有效期)的值,以及本地记录的请求时间,和当前时间做对比,可以很方便地判断出access_token是否过期。如果过期了,需要通过refresh_token获取新的access_token。因为access_token的有效期只有2个小时,这个验证是必须的。
refresh_token同理。


