This repository contains firmware for the Pocket Science Lab (PSLab) open hardware platform. Hardware version 5 and 6 are supported.
![]()


The PSLab provides an array of test and measurement instruments for doing science and engineering experiments. Its built-in instruments include an oscilloscope, a waveform generator, a frequency counter, programmable voltage and current sources, and a logic analyzer. The PSLab also has UART, I2C, and SPI buses, via which external devices can be connected and controlled.
The PSLab is a fully open device, and FOSSASIA provides a complete hardware and software stack under open source licenses:
-
You can get a Pocket Science Lab device from the FOSSASIA shop
-
More resellers are listed on the PSLab website
- The PSLab chat channel is on Gitter
- Please also join us on the PSLab Mailing List
The following tools are required to build the firmware:
- xc16 compiler
- cmake
This project is built with CMake. After cloning this repository, you must first initialize and update the toolchain submodule:
git submodule init
git submodule update
This will populate the external/cmake-microchip directory, after which the
firmware can be built:
mkdir build
cd build
cmake ..
make
This will create a build artifact in the build directory:
pslab-firmware.hex.
The firmware can be flashed over USB or by using a programmer such as the PICkit3.
Firmware can be flashed over USB if the device already has the bootloader installed.
Flashing the firmware requires the pslab-python library. See pslab-python for installation instructions.
Follow these steps to flash new firmware:
-
If using PSLab v5, see Entering bootloader mode on PSLab v5
-
Press and hold the 'BOOT' button
-
Press the 'RESET' button
-
The 'Status' LED should start blinking, indicating that the device is in bootloader mode
-
Release the 'BOOT' button
-
-
Run
pslab flash --port <portname> firmware.hex -
After flashing is complete, reset or power cycle the device
Warning If your device contains a bootloader, flashing just the firmware HEX with a programmer will OVERWRITE the bootloader. If for some reason you are unable to flash over USB, it is a better idea to first create a combined HEX file containing both the bootloader and the firmware and flash that, rather than flashing the pure firmare HEX. See the bootloader repository for instructions on how to create a combined HEX.
Flashing with a programmer requires the mdb.sh script, which is distributed as
part of Microchip's MPLAB-X software suite. On Linux, the default installation
path for mdb.sh is /opt/microchip/mplabx/<version>/mplab_platform/bin/mdb.sh.
This script is used to run the file flash.mdbscript, located in the repository
root. Before following the below steps, you may need to modify flash.mdbscript
depending on which programmer you are using and the location of the firmware
HEX.
- Disconnect the device from any power source
- Connect the programmer to the device's ICSP header
- Power on the device via USB
- Run
mdb.sh flash.mdbscript - Disconnect the programmer
The PSLab v5 lacks the BOOT button which is used to enter bootloader mode on the v6. The pin which is connected to the BOOT button on the v6 is present, however. It is therefore possible to enter bootloader mode on the v5 by following these steps.
Note The PSLab v5 does not come with the bootloader preinstalled. These steps will have no effect unless you have already installed the bootloader as described here.
-
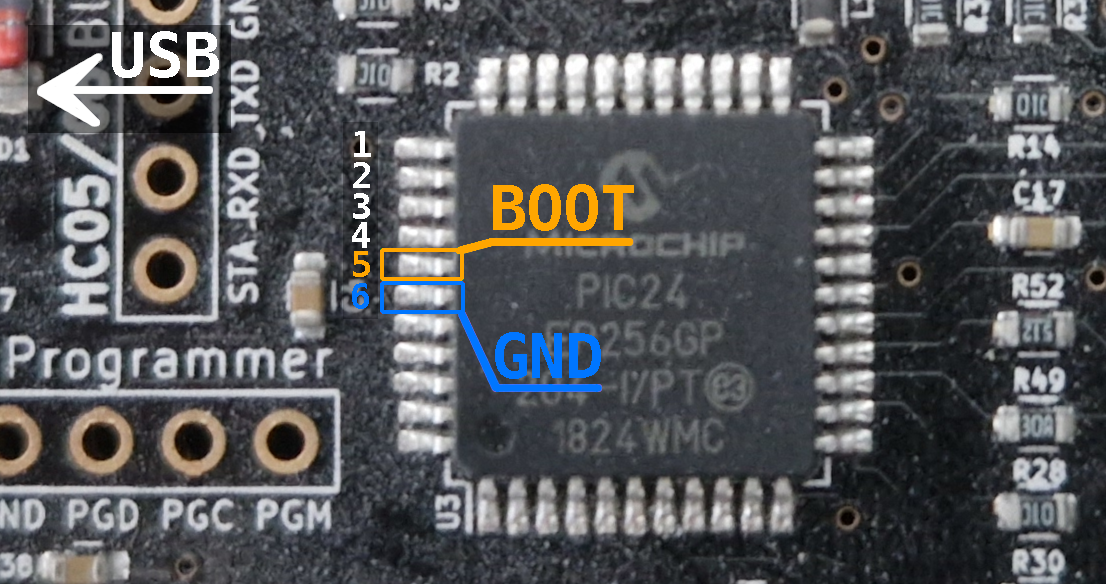
With the USB port to the top left of the board, the 5:th pin on the MCU's left side is the BOOT pin, counting from the top. Immediately below it (6:th from the top) is a conveniently located GND pin:
-
Bridge these pins by touching both simultaneously with a small piece of metal, such as the tip of a jump wire or a paper clip.
-
Reset or power cycle the device. The v5 lacks a RESET button, but you can soft-reset it through
pslab-python:import pslab pslab.ScienceLab().reset()
-
The BOOT and GND pins must be bridged when the reset / power cycle happens. If you did it right the SYSTEM LED will start blinking, indicating that the PSLab is in bootloader mode.

📦pslab-firmware
 ┣ 📂src                        # PSLab firmware source code
 ┃ ┣ 📂bus                      # Communication specific source files
 ┃ ┃ ┣ 📜 ...
 ┃ ┃ ┗ 📜i2c.c
 ┃ ┣ 📂helpers                  # Supplementary functions
 ┃ ┃ ┣ 📜 ...
 ┃ ┃ ┗ 📜version.c
 ┃ ┣ 📂instruments              # Instrument specific source files
 ┃ ┃ ┣ 📜 ...
 ┃ ┃ ┗ 📜multimeter.c
 ┃ ┣ 📂registers                # PIC specific register entry files
 ┃ ┃ ┣ 📂comparators
 ┃ ┃ ┃ ┣ 📜 ...
 ┃ ┃ ┃ ┗ 📜ic1.c
 ┃ ┃ ┣ 📂 ...                   # includes converters, memory, system
 ┃ ┃ ┣ 📂timers
 ┃ ┃ ┃ ┣ 📜 ...
 ┃ ┃ ┃ ┗ 📜tmr1.c
 ┃ ┣ 📂sdcard                   # SD Card specific file handling source files
 ┃ ┣ 📜 ...
 ┃ ┣ 📜main.c                   # Entry point to PSLab Core
 ┃ ┣ 📜commands.c               # Entry point to function implementations
 ┣ 📂external
 ┃ ┣ 📂cmake-microchip          # Toolchain submodule
 ┣ 📜CMakeLists.txt
 ┣ 📜flash.mdbscript
 ┣ 📜LICENSE
 ┗ 📜README.md