Combining the power of Quasar and Feathers to build real-time web apps
A couple of days ago I 've started looking at what could be the foundation to build good-looking real-time web apps for new projects. Starting from a Angular 1.x background I was looking for something based on new Javascript standards (TypeScript, ES2015, ES2016, etc.), lightweight and easy to learn, as well as having less to do with the big players. I found Vue.js that mostly satisfy all these criteria. However, it missed a built-in component library, which brings me naturally to find Quasar.
Then I looked for something similar to handle the most basic tasks of creating real-time web apps on the server-side, I dreamed of a framework handling indifferently REST/socket API calls, with built-in support for most authentication schemes, being database/transport agnostic so that I could develop microservices powering different technologies. I naturally found Feathers, which additionnaly provides all of this with a plugin based architecture around a minimalist core.
I decided to start building a basic real-time chat app intensively inspired from https://github.com/feathersjs/feathers-chat (many thanks to the Feathers team for their great material):
Contributors
This tutorial has been enhanced and maintained thanks to the following contributors:
Disclaimer
Although this tutorial details the path to create an application skeleton featuring Quasar and Feathers from scratch, as well as code details, most of this work is currently under integration in the Quasar ecosystem. Indeed, Quasar provides the wrapper concept which allows to plug the frontend app into a larger piece of work such as Electron or Express powered backend. The simplest way to retrieve an up-to-date version and start with this application skeleton is to use the Quasar Feathers wrapper guide https://github.com/quasarframework/quasar-wrapper-feathersjs-api.
You can also download the source code of the app by cloning this repo and jump in the quasar-feathers directory:
npm/yarn install -g quasar-cli
git clone https://github.com/claustres/quasar-feathers-tutorial
cd quasar-feathers-tutorial
cd quasar-feathers
npm/yarn install
quasar dev
// Then in another terminal
cd api
npm/yarn install
npm run dev
Open your browser on localhost:8080.
Last but not least, I assume your are familiar with the Vue.js and Node.js ecosystem.
Installation and configuration
This tutorial has been upgraded to Quasar version 0.15.10 and Feathers version 3.1.0 (Buzzard).
This tutorial has been initially made with Quasar version 0.13.4 and Feathers version 2.1.1. You can find previous version in the releases.
Feel free to submit any problem by opening an Issue or upgrade the code with a Pull Request.
Each framework provides its own CLI so that starting a project is easy, with a couple of instructions you have everything ready to start coding your app.
Quasar for the frontend:
$ npm install -g quasar-cli
$ quasar create quasar-feathers
$ cd quasar-feathers
$ npm install
// Will launch the frontend server in dev mode on 8080
$ quasar dev
Feathers for the backend in the app root directory:
$ npm install -g @feathersjs/cli
$ mkdir api
$ cd api
// For latest Feathers (Auk release)
$ feathers generate app
$ feathers generate authentication
// For legacy Feathers (Pre-Auk releases)
$ feathers generate
// Will launch the backend server in dev mode on 3030
$ npm start
The default NeDB datastore is fine for our tutorial because it does not rely on any third-party DB software to be installed. Because we generated the Feathers boilerplate with authentication we already have a user service providing CRUD operations as well. But as we want to develop a chat application we miss a message service so we generate it in the backend folder:
feathers generate serviceProvide the following answers after issuing the feathers generate service command:
? What kind of service is it? NeDB
? What is the name of the service? messages
? Which path should the service be registered on? /messages
? Does the service require authentication? Yes
? What is the database connection string? nedb://../data
force config/default.json
create src/services/messages/messages.service.js
force src/services/index.js
create src/models/messages.model.js
create src/services/messages/messages.hooks.js
create test/services/messages.test.js
API glue
Feathers provides you with a thin layer on the client-side to make API authentication and calls so simple. We create a new src/api.js file in the frontend to handle the glue with the API:
import feathers from '@feathersjs/feathers'
import socketio from '@feathersjs/socketio-client'
import auth from '@feathersjs/authentication-client'
import io from 'socket.io-client'

const socket = io('http://localhost:3030', {transports: ['websocket']})

const api = feathers()
  .configure(socketio(socket))
  .configure(auth({ storage: window.localStorage }))

api.service('/users')
api.service('/messages')

export default api
Now the API is easy to integrate in any component to perform the various tasks we need, e.g.:
import api from 'src/api'
const users = api.service('users')
// Authenticate
api.authenticate({
  strategy: 'local',
  email: email,
  password: password
}).then(_ => {
  Toast.create.positive('Authenticated')
})
// Get all users
users.find().then((response) => {
  this.$data.users = response.data
})
// Listen to user events
users.on('created', user => {
  this.$data.users = this.$data.users.concat(user)
})
Main layout
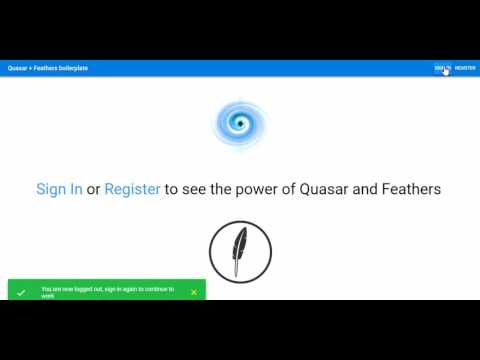
From a end-user perspective the application will be simple:
- a menu toolbar including (src/layouts/MyLayout.vue component)
- a sign in/register entry when not connected
- home/chat entries and a signout menu to logout when connected
- a sidebar menu recalling the home/chat entries and a about section
- a landing home page displaying different text depending on the connection state (src/pages/Home.vue component)
- a signin/register form with email/password (src/pages/SignIn.vue component)
- a chat view listing available users and providing real-time messages read/write (src/pages/Chat.vue component)
The main app layout is already part of the Quasar default template so we will directly modify it but additional components can be generated using the CLI:
$ quasar new page Home
$ quasar new page SignIn
$ quasar new page Chat
We update the layout of the src/layouts/MyLayout.vue template to include a Toolbar with some entries, a logout button, a Sidebar menu and an entry point for other components:
 <q-layout>
   <q-layout-header>
     <q-toolbar
       color="primary"
       :glossy="false"
       :inverted="$q.theme === 'ios'"
     >
       <q-btn
         flat
         dense
         round
         aria-label="Menu"
         @click="leftDrawerOpen = !leftDrawerOpen"
         v-show="authenticated"
       >
         <q-icon name="menu" />
       </q-btn>

       <q-toolbar-title>
         Quasar + Feathers boilerplate
       </q-toolbar-title>

       <q-btn flat @click="goTo('signin')" v-show="!authenticated">
         Sign In
       </q-btn>
       <q-btn flat @click="goTo('register')" v-show="!authenticated">
         Register
       </q-btn>
       <q-btn flat round @click="goTo('home')" v-show="authenticated">
         <q-icon name="home" />
         <q-tooltip anchor="bottom middle" self="top middle" :offset="[0, 20]">Home</q-tooltip>
       </q-btn>
       <q-btn flat round @click="goTo('chat')" v-show="authenticated">
         <q-icon name="chat" />
         <q-tooltip anchor="bottom middle" self="top middle" :offset="[0, 20]">Chat</q-tooltip>
       </q-btn>
       <q-btn flat round @click="signout" v-show="authenticated">
         <q-icon name="exit_to_app" />
         <q-tooltip anchor="bottom middle" self="top middle" :offset="[0, 20]">Signout</q-tooltip>
       </q-btn>

     </q-toolbar>
   </q-layout-header>

   <q-layout-drawer
     v-model="leftDrawerOpen"
     v-show="authenticated"
     no-hide-on-route-change
     :content-class="$q.theme === 'mat' ? 'bg-grey-2' : null">

     <q-list
       no-border
       link
       inset-delimiter
     >

       <q-item to="/home">
         <q-item-side icon="home" />
         <q-item-main label="Home" />
       </q-item>

       <q-item to="/chat">
         <q-item-side icon="chat" />
         <q-item-main label="Chat" />
       </q-item>

       <q-collapsible icon="info" label="About">
         <p style="padding: 25px;" class="text-grey-7">
           This is a template project combining the power of Quasar and Feathers to create real-time web apps.
         </p>
       </q-collapsible>

     </q-list>
   </q-layout-drawer>

   <q-page-container>
     <router-view :user="user"></router-view>
   </q-page-container>
 </q-layout>
We update the router configuration in src/router/routes.js to reflect this as well:
export default [
  {
    path: '/',
    component: () => import('layouts/default'),
    children: [
      { path: '/home', name: 'home', component: () => import('pages/Home') },
      { path: '/signin', name: 'signin', component: () => import('pages/SignIn') },
      { path: '/register', name: 'register', component: () => import('pages/SignIn') },
      { path: '/chat', name: 'chat', component: () => import('pages/Chat'), meta: { requiresAuth: true } }
    ]
  },

  { // Always leave this as last one
    path: '*',
    component: () => import('pages/404')
  }
]
We set a requiresAuth: true flag in the meta property of the 'chat' route. This is used to implement a Vue "router guard" which enforces authentication on the Chat page (the Chat page should only be accessible after the user logs in).
The router guard goes into the src/router/index.js file and consists of a router.beforeEach method which accepts three parameters (to, from and next), as shown below.
...
// Import the client 'auth' module which allows us to check if there's an authenticated user
import auth from 'src/auth'
...
router.beforeEach((to, from, next) => {

  if (!to.meta.requiresAuth || auth.authenticated()) {
    // All is okay, let the route change continue
    next()
  } else {
    console.log('Not authenticated')
    // Cancel the route change and redirect back to the Home page
    next({ path: '/home' })
  }
})
...
The to parameter is the route which we are trying to navigate to, from is the route we're coming from, and next is a callback function which we'll call to determine the outcome of the route change attempt. Consult this page for details.
If we see that the route that we try to navigate to requires authentication (this is the meta.requiresAuth property which we've set in src/router/index.js), then we check if there is an authenticated user. If there isn't, then we cancel the navigation attempt, and redirect back to the Home page (from where the user can log in) by calling next({ path: '/home' }).
The 'auth' module which we use to check if there's an authenticated user will be created later.
Authentication
Backend
In the boilerplate a local authentication strategy has been setup based on a JSON Web Token in api/src/authentication.js:
const authentication = require('@feathersjs/authentication')
const jwt = require('@feathersjs/authentication-jwt')
const local = require('@feathersjs/authentication-local')

module.exports = function() {
  const app = this
  const config = app.get('authentication')

  // Set up authentication with the secret
  app.configure(authentication(config))
  app.configure(jwt())
  app.configure(local())
  // The `authentication` service is used to create a JWT.
  // The before `create` hook registers strategies that can be used
  // to create a new valid JWT (e.g. local or oauth2)
  app.service('authentication').hooks({
    before: {
      create: [
        authentication.hooks.authenticate(config.strategies)
      ],
      remove: [
        authentication.hooks.authenticate('jwt')
      ]
    }
  })
}
Frontend
We create a new src/auth.js file in the frontend to manage authentication and keep track of the logged in user. This module acts as a simple wrapper around the Feathers authentication API, which makes the Vue components a bit simpler. We also used it in the Vue router guard, to determine if there is an authenticated user (see before).
// Import the Feathers client module that we've created before
import api from 'src/api'

const auth = {

  // keep track of the logged in user
  user: null,

  getUser() {
    return this.user
  },

  fetchUser (accessToken) {

    return api.passport.verifyJWT(accessToken)
      .then(payload => {
        return api.service('users').get(payload.userId)
      })
      .then(user => {
        return Promise.resolve(user)
      })
  },

  authenticate () {

    return api.authenticate()
      .then((response) => {
        return this.fetchUser(response.accessToken)
      })
      .then(user => {
        this.user = user
        return Promise.resolve(user)
      })
      .catch((err) => {
        this.user = null
        return Promise.reject(err)
      })
  },

  authenticated () {
    return this.user != null
  },

  signout () {

    return api.logout()
      .then(() => {
        this.user = null
      })
      .catch((err) => {
        return Promise.reject(err)
      })
  },

  onLogout (callback) {

    api.on('logout', () => {
      this.user = null
      callback()
    })
  },

  onAuthenticated (callback) {

    api.on('authenticated', response => {
      this.fetchUser(response.accessToken)
      .then(user => {
        this.user = user
        callback(this.user)
      })
      .catch((err) => {
        callback(this.user)
      })
    })
  },

  register (email, password) {
    return api.service('users').create({
      email: email,
      password: password
    })
  },

  login (email, password) {
    return api.authenticate({
      strategy: 'local',
      email: email,
      password: password
    })
  }

}

export default auth
On the frontend we setup the src/pages/SignIn.vue component as a basic dialog with e-mail/password inputs:
<template>
  <q-page class="flex flex-center">
    <q-dialog v-model="showDialog" :title="title" @ok="onOk" @hide="onHide" >
      <div slot="body">
        <div class="row q-mb-md">
          <q-input
            v-model="email" type="email" name="email" stack-label="E-mail" class="full-width" autofocus
          />
        </div>
        <div class="row">
          <q-input
            v-model="password" type="password" name="email" stack-label="Password" class="full-width"
          />
        </div>
      </div>
    </q-dialog>
  </q-page>
</template>

<script>
import auth from 'src/auth'

export default {
  data () {
    return {
      showDialog: true,
      email: null,
      password: null,
      title: null
    }
  },
  computed: {
  },
  methods: {
    goHome() {
      this.$router.push({ name: 'home' })
    },
    onHide() {
      // Workaround needed because of timing issues (sequencing of 'hide' and 'ok' events) ...
      setTimeout(() => {
        this.goHome()
      }, 50)

    },
    onOk(data) {
      if (this.isRegistration()) {
        this.register(this.email, this.password)
          .then(() => {
            return this.login(this.email, this.password)
          })
          .then(_ => {
            this.$q.notify({type: 'positive', message: 'You are now logged in'})
          })
          .catch(_ => {
            this.$q.notify({type: 'positive', message: 'Cannot register, please check your e-mail or password'})
            this.goHome()
          })
      } else {
        this.login(this.email, this.password)
          .then(_ => {
            this.$q.notify({type: 'positive', message: 'You are now logged in'})
          })
          .catch(_ => {
            this.$q.notify({type: 'positive', message: 'Cannot sign in, please check your e-mail or password'})
            this.goHome()
          })
      }
    },
    isRegistration () {
      return this.$route.name === 'register'
    },
    register (email, password) {
      return auth.register(email, password)
    },
    login (email, password) {
      return auth.login (email, password)
    }
  },
  mounted () {
    this.title = this.isRegistration() ? 'Register' : 'Sign In'
  },
  beforeDestroy () {
  }
}
</script>

<style lang="styl">
</style>
We manage registration as well as login, depending on the route used to reach the component.
The component's login and register method simply delegate to the login/register methods of the auth module that we've created before.
Once connected, the user should land on the home page then be able to navigate in the app, so that in the main layout we have to track the login state as the currently connected user in $data.user (null if not logged in). We will also manage logout from the profile menu entry and restoring the previous session if any by trying to authenticate on mounting src/layouts/MyLayout.vue:
import auth from 'src/auth'

export default {
  name: 'index',
  components: {
  },
  data () {
    return {
      leftDrawerOpen: this.$q.platform.is.desktop,
      user: null
    }
  },
  computed: {
    authenticated () {
      return this.$data.user !== null
    }
  },
  methods: {
    goTo (route) {
      this.$router.push({ name: route })
    },
    signout () {
      auth.signout()
        .then(() => {
          this.$q.notify({type: 'positive', message: 'You are now logged out, sign in again to continue to work'})
        })
        .catch(() => {
            this.$q.notify({type: 'positive', message: 'Cannot logout, please check again in a few minutes'})
        })
    },
    setUser (user) {
      this.$data.user = user
    }
  },
  mounted () {
    // Check if there is already a session running
    auth.authenticate()
    .then((user) => {
      this.setUser(user)
      this.$q.notify({type: 'positive', message: 'Restoring previous session'})
    })
    .catch(_ => {
      this.setUser(null)
      this.$router.push({ name: 'home' })
    })

    // On successful login
    auth.onAuthenticated((user) => {
      this.setUser(user)
      this.$router.push({ name: 'home' })
    })

    // On logout
    auth.onLogout(() => {
      this.setUser(null)
      this.$router.push({ name: 'home' })
    })
  },
  beforeDestroy () {
  }
}
We make the current user available to sub components easily using a user prop in the default layout template:
<router-view :user="user"></router-view>Real-time chat
Now most of the skeleton is in place the main feature of our app remains to be developed.
Backend
In the boilerplate we generated a basic model for our messages and datastore in api/src/models/messages.model.js:
const NeDB = require('nedb')
const path = require('path')

module.exports = function(app) {
  const dbPath = app.get('nedb')
  const Model = new NeDB({
    filename: path.join(dbPath, 'messages.db'),
    autoload: true
  })

  return Model
}
We then add a hook in api/src/hooks/process-message.js to automatically process messages on creation in order to:
- do some basic escaping of the content
- add the creation date
- add the ID of the user that created it
module.exports = function() {
return function(hook) {
// The authenticated user
const user = hook.params.user
// The actual message text
const text = hook.data.text
// Messages can't be longer than 400 characters
.substring(0, 400)
// Do some basic HTML escaping
.replace(/&/g,'&').replace(/</g,'<').replace(/>/g,'>')
// Override the original data
hook.data = {
text,
// Set the user id
userId: user._id,
// Add the current time via `getTime`
createdAt: new Date().getTime()
}
// Hooks can either return nothing or a promise
// that resolves with the `hook` object for asynchronous operations
return Promise.resolve(hook)
}
}We include this hook for our messages, as well as the one for authentication and the one to automatically populate the user that created the message, in api/src/services/messages/messages.hooks.js:
const { authenticate } = require('@feathersjs/authentication').hooks
const { populate } = require('feathers-hooks-common')
const processMessage = require('../../hooks/process-message')

module.exports = {
  before: {
    all: [ authenticate('jwt') ],
    find: [],
    get: [],
    create: [ processMessage() ],
    update: [ processMessage() ],
    patch: [ processMessage() ],
    remove: []
  },
  after: {
    all: [
      populate({
        schema: {
          include: [{
            service: 'users',
            nameAs: 'user',
            parentField: 'userId',
            childField: '_id'
          }]
        }
      })
    ],
    ...
  },
  error: {
    ...
  }
}
One more hook in api/src/hooks/gravatar.js will help us provide each user with his Gravatar in order to have a beautiful picture in the chat view:
// We need this to create the MD5 hash
const crypto = require('crypto')
// The Gravatar image service
const gravatarUrl = 'https://s.gravatar.com/avatar'
// The size query. Our chat needs 60px images
const query = 's=200'

module.exports = function() {
  return function(hook) {
    // The user email
    const { email } = hook.data
    // Gravatar uses MD5 hashes from an email address to get the image
    const hash = crypto.createHash('md5').update(email).digest('hex')
    hook.data.avatar = `${gravatarUrl}/${hash}?${query}`
    // Hooks can either return nothing or a promise
    // that resolves with the `hook` object for asynchronous operations
    return Promise.resolve(hook);
  }
}
We include this hook for our users, as well as the one for authentication (except to be able to create a user when registering), in api/src/services/users/users.hooks.js:
const { authenticate } = require('@feathersjs/authentication').hooks
const { hashPassword, protect } = require('@feathersjs/authentication-local').hooks;
const commonHooks  = require('feathers-hooks-common')
const gravatar = require('../../hooks/gravatar')

module.exports = {
  before: {
    all: [],
    find: [ authenticate('jwt') ],
    get: [ authenticate('jwt') ],
    create: [hashPassword(), gravatar()],
    update: [ authenticate('jwt') ],
    patch: [ authenticate('jwt') ],
    remove: [ authenticate('jwt') ]
  },
  after: {
    all: [
      commonHooks.when(
        hook => hook.params.provider,
        protect('password')
      )
    ],
    ...
  },
  error: {
    ...
  }
}
Frontend
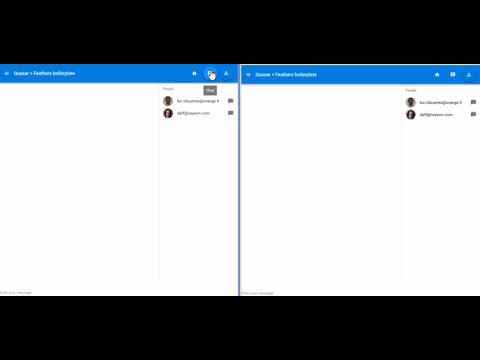
Helpfully Quasar comes with a built-in chat component that we will use to display our messages. We will also use the built-in list to list available people. Last, we will use a simple text input to send messages in the chat room. Inside the component these data are respectively stored in $data.messages, $data.users, $data.message. The final template of the src/pages/Chat.vue component is thus the following:
  <q-page class="flex flex-center">
      <div class="row full-width">
        <div class="layout-padding col-8" >
          <q-chat-message v-for="message in messages" :key="message.id"
            :text="[message.text]"
            :avatar="message.user.avatar"
            :stamp="messageDate(message)"
            :sent="isSent(message) ? true : false"
          />
        </div>
        <q-list highlight class="col-auto">
          <q-list-header>People</q-list-header>
          <q-item v-for="user in users" :key="user.id">
            <q-item-side :avatar="user.avatar" />
            <q-item-main>
              <q-item-tile label>{{user.email}}</q-item-tile>
            </q-item-main>
            <q-item-side right>
              <q-item-tile icon="chat_bubble" color="green" />
            </q-item-side>
          </q-item>
        </q-list>
      </div>
    <q-input
        class="row col-12 fixed-bottom chat-message"
        style="z-index: 1001; margin-top: 16px; margin-bottom: 8px;"
        v-model="message"
        v-on:keyup.enter="send"
        type="textarea"
        float-label="Enter your message"
        :min-rows="1"
      />
  </q-page>
As you can see we rely on the Quasar positioning classes to make the message input be fixed at the bottom of the page.
Retrieving messages/users on mount and in real-time is a piece of cake in src/pages/Chat.vue:
...
  mounted () {
    const messages = api.service('messages')
    const users = api.service('users')

    // Get all users and messages
    messages.find({
      query: {
        $sort: { createdAt: -1 },
        $limit: 25
      }
    })
      .then((response) => {
        // We want the latest messages but in the reversed order
        this.$data.messages = response.data.reverse()
      })
    users.find()
      .then((response) => {
        this.$data.users = response.data
      })

    // Add new messages to the message list
    messages.on('created', message => {
      console.log('message received')
      this.$data.messages.unshift(message)
    })
    // Add new users to the user list
    users.on('created', user => {
      console.log('user received')
      this.$data.users = this.$data.users.concat(user)
    })
  }
...
Conclusion
I hope that, like me, you measure the power of Quasar and Feathers to create beautiful real-time apps in seconds !