PLEASE NOTE This repository is deprecated and will not be updated. Please see https://docs.payone.com/display/public/INT/A+Simple+PAYONE+Integration+in+PHP for the current guide
- Prerequisites
- Communication principles
- Where to go from here
- Redirect payment methods
- Credit Card Payments
- Examples
- Try it out
- PHP 5.4 or higher (https://secure.php.net/)
- Composer (https://getcomposer.org/download/)
- A PAYONE account or test account (https://www.payone.com/kontakt/)
Communication from your server to our platform is performed by sending key-value-pairs per HTTP Post over a secure channel. In return, your application will receive a response string containing the result of your request. For sending the request to us, we recommend using a cURL wrapper that sends an array as key-value-pairs. The response are key value pairs delimited by EOL breaks, which can easily be parsed into an array. See Payone.php for Details.
For a detailed description of every parameter please refer to the Server API Description.
For every request to our platform, a set of default parameters is needed:
$defaults = array(
    "aid" => "your_account_id",
    "mid" => "your_merchant_id",
    "portalid" => "your_portal_id",
    "key" => hash("md5", "your_secret_portal_key"), // the key has to be hashed as md5
    "api_version" => "3.8",
    "mode" => "test", // can be "live" for actual transactions
    "encoding" => "UTF-8",
    "integrator_name" => "name_of_the_surrounding_application",
    "integrator_version" => "version_of_the_surrounding_application",
    "solution_name" => "your_name_here",
    "solution_version" => "version_of_the_payone_integration"
);
These parameters identify you as a merchant and ensure that only authorized API requests are processed by our platform. The integrator_* and solution_* parameters provide us with statistical data, which integrations are in use and where.
Additionally, some information about the customer can be transmitted, for instance received from your shop application or ERP system:
$personalData = array(
    "salutation" => "Mr.",
    "firstname" => "Henry",
    "lastname" => "Tudor", // mandatory
    "street" => "Royal Street 1",
    "zip" => "24118",
    "city" => "Kiel",
    "country" => "DE", // mandatory
    "email" => "henry.viii@tudor.gov.uk",
    "birthday" => "19700204",
    "language" => "de"
);
For details about the individual parameters and more parameters that are available but not listed here, please refer to the Server API Description.
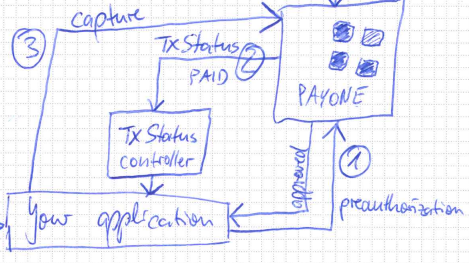
Usually, processing payment is a three step process. In the first step, the account receivable is initiated. During the second step, we wait for the payment to be asynchronously confirmed, if applicable. Then, in a final step, the receivable is booked and the money collected. The following data is needed to complete our initiation request:
$prepayment = array(
    "clearingtype" => "vor", // prepayment
    "reference" => "your_unique_reference", // a unique reference, e.g. order number
    "amount" => "10000", // amount in smallest currency unit, i.e. cents
    "currency" => "EUR",
    "request" => "preauthorization" // create account receivable
);
Then, the request can easily be merged together and sent to the platform using the simple functions from the Payone class:
$request = array_merge($defaults, $personalData, $prepayment);
$response = Payone::sendRequest($request);
You'll receive a status response informing you whether the request was successful and if not, about the cause of the error. However, if your API credentials were correct, you'll have received a status=APPROVED response. In any successful response you'll always receive a transaction ID parameter txid. This parameter is vital for any further communication about that transaction. Specifically to the prepayment clearing type, you'll receive bank account details. The customer has to know these bank account details to be able to wire the money to that account.
Depending on the payment method chosen, the confirmation of the customer's payment can be instant or take up to several days. Once we have new information about the transaction, we'll send a transaction status query to the URL configured in the PAYONE Merchant Interface. This status notification should be processed by your application in a separate controller, which should only be accessible from our platform (i.e. only from our IPv4 subnet). To prevent any tampering with the notification and minimize the danger of man-in-the-middle attacks, we highly recommend making this controller available through a secure connection only. Our platform expects a TSOK string as a confirmation that the notification has been received, if the TSOK hasn't been sent within 10 seconds, our platform will abandon the notification and try again at a later time.
// you'll need to include the $defaults array somehow, or at least get the key from a secret configuration file
if ($_POST["key"] == hash("md5", $defaults["key"])) {
    // key is valid, this notification is for us
    echo "TSOK";
    /**
     * Most likely the notification will contain something like $_POST["txaction"] == "paid"
     * but it can also include other parameters not used here. Usually you'd log them and
     * update your order status accordingly. Refer to the Server API Description, section 4.2
     * for details about the transaction status notification.
     */
    if ($_POST["txaction"] == "paid") {
        // update your transaction accordingly, e.g. by $_POST["reference"]
    }
}
N.B. our platform does not follow HTTP 30x or any other form of redirects.
Once the transaction has been paid, the funds can be captured and the order is ready for shipping. Capturing indicates that the order should be finalized in terms of bookkeeping and, if applicable, that the money can be transferred (i.e. for credit card payments or direct debit, see below):
// again, the default values will be needed
$capture = array(
    "request" => "capture",
    "txid" => "your_txid",
    "sequencenumber" => "previous_sequencenumber_plus_one", // get this from the last received transactionsstatus
    "amount" => "your_amount", // you can either capture the full amount of the tx, or less
    "currency" => "EUR"
);
$request = array_merge($defaults, $capture);
$response = Payone::sendRequest($request);
if ($response["status"] == "APPROVED") {
    // order is paid, amount is booked, ship the item!
}
The sequencenumber parameter ensures that all transaction status notifications have been processed before new requests can be sent to our API. It is incremented with each pair of request and transaction status notification. For the preauthorization request it is always implied as 0 and must not be sent.
This intro is just the tip of the iceberg. For online bank transfer like Sofort.com, for instance, you'll need to redirect the customer to an URL specified in the response. For credit card processing, you'll need to setup a HTML container for input fields made available through our invisible iFrame integration and make sure your system never comes in contact with genuine credit card data. PAYONE will provide you with a pseudo card number that you can use to preauthorize and capture transactions just like in the examples above.
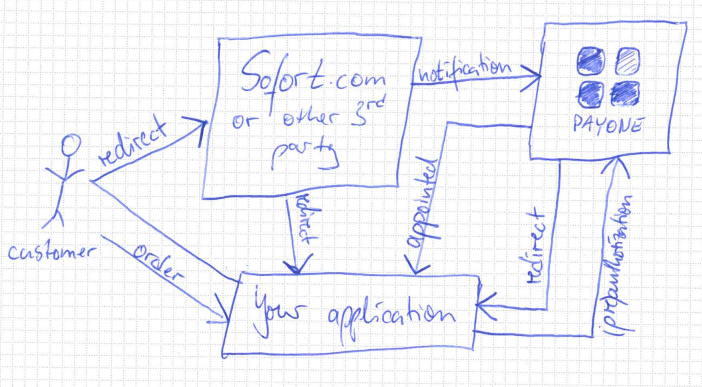
Sometimes, payment methods require information from the customer on 3rd party websites. Usually this is the case if the customer needs to enter transaction credentials, such as username/password or a TAN. Once you have acquainted yourself with the basic transaction principles outlined in the 1 Getting started tutorial, you're ready to tackle these payment methods. This is, again, a three step process: Preparing the (pre-)authorization, redirecting the customer, and verifying the transaction status.
For the authorization, we'll rely on the Payone::sendRequest() function as before. So first, we need the $defaults and $personalData arrays:
$defaults = array(
    "aid" => "your_account_id",
    "mid" => "your_merchant_id",
    "portalid" => "your_portal_id",
    "key" => hash("md5", "your_secret_portal_key"), // the key has to be hashed as md5
    "api_version" => "3.8",
    "mode" => "test", // can be "live" for actual transactions
    "encoding" => "UTF-8"
);
$personalData = array(
    "salutation" => "Mr.",
    "firstname" => "Henry",
    "lastname" => "Tudor",
    "street" => "Royal Street 1",
    "zip" => "24118",
    "city" => "Kiel",
    "country" => "DE",
    "email" => "henry.viii@tudor.gov.uk",
    "birthday" => "19700204",
    "language" => "de"
);
However, a couple of new parameters need to be introduced:
$onlineTransfer = array(
    "clearingtype" => "sb", // sb means online bank transfer
    "reference" => "your_unique_reference",
    "amount" => "10000", // amount in smallest currency unit, i.e. cents
    "currency" => "EUR",
    "request" => "authorization", // create account receivable and instantly book the amount
    "onlinebanktransfertype" => "PNT", // this is the type for Sofort.com
    "bankcountry" => "DE", // we need to know the country of the customer's bank, i.e. of the invoice address
    /**
     * As of July 2016, IBAN and BIC are optional for Sofort transactions as long as we get a bankcountry
     */
    //"iban" => "DE85123456782599100003",
    //"bic" => "TESTTEST",
    "successurl" => "https://yourshop.com/payment/success?reference=your_unique_reference",
    "errorurl" => "https://yourshop.com/payment/error?reference=your_unique_reference",
    "backurl" => "https://yourshop.com/payment/back?reference=your_unique_reference"
);
As a change, we'll be using "request" => "authorization" here, which means that not only the account receivable is created but also instantly booked. This is possible because Sofort.com provides instant notification about a successful payment and it saves you the hassle of implementing a separate "request" => "capture". For rather asynchronous payment methods like prepayment or invoice this is not possible. Refer to the Server API Description for details. However, you are free to use a preauthorization/capture setup here as well if you see fit, for instance for bookkeeping reasons.
The URL parameters determine to which page the customer gets redirected as soon as they a) complete the transaction (successurl), b) the transaction fails (errorurl) and the customer is advised to choose a different payment method or try again, or c) the customer hits "Back to shop" or any similar button on the 3rd party site to get back to the payment method selector (backurl). These controllers need to be implemented by you.
The main difference between authorization and preauthorization is, that with authorization the funds are due instantly, while with preauthorization it is merely an "arrangement to pay". Funds in the preauthorization mode are due when a capture call is sent. With certain payment methods, the preauthorized funds are reserved (e.g. on a credit card), this is, however, not always the case. The time of the capture has implications on e.g. the dunning process as well.
To make a better example:
Imagine a standard fashion retailer. They would normally use a preauthorization workflow. The amount of the order is preauthorized when the customer finishes their checkout. When the goods are shipped (maybe partially, as not all items might be in stock), a capture API call is sent to indicate the funds are due now. There can be more than one capture call for a single preauthorization.
On the other hand, a merchant of digital content (e.g. e-books) would typically use an authorization flow to be able to make the goods available immediately.
In a typical integration, the merchant would be able to configure in their backend, which mode to use in which setting for which payment method.
Once you have prepared all the parameters needed for that transaction you're ready to authorize the transaction and then redirect the customer. We'll merge the arrays into one request, send the request to PAYONE, and see whether we get a status=REDIRECT response:
$request = array_merge($defaults, $personalData, $onlineTransfer);
$response = Payone::sendRequest($request);
if ($response["status"] == "REDIRECT") {
    header("Location: " . $response["redirecturl"]); // or other redirect method
}
else {
    echo "Something went wrong. :(";
}
After the customer completed the transaction on the 3rd party site, they'll be redirected to the successurl so be sure to inform them about the success of their order. However, the order is not quite finished yet.
However, to prevent people with fraudulent intentions from directly calling the successurl, you can't rely on it alone. Additionally, PAYONE will sent a transaction status notification to the shop to indicate that the payment transaction has been completed. When verifying the transaction status take care to validate the key and probably the source IPv4 subnet as well. However, you won't receive a txaction=paid notification right away but rather a txaction=appointed to indicate that the transaction has been triggered and will be marked paid in a couple of minutes:
// you'll need to include the $defaults array somehow, or at least get the key from a secret configuration file
if ($_POST["key"] == hash("md5", $defaults["key"])) {
    // key is valid, this notification is for us
    echo "TSOK";
    if ($_POST["txaction"] == "appointed") {
        // a freshly created transaction has been marked successfully initiated
        // update that transaction accordingly, e.g. by $_POST["reference"]
    }
    if ($_POST["txaction"] == "paid") {
        // update your transaction accordingly, e.g. by $_POST["reference"]
    }
}Online payments with credit cards are de facto mandatory for every online shop. However, the credit card issuers have high requirements concerning the security of credit card transactions. The Payment Card Industry Data Security Standard (PCI DSS) defines the prerequisites and certification steps. As certification is quite complex for merchants, PAYONE developed a solution that only requires the lowest level of PCI DSS compliance. Essentially, processing a credit card transaction is a three step process:
- Create the form to capture the credit card details
- Send them to PAYONE and receive a token in a callback
- Perform (pre-)authorization using the token
The token is a so called pseudo card PAN, a number that resembles a credit card number, so that 3rd party systems can use it, but doesn't entail the PCI DSS requirements for storing card data. To avoid the software on the server to come in contact with credit card data, the Client API is used for communication between the buyer's browser and PAYONE.
PAYONE's "Hosted iFrame" solution gives the merchant the most flexibility in designing the checkout form while at the same time being PCI DSS compliant. The actual <input> elements are loaded from a secure PAYONE system so that the shop software itself isn't in the scope of PCI DSS certification. First, we need a sceleton of the form:
<script type="text/javascript" src="https://secure.pay1.de/client-api/js/v1/payone_hosted_min.js"></script>
<form name="paymentform" action="" method="post">
    <fieldset>
        <input type="hidden" name="pseudocardpan" id="pseudocardpan">
        <input type="hidden" name="truncatedcardpan" id="truncatedcardpan">

        <!-- configure your cardtype-selection here -->
        <label for="cardtypeInput">Card type</label>
        <select id="cardtype">
            <option value="V">VISA</option>
            <option value="M">Mastercard</option>
            <option value="A">Amex</option>
        </select>

        <label for="cardpanInput">Cardpan:</label>
        <span class="inputIframe" id="cardpan"></span>

        <label for="cvcInput">CVC:</label>
        <span id="cardcvc2" class="inputIframe"></span>

        <label for="expireInput">Expire Date:</label>
        <span id="expireInput" class="inputIframe">
            <span id="cardexpiremonth"></span>
            <span id="cardexpireyear"></span>
        </span>

        <label for="firstname">Firstname:</label>
        <input id="firstname" type="text" name="firstname" value="">
        <label for="lastname">Lastname:</label>
        <input id="lastname" type="text" name="lastname" value="">

        <div id="errorOutput"></div>
        <input id="paymentsubmit" type="button" value="Submit" onclick="check();">
    </fieldset>
</form>
<div id="paymentform"></div>
To configure the appearance of the various form elements delivered by PAYONE, a little JavaScript is neccessary:
<script>
    var request, config;

    config = {
        fields: {
            cardpan: {
                selector: "cardpan",                 // put name of your div-container here
                type: "text",                        // text (default), password, tel
                style: "font-size: 1em; border: 1px solid #000;"
            },
            cardcvc2: {
                selector: "cardcvc2",                // put name of your div-container here
                type: "password",                    // select(default), text, password, tel
                style: "font-size: 1em; border: 1px solid #000;",
                size: "4",
                maxlength: "4"
            },
            cardexpiremonth: {
                selector: "cardexpiremonth",         // put name of your div-container here
                type: "select",                      // select(default), text, password, tel
                size: "2",
                maxlength: "2",
                iframe: {
                    width: "50px"
                }
            },
            cardexpireyear: {
                selector: "cardexpireyear",          // put name of your div-container here
                type: "select",                      // select(default), text, password, tel
                iframe: {
                    width: "80px"
                }
            }
        },
        defaultStyle: {
            input: "font-size: 1em; border: 1px solid #000; width: 175px;",
            select: "font-size: 1em; border: 1px solid #000;",
            iframe: {
                height: "33px",
                width: "180px"
            }
        },
        error: "errorOutput",                        // area to display error-messages (optional)
        language: Payone.ClientApi.Language.de       // Language to display error-messages
                                                     // (default: Payone.ClientApi.Language.en)
    };

    request = {
        request: 'creditcardcheck',                  // fixed value
        responsetype: 'JSON',                        // fixed value
        mode: 'live',                                // desired mode
        mid: '10001',                                // your MID
        aid: '10002',                                // your AID
        portalid: '2000002',                         // your PortalId
        encoding: 'UTF-8',                           // desired encoding
        storecarddata: 'yes',                        // fixed value
        // hash calculated over your request-parameter-values (alphabetical request-order) plus PMI portal key
        hash: '5c4014cebeb361d9e186fd42c810b9b1'     // see Chapter 3.1.5.3 of Client API documentation
    };
    var iframes = new Payone.ClientApi.HostedIFrames(config, request);
    iframes.setCardType("V");

    document.getElementById('cardtype').onchange = function () {
       iframes.setCardType(this.value);              // on change: set new type of credit card to process
    };

    function check() {                               // Function called by submitting PAY-button
        if (iframes.isComplete()) {
            iframes.creditCardCheck('checkCallback');// Perform "CreditCardCheck" to create and get a
                                                     // PseudoCardPan; then call your function "checkCallback"
        } else {
            console.debug("not complete");
        }
    }

    function checkCallback(response) {
        console.debug(response);
        if (response.status === "VALID") {
            document.getElementById("pseudocardpan").value = response.pseudocardpan;
            document.getElementById("truncatedcardpan").value = response.truncatedcardpan;
            document.paymentform.submit();
        }
    }

</script>
After the check has gone through, the pseudo card PAN and truncated card PAN (e.g. 4111xxxxxxxx1111) will be stored in the hidden input fields and submitted to your application through http post.
After you have obtained the pseudo card PAN through the Client API channel, the rest of the transaction can be continued through the Server API channel following the scheme above:
$creditCard = array(
    "clearingtype" => "cc", // cc for credit card
    "reference" => "your_unique_reference",
    "amount" => "10000", // amount in smallest currency unit, i.e. cents
    "currency" => "EUR",
    "request" => "preauthorization",
    "successurl" => "https://yourshop.com/payment/success?reference=your_unique_reference", // URLs might be necessary since some cards require REDIRECT for 3d secure
    "errorurl" => "https://yourshop.com/payment/error?reference=your_unique_reference",
    "backurl" => "https://yourshop.com/payment/back?reference=your_unique_reference",
    "pseudocardpan" => $pseudocardpan // pseudo card pan received from previous checkout steps, no other card details required
);

$request = array_merge($defaults, $personalData, $creditCard);
$response = Payone::sendRequest($request);
if ($response["status"] == "REDIRECT") { // this happens when the card needs a 3d secure verification
    header("Location: " . $response["redirecturl"]); // or other redirect method
} elseif ($response["status"] == "APPROVED") { // no 3d secure verification required, transaction went through
    echo "Thank you for your purchase.";
} else {
    echo "There has been an error processing your request.";
}
If the card requires 3D Secure verification, our platform will respond with a status=redirect response and give the URL the 3D Secure verification has to be carried out. After the customer successfully completed the 3D Secure form, we will send a transaction status notification appointed and then redirect them to the URL stated in the successurl parameter. The transaction status notification coming in before the redirect to the successurl asserts that the customer has indeed completed their 3D Secure form.
After the preauthorization is completed, you can continue with the transaction e.g. by capturing the full or a partial amount.
There are some handy examples in the examples folder. You're welcome to add more, if you feel like it!
If you want to try out the examples provided here with your own account credentials, please install the required libraries through composer first:
git clone https://github.com/fjbender/simple-php-integration
cd simple-php-integration/
composer install
Then, adapt the individual files in examples/ to your needs.