96Boards Self Sustainable Developer Station
Table of Contents
- Introduction
- Hardware
- Software
- Initial Setup
- 3D Printing
- Wires, switches, contacts and more...
- Schematic review
- Putting it all together
- Conclusion
Introduction
Robert Wolff, David Tischler and Gabriel Peterson teamed up to demonstrate two projects and excellent 3D printing and design that are enabled by the Arm Innovator Program and Shiratech / Arrow YVR18 Hackathon. The Solar-powered Mobile Developer Workstation is a project that places a 96Boards Arm single board computer, battery, solar charging unit, LCD panel, and standard electric sockets in to a suitcase-like enclosure that can be deployed anywhere. With the addition of an LTE and sensor mezzanine, the device can remotely monitor environmental conditions, as well. Adding further to the demo, miniNodes is placing a small carrier board inside the box that holds 5 Raspberry Pi Computer-on-Modules, that can add additional compute capacity and run small, specialized workloads or containers that can be remotely deployed to to the box. This allows remote management and updating, even at extreme edge locations, as long as there is cellular coverage.
Hardware
Compute: The 96Boards DragonBoard 410c (or 96Boards equivalent) will act as the gateway to the entire system. Running Linux, and equipped with several peripheral and sensors, the hub will showcase a variety of applications while leaving the option open for almost an infinite amount of other use-cases.
Power: The kit is capable of taking in two different power sources. For the purpose of this demo, there will be a 3A power supply and 2 x .65A solar panels. The panels will run in parallel providing upwards of 1.2A. The DC power supply is needed in the case of this demo, as in most cases it is showcased in doors. Either way, there are two power inputs and the system is capable of taking up to 20A at 12 or 24 volts.
Connectivity: The Kit is equipped with its own 4G/LTE connection! Thanks to the Arrow/Shiratech LTE mezzanine, this kit is completely off the grid both power and connectivity. Event in a room with bogged down WiFi, the kit able to connect and use any LTE network.
Bill of Materials
- Case
- LCD Screen
- Charge Controller
- Batteries
- Solar Panels x 2
- Inveter
- 96Boards Base Board - Arrow DragonBoard 410c
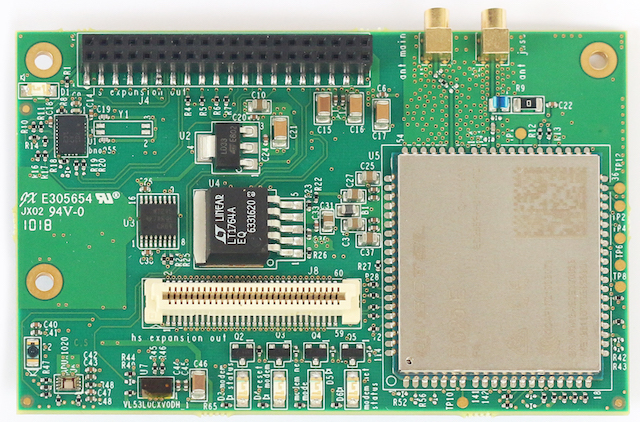
- 96Boards Mezzanine - Shiratech LTE
- 3D Printer
- Fillament
- Switches
- Juntions
- Wires
- Connectors
Software
The 96Boards used in this project was the DragonBoard 410c. For the base operating system, we used the Linaro Debian flavor of Linux.
CAD Software
My CAD/CAM software of choice is Autodesk Fusion 360. I began using it simply because it has all the features I currently need and is free for hobbyists and startups. Some nice bonuses it has are built in version control, collaboration tools, and frequent updates that add new capabilities. There is also a nice tutorial section that has easy to follow videos to learn the software. It is more cloud based than I’d like, however, and often I have to wait much longer for files to download or upload, or to process, than I’d have to if everything was done locally on my machine. There are also a number of headaches associated with organization, selection, snapping, and workflows that more polished and mature CAD/CAM software don’t suffer from. But ultimately it’s hard to beat free when the software is still able to get the job done.
96Boards Baseboard and Mezzanine
The 96Boards used in this project was the DragonBoard 410c, which was paired with the Shiratech LTE mezzanine.

Initial Setup
Preparing the box
The box we chose to use was from Home Depot and required a few modification prior to measuring and preparing our designs. Some of the inside of the top of the box was gutted, and various inserts were disgarded to make sure we had enough space for all of our components.
Once the box has been gutted and striped of excess inserts, we gathered our main components and began to structure our layout. It was very important for us to decide before hand, exactly where each part would sit. This made it easier for us to design the 3D parts which would later be inserted into the box. These 3D parts would not only serve as aesthetics, but also play a crucial role to the inner structure of the box. These parts would hold and protect the various electronics of the kit.
Gathering main components
The main components are listed in Bill of Materials section; however, it is important to note, many of the components used in this kit might be considered a bit of "over kill". Especially when looking at the charge controller and inverter, many of the other components are not able to take advantage of the spec these parts can input/output. To this point, the kit can be looked at as a hub for a larger station, or simply the means to a future expansion.
Either way, the components were chosen based on ease of access, cost, and funtionality. Most parts can be replaced with something less robust to either reduce the cost and/or weight and/or capabilities of the kit.
Download STL files
Visit The STL file download section to get access to all currently available V1 STL files.
3D Printing
The 3D printer I used is the Original Prusa i3 MK3. I chose that printer because it can achieve a high enough temperature that I can use all commonly used filaments, it has a heated bed, a flexible steel plate that is magnetically secured to the bed that makes removing prints easy, the ability to continue printing after a power loss, and large variety of sensors that puts it on par with more expensive printers. I bought the kit version of the printer that comes only as parts and requires assembly and calibration before use. For $250 more I could have bought it fully assembled and calibrated, but I enjoy putting things together and I now have a much better understanding of how the printer works. Troubleshooting any issues that come up in the future will also be much easier as a result. I use Slic3r PE to generate the gcode off the STL files, as it has profiles already optimized for my printer and filament, and with it I get great results.
I chose PLA to use as the filament for the prototype primarily for environmental reasons, lack of fumes, and ease of use. Knowing we’d have to print items several times as design tweaks occur often in initial design, plenty of waste is almost always a result. PLA is plant based, usually corn or sugar based, and biodegradable. It also doesn’t have any toxic fumes while printing (always check to verify the dye or additives are not toxic as well before foregoing proper ventilation) and we were stuck in a small room with it while working, and it was printing non-stop. Once design has been cemented we will switch to PETG. It has much higher temperature tolerances and is more durable and impact resistant.
Wires switches contacts and more
Cutting all the wires for this box (SO MANY) took a while. Not only that it was also very time consuming measuring and placing them according to the schematic.
Schematic review
Unfortunately, I did not have time to draft the schematic in a profesional CAD software; however, I was able to take a picture and upload it here. In the future, I do plan to remake this schematic more professionally, and to provide the files open to the public.
Putting it all together
- Box is gutted and ready - Check!
- All major parts are measured and placed for reference
- Schematics are drawn
- All the parts are printed - Check!
- All the components are gathered - Check!
- All the wires are cut and measured - Check!
- Connectors/Junctions are placed - Check!
- DragonBoard 410c is ready - Check!
- Shiratech LTE Mezzanine is reach - Check!
- 3D parts and components are placed - Check!
- Wired up - Check!
Pictures of the kit


![]()
