Also you can use this library with CT6523, PT6523, LC75823, SC6523, RSM6523, LF6523, HXJ6523, LP75823, SL4816, SWE75823, ZL75823, TM75823, SJ75823, CS1685, ADS75823, AX75823, CS75823, LS75823, PM1725, PS75823, SC75823.
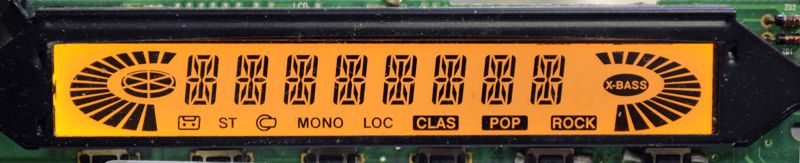
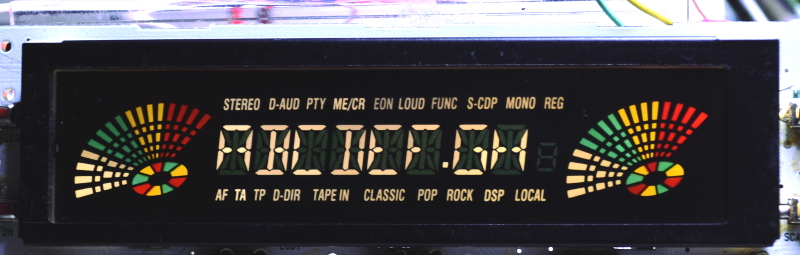
When creating this library, I used the screen on the front panel of an old cassette player. You probably won't have the same panel as I was working on. The lcd panel you own will contain completely private areas. However, as long as it includes any of the above drivers, you can arrange the segment and symbol data according to your own board and can be used for other lcd panels. As an example, it is edited for another lcd panel using PT6523 driver, on this page.

- Create a new folder named
LC75823under thelibraries/folder in your Arduino draft folder (create it if thelibrariesfolder does not exist yet). - Place the
src/andexample/folders in the library files to the new folderLC75823/.
The Arduino sketch folder is located in the following locations depending on your operating system (if you haven't changed it).
- Linux:
/home/<username>/Arduino/or/home/<username>/sketchbook/ - Windows:
C:\Users\<username>\My Documents\arduino\ - Mac:
/Users/<username>/Documents/Arduino/
Also, when you open the File > Preferences window from the Arduino IDE menu, you can learn-change from the "Draft Book Location" area.
After placing the files, close all opened Arduino IDEs. When you turn it back on, the IDE will automatically re-scan your libraries and add the library you just added to its list. To check this, open your Arduino IDE and search for the line LC75823 under the File > Examples menu. When you hover over this line, you will see some examples ready to use.
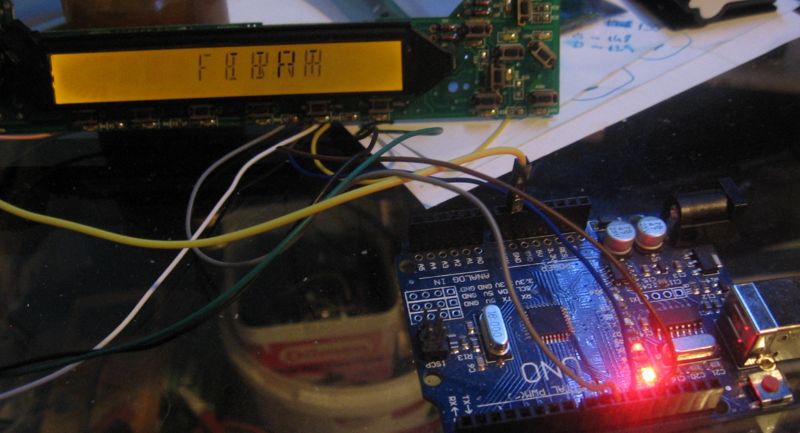
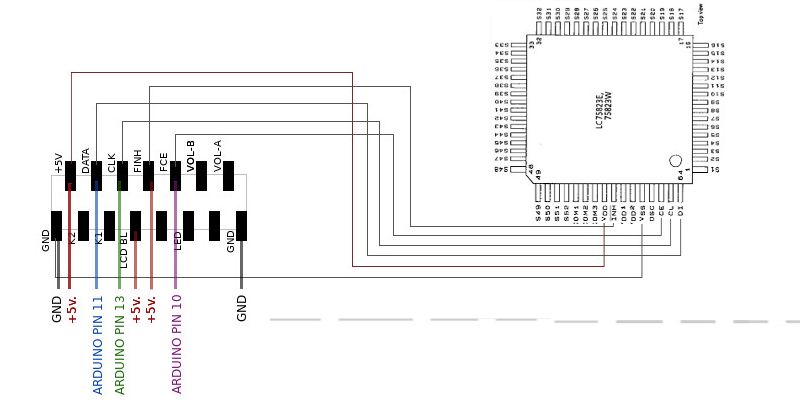
This library uses the standard Arduino SPI library for SPI connection. Therefore;
- Data line to Arduino pin 11 (or MOSI pin 4 on the ICSP socket),
- CLK to Arduino pin 13 (or SCK pin 3 on the ICSP socket),
- FCE (ChipEnabled, SlaveSelect) input needs to be connected to Arduino pin 10.
These pins are valid for the Arduino Uno model. For other Arduino models please check this page. FCE (ChipEnabled, SlaveSelect) can be connected to Arduino pin 10 on all models. Or you can set the parameter in the begin (<SlaveSelect pin>, <address>) function to another pin. The connection scheme should be as in the image.
In order to use the library in your own project, you can follow the path of Draft > add library > LC75823 in the Arduino IDE menu. Or add the following code at the start of your .ino file by yourself.
#include <LC75823.h>After adding the library, you need to generate a new object from the LC75823 class.
LC75823 lcd;Now you can use the following functions with this new lcd object you created.
This function starts the lcd. Chip enable slaveSelect pin number and driver's SPI address need to be entered as parameters. It also includes standard Arduino SPI functions such as SPISettings() and SPI.begin() and sets the chip enable pin to OUT. Since these operations must be started before printing to the screen, they must be defined in the Arduino setup() function.
void setup()
{
  lcd.begin(10, 130);
}Prints the entered text on the screen. The text to be printed can be entered as an array of type char or can be passed as a string parameter by typing directly between the"" characters. Since the screen can display 8 characters at the same time, the first 8 characters of the entered text will appear on the screen.
The library supports only 32 to 127 characters in the ASCII character table. Other characters will appear on the screen as two-character spaces.
void loop()
{
  char a[14]="HELLO WORLD";
  lcd.text(a);

  //veya

  lcd.text("HELLO WORLD");
}Prints the entered text by sliding from right to left side of the screen. The text to be printed can be entered as a char array or as a string parameter by typing directly between the "" characters. The text shown on the screen this way does not have a character and number limit.
The library supports only 32 to 127 characters in the ASCII character table. Other characters will appear on the screen as two-character spaces.
void loop()
{
  char a[44]="ARDUINO LC75823 TEST. 01 JULY 2018";
  lcd.sText(a);

  //veya

  lcd.sText("ARDUINO LC75823 TEST. 01 JULY 2018");
}
When defining the
char arraythat carries the text, count of elements of the array must be 1 more than the number of characters of the text. If you are entering 12 letter text, you must create the array with 13 elements. Thus, the character\0is automatically placed in the last element of the array. Otherwise, when a series without a termination element is printed on the screen, irrelevant data defined after it or at addresses after it in the memory are also printed on the screen.
In some cases, you may need to printdifferent data types at the same time, such as char, int. In such cases, you can use sprintf(). In the example below, the value of an int variable is combined with some char characters and entered as parameters in the sText () function of the lcd object.
void loop()
{
  int a = 4;
  int b = 8;
  char buffer[14];
  sprintf (buffer, "%d PLUS %d = %d", a, b, a+b);
  lcd.sText(buffer);
}
While the Sprintf() function supports int data type, it does not support variables of type float. You can use the dtostrf() function to overcome this limit. Below, the value of a float variable is passed into another string char via the dtostrf() function. In the next step, it is merged with another char array in the sprintf() function. And finally, it is printed on the screen with sText() function.
void loop()
{
  char ss[2];
  char scr[2];
  int val = 0;
  float volt;

  val = analogRead(0);
  volt = val * 0.00468;
  dtostrf(volt, 4, 2, ss);
  sprintf(scr, "%s V", ss);
  lcd.text(scr);
}
.ino file containing the sample code above:
LC75823/examples/LC75823_voltage_level/LC75823_voltage_level.ino
If the sText () function is used, it returns an int type information about how many times the text is rotated on the screen. If you want to end the visibility of a text after a certain number of times on the screen, you can operate according to the value returned from this function. In the example below, after the text has rotated 3 times on the screen, it exits the loop and moves on to the next action.
void loop()
{
  for (int i = 0; lcd.textLoopCount() < 3; i++)
   {
    lcd.sText("THIS TEXT WILL REPEAT ON THE SCREEN 3 TIMES.);
   }
}
.ino file containing the sample code above:
LC75823/examples/LC58823_text/LC75823_text.ino
This funtcion is used to show and hide the symbols on the screen. An enum constant has been defined corresponding to all symbols on the lcd panel. You can change the visibility of the corresponding symbol by entering one of these enum constants named symbol and the state it will contain (true or 1 = show, false or 0 = hide) as a parameter to this function.
void loop()
{
  // Symbol status information set to true, display them
  boolean sts = true;
  lcd.symbol(POP, sts);
  lcd.symbol(X_BASS, sts);
  lcd.symbol(TEYP_ICON, sts);
  delay(1500);

  // Symbol status information set to 0, hiding symbols.
  byte bsts = 0;
  lcd.symbol(POP, bsts);
  lcd.symbol(X_BASS, bsts);
  lcd.symbol(TEYP_ICON, bsts);
}
.ino file containing the sample code above:
LC75823/examples/LC75823_symbols/LC75823_symbols.ino
All symbol constants are given below.
  ST,
  MONO,
  LOC,
  CLAS,
  POP,
  ROCK,
  TEYP_ICON,
  CD_ICON,
  X_BASS,
  CHART_1,
  CHART_2,
  CHART_3,
  VOLUME_1,
  VOLUME_LEFT_2,
  VOLUME_LEFT_3,
  VOLUME_LEFT_4,
  VOLUME_LEFT_5,
  VOLUME_LEFT_6,
  VOLUME_LEFT_7,
  VOLUME_LEFT_8,
  VOLUME_RIGHT_2,
  VOLUME_RIGHT_3,
  VOLUME_RIGHT_4,
  VOLUME_RIGHT_5,
  VOLUME_RIGHT_6,
  VOLUME_RIGHT_7,
VOLUME_RIGHT_8Used to control some sequential and interconnected symbols, such as volume level and chart. The status of the VOLUME_ * and CHART_ * symbols, which can also be manipulated with the symbol() function, can be changed by entering the sequential int values with this function. So you can use these symbols in sequential operations in a loop.
void loop()
{
  // Show symbol VOLUME_1.
  lcd.volumeChart(1, true);

  // Show symbol VOLUME_LEFT_2.
  lcd.volumeChart(2, true);

  // Show symbol VOLUME_RIGHT_4.
  lcd.volumeChart(11, true);
}
All volume symbol contstants are given below.
   1: VOLUME_1

   2: VOLUME_LEFT_2
   3: VOLUME_LEFT_3
   4: VOLUME_LEFT_4
   5: VOLUME_LEFT_5
   6: VOLUME_LEFT_6
   7: VOLUME_LEFT_7
   8: VOLUME_LEFT_8

   9: VOLUME_RIGHT_2
  10: VOLUME_RIGHT_3
  11: VOLUME_RIGHT_4
  12: VOLUME_RIGHT_5
  13: VOLUME_RIGHT_6
  14: VOLUME_RIGHT_7
  15: VOLUME_RIGHT_8

  16: CHART_1
  17: CHART_2
18: CHART_3Sets the volume level to the desired value. There are 15 independent volume symbols in total, with the symbol number 1 being common, left and right seven separate from each other. It is used to bring the level symbols to the desired value without going into the loop. For example, it is enough to use the volumeLeftLevel(5) command to bring the left level to 5, and to use the volumeRightLevel(3) command to bring the right level to 3.
void loop()
{
  lcd.volumeLeftLevel(5);
  lcd.volumeRightLevel(3);
}
Level steps consist of 8 different segments in total. By default, the lowest level is 0 and the highest level is 8. However, you can edit these values with volumeStartValue() and volumeEndValue() functions.
In cases where 8 units are not sufficient as a level range, starting and ending values can be set with these functions. In the example below, the approximate value of the voltage (max 5v) applied to the Arduino analog pin A0 is shown on the level symbols. Arduino converts the voltage value coming from the analog input to a value between 0 - 1023. However, because this value exceeds the standard level limit of 8, any data above 8 moves the level to the end. To fix this, you can declare the lower and upper level limits with these two functions.
If it is not necessary to change this setting during the program execution, define it in the setup() function.
void setup()
{
  lcd.begin(10, 130);
  lcd.volumeStartValue(0);
  lcd.volumeEndValue(1023);
  int val = 0;
}

void loop()
{
  val = analogRead(0);

  lcd.volumeLeftLevel(val);
  lcd.volumeRightLevel(val);
}
.ino file containing the sample code above:
LC75823/examples/LC75823_voltage_level/LC75823_voltage_level.ino
Used for rotation animation of chart symbols. Creates a rotation animation on the chart symbols as long as true or 1 is entered in the function.
void loop()
{
  for (int j = 0; j <= 8; j++)
    {
        lcd.sChart(1);
    }
}
.ino file containing the sample code above:
LC75823/examples/LC75823_symbols/LC75823_symbols.ino
Used to setup animation speed(text scrolling, level transitions, chart animation, etc). It can be used at any point in the application. The parameter of type int must be in milliseconds. The specified time determines the transition speed of the animation. Therefore, the shorter the time, the faster the animations are shown. If no value is specified, the default value is applied to 300ms.
Clears the characters currently written on the screen. When used in transitions between texts, it prevents the risk of text interlacing.
Resets all symbols on the screen, left and right level information in addition to the clear() function. Sets the animation speed to its initial value of 300ms. If the screen is in power saving mode, it will turn on. However, it does not change the level ranges set by volumeStartValue() and volumeEndValue().
Put display into power saving mode. Since the oscillator inside the lcd will stop and the voltage on the segment lines will be pulled to the value Vss, the screen lcd section is closed. In cases where the screen is operated with a battery, it can be switched to this mode after a certain period of time.
Returns display prom power saving to normal mode