ngx_lua_php_queue
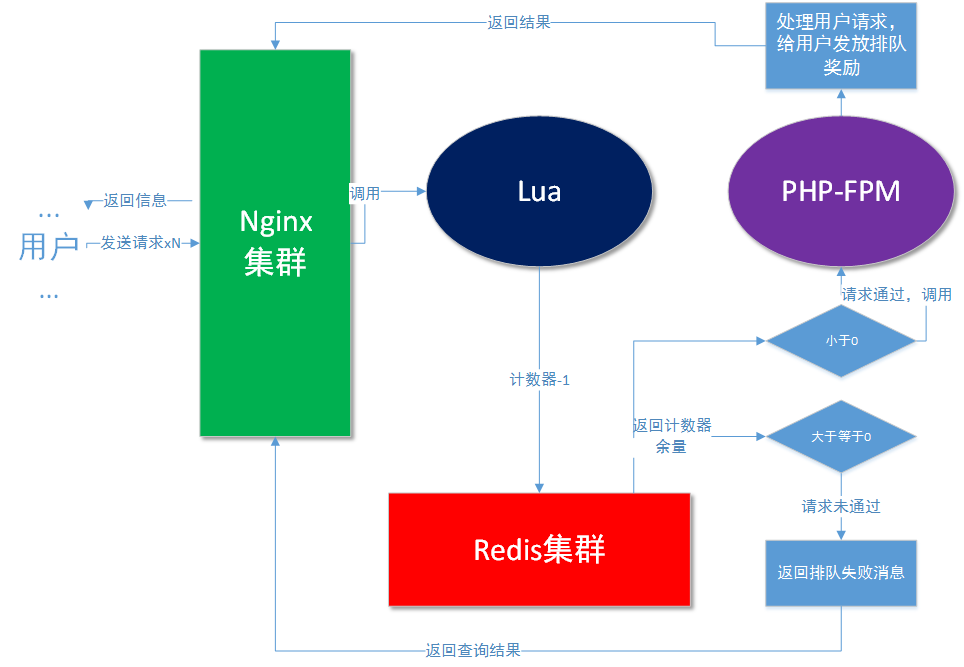
nginx+lua+php+redis实现单业务排队系统架构
在做并发量很大的秒杀活动时,php会因为并发量过大而php进程不足导致服务器负载过大,无法同时处理过多请求,返回不友好的502错误。该项目旨在将php进程的压力转移到nginx层,使用lua作为中间语言,redis读取/储存队列信息,大大提高了并发量,降低了php进程的负载压力。
LICENSE: https://github.com/takatost/ngx_lua_php_queue/blob/master/LICENSE
安装
- 首先安装openresty和php、redis
- 安装完成后,将
lua_script和php_scripts放入web文档目录,默认为/opt/htdocs/lua_queue - 接着讲nginx/conf中的配置文件放入openresty的nginx配置文件目录,如
/opt/ngx_openresty_1.7.2.1/nginx/conf - 打开配置文件
conf/vhosts/lua_queue.com.conf。
第2行:redis服务器的配置,`server 地址:端口;`
第8行:web域名配置,`server_name 域名;`
第9行:web和php文档目录配置,`root 文档目录;`,默认为`root /opt/htdocs/lua_queue/php_scripts;`
第9行:web和php文档目录配置,`root 文档目录;`
第27行:lua文档目录配置,`root lua文档目录;`,默认为`access_by_lua_file /opt/htdocs/lua_queue/lua_scripts/content.lua;`5. 配置完成后,重启nginx,载入配置文件 6. 将域名的hosts写入/etc/hosts 7. 配置php的redis设置
打开`php_scripts`文档目录下的config.php,将redis地址和端口填入其中8. 建立cron任务,`*/1 * * * * php /opt/htdocs/lua_queue/php_scripts/cron_queue.php`,一分钟执行一次,更新redis计数器 9. 到此,安装步骤全部完成,打开配置的域名首页来看看吧
