
stalkr micro service which feeds our clients with GitHub push events.
![]()
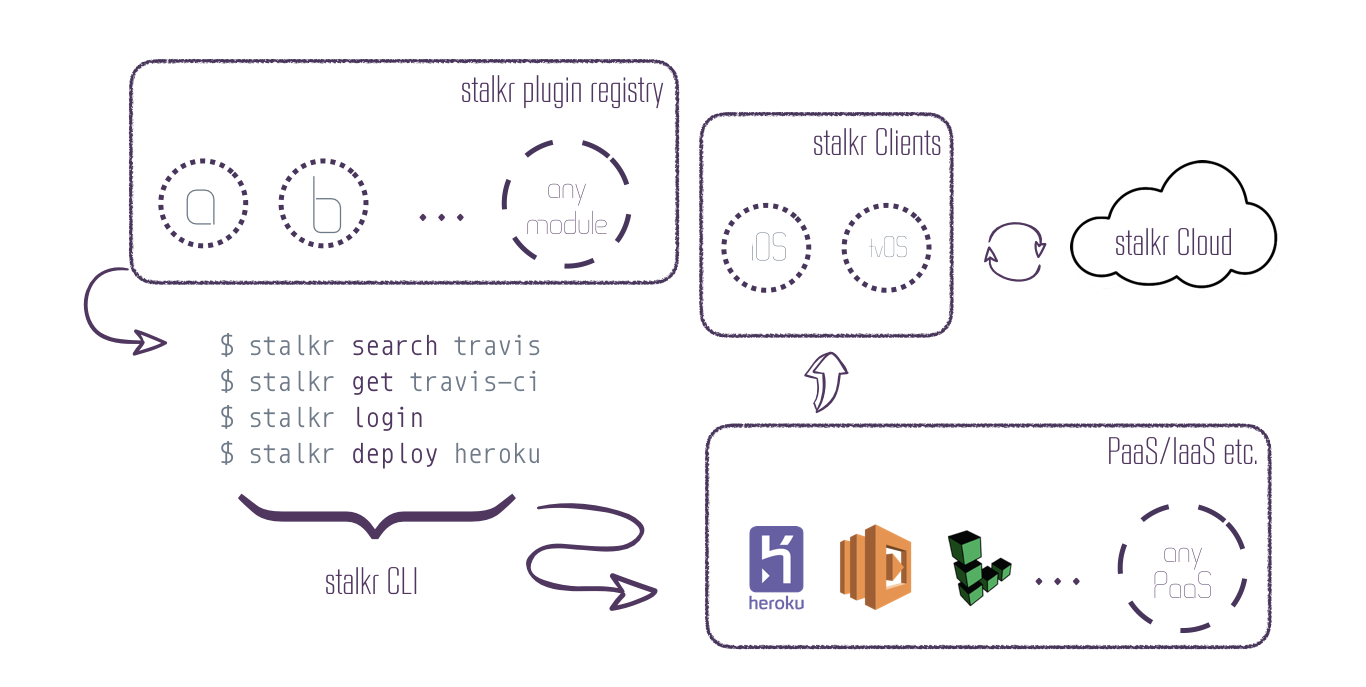
stalkr is a simple–yet powerful–set of tools which gathers data from both continuous integration and application infrastructure monitoring tools in order to make it easier to monitor the whole developing process, in a way the entire team can see at a glance, from the very first commit to the final release.
Although our experimental release is a simple client made for the TV, we do intend to make stalkr clients available on as much platforms as possible, which include:
-
Other Smart TV platforms–e.g. Android TV, webOS, Tizen etc.;
-
SmartWatch platforms–e.g. watchOS, Android Wear etc.;
-
Popular Mobile platforms–e.g. iOS, Android etc.;
-
Popular Desktop OSs–e.g. macOS, Linux, Windows etc.;
-
The Web itself.
If you can't wait to check it out:
![]()
easy peasy lemon squeezy!
Coming soon.
Use the stalkr Package Catalog/Registry to quickly and easily find open-source packages to speed your development.
It basically discovers all the available stalkr plugins in popular back-end registries out there–e.g. node.js-based plugins available npmjs.com registry can be discovered if they contain stalkr-plugin value in keywords field of package.json.
Coming soon.
Use the stalkr CLI to quickly bootstrap and deploy your packages right from your terminal.
It basically works as an abstraction layer over commom CLI tools used to get a stalkr package up and running.
As stated above, we do intend to have multiple clients to fetch data from your deployed micro services.

Right now, only the TV one is available for download at the App Store, with our Minimum Viable Product.

-
Install the Stalkr in your TV
-
Go to "New Dashboard" tab. We recommend the use of one iPhone or remote keyboard for set a config in inputs.
-
You don't need fill all steps, but only the section "Dashboard" and, in next sections, you need fill only if you want this cell in your dashboard.
-
For to know how to set a "Pusher Key" parameter, see the section Pusher in this readme.
Coming soon.
The stalkr Cloud is PaaS which behaves as one our revenue streams and helps your organizing your projects across organizations, teams, roles etc.
Organizations are great for creating distinct groups of users within your company, such as divisions or groups working on similar projects.
Teams give organizations the ability to create groups of members and control access to projects. Team members can be granted read, write, or admin permissions to specific projects.
Those are the services where you deploy any stalkr micro service–such as the one whose documentation you're reading.
More information on these topics can be found at Server.
Webhooks are user-defined HTTP callbacks which are usually triggered by some event, such as pushing code to a repository–which is what happens here–or a comment being posted to a blog. When that event occurs, the source platform makes an HTTP request to the URI which as been previously set for the webhook.
Users can set them to cause events on one site to invoke behaviour on another. The action taken may be anything. Common uses are to trigger builds with continuous integration systems or to notify bug tracking systems–and that's how stalkr works. Since they use HTTP, they can be integrated into web services without adding new infrastructure.
We intend to work over a bunch of different realtime frameworks–e.g. Socket.IO, Primus and ws–and services–e.g. Ably, PubNub and Pusher itself–based on a commom protocol for transporters.
But now Pusher has shown to achieve good documentation/examples, a solid API, and great backend/debug tools, which led us to deal, in our Minimum Viable Product, only with Pusher.
Then you need to create an account, and make a note of your app_id, app_key and app_secret for each project you'd like to integrate with stalkr.
Depending on how much push events your repo triggers, it can be necessary to add a Github API token:
-
Head on over to your settings to manage personal API tokens.
-
Then clink on
Generate new token. -
Put the description which is more expressive for you.
-
Check both
repoanduserscopes. -
Then click on
Generate token.
-
Make sure you define the
ENVvariables below:# Pusher credentials export PUSHER_ID='123456' export PUSHER_KEY='4JEUi0C2UT49m872Euc5' export PUSHER_SECRET='Bzx2MlrMbNtBpZv391J1' # GitHub credentials export GITHUB_TOKEN='5K78650K9PGuTHgbVOGl26l9nQ6JuLyS' # Basic stalkr cell metadata export STALKR_TEAM='myTeam' export STALKR_PROJECT='myProject'
-
Clone this repository:
git clone https://github.com/stalkr-io/github-commits-feed
-
Install all dependencies:
# via npm
npm install
# or using yarn
yarn
-
Launch it:
# via npm
npm start
# or using yarn
yarn start
If everything goes okay, it should now be running at localhost:3000.
-
Install now globally:
# via npm
npm install -g now
# or using yarn
yarn global add now
-
Run now with the
-eflag to define these environment variables:now -e PUSHER_ID='123456' \ PUSHER_KEY='4JEUi0C2UT49m872Euc5' \ PUSHER_SECRET='Bzx2MlrMbNtBpZv391J1' \ GITHUB_TOKEN='5K78650K9PGuTHgbVOGl26l9nQ6JuLyS' \ STALKR_TEAM='myTeam' \ STALKR_PROJECT='myProject'
-
Sign in, then select the related repository you own.
-
Click on
Settingson the top panel. -
Then click on
Webhooks & Serviceson the left panel. -
Click on the
Add WebHookButton. -
Paste the URL where you've deployed your stalkr webhook in the
URLform field. -
Select
application/jsonas the content type. -
Remain the
Just the push event.checkbox checked. -
Remain the
Activecheckbox checked. -
Click on
Add webhookto save the webhook.
Your configuration should look similar to this:

Maintainer:
ythecombinator.me · GitHub @ythecombinator · Twitter @ythecombinator