The Harmonica tutorial at Transform 21 💚
Instructors: Santiago Soler1,2, Andrea Balza Morales3 and Agustina Pesce1,2
1 CONICET, Argentina
2 Instituto Geofísico Sismológico Volponi, UNSJ, Argentina
3 RWTH Aachen, Applied Geophysics and Geothermal Energy, Germany
| Info | |
|---|---|
| When | Thursday, April 22 • 17:00 - 19:00 GMT |
| Slack (Q&A) | Software Underground channel t21-thurs-harmonica |
| Live stream | https://youtu.be/0bxZcCAr6bw |
| conda environment | t21-thurs-harmonica |
| Harmonica documentation | https://www.fatiando.org/harmonica |
Make sure you've done these things before the tutorial on Thursday:
- Sign-up for the Software Underground Slack
- Join the channel
t21-thurs-harmonica. This is where all communication will happen. - Set up your computer (instructions below). We will not have time to
solve many computer issues during the tutorial so make sure you do this
ahead of time. If you need any help, ask at the
t21-thurs-harmonicachannel on Slack.
In this tutorial we’ll take a tour around Harmonica, a Python library for forward modelling, inversion and processing gravity data, focusing on the processing workflow. We will start with a real dataset of scattered gravity observations and finally produce a regular grid of the Bouguer gravity disturbance. We will accomplish this by following these steps:
- Load the gravity dataset.
- Compute gravity disturbance by removing the normal gravity through Boule.
- Project the data to plain coordinates.
- Load a digital elevation model (DEM) of the survey area.
- Compute Bouguer gravity disturbance by forward modelling the topography with prisms.
- Interpolate the Bouguer gravity disturbance onto a regular grid at a constant height through the equivalent layer technique.
- Obtain the Bouguer gravity disturbance on a profile using the same equivalent layer.
- Some knowledge of Python is assumed (for example, you might want to attend this or this tutorial).
- All coding will be done in Jupyter notebooks. I'll explain how they work briefly but it will help if you've used them before.
- We'll use numpy, pandas, xarray, and matplotlib. You don't need to be an expert in these tools but some familiarity will help.
There are a few things you'll need to follow the tutorial:
- A working Python installation (Anaconda or Miniconda)
- The Harmonica tutorial conda environment installed
- A web browser that works with Jupyter notebooks (basically anything except Internet Explorer)
To get things setup, please do the following.
If you have any trouble, please ask for help in the
t21-thurs-harmonica channel on the Software Underground slack.
Windows users: When you see "terminal" in the instructions, this means the "Anaconda Prompt" program for you.
Install a Python distribution:
In this tutorial we will be using the Anaconda
Python distribution along with the conda package manager. If you already have
Anaconda or Miniconda installed, you can skip this step.
If not, please follow the instructions for getting Anaconda up and running in your system: https://docs.anaconda.com/anaconda/install/
Create the t21-thurs-harmonica conda environment:
- Download the
environment.ymlfile from here (right-click and select "Save page as" or similar) - Make sure that the file is called
environment.yml. Windows sometimes adds a.txtto the end, which you should remove. - Open a terminal (Anaconda Prompt if you are running Windows). The following steps should be done in the terminal.
- Navigate to the folder that has the downloaded environment file (if you don't know how to do this, take a moment to read the Software Carpentry lesson on the Unix shell).
- Create the conda environment by running
conda env create --file environment.yml(this will download and install all of the packages used in the tutorial).
Verify that the installation works:
- Download the
test_install.pyscript from here - Open a terminal. The following steps should be done in the terminal.
- Activate the environment:
conda activate t21-thurs-harmonica - Navigate to the folder where you downloaded
test_install.py - Run the test script:
python test_install.py - You should this text in the terminal (the last part of the second line will depend on your system):
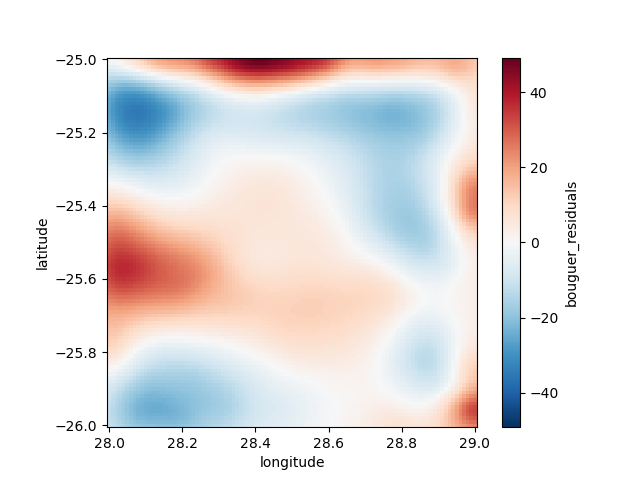
Harmonica version: 0.2.1 Downloading file 'south-africa-gravity.ast.xz' from 'https://github.com/fatiando/harmonica/raw/v0.2.0/data/south-africa-gravity.ast.xz' to '/home/USER/.cache/harmonica/v0.2.0'. - The following figure should pop up:
If none of these commands gives an error, then your installation should be working.
If you get any errors or the outputs look significantly different,
please let us know on Slack at #t21-thurs-harmonica.
Start JupyterLab:
- Windows users: Make sure you set a default browser that is not Internet Explorer.
- Activate the conda environment:
conda activate t21-thurs-harmonica - Start the JupyterLab server:
jupyter lab - Jupyter should open in your default web browser. We'll start from here in the tutorial and create a new notebook together.
If you really can't get things to work on your computer, you can run the code online through Google Colab (you will need a Google account). A starter notebook that installs Harmonica can be found here:
https://swu.ng/t21-harmonica-colab
To save a copy of the Colab notebook to your own account, click on the "Open in playground mode" and then "Save to Drive". You might be interested in this tutorial for an overview of Google Colab.
If you cannot use Google Colab, a second alternative option is to use to the Software Underground JupyterHub. You need to sign in with your Slack credentials on this website: https://jupyter-dev.softwareunderground.org/
For more information about the login process, please read this: https://github.com/softwareunderground/jupyterhub-deployment/tree/first-deployment#login-process
Once you are logged in, JupyterHub will ask you to choose a server
configuration, please choose the t21-thurs-harmonica option.
After JupyterHub sets up an instance for you, it will prompt a JupyterLab
interface.
In order to create a new notebook for running during the tutorial, please click
the Python [conda env:t21-thurs-harmonica] button in the Launcher.
It will create a new notebook running the t21-thurs-harmonica environment, so
you don't need to install any dependency, they are already installed! 🎉
⚠️ The Software Undeground JupyterHub instances are still in experimental phase. You may expect some unwanted behaviour or sudden crushes. Use it carefully and download the notebook every once in a while to have a backup.⚠️
Thanks Filippo Broggini for setting this up!
This work is licensed under a Creative Commons Attribution 4.0 International License.
