This is the iOS SDK of adjust™. You can read more about adjust™ at adjust.com. If your app is a iOS Web App, consult our iOS Web App guide.
These are the minimal steps required to integrate the adjust SDK into your iOS project. We are going to assume that you use Xcode for your iOS development.
If you're using CocoaPods, you can add the following line to your
Podfile and continue with step 3:
pod 'Adjust', :git => 'git://github.com/adjust/ios_sdk.git', :tag => 'v3.4.0'Download the latest version from our releases page. Extract the archive in a folder of your choice.
In Xcode's Project Navigator locate the Supporting Files group (or any other
group of your choice). From Finder drag the Adjust subdirectory into
Xcode's Supporting Files group.

In the dialog Choose options for adding these files make sure to check the
checkbox to Copy items into destination group's folder and select the upper
radio button to Create groups for any added folders.

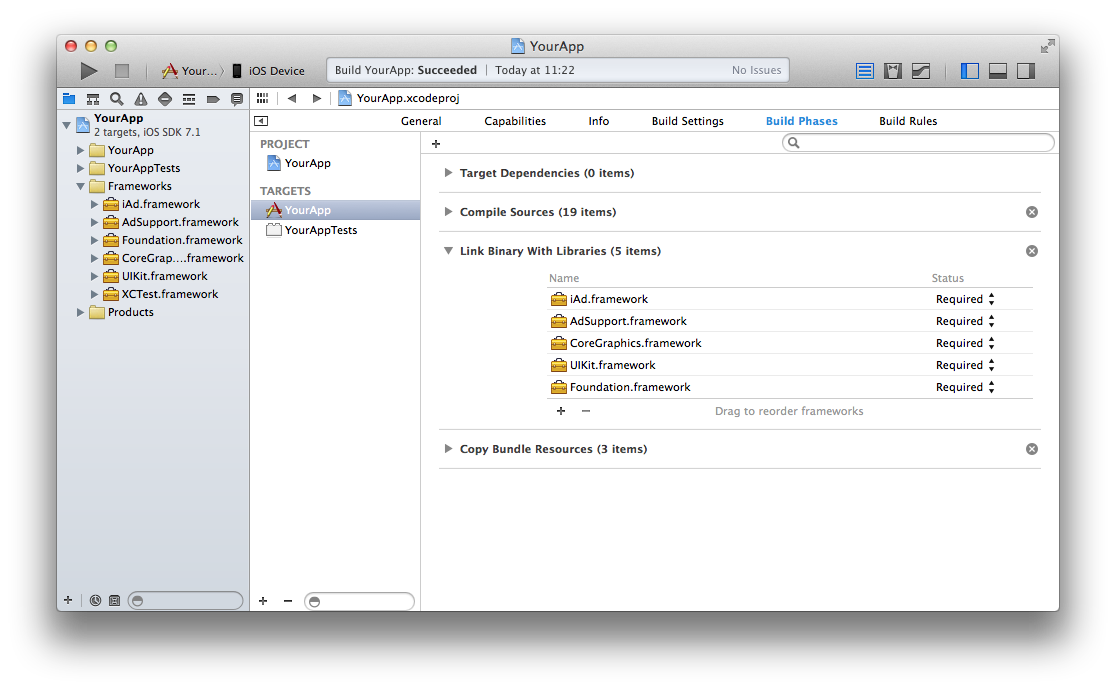
In the Project Navigator select your project. In the left hand side of the main
view select your target. In the tab Build Phases expand the group Link Binary with Libraries. On the bottom of that group click on the + button.
Select the AdSupport.framework and click the Add button. Repeat the same step to
add the iAd.framework. In the list of frameworks select the newly added AdSupport.framework
and iAd.framework. Change the attribute Required to Optional.
In the Project Navigator open the source file your Application Delegate. Add
the import statement at the top of the file. In the didFinishLaunching or
didFinishLaunchingWithOptions method of your App Delegate add the following
calls to Adjust:
#import "Adjust.h"
// ...
[Adjust appDidLaunch:@"{YourAppToken}"];
[Adjust setLogLevel:AILogLevelInfo];
[Adjust setEnvironment:AIEnvironmentSandbox];
Replace {YourAppToken} with your App Token. You can find in your dashboard.
You can increase or decrease the amount of logs you see by calling
setLogLevel: with one of the following parameters:
[Adjust setLogLevel:AILogLevelVerbose]; // enable all logging
[Adjust setLogLevel:AILogLevelDebug];   // enable more logging
[Adjust setLogLevel:AILogLevelInfo];    // the default
[Adjust setLogLevel:AILogLevelWarn];    // disable info logging
[Adjust setLogLevel:AILogLevelError];   // disable warnings as well
[Adjust setLogLevel:AILogLevelAssert];  // disable errors as well
Depending on whether or not you build your app for testing or for production
you must call setEnvironment: with one of these parameters:
[Adjust setEnvironment:AIEnvironmentSandbox];
[Adjust setEnvironment:AIEnvironmentProduction];
Important: This value should be set to AIEnvironmentSandbox if and only
if you or someone else is testing your app. Make sure to set the environment to
AIEnvironmentProduction just before you publish the app. Set it back to
AIEnvironmentSandbox when you start testing it again.
We use this environment to distinguish between real traffic and artificial traffic from test devices. It is very important that you keep this value meaningful at all times! Especially if you are tracking revenue.
Build and run your app. If the build succeeds, you successfully integrated
adjust into your app. After the app launched, you should see the debug log
Tracked session start.

-
If your build failed with the error
Adjust requires ARC, it looks like your project is not using ARC. In that case we recommend transitioning your project to use ARC. If you don't want to use ARC, you have to enable ARC for all source files of adjust in the target's Build Phases:Expand the
Compile Sourcesgroup, select all adjust files (AjustIo, AI..., ...+AIAdditions, AF..., ...+AFNetworking) and change theCompiler Flagsto-fobjc-arc(Select all and press theReturnkey to change all at once).
Once you integrated the adjust SDK into your project, you can take advantage of the following features.
You can tell adjust about every event you want. Suppose you want to track
every tap on a button. You would have to create a new Event Token in your
dashboard. Let's say that Event Token is abc123. In your button's
buttonDown method you could then add the following line to track the click:
[Adjust trackEvent:@"abc123"];You can also register a callback URL for that event in your dashboard and we
will send a GET request to that URL whenever the event gets tracked. In that
case you can also put some key-value-pairs in a dictionary and pass it to the
trackEvent method. We will then append these named parameters to your
callback URL.
For example, suppose you have registered the URL
http://www.adjust.com/callback for your event with Event Token abc123 and
execute the following lines:
NSMutableDictionary *parameters = [NSMutableDictionary dictionary];
[parameters setObject:@"value" forKey:@"key"];
[parameters setObject:@"bar"   forKey:@"foo"];
[Adjust trackEvent:@"abc123" withParameters:parameters];
In that case we would track the event and send a request to:
http://www.adjust.com/callback?key=value&foo=bar
It should be mentioned that we support a variety of placeholders like {idfa}
that can be used as parameter values. In the resulting callback this
placeholder would be replaced with the ID for Advertisers of the current
device. Also note that we don't store any of your custom parameters, but only
append them to your callbacks. If you haven't registered a callback for an
event, these parameters won't even be read.
If your users can generate revenue by clicking on advertisements or making in-app purchases you can track those revenues. If, for example, a click is worth one cent, you could make the following call to track that revenue:
[Adjust trackRevenue:1.0];The parameter is supposed to be in cents and will get rounded to one decimal point. If you want to differentiate between different kinds of revenue you can get different Event Tokens for each kind. Again, you need to create those Event Tokens in your dashboard. In that case you would make a call like this:
[Adjust trackRevenue:1.0 forEvent:@"abc123"];Again, you can register a callback and provide a dictionary of named parameters, just like it worked with normal events.
NSMutableDictionary *parameters = [NSMutableDictionary dictionary];
[parameters setObject:@"value" forKey:@"key"];
[parameters setObject:@"bar"   forKey:@"foo"];
[Adjust trackRevenue:1.0 forEvent:@"abc123" withParameters:parameters];
You can also pass in an optional transaction ID to avoid tracking duplicate revenues. The last ten transaction IDs are remembered and revenue events with duplicate transaction IDs are skipped. This is especially useful for In-App Purchase tracking. See an example below.
If you want to track In-App Purchases, please make sure to call trackRevenue
after finishTransaction in paymentQueue:updatedTransaction only if the
state changed to SKPaymentTransactionStatePurchased:
- (void)paymentQueue:(SKPaymentQueue *)queue updatedTransactions:(NSArray *)transactions {
    for (SKPaymentTransaction *transaction in transactions) {
        switch (transaction.transactionState) {
            case SKPaymentTransactionStatePurchased:
                [self finishTransaction:transaction];

                [Adjust trackRevenue:...
                       transactionId:transaction.transactionIdentifier // avoid duplicates
                            forEvent:...
                      withParameters:...];

                break;
            // more cases
        }
    }
}
If you want to track all revenues in the same currency you might want to use AEPriceMatrix to do simple tier based currency conversion.
You can also set up the adjust SDK to read deep links that come to your app, also known as custom URL schemes in iOS. We will only read the data that is injected by adjust tracker URLs. This is essential if you are planning to run retargeting or re-engagement campaigns with deep links.
In the Project Navigator open the source file your Application Delegate. Find
or add the method openURL and add the following call to adjust:
- (BOOL)  application:(UIApplication *)application openURL:(NSURL *)url
    sourceApplication:(NSString *)sourceApplication annotation:(id)annotation
{
    [Adjust appWillOpenUrl:url];
}Every time your app tries to track a session, an event or some revenue, you can be notified about the success of that operation and receive additional information about the current install. Follow these steps to implement the optional delegate protocol in your app delegate.
Please make sure to consider applicable attribution data policies.
-
Open
AppDelegate.hand add theAdjust.himport and theAdjustDelegatedeclaration.#import "Adjust.h" @interface AppDelegate : UIResponder <UIApplicationDelegate, AdjustDelegate>
-
Open
AppDelegate.mand set the adjust delegate indidFinishLaunchingwhere you already set the adjust environment.[Adjust setEnvironment:AIEnvironmentSandbox]; [Adjust setDelegate:self];
-
Still in
AppDelegate.madd the following delegate callback function to your app delegate implementation.- (void)adjustFinishedTrackingWithResponse:(AIResponseData *)responseData { } -
Implement the delegate function.
The delegate function will get called every time any activity was tracked or
failed to track. Within the delegate function you have access to the
responseData parameter. Here is a quick summary of its attributes:
-
AIActivityKind activityKindindicates what kind of activity was tracked. It has one of these values:AIActivityKindSession AIActivityKindEvent AIActivityKindRevenue AIActivityKindReattribution -
NSString activityKindStringhuman readable version of the activity kind. Possible values:session event revenue reattribution -
BOOL successindicates whether or not the tracking attempt was successful. -
BOOL willRetryis true when the request failed, but will be retried. -
NSString erroran error message when the activity failed to track or the response could not be parsed. Isnilotherwise. -
NSString trackerTokenthe tracker token of the current install. Isnilif request failed or response could not be parsed. -
NSString trackerNamethe tracker name of the current install. Isnilif request failed or response could not be parsed. -
NSString networkthe network grouping level of the current install. Isnilif request failed, unavailable or response could not be parsed. -
NSString campaignthe campaign grouping level of the current install. Isnilif request failed, unavailable or response could not be parsed. -
NSString adgroupthe ad group grouping level of the current install. Isnilif request failed, unavailable or response could not be parsed. -
NSString creativethe creative grouping level of the current install. Isnilif request failed, unavailable or response could not be parsed.
If your app makes heavy use of event tracking, you might want to delay some
HTTP requests in order to send them in one batch every minute. You can enable
event buffering by adding the following line after your setEnvironment: call
in the didFinishLaunching method of your Application Delegate:
[Adjust setEventBufferingEnabled:YES];You can disable the adjust SDK from tracking by invoking the method
setEnabled with the enabled parameter as NO. This setting is remembered
between sessions, but it can only be activated after the first session.
[Adjust setEnabled:NO];You can verify if the adjust SDK is currently active with the method
isEnabled. It is always possible to activate the adjust SDK by invoking
setEnabled with the enabled parameter as YES.
If your app receives notifications you can save the push token in the adjust SDK.
In the Project Navigator open the source file your Application Delegate. Find
or add the method didRegisterForRemoteNotificationsWithDeviceToken and add the following call to adjust:
- (void)application:(UIApplication *)application didRegisterForRemoteNotificationsWithDeviceToken:(NSData *)deviceToken
{
    [Adjust setDeviceToken:deviceToken];
}The adjust-SDK is licensed under the MIT License.
Copyright (c) 2012-2014 adjust GmbH, http://www.adjust.com
Permission is hereby granted, free of charge, to any person obtaining a copy of this software and associated documentation files (the "Software"), to deal in the Software without restriction, including without limitation the rights to use, copy, modify, merge, publish, distribute, sublicense, and/or sell copies of the Software, and to permit persons to whom the Software is furnished to do so, subject to the following conditions:
The above copyright notice and this permission notice shall be included in all copies or substantial portions of the Software.
THE SOFTWARE IS PROVIDED "AS IS", WITHOUT WARRANTY OF ANY KIND, EXPRESS OR IMPLIED, INCLUDING BUT NOT LIMITED TO THE WARRANTIES OF MERCHANTABILITY, FITNESS FOR A PARTICULAR PURPOSE AND NONINFRINGEMENT. IN NO EVENT SHALL THE AUTHORS OR COPYRIGHT HOLDERS BE LIABLE FOR ANY CLAIM, DAMAGES OR OTHER LIABILITY, WHETHER IN AN ACTION OF CONTRACT, TORT OR OTHERWISE, ARISING FROM, OUT OF OR IN CONNECTION WITH THE SOFTWARE OR THE USE OR OTHER DEALINGS IN THE SOFTWARE.