On December 11th, OpenAI added Cloudflare protections that make it more difficult to access the unofficial API.
To circumvent these protections, we've added a fully automated browser-based solution, which uses Puppeteer and CAPTCHA solvers under the hood. 🔥
import { ChatGPTAPIBrowser } from 'chatgpt'

const api = new ChatGPTAPIBrowser({
  email: process.env.OPENAI_EMAIL,
  password: process.env.OPENAI_PASSWORD
})
await api.initSession()

const result = await api.sendMessage('Hello World!')
console.log(result.response)
This solution is not lightweight, but it does work a lot more consistently than the previous REST API-based approach. For example, I'm currently using this approach to automate 10 concurrent OpenAI accounts for my Twitter bot. 😂
To use the updated version, make sure you're using the latest version of this package and Node.js >= 18. Then update your code following the examples below, paying special attention to the sections on Authentication, Restrictions, and CAPTCHAs.
We recently added support for CAPTCHA automation using either nopecha or 2captcha. Keep in mind that this package will be updated to use the official API as soon as it's released, so things should get much easier over time. 💪
Lastly, please consider starring this repo and following me on twitter to help support the project.
Thanks && cheers, Travis

Node.js client for the unofficial ChatGPT API.

![]()
This package is a Node.js wrapper around ChatGPT by OpenAI. TS batteries included. ✨
You can use it to start building projects powered by ChatGPT like chatbots, websites, etc...
npm install chatgpt puppeteerpuppeteer is an optional peer dependency used to automate bypassing the Cloudflare protections via getOpenAIAuth. The main API wrapper uses fetch directly.
import { ChatGPTAPIBrowser } from 'chatgpt'

async function example() {
  // use puppeteer to bypass cloudflare (headful because of captchas)
  const api = new ChatGPTAPIBrowser({
    email: process.env.OPENAI_EMAIL,
    password: process.env.OPENAI_PASSWORD
  })

  await api.initSession()

  const result = await api.sendMessage('Hello World!')
  console.log(result.response)
}
Or, if you want to use the REST-based version:
import { ChatGPTAPI, getOpenAIAuth } from 'chatgpt'

async function example() {
  // use puppeteer to bypass cloudflare (headful because of captchas)
  const openAIAuth = await getOpenAIAuth({
    email: process.env.OPENAI_EMAIL,
    password: process.env.OPENAI_PASSWORD
  })

  const api = new ChatGPTAPI({ ...openAIAuth })
  await api.initSession()

  // send a message and wait for the response
  const result = await api.sendMessage('Write a python version of bubble sort.')

  // result.response is a markdown-formatted string
  console.log(result.response)
}
ChatGPT responses are formatted as markdown by default. If you want to work with plaintext instead, you can use:
const api = new ChatGPTAPIBrowser({ email, password, markdown: false })If you want to track the conversation, use the conversationId and messageId in the result object, and pass them to sendMessage as conversationId and parentMessageId respectively.
const api = new ChatGPTAPIBrowser({ email, password })
await api.initSession()

// send a message and wait for the response
let res = await api.sendMessage('What is OpenAI?')
console.log(res.response)

// send a follow-up
res = await api.sendMessage('Can you expand on that?', {
  conversationId: res.conversationId,
  parentMessageId: res.messageId
})
console.log(res.response)

// send another follow-up
// send a follow-up
res = await api.sendMessage('What were we talking about?', {
  conversationId: res.conversationId,
  parentMessageId: res.messageId
})
console.log(res.response)
Sometimes, ChatGPT will hang for an extended period of time before beginning to respond. This may be due to rate limiting or it may be due to OpenAI's servers being overloaded.
To mitigate these issues, you can add a timeout like this:
// timeout after 2 minutes (which will also abort the underlying HTTP request)
const response = await api.sendMessage('this is a timeout test', {
  timeoutMs: 2 * 60 * 1000
})
Usage in CommonJS (Dynamic import)
async function example() {
  // To use ESM in CommonJS, you can use a dynamic import
  const { ChatGPTAPI, getOpenAIAuth } = await import('chatgpt')

  const openAIAuth = await getOpenAIAuth({
    email: process.env.OPENAI_EMAIL,
    password: process.env.OPENAI_PASSWORD
  })

  const api = new ChatGPTAPI({ ...openAIAuth })
  await api.initSession()

  const result = await api.sendMessage('Hello World!')
  console.log(result)
}See the auto-generated docs for more info on methods and parameters. Here are the docs for the browser-based version.
To run the included demos:
- clone repo
- install node deps
- set
OPENAI_EMAILandOPENAI_PASSWORDin .env
A basic demo is included for testing purposes:
npx tsx demos/demo.tsA conversation demo is also included:
npx tsx demos/demo-conversation.tsA browser-based conversation demo is also included:
npx tsx demos/demo-conversation-browser.tsThe authentication section relates to the REST-based version (using getOpenAIAuth + ChatGPTAPI). The browser-based solution, ChatGPTAPIBrowser, takes care of all the authentication for you.
On December 11, 2022, OpenAI added some additional Cloudflare protections which make it more difficult to access the unofficial API.
You'll need a valid OpenAI "session token" and Cloudflare "clearance token" in order to use the API.
We've provided an automated, Puppeteer-based solution getOpenAIAuth to fetch these for you, but you may still run into cases where you have to manually pass the CAPTCHA. We're working on a solution to automate this further.
You can also get these tokens manually, but keep in mind that the clearanceToken only lasts for max 2 hours.
Getting tokens manually
To get session token manually:
- Go to https://chat.openai.com/chat and log in or sign up.
- Open dev tools.
- Open
Application>Cookies.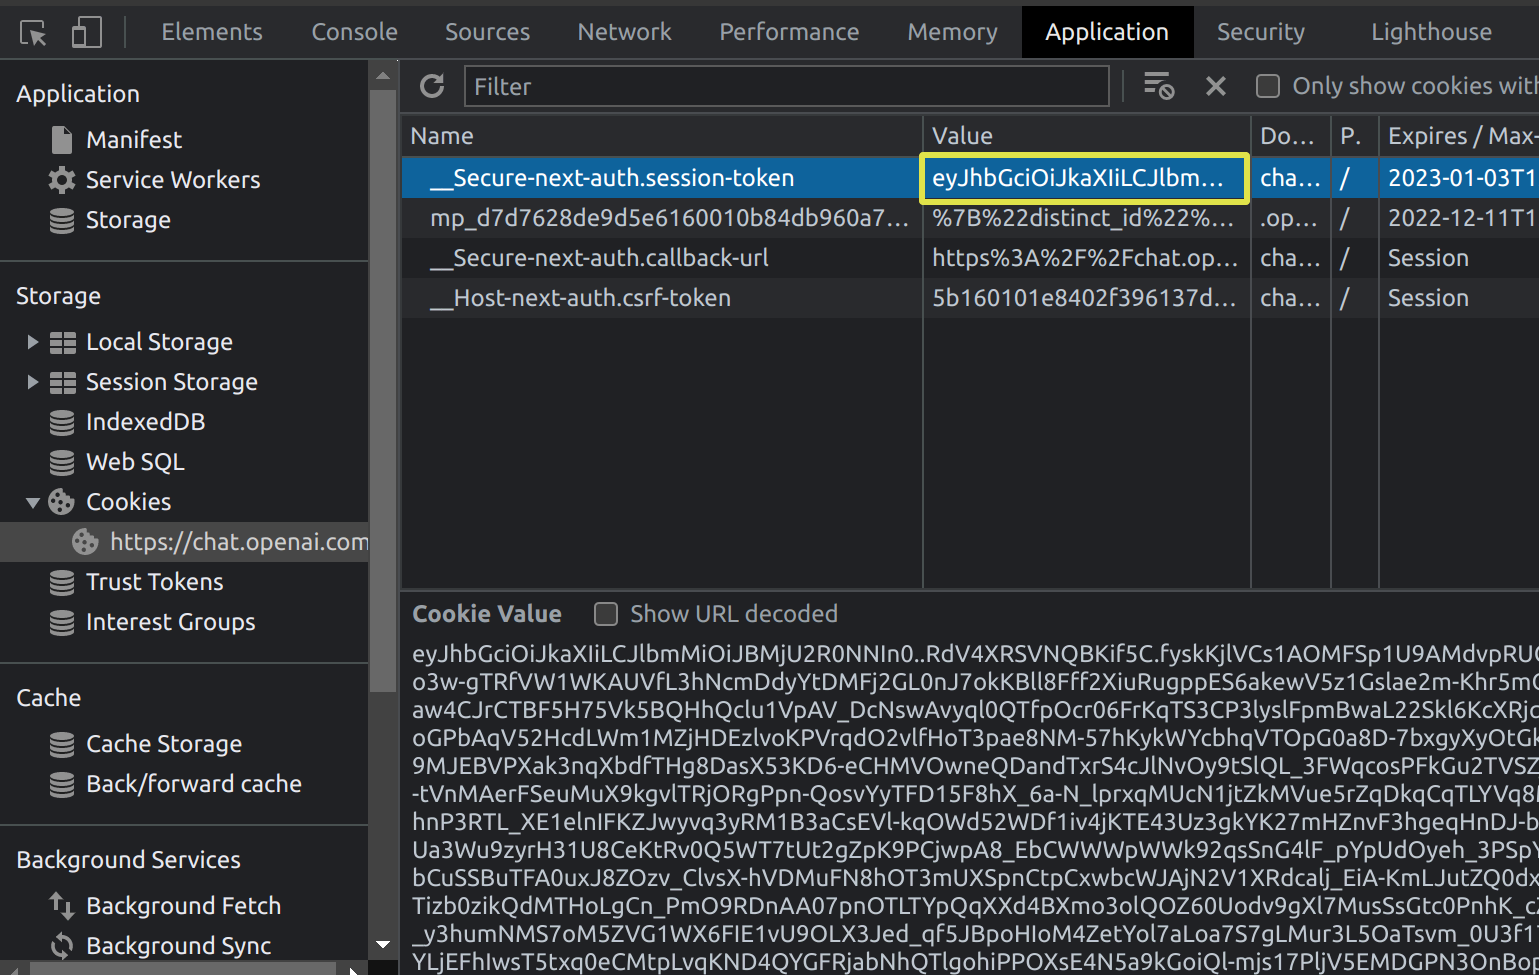
- Copy the value for
__Secure-next-auth.session-tokenand save it to your environment. This will be yoursessionToken. - Copy the value for
cf_clearanceand save it to your environment. This will be yourclearanceToken. - Copy the value of the
user-agentheader from any request in yourNetworktab. This will be youruserAgent.

Pass sessionToken, clearanceToken, and userAgent to the ChatGPTAPI constructor.
Note This package will switch to using the official API once it's released, which will make this process much simpler.
The browser portions of this package use Puppeteer to automate as much as possible, including solving all CAPTCHAs. 🔥
Basic Cloudflare CAPTCHAs are handled by default, but if you want to automate the email + password Recaptchas, you'll need to sign up for one of these paid providers:
- nopecha - Uses AI to solve CAPTCHAS
- Faster and cheaper
- Set the
NOPECHA_KEYenv var to your nopecha API key - Demo video of nopecha solving the login Recaptcha (41 seconds)
- 2captcha - Uses real people to solve CAPTCHAS
- More well-known solution that's been around longer
- Set the
CAPTCHA_TOKENenv var to your 2captcha API token
Alternatively, if your OpenAI account uses Google Auth, you shouldn't encounter any of the more complicated Recaptchas — and can avoid using these third-party providers. To use Google auth, make sure your OpenAI account is using Google and then set isGoogleLogin to true whenever you're passing your email and password. For example:
const api = new ChatGPTAPIBrowser({
  email: process.env.OPENAI_EMAIL,
  password: process.env.OPENAI_PASSWORD,
  isGoogleLogin: true
})The browser implementation supports setting a proxy server. This is useful if you're running into rate limiting issues or if you want to use a proxy to hide your IP address.
To use a proxy, pass the proxyServer option to the ChatGPTAPIBrowser constructor, or simply set the PROXY_SERVER env var. For more information on the format, see here.
const api = new ChatGPTAPIBrowser({
  email: process.env.OPENAI_EMAIL,
  password: process.env.OPENAI_PASSWORD,
  proxyServer: '<ip>:<port>'
})
You can also set the PROXY_VALIDATE_IP env var to your proxy's IP address. This will be used to validate that the proxy is working correctly, and will throw an error if it's not.
These restrictions are for the getOpenAIAuth + ChatGPTAPI solution, which uses the unofficial API. The browser-based solution, ChatGPTAPIBrowser, generally doesn't have any of these restrictions.
Please read carefully
- You must use
node >= 18at the moment. I'm usingv19.2.0in my testing. - Cloudflare
cf_clearancetokens expire after 2 hours, so right now we recommend that you refresh yourcf_clearancetoken every hour or so. - Your
user-agentandIP addressmust match from the real browser window you're logged in with to the one you're using forChatGPTAPI.- This means that you currently can't log in with your laptop and then run the bot on a server or proxy somewhere.
- Cloudflare will still sometimes ask you to complete a CAPTCHA, so you may need to keep an eye on it and manually resolve the CAPTCHA.
- You should not be using this account while the bot is using it, because that browser window may refresh one of your tokens and invalidate the bot's session.
Note Prior to v1.0.0, this package used a headless browser via Playwright to automate the web UI. Here are the docs for the initial browser version.
All of these awesome projects are built using the chatgpt package. 🤯
- Twitter Bot powered by ChatGPT ✨
- Mention @ChatGPTBot on Twitter with your prompt to try it out
- Lovelines.xyz
- Chrome Extension (demo)
- VSCode Extension #1 (demo, updated version, marketplace)
- VSCode Extension #2 (marketplace)
- VSCode Extension #3 (marketplace)
- VSCode Extension #4 (marketplace)
- Raycast Extension #1 (demo)
- Raycast Extension #2
- Telegram Bot #1
- Telegram Bot #2
- Telegram Bot #3 (group privacy mode, ID-based auth)
- Deno Telegram Bot
- Go Telegram Bot
- Telegram Bot for YouTube Summaries
- GitHub ProBot
- Discord Bot #1
- Discord Bot #2
- Discord Bot #3
- Discord Bot #4 (selfbot)
- WeChat Bot #1
- WeChat Bot #2
- WeChat Bot #3
- WeChat Bot #4
- WeChat Bot #5
- QQ Bot (plugin for Yunzai-bot)
- QQ Bot (plugin for KiviBot)
- QQ Bot (oicq)
- QQ Bot (oicq + RabbitMQ)
- QQ Bot (go-cqhttp)
- EXM smart contracts
- Flutter ChatGPT API
- Carik Bot
- Github Action for reviewing PRs
- WhatsApp Bot #1 (multi-user support)
- WhatsApp Bot #2
- WhatsApp Bot #3
- Matrix Bot
- Rental Cover Letter Generator
- Assistant CLI
- Teams Bot
- Askai
- TalkGPT
- iOS Shortcut
- Slack Bot #1
- Slack Bot #2 (with queueing mechanism)
- Electron Bot
- Kodyfire CLI
- Twitch Bot
- Continuous Conversation
- Figma plugin
If you create a cool integration, feel free to open a PR and add it to the list.
This package is ESM-only. It supports:
- Node.js >= 18
- Node.js 17, 16, and 14 were supported in earlier versions, but OpenAI's Cloudflare update caused a bug with
undicion v17 and v16 that needs investigation. So for now, usenode >= 18
- Node.js 17, 16, and 14 were supported in earlier versions, but OpenAI's Cloudflare update caused a bug with
- We recommend against using
chatgptfrom client-side browser code because it would expose your private session token - If you want to build a website using
chatgpt, we recommend using it only from your backend API
- Huge thanks to @waylaidwanderer, @abacaj, @wong2, @simon300000, @RomanHotsiy, @ElijahPepe, and all the other contributors 💪
- The original browser version was inspired by this Go module by Daniel Gross
- OpenAI for creating ChatGPT 🔥
MIT © Travis Fischer
If you found this project interesting, please consider sponsoring me or following me on twitter