Custom Views Argument Example
In this tutorial we will learn how to have a field, e.g. field_slug, and use
it to make pretty URLs for Views pages which expect taxonomy terms as
contextual arguments. Furthermore, the admin will be able to edit the field_slug
to choose what appears in the URL. Example: blog/psychology/search.
The Problem
In certain Drupal projects we have taxonomy terms as contextual arguments for
certain Views pages, e.g. /blog/[TERM]/search. Automatic URL patterns with
the pathauto module create URLs to the default taxonomy term landing pages,
however if you have Views where you have taxonomy terms as contextual filters,
things get a little hard. In these cases, we often end up with term IDs in the
URL, like /blog/[TID]/search. But having an ID in the URL is so old-school!
We want pretty URLs which humans can read, right?
In this tutorial we will discuss about creating a custom Views argument which will take a string slug from the URL and treat it as a taxonomy term ID to make our URLs pretty.
Assumptions
It has been assumed that you know:
- The basic concepts of Drupal 8.
- How to configure fields.
- How to configure a view with a contextual filter.
- How to create a custom module in Drupal 8.
- How to create a custom plugin in Drupal 8.
Additionally, you will need to configure some module or code to ensure that the
slugs for taxonomy terms are unique within the site, i.e. if one term has the
slug bunny then another tag should not be allowed to have it. You can also
have a custom / contrib module to generate these slugs automatically.
The solution
Reference: Drupal\taxonomy\Plugin\views\argument\Taxonomy.
There are many different ways to solve this problem, but we will solve it
with the help of the core taxonomy argument plugin which comes with
the taxonomy module. The said plugin takes a term ID from the URL and passes
it to Views after optional validation. We will override the plugin so that it
takes a string from the URL (slug), finds the relevant term ID and then leaves
the rest of the operations to the original plugin.
Step 1: Content and field configuration
To make the example work, we need the following configuration to be in place:
- A taxonomy vocabulary named tags.
- Tags should have the following field:
- Field name: Slug
- Machine name: field_slug
- Type: Text (Plain)
- Size: 32 characters
- A content type named article.
- Article should have the following field:
- Field name: Tags
- Machine name: field_tags
- Type: Entity reference (to taxonomy terms from Tags)
- Number of values: At least one
For this example, we will use the above setup, however in reality, you modify things as per your requirements. All of the configurations as listed above come out of the box when you install the Standard profile of Drupal. You will only need to configure the Slug manually.

Step 2: Create a custom module
To place the custom code we create a module, example: custom_views_argument.
Declare a dependency on the views module in the .info.yml.
Step 3: Implement hook_views_data_alter()
Reference: custom_views_argument.module
The hook_views_data_alter() hook tells Views about the various database
tables, fields and the relevant plugins associated to them. We implement
this hook to tell Drupal to include our custom argument plugin which we will
create in the next step.
Step 4: Implement CustomTaxonomySlug.php
Reference: CustomTaxonomySlug.php
Next we implement the CustomTaxonomySlug class with a proper annotation
@ViewsArgument("custom_taxonomy_slug"). This tells the Views module that the
class is a special class which implements a Views argument plugin. We extend
the Drupal\taxonomy\Plugin\views\argument\Taxonomy class and override one
important method CustomTaxonomySlug::setArgument().
    public function setArgument($arg) {
      // If we are not dealing with the exception argument, example "all".
      if ($this->isException($arg)) {
        return parent::setArgument($arg);
      }
      // Convert slug to taxonomy term ID.
      $tid = is_numeric($arg)
        ? $arg : $this->convertSlugToTid($arg);
      $this->argument = (int) $tid;
      return $this->validateArgument($tid);
    }
All we do here is catch the argument from the URL and if it is a slug, we use
a convertSlugToTid() method to retrieve the underlying taxonomy term ID.
That is it! The rest of the things are handled by the taxonomy plugin.
Step 5: Create Demo Content
Now that everything is in place, we will put our solution to the test. Start by creating some demo content. Create 2-3 articles and assign them some tags. The tags are created, however, they don't have a slug.
Once done, go to the Admin > Structure > Taxonomy > Tags page and edit the tags and give them nice URL slugs containing only English alphabet letters, numbers and dashes. For real projects, you might need to use a custom or contrib module to automatically generate slugs depending on your needs.
Step 6: Configure a View
Now we're all set! The last step is to create and configure a View which will put everything together.
- Create a View of Content. You can name it Blog.
- Create a page display and set it's URL to
/blog/% - Add a relationship to taxonomy terms referenced from field_tags.
- We do this to be able to use the Slug field in a filter.

- We do this to be able to use the Slug field in a filter.
- Now, define a contextual filter for the Slug using the custom argument
plugin which we created.
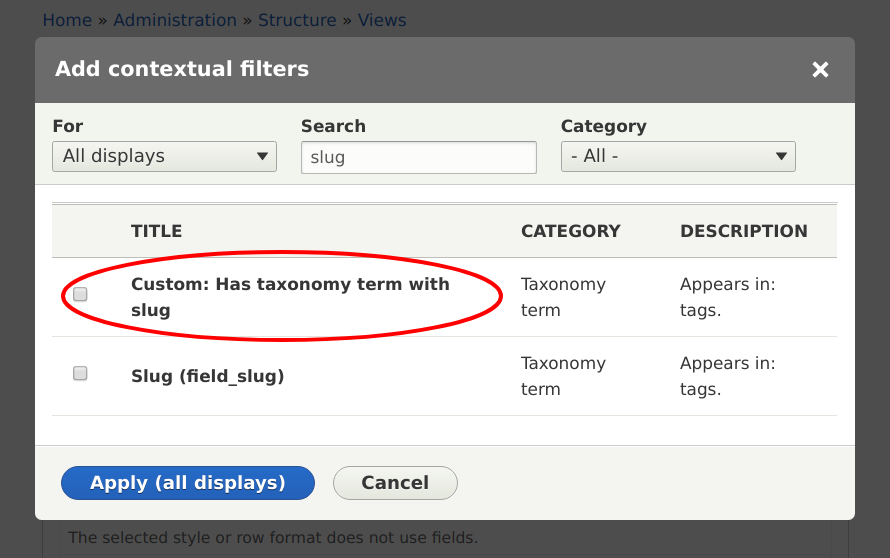
- Click on the Add button for Contextual filters
- Choose the Slug filter which we created. It should have the name we had defined in our plugin, i.e. Custom: Has taxonomy term with slug.
- Optionally, specify a validation criteria for Taxonomy Term and specify
the Tags vocabulary.
- Save the view.


And we're done! If you visit the /blog/SLUG, you should see all the articles
which have the taxonomy term associated to SLUG. Here, SLUG refers to the
value you put in the Slug field for the tag. E.g. if you have a tag named
Bunny Wabbit and you wrote bunny-wabbit in the Slug field, you should go
the the URL /blog/bunny-wabbit.
Next steps
- Read more about hook_views_data() and hook_views_data_alter().
- Read more about the Plugin API in Drupal 8.