Sample application and supporting docs for Prime Digital Academy guest lecture, Apr 9, 2020.
In this readme, we'll walk through how this application works, how to run it locally, and how to deploy it to the cloud on AWS.
There are two main components to this application:
- A REST API server, to list, create, update, and delete todo list items.
- A client application with the todo list user interface.
The API server is written in Javascript (Node.js) using the express.js web framework. We're using a simple "in-memory" array of todo list objects as our data store (there is no actual database, just to keep things simple).
The API server code is located in server.js.
The client application is written using HTML, CSS, and Javascript. The Javascript code makes HTTP (AJAX) requests to the API server, and renders the results as HTML.
The client application code is located in views/index.html.
From your terminal or Command Line, run:
git clone https://github.com/eschwartz/prime-cloud-intro.git
cd prime-cloud-intro
This will clone the project git repo onto your machine
To run the web server locally, you will first need to install your Node.js dependencies (eg. Express.js).
npm install
Then to start the web server:
node ./server.js
After a moment, you should see a message like:
App running at http://localhost:8080
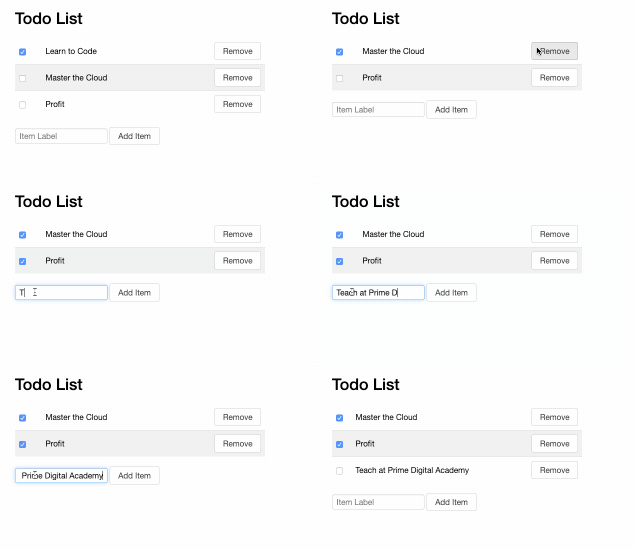
That means your web server is up and running. Paste that URL (http://localhost:8080) into your browser. You should see the Todo List application:
To shut down the web server, go back to your Terminal / Command Line, and hit Ctrl+C.
We can take this same code we've run locally on our own computers, and deploy it to a "virtual machine" running in the cloud on AWS.
To deploy code to AWS, you will first need an AWS account. AWS provides a "free tier" account, which will give you access to basic AWS services at no cost for 12 months. Everything described in these docs will be available in your free tier account.
To sign up, visit:
and follow the instructions for setting up your account. Note that you will need a credit card on hand to sign up.
First, login to your AWS account:
https://console.aws.amazon.com/
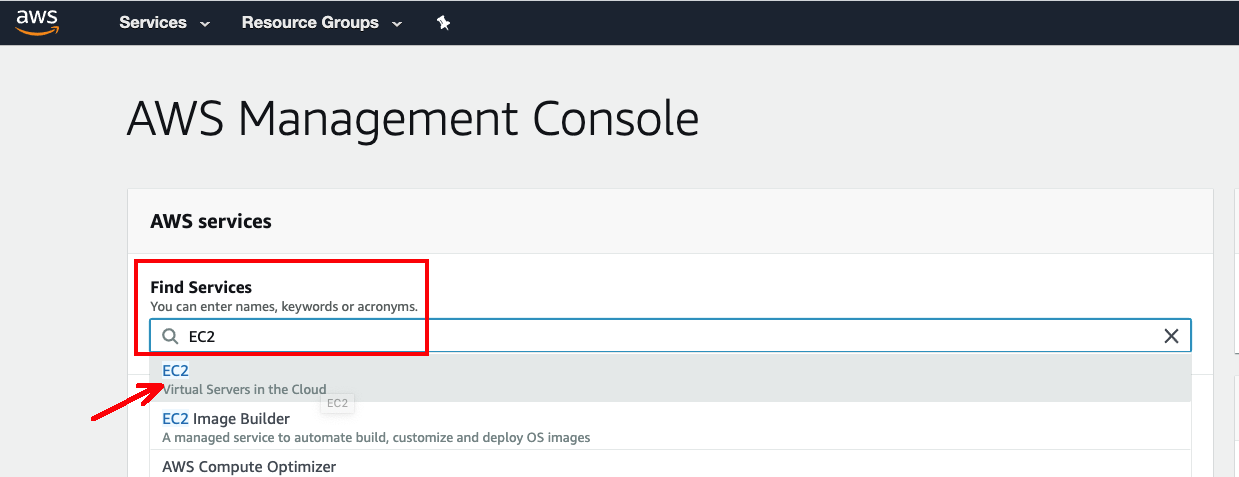
Then under Find Services type in EC2, and select the EC2 link from the dropdown:
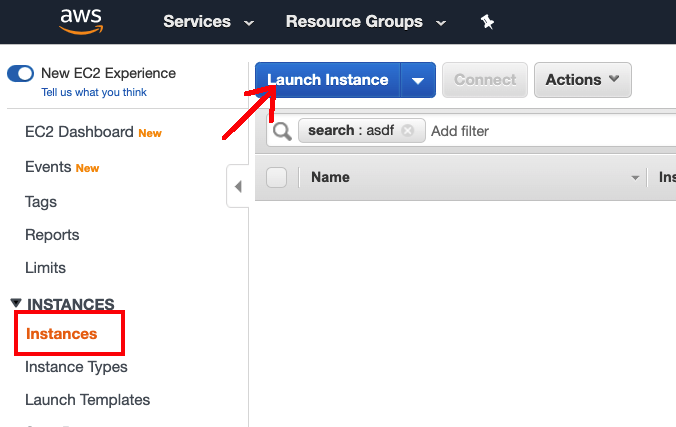
In the side navigation, select Instances, then click the big blue Launch Instance button:
You will be prompted to choose an Amazon Machine Image. This is a fancy way of asking what kind of operating system you want on your virtual machine. For this demo, we'll use Ubuntu, a popular Linux OS. Scroll down until you find Ubuntu Server 18.04, and select that option:
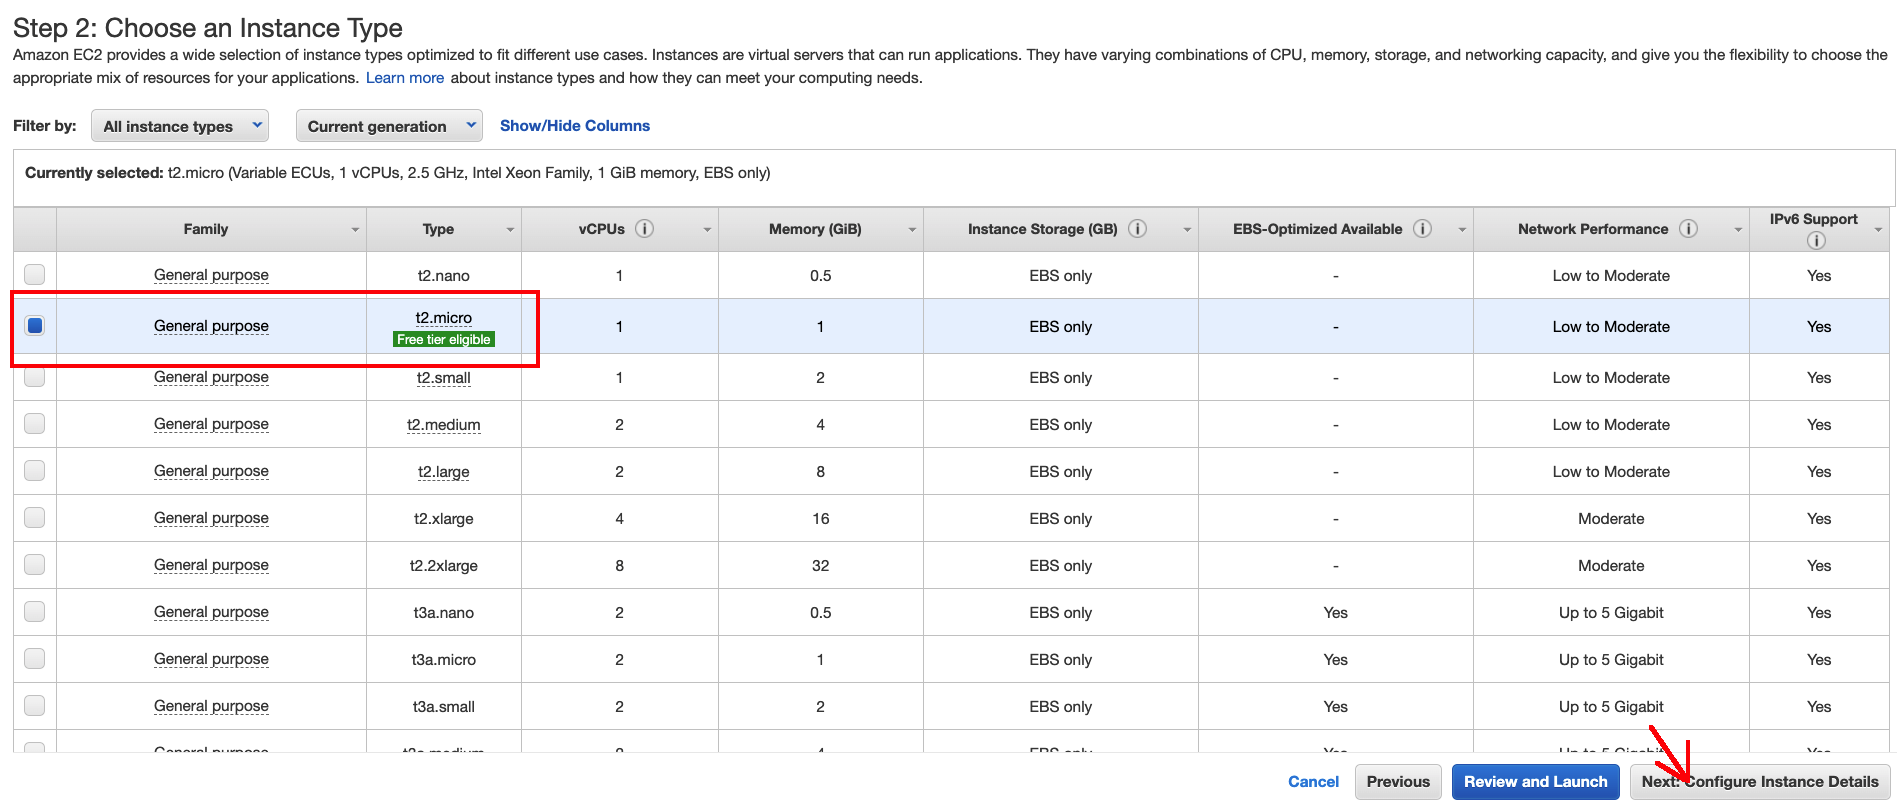
The next screen, Choose an Instance Type, allows you to decide how powerful you want your machine to be. For this demo, we can use a t2.micro, which qualifies for free tier pricing. Make sure that type is selected, an click Next:
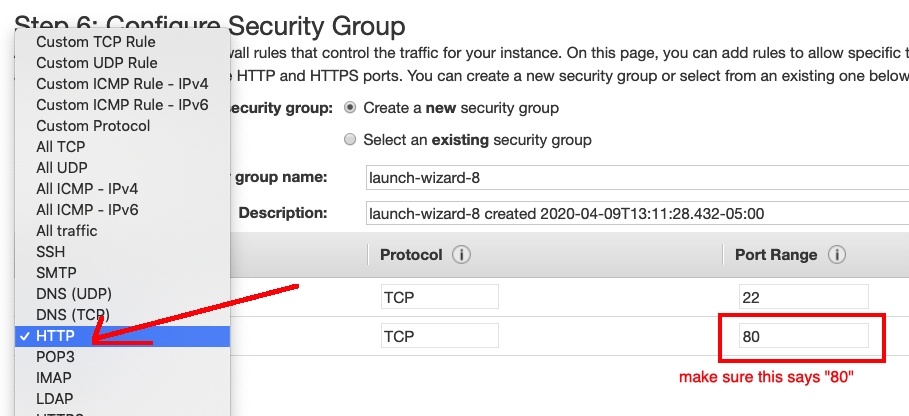
Continue to click Next, until you get to Step 6: Configure Security Group. This is where we configure what kind of network traffic we're allowing into our machine. By default, we accept SSH traffic (port 22), but we'll also need to accept HTTP traffic (port 80) to run our web server.
Click Add Rule, then select HTTP. Then click the Review and Launch button:
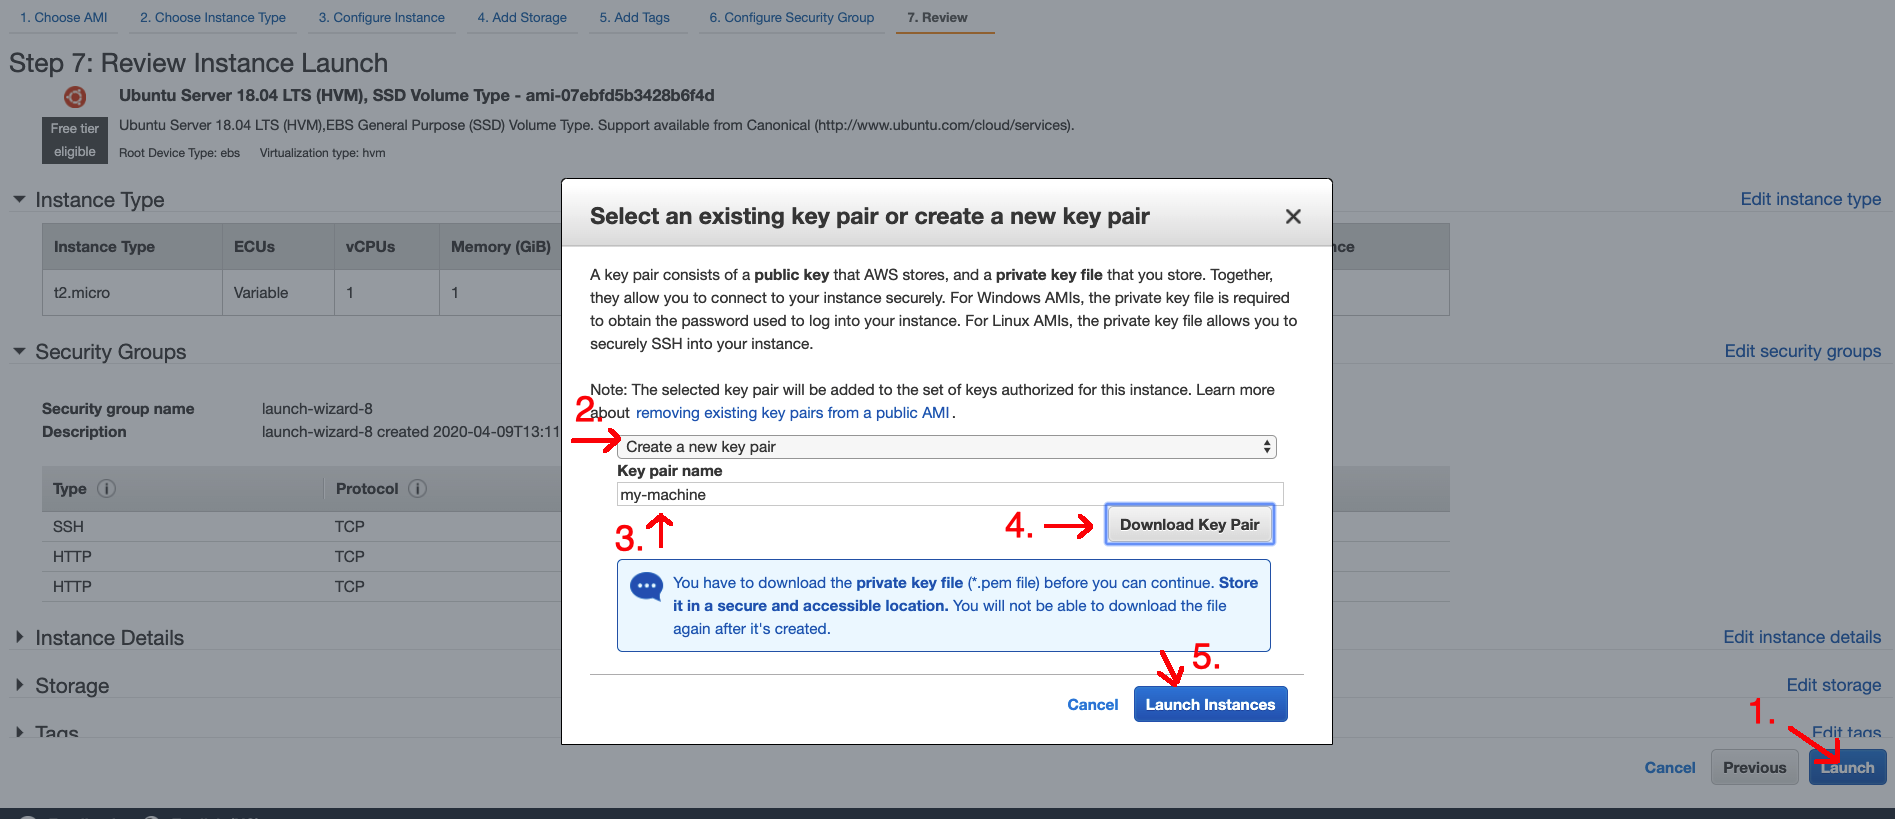
And then click Launch. You'll be prompted to create a new "key pair". This is a special file created by AWS which acts kind of like a password for logging into your virtual machine.
Select Create a new key pair (1), then give the key a name, like "my-machine" (2), then download the key (3), then click Launch Instance (3):
You virtual machine ("EC2 Instance") is now being created! Click on the instance ID to view its status:
..and wait until the Instance State says "running":
Congratulations! You've created a virtual machine in the cloud!
So your virtual machine is up and running. But into order to do anything with it, you'll need to SSH into it.
This guide will assume you're running on a Mac or Linux machine For using SSH with windows, see this guide from the AWS docs
First, we will need to find the key pair file we created in the last section. If you're on a Mac, it should be in ~/Downloads/my-machine.pem. Let's move it somewhere safer, where we won't accidentally delete it.
Open your Terminal, and run the following commands:
mkdir -p ~/.ssh
mv ~/Downloads/my-machine.pem ~/.ssh
chmod 400 ~/.ssh/my-machine.pem
That moves the file to a directory called .ssh, within your home directory. The last line (chmod) changes the permissions on the file, to keep it secure.
Next, we'll need to know the web address of our virtual machine. Every virtual machine created in AWS gets a "Public IP address", which is basically like a web address for machine. Let's go back to the AWS EC2 dashboard, to find the public IP address:
Then back in our terminal, we'll use that IP address along with your key pair file to SSH into the machine. Enter this command, replacing PUBLIC_IP_ADDRESS with the actual IP address of your virtual machine in EC2.
ssh -i ~/.ssh/my-machine.pem ubuntu@PUBLIC_IP_ADDRESS
This should prompt you with something like:
The authenticity of host '3.82.217.172 (3.82.217.172)' can't be established.
ECDSA key fingerprint is SHA256:XfER1WQPBOUuUBcG54tv60RewLD9dkhugs5zFHFfEwI.
Are you sure you want to continue connecting (yes/no)?
Type in yes and press ENTER.
You should then see a new command line prompt, like:
ubuntu@ip-123-45-67-890:~$
You have now SSH'd into your machine! Any commands you type now will be sent to that virtual machine.
If you're running into any trouble with the SSH connection, see the AWS docs for SSH'ing to EC2.
Our final step is to do a bit of server setup, and then deploy and run our application.
With your SSH connection active (see last step), run the following commands to install the latest version of node:
sudo su
wget -qO- https://raw.githubusercontent.com/nvm-sh/nvm/v0.38.0/install.sh | bash
source ~/.bashrc
nvm install --lts
This will install Node.js and npm, which we need to run our server. This may take a minute...
Once that's complete, we will need a way to get our application code onto the virtual machine. For this, we'll use git to clone our application repo:
git clone https://github.com/eschwartz/prime-cloud-intro.git
cd prime-cloud-intro
We now have our application code (from this repo) running on our virtual machine. Next we need to install our dependencies (express.js) with npm:
npm install
Finally, we can start up our web server
sudo npm start
If everything is working correctly, your web server should be up and running. You should see some log output like:
App running at http://12.34.56.78:80
Copy that URL into your web browser. You should see the Todo List web app up and running on the cloud!
One last small warning: even with a "free tier" account, it is still possible to spend (lots of) money on AWS. For example, if you choose the wrong instance type (running a supercomputer in AWS is $$$!).
So a couple of recommendations:
1. Get in the habit of cleaning up after yourself.
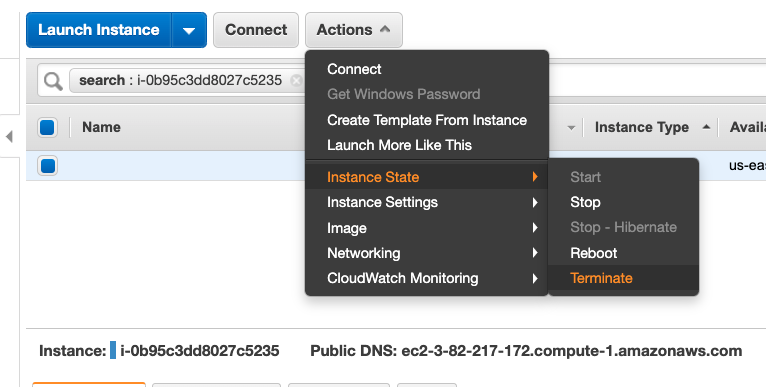
When you're done with this demo, go back to your EC2 dashboard, and terminate the instance:
Try to always do this after running anything in AWS, to prevent any surprise bills at the end of the month.
2. Create a Budget
AWS has a Budgets service, which will notify you if you spend more than you intended to. So if you do accidentally choose to run a supercomputer in AWS, it will only charge you for the first few hours, before sending you a notification that you're over budget.
See AWS docs for Creating a Cost Budget
Create an IAM user, with access to S3. Save the Acess Key ID, and Secret Access Key as environment variables in your app:
AWS_ACCESS_KEY_ID
AWS_SECRET_ACCESS_KEY
See docs: https://docs.aws.amazon.com/AWSJavaScriptSDK/latest/AWS/S3.html
// npm install aws-sdk
// Requires two env vars, from when you create an IAM user
// AWS_ACCESS_KEY_ID
// AWS_SECRET_ACCESS_KEY
const aws = require('aws-sdk');
const fs = require('fs');

async function main() {
  const s3 = new aws.S3();

  await s3.upload({
    Bucket: "cullen-lecture-4-20-21",
    Key: "awesome-sauce.jpg",
    Body: fs.createReadStream('/Users/edan/memes/awesome-sauce.jpg')
  }).promise();

  console.log('done');
}

main()
  .then(() => process.exit(0))
  .catch(err => {
    console.error(err);
    process.exit(1);
  })