Flit is an Arduino connected to my coffee machine. It runs a (very) tiny webserver that outputs a single value: an integer representing the weight of the coffee pot.
| Coffee Pot State | Value |
|---|---|
| Full | 830 |
| Some coffee | 700 < x < 830 |
| No coffee | 100 < x < 700 |
| Pot off sensor | 0 < x < 100 |
(Note that the above values are unique to my coffee pot. YMMV.)
There is currently one Flit client: Presto.
- Freeduino or Arduino UNO (ye olde computer) (Quantity: 1)
- WiFly shield (for 802.11b/g network magicks) (Quantity: 1)
- Stackable header kit (to connect the shield to the Arduino) (Quantity: 2, four headers each; you'll want extras)
- FlexiForce pressure sensor (up to 25 lbs!) (Quantity: 1)
- Breadboard (to complete the circuit for the sensor) (Quantity: 1)
- Jumper wires (F/F and M/M) (to connect the sensor to the breadboard) (Quantity: a bunch)
- RGB LED (to indicate the coffee state on the Arduino itself) (Quantity: 1)
- 330Ω resistors (needed to properly connect the RGB LED) (Quantity: 3)
- 1MΩ resistor (needed to properly connect the sensor) (Quantity: 1)
- 9V to barrel jack adapter + 9V battery (Quantity: 1)
You'll also need a soldering iron, solder, desoldering braid (for fixing mistakes), and safety glasses.
- WiFly shield library
- Flit core (see
src/flit.ino)
- Assembling the Freeduino (you can also just buy a ready-made Arduino UNO)
- Downloading the Arduino software
- Connecting the WiFly shield (includes soldering on the RGB LED)
- Connecting the FlexiForce pressure sensor
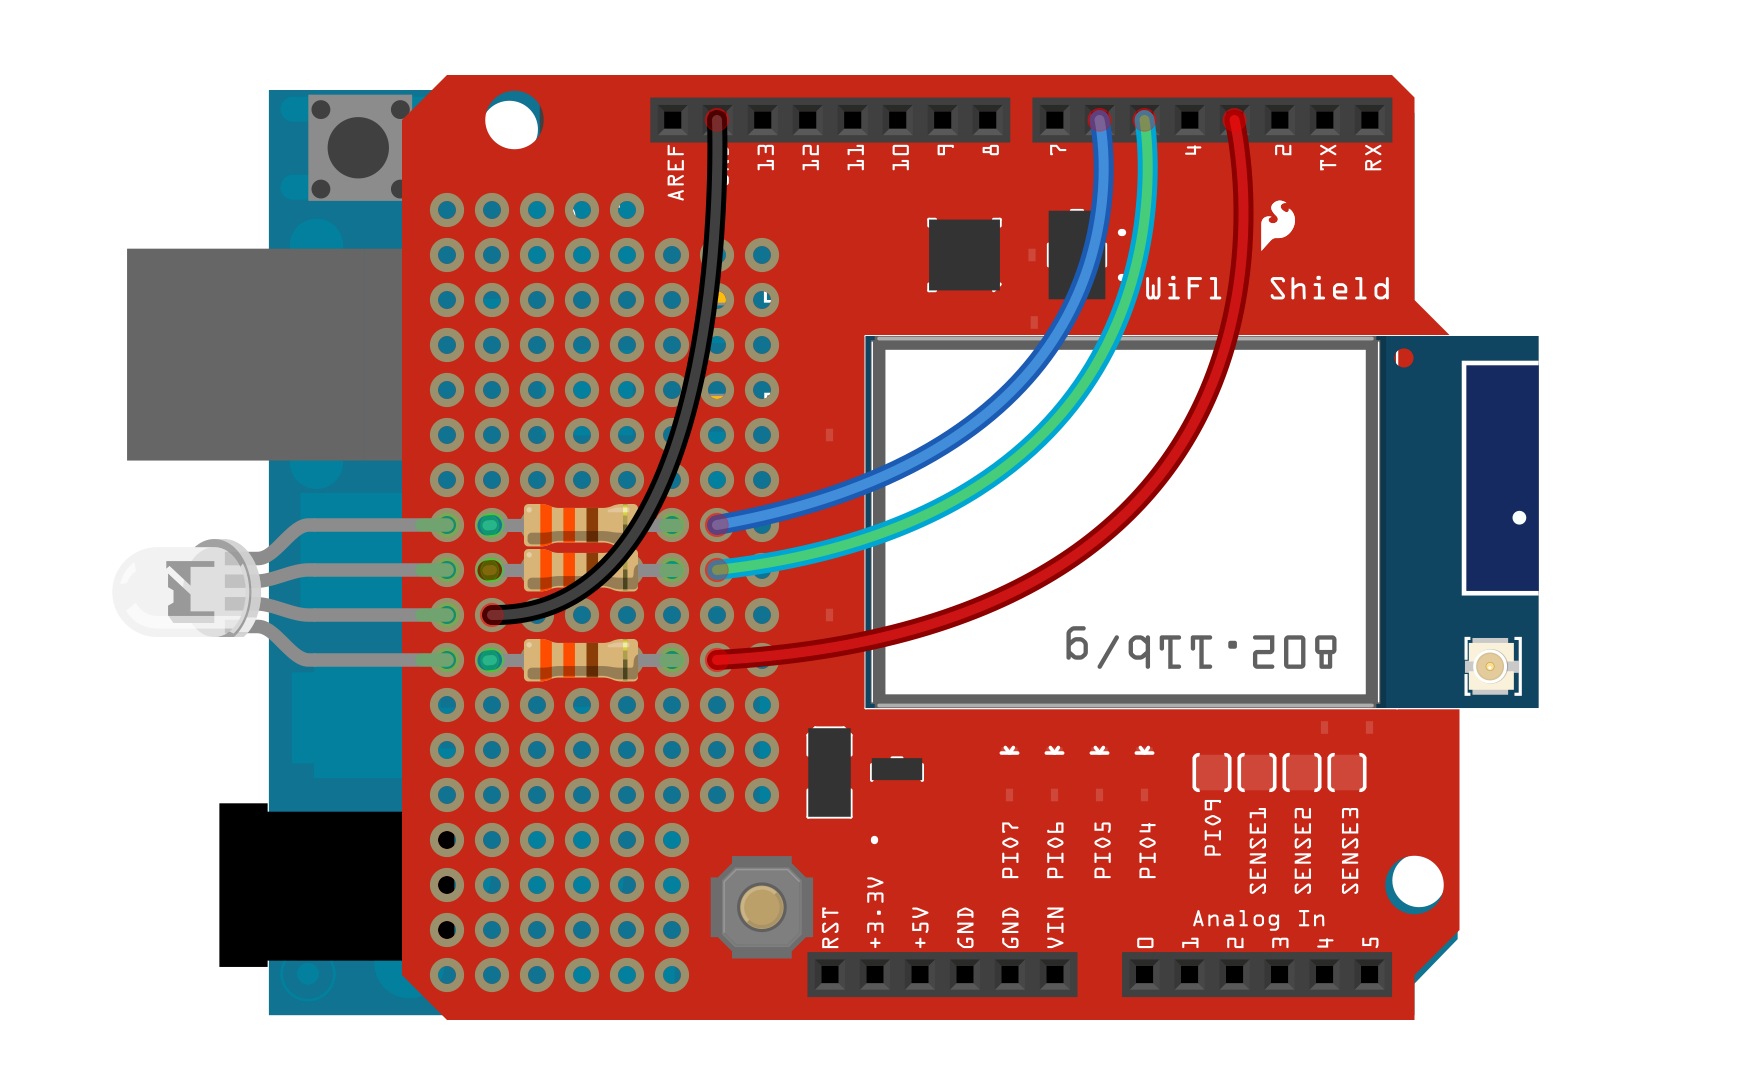
- WiFly shield + RGB LED:
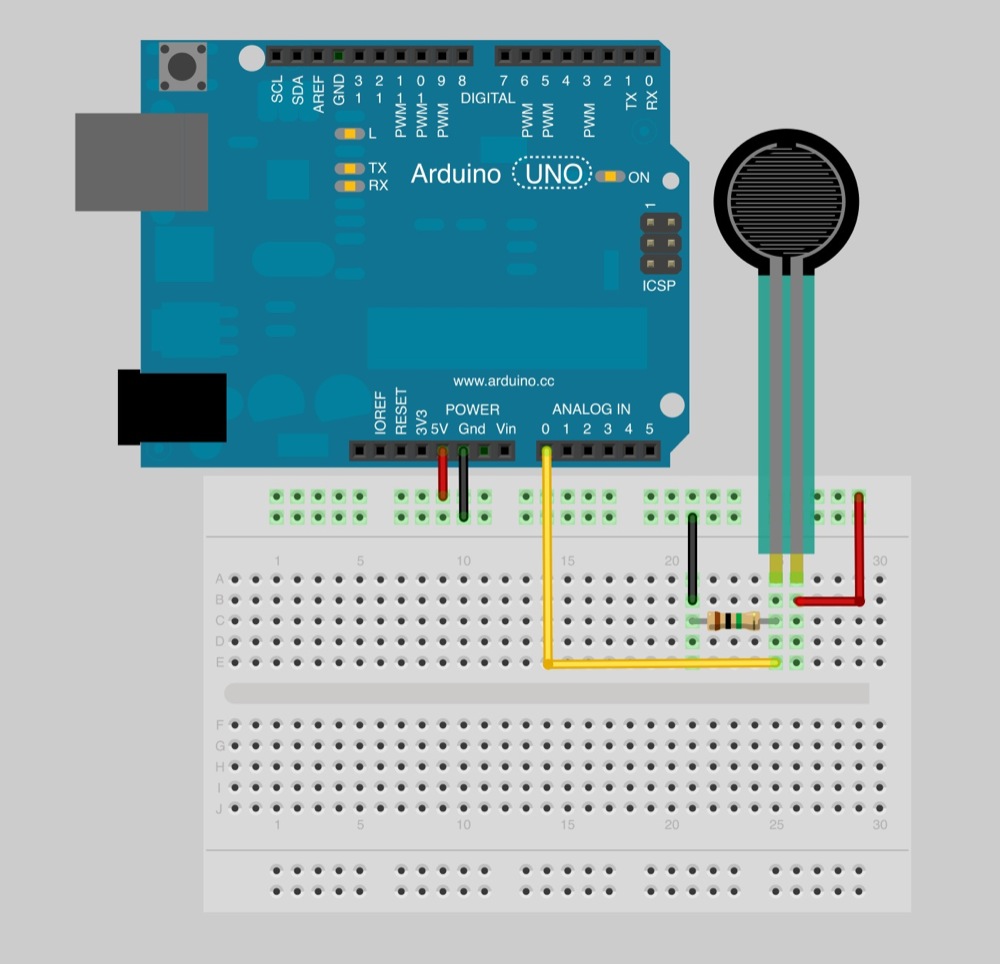
- Arduino + pressure sensor:

- Assemble the Freeduino and ensure it's working (connect to your computer, and try the "Blink" sketch under File > Examples > Basics > Blink). Skip this step if you have a pre-assembled Arduino.
- Solder the stackable headers to the WiFly shield. Mount it on the Arduino and run the WiFly sketches as outlined in the above WiFly tutorial to ensure it works.
- Remove the WiFly shield from the Arduino. Solder the RGB LED + resistors to the WiFly shield as shown in the above Fritzing diagram. It's easiest to solder the resistors first, since you'll want to use their long leads to connect the LED's holes to those of the resistors (the same will be true for the jumpers, which will be soldered to the board but must be connected to the resistor leads in order to complete the circuit). The easiest way to do this is to bend the resistor leads so they pass over the LED and jumper holes, solder all the components, then clip the extra leads (the jumper holes will each have a jumper lead and a resistor lead poking out, and the LED holes will have LED and resistor leads poking out).
- Solder the jumpers to the WiFly shield, then plug their free ends into the stackable headers as shown in the Fritzing diagram.
- Test the LED! You can do this by writing a short sketch that just loops through the LED states (see ll. 194-224 in
src/flit.ino). - Connect the jumpers for the FlexiForce sensor as shown in the Fritzing diagram. Use F/F + M/M or F/M jumpers to extend the leads on the sensor as needed.
- Calibrate the sensor by putting your coffee pot on it and adjusting the threshold values in
src/flit.inoas needed. - Enjoy!
Q: Why do I get the error "'SpiSerial' was not declared in this scope" when I try to use the WiFly library code?
A: Disregard the instructions in the WiFly tutorial that tell you to put the entire unzipped WiFly directory into arduino/libraries. You only want the libraries/ subdirectory from the WiFly code in your arduino/libraries folder (i.e you don't want the firmware and everything else).
Q: Where should I put the flit.ino code?
A: You can put it anywhere you like, but it's probably easiest to put it in arduino/libraries.
Q: The tutorial says I can use male headers for the WiFly shield. Do I have to use stackable headers?
A: For this project, yes. Otherwise, you won't have anywhere to attach the pressure sensor (the WiFly shield will use up all the Arduino's pins). If you accidentally soldered male headers to your WiFly shield, don't freak out!
- Pick up some desoldering braid.
- Lay the braid alongside the joint and reheat it with your iron. The solder should wick into the braid. Make sure to get all of it (or as much as you possibly can without burning the crap out of your board).
- Carefully loosen the headers with a pair of pliers (and ideally remove the plastic portion of the headers, leaving only the pins themselves). You may have to repeat desoldering + plier-ing a few times to get all the pins out.
- Once the old pins are off, solder on the stackable headers (this is a bit tricky, since the plastic leads on the headers make it so you have to solder them to the WiFly shield from underneath).
Q: The code is working, but my WiFly shield forgets my network information as soon as I upload flit.ino! How do I fix this?
A: Make sure you save the wifi configuration (see this step under Autoconnect to a Network).
The WiFly shield hardware is licensed under Creative Commons Share-alike 3.0. The WiFly shield software is licensed under the LGPL. This project is based on work by Daniel Kronovet, which is licensed under the GPL 2.0.
Everything else © 2017 Eric Weinstein, distributed under the MIT License (see LICENSE).