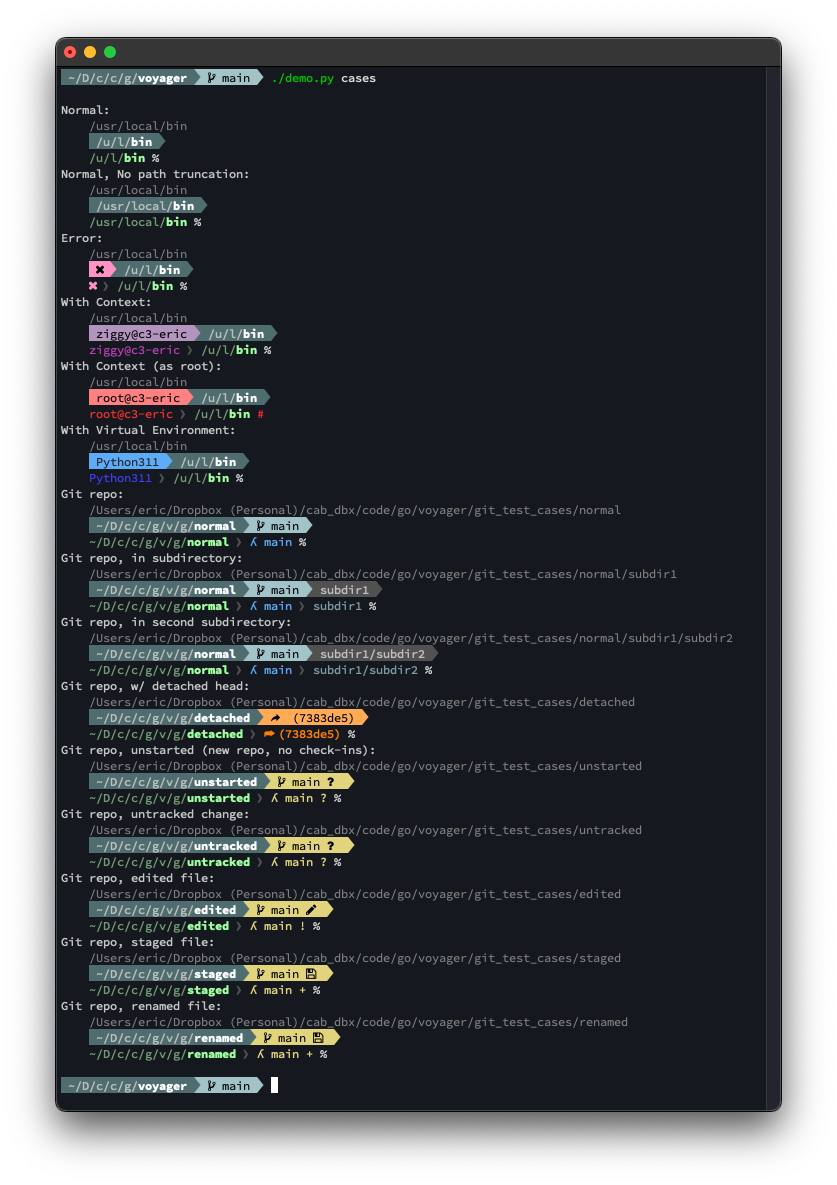
A git-aware prompt for zsh and bash.
Like Starship but smaller, and with a single mission.
Voyager recognizes when you are in a git repo directory and shows your git repo name and status in the middle of your path, with the git root path on the left, and your location within that repo (i.e. subdirectory relative to the repo root) on the right.
By default Voyager uses Powerline font symbols. To view them you will need to install a Powerline font in your terminal program. It also uses at least one "Nerd Fonts" symbol (for the $ prefix for bash), so you'll want to use a "Nerd Fonts" font for full compatibility.
You can find a huge number of Nerd Fonts patched fonts here.
Personally I use the Nerd Fonts patched version of SourceCodePro (which they call "Sauce Code Pro").
Voyager also supports a "text" format for use in environments where Powerline symbols are unavailable (also useful when you are capturing terminal output logs).
- Download one of the pre-made builds from Releases.
- Extract the archive
- For tar archives:
tar -xvzf <archive>e.g.tar -xvzf voyager_1.7.0.linux.arm.tgz
- For tar archives:
cdinto the extracted archive.- run
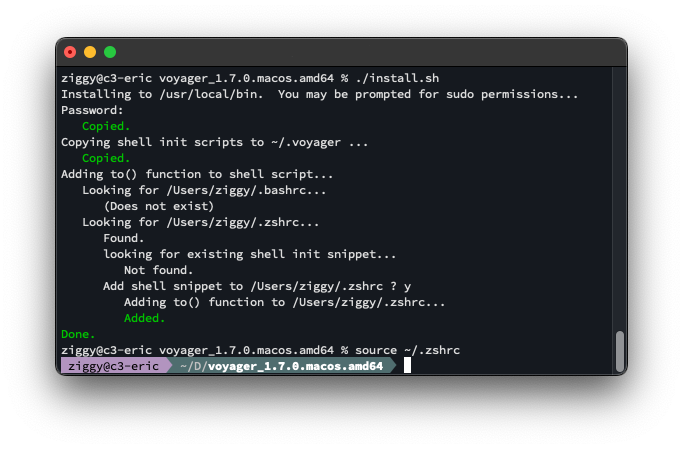
./install.sh - Exit your shell and open a new one (or just open a new one somewhere else). The new prompt should be present when you open the new shell.
- NOTE: I recommend opening a new shell first to test that the new prompt is working. It's always frustrating to break the prompt in the shell you are trying to do work in. If the prompt is wonky in the new shell for some reason, then you'll still have a good prompt in your old shell session so that you can fix the issue or uninstall.
NOTE: If you are installing on MacOS and you downloaded one of the pre-built images (rather than building from source) then you will need to grant MacOS permission to run the voyager executable.
- Follow the Build Instructions to build the installation images.
cdinto the build for your OS and processor architecture underdist/builds- Run
./install.sh
- Delete the shell initialization hook from your
~/.bashrcand/or~/.zshrc.- Delete the lines from:
# voyager:start ---------------------------------------------------------
- Through:
# voyager:end --------------------------------------------------------
- Delete the lines from:
- Exit your shell (
exit) and start a new one.- Your prompt should now be back to its "pre-voyager" normal. We needed to do that before deleting the voyager scripts and executable below.
- Delete the shell initialization scripts
rm -r ~/.voyager
- Delete the executable:
sudo rm /usr/local/bin/voyager
voyager is an executable called by a shell script (see dist/resources/bashrc.init.bash and dist/resources/zshcr.init.sh). The voyager executable takes all its arguments on the command line (it does not access any environment variables directly), but the supporting shell scripts use environment variables to configure what command line options they pass to the voyager executable. That means that you can configure Voyager's behavior by setting the environment variables the shell scripts use (or, if you prefer, modifying the shell scripts).
VGER_DEFAULT_USER- If you set this to a user name (e.g.
ziggy) then the "context" information (e.g.ziggy@<machinename>) will not be shown for that user.- e.g.
export VGER_DEFAULT_USER=ziggy
- e.g.
- Typically you would set this to your own username to de-clutter the prompt during "normal" use.
- NOTE: The context is always shown when you are SSH'd into a machine, regardless of the default user setting.
- If you set this to a user name (e.g.
VGER_OPT_POWERLINE- This is set to
-powerlineby default. Clear it to use text mode instead. - NOTE: The helper aliases
vger_textandvger_plmanipulate this variable.
- This is set to
VGER_TRUNCATION_START_DEPTH- Sets how may path elements (right to left) to show in full before truncation begins.
- Set this to 0 to truncate all path components.
- Set this to 1 to truncate all but the last path component (the default).
- Set this to 1000 for no truncation.
- NOTE: The helper aliases
vger_shortandvger_longmanipulate this variable.
- Sets how may path elements (right to left) to show in full before truncation begins.
VGER_COLOR- Sets the color mode. Set this to one of
16m,256,16, ornone - Note: The helper aliases
vger_16m.vger_256,vger_16, andvger_nonemanipulate this variable.
- Sets the color mode. Set this to one of
Voyager defines several aliases to help you easily change options on-the-fly (see dist/resources/bashrc.init.bash and dist/resources/zshcr.init.sh).
vger_text- Set the prompt to text mode.
vger_pl- Set the prompt to powerline mode.
vger_short- All but the last path component will be truncated (to a single character).
- If you are in a git repo, this only affects the git root-path (i.e. the path up to the git root folder. Git repo subdirectories are always shown in full).
vger_long- All path components will be shown in full.
vger_16m- Set the color mode to
16m(i.e. 24-bit RGB)
- Set the color mode to
vger_256- Set the color mode to
256
- Set the color mode to
vger_16- Set the color mode to
16
- Set the color mode to
vger_none- Set the color mode to
none
- Set the color mode to
The demo is written in Python. To run it you will need to have Python 3.8 or greater installed, as well as click and rich.
The demo expects a bunch of small subdirectories to exist under git_test_cases/ (each one is a small git repo to exercise the prompt under different repo conditions). To create those directories, cd git_test_cases, then tar -xvzf git_test_cases.tgz.
The demo expects an executable (voyager) to be at the git repo root. You can run go build . to create it.
- View the various prompt cases in color mode
16m:./demo.py cases
- View the various prompt cases in all color modes:
./demo.py cases -c
- View the various prompt output formats in color mode
16m:./demo.py formats
- View the various prompt output formats in all color modes:
./demo.py formats -c
🔴 TBD
(These instructions presume that you have a working go environment set up on your machine)
- Clone the repo.
cdinto the repo.- Run
go get .to fetch the dependencies. - Run
./build.sh- The builds will be created in
/dist/builds - the
zip/tarimages will be created in/dist/images
- The builds will be created in
The build script creates cross-compiled builds for multiple OS's and processor architectures. If you need to create a build for different OS or architecture, add a new one to the end of the .build.sh script.
For example, this line creates a release for the linux OS and the amd64 architecture, and packages the output as a tar image:
do_build linux amd64 tar
The API of the do_build() function is basically do_build(GOOS, GOARCH, [tar|zip]) so you can pass any GOOS or GOARCH that go supports.
NOTE: For clarity, if the GOOS is set to darwin then the name macos gets used when creating build outputs.
🔴 TBD


