Installation instructions and step-by-step examples for the Kubecon 2022 EU
session Optimize Kubernetes on vSphere with Event-Driven Automation.
This tutorial uses and deploys the components of the VMware Event Broker Appliance (VEBA) directly on a Kubernetes environment to create reactive and event-driven solutions for common operational use cases, e.g. notification to 3rd party systems like Slack.
The solutions described here are meant to serve as an inspiration and starting point. Because with VEBA, you are only limited by your imagination ;)
This demo is tested with vmware-veba/event-router v0.7.3 and Knative v1.2.0.
VMware vSphere categories and tags are often used to identify and group
related resources, e.g. virtual machines running on the same
hosts/rack/datacenter.
Kubernetes can leverage vSphere tags and automatically map
them
to topology labels, e.g. topology.kubernetes.io/zone.
Mapping vSphere tags to Kubernetes labels ensures that both runtimes
(schedulers) have the same understanding of the underlying infrastructure and
topology.
However, due to the dynamic nature of a vSphere environment (vSphere DRS and vSphere [proactive] HA), these mappings can get out of sync, often requiring manual operator intervention.
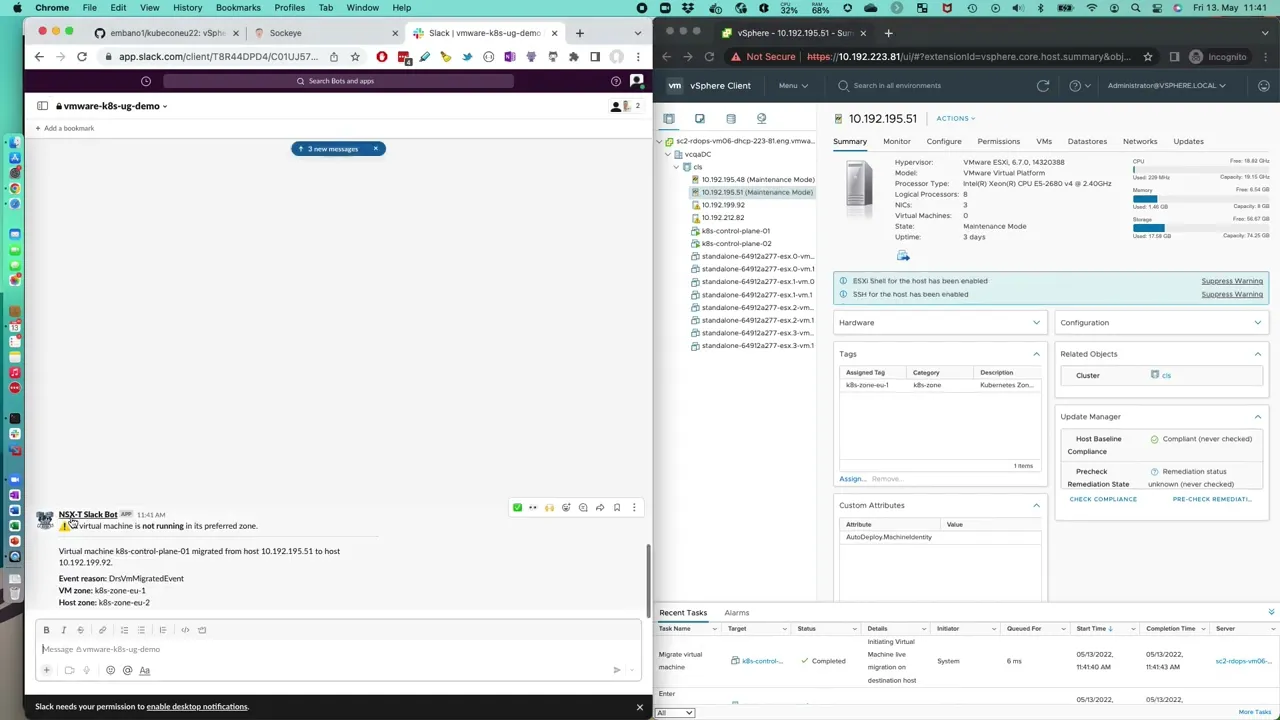
Deploy a function which sends a Slack notification when a virtual machine is not
running on the preferred host (i.e. tag mismatch).
If you haven't already done so, set up Slack Incoming Webhooks (documentation).
Create the appropriate vSphere zone category and associated tags (if not
already done so). This example uses the category k8s-zone and two zone tags
(k8s-zone-eu-1 and k8s-zone-eu-2). This can be done with
govc or through the
vCenter UI.
govc tags.category.create -d "Kubernetes zone" k8s-zone
govc tags.create -d "Kubernetes Zone EU-1" -c k8s-zone k8s-zone-eu-1
govc tags.create -d "Kubernetes Zone EU-2" -c k8s-zone k8s-zone-eu-2
Assign the tags to your virtual machines and hosts accordingly. For example,
below you can see that tags k8s-zone-eu-1 and k8s-zone-eu-2 are attached
to two hosts and one virtual machine each.
# EU-1
govc tags.attached.ls k8s-zone-eu-1
HostSystem:host-33
HostSystem:host-21
VirtualMachine:vm-56

# EU-2
govc tags.attached.ls k8s-zone-eu-2
HostSystem:host-15
HostSystem:host-27
VirtualMachine:vm-57tags on objects other than virtual
machines and hosts. See the hacking section
below for details.
Create a Kubernetes secret to store the Slack Webhook URL (token).
kubectl -n vmware-functions create secret generic slack-credentials --from-literal=token='https://your-token-value...'Create the Kubernetes vsphere-credentials secret which will be used by the
function to connect to the vCenter Server to retrieve tag assignments.
kubectl -n vmware-functions create secret generic vsphere-credentials --from-literal=username='vcenter-username' --from-literal=password='vcenter-password'Configure the function. Open the function.yaml and change the following values.
- name: VCENTER_URL
  value: "https://your-vcenter..."
- name: VCENTER_INSECURE
  value: "true" # will not panic on self-signed certificates
- name: CATEGORY
  value: "k8s-zone" # change this if your zone category has a different name
Save and close the YAML file in the tagdrift-fn folder. Deploy the function.
cd tagdrift-fn
kubectl -n vmware-functions create -f function.yaml
kubectl -n vmware-functions wait --timeout=3m --for=condition=Ready ksvc/tagdrift-fn
Inspect the logs that the function is correctly running.
kubectl -n vmware-functions logs deploy/tagdrift-fn-00001-deployment  -c user-container
2022-05-12T12:13:08.475Z        INFO    tagdrift        tagdrift-fn/main.go:55  starting tagdrift function      {"commit": "862f6a31", "listenPort": 8080, "debug": true}
In case the function is not starting (pending), panicking (CrashLoopBackoff)
or throwing warnings/errors make sure that:
- The Kubernetes Slack
secretwas created as described above before creating the function - The vSphere configuration values are correct
- You have sufficient permissions to connect to vCenter and send to Slack
If the function is working correctly, the following Slack message will be posted.

The following descriptions assume a kind installation. Change the environment
values accordingly (also if you are not using kind).
export KIND_CLUSTER_NAME=kubeconeu22
export KO_DOCKER_REPO=kind.local
export KO_COMMIT=$(git rev-parse --short=8 HEAD)
Then build and push/load the image with ko.
cd tagdrift-fn
ko publish -B .- Extend the function to retrieve VM
zoneobject tags from higher-level objects, e.g. cluster/folder - Send the notification to another system, e.g. Teams or PagerDuty
- Create a trigger for an HA event
- Extend the integration by having a Slack bot take action to migrate the VM back to a preferred host/site
VMware vSphere alarms are an important asset in the DevOps toolbox to proactively notify an operator on resource starvation or exhaustion.
But as of today, these alarms (managed in VMware vCenter Server) are also limited:
- Limited extensibility (send to Slack, anyone?)
- Security and stability concerns:
- requires vCenter access to manage
- custom actions only possible with scripts on the vCenter server appliance
- Resource concerns:
- custom solutions often use polling and increase coupling between vCenter and the integration
- When using out of the box events (push instead of pull), the
AlarmEventschema lacks important alarm details
Deploy a multi-step event pipeline using the vSphere Alarm
Server to first enrich
incoming vSphere AlarmStatusChangedEvents with critical data and then send
them in parallel to the event viewer (Sockeye) and Slack if the severity is
yellow or red.
If you haven't already done so, set up Slack Incoming Webhooks (documentation).
Next, clone the VMware Event Broker Appliance Github repository which contains the functions and demo code.
# from within the current kubeconeu22 git repository
git clone https://github.com/vmware-samples/vcenter-event-broker-appliance scenarios
cd scenarios/examples/knative/powershell/kn-ps-slack-vsphere-alarmEdit the file slack_secret.json and enter your Slack Webhook token URL.
Create the Kubernetes secret.
kubectl -n vmware-functions create secret generic slack-secret --from-file=SLACK_SECRET=slack_secret.jsonCreate the Kubernetes vsphere-credentials secret which will be used by the
vSphere Alarm Service to connect to the vCenter Server to retrieve the
additional information for a given vSphere Alarm event.
💡 If you already created this secret, skip this step.
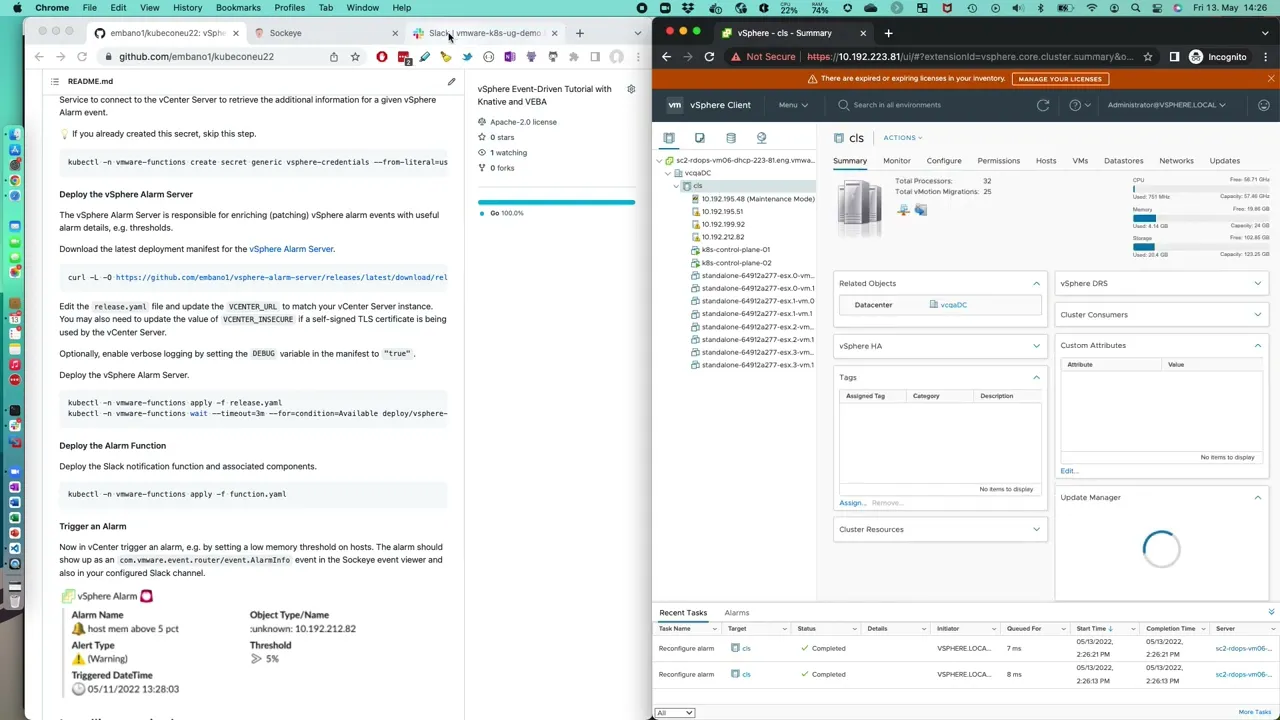
kubectl -n vmware-functions create secret generic vsphere-credentials --from-literal=username='vcenter-username' --from-literal=password='vcenter-password'The vSphere Alarm Server is responsible for enriching (patching) vSphere alarm events with useful alarm details, e.g. thresholds.
Download the latest deployment manifest for the vSphere Alarm Server.
curl -L -O https://github.com/embano1/vsphere-alarm-server/releases/latest/download/release.yamlEdit the release.yaml file and update the VCENTER_URL to match your vCenter
Server instance. You may also need to update the value of VCENTER_INSECURE if
a self-signed TLS certificate is being used by the vCenter Server.
Optionally, enable verbose logging by setting the DEBUG variable in the
manifest to "true".
Deploy the vSphere Alarm Server.
kubectl -n vmware-functions apply -f release.yaml
kubectl -n vmware-functions wait --timeout=3m --for=condition=Available deploy/vsphere-alarm-server
Deploy the Slack notification function and associated components.
kubectl -n vmware-functions apply -f function.yamlNow in vCenter trigger an alarm, e.g. by setting a low memory threshold on
hosts. The alarm should show up as an com.vmware.event.router/event.AlarmInfo
event in the Sockeye event viewer and also in your configured Slack channel.

The following tools are needed to follow along:
export KIND_CLUSTER_NAME=kubeconeu22
export KO_DOCKER_REPO=kind.local
curl -sL install.konk.dev | bash
Source: https://github.com/csantanapr/knative-kind
kn lets you work with Knative
resources, e.g. KServices, Brokers, etc. instead of using kubectl.
# OSX
brew install knative/client/kn

kn version
Version:      v0.23.0
Build Date:   2021-05-19 07:42:12
Git Revision: 3cc608f9
Supported APIs:
* Serving
  - serving.knative.dev/v1 (knative-serving v0.23.0)
* Eventing
  - sources.knative.dev/v1 (knative-eventing v0.23.0)
  - eventing.knative.dev/v1 (knative-eventing v0.23.0)
Source: https://knative.dev/docs/install/client/#kn
Installing the RabbitMQ Knative Broker ensures reliable and (if needed)
ordered event delivery which the in-memory Broker does not. This avoids
certain issues for this demo.
Source: https://github.com/knative-sandbox/eventing-rabbitmq/blob/release-1.4/docs/broker.md
kubectl apply -f https://github.com/rabbitmq/cluster-operator/releases/latest/download/cluster-operator.yml
kubectl apply -f https://github.com/jetstack/cert-manager/releases/latest/download/cert-manager.yaml

kubectl -n cert-manager wait --timeout=3m --for=condition=Available deploy --all
kubectl apply -f https://github.com/rabbitmq/messaging-topology-operator/releases/latest/download/messaging-topology-operator-with-certmanager.yaml
kubectl -n rabbitmq-system wait --timeout=3m --for=condition=Available deploy --allkubectl apply -f https://github.com/knative-sandbox/eventing-rabbitmq/releases/latest/download/rabbitmq-broker.yaml
kubectl -n knative-eventing wait --timeout=3m --for=condition=Available deploy --allDeploy a RabbitMQ Cluster in the vmware-functions namespace, which will be
used for the Knative Broker.
kubectl create ns vmware-functions

kubectl apply -f - << EOF
apiVersion: rabbitmq.com/v1beta1
kind: RabbitmqCluster
metadata:
  name: rabbitmq
  namespace: vmware-functions
spec:
  replicas: 1
EOFNow we can deploy a Knative Broker instance named default in the
vmware-functions namespace using the previously created RabbitMQ cluster.
kubectl -n vmware-functions wait --timeout=3m --for=condition=Ready pod/rabbitmq-server-0

kubectl apply -f - << EOF
apiVersion: eventing.knative.dev/v1
kind: Broker
metadata:
  name: default
  namespace: vmware-functions
  annotations:
    eventing.knative.dev/broker.class: RabbitMQBroker
spec:
  config:
    apiVersion: rabbitmq.com/v1beta1
    kind: RabbitmqCluster
    name: rabbitmq
  delivery:
    retry: 5
EOF

kubectl -n vmware-functions wait --timeout=3m --for=condition=Ready broker/defaultInstall the event viewer UI.
kubectl -n vmware-functions create -f https://github.com/n3wscott/sockeye/releases/download/v0.7.0/release.yaml

# Update Sockeye to disable scale-to-zero
kn service -n vmware-functions update --scale 1 sockeyeInstall a Trigger which will send all events from the default Broker
to the Sockeye KService.
kn trigger -n vmware-functions create sockeye --broker default --sink ksvc:sockeye
kubectl -n vmware-functions wait --timeout=3m --for=condition=Ready trigger/sockeyeRetrieve the Sockeye URL (here
http://sockeye.vmware-functions.127.0.0.1.sslip.io) and open it in a browser.
kn service list -n vmware-functions
NAME      URL                                                  LATEST          AGE   CONDITIONS   READY   REASON
sockeye   http://sockeye.vmware-functions.127.0.0.1.sslip.io   sockeye-00002   2m    3 OK / 3     True
You should see the Sockeye interface but no incoming events yet.
Install the VMware Event Router to retrieve vSphere events, transform them into
standardized CloudEvents and send them to the default Broker.
Source: https://vmweventbroker.io/kb/event-router
helm repo add vmware-veba https://projects.registry.vmware.com/chartrepo/veba

# update index in case the repo was already installed
helm repo updateInstalls the VMware Event Router in the vmware-system namespace.
Change the values in the vcenter section accordingly. The username must have
at least read-only access to the vCenter inventory and be able to read from the
event stream (database).
cat << EOF | helm install -n vmware-system --create-namespace -f - router vmware-veba/event-router --wait
eventrouter:
  config:
    logLevel: debug
  vcenter:
    address: https://vcenter.local
    username: administrator@vsphere.local
    password: P@ssw0rd
    insecure: false # fail on TLS certificate warnings
  eventProcessor: knative
  knative:
    destination:
      ref:
        apiVersion: eventing.knative.dev/v1
        kind: Broker
        name: default
        namespace: vmware-functions
EOF
Verify the installation. The router deployment should not throw any errors or
be in CrashLoopBackoff state.
# READY must show 1 available pod
kubectl -n vmware-system get deploy router
NAME     READY   UP-TO-DATE   AVAILABLE   AGE
router   1/1     1            1           40s

# retrieve logs
kubectl -n vmware-system logs deploy/router

 _    ____  ___                            ______                 __     ____              __
| |  / /  |/  /      ______ _________     / ____/   _____  ____  / /_   / __ \____  __  __/ /____  _____
| | / / /|_/ / | /| / / __  / ___/ _ \   / __/ | | / / _ \/ __ \/ __/  / /_/ / __ \/ / / / __/ _ \/ ___/
| |/ / /  / /| |/ |/ / /_/ / /  /  __/  / /___ | |/ /  __/ / / / /_   / _, _/ /_/ / /_/ / /_/  __/ /
|___/_/  /_/ |__/|__/\__,_/_/   \___/  /_____/ |___/\___/_/ /_/\__/  /_/ |_|\____/\__,_/\__/\___/_/

2022-04-29T12:54:44.900Z        WARN    [VCENTER]       vcenter/vcenter.go:126  using potentially insecure connection to vCenter        {"address": "https://10.192.229.97", "insecure": true}
2022-04-29T12:54:44.900Z        INFO    [MAIN]          router/main.go:114      connecting to vCenter   {"commit": "92d95709", "version": "v0.7.2", "address": "https://10.192.229.97"}
2022-04-29T12:54:44.901Z        INFO    [KNATIVE]       injection/injection.go:61       Starting informers...
2022-04-29T12:54:45.013Z        INFO    [MAIN]          router/main.go:169      created Knative processor       {"commit": "92d95709", "version": "v0.7.2", "sink": "http://default-broker-ingress.vmware-functions.svc.cluster.local"}
2022-04-29T12:54:45.014Z        WARN    [METRICS]       metrics/server.go:59    disabling basic auth: no authentication data provided
2022-04-29T12:54:45.014Z        INFO    [METRICS]       metrics/server.go:98    starting metrics server {"address": "http://0.0.0.0:8082/stats"}
2022-04-29T12:54:45.214Z        INFO    [VCENTER]       vcenter/vcenter.go:213  checkpointing disabled, setting begin of event stream   {"beginTimestamp": "2022-04-29 12:54:45.129336 +0000 UTC"}
2022-04-29T12:54:46.801Z        DEBUG   [VCENTER]       vcenter/vcenter.go:313  no new events, backing off      {"delaySeconds": 1}
2022-04-29T12:54:48.124Z        DEBUG   [VCENTER]       vcenter/vcenter.go:313  no new events, backing off      {"delaySeconds": 2}
If all goes well you might already see UserLoginSessionEvent events in the
Sockeye UI.
You can also manually trigger an event, e.g. by powering on/off a virtual machine.
This completes the installation. Now you can follow along with the scenarios in the tutorial section