xeokit-xkt-utils
xeokit-xkt-utils is a library of JavaScript tools for creating XKT model geometry files, which we then can load
into xeokit. Using this library in either browser or node, we can convert glTF into XKT, and can even generate XKT files programmatically.
This library is currently used within the xeokit-gltf-to-xkt tool to convert glTF to XKT.

Contents
Links
Features
- Generate XKT files programmatically.
- Convert glTF into XKT files.
- Full-precision geometry without the cost of storing double-precision values.
- Geometry compression using instancing, quantization, oct-encoding and gzip.
- Works in browser and node.
JavaScript API
XKTModel
At the center of xeokit-xkt-utils is the XKTModel
class, which represents an XKT model.
XKTModel provides builder methods, with which we can programmatically populate it with 3D objects.
xeokit-xkt-utils also provides these utility functions for loading, serializing and validating XKTModels:
loadGLTFIntoXKTModelloads glTF JSON into anXKTModel.writeXKTModelToArrayBufferserializes anXKTModelto anArrayBuffer.validateXKTArrayBuffervalidates anArrayBufferagainst theXKTModelit was serialized from.
Building an XKTModel
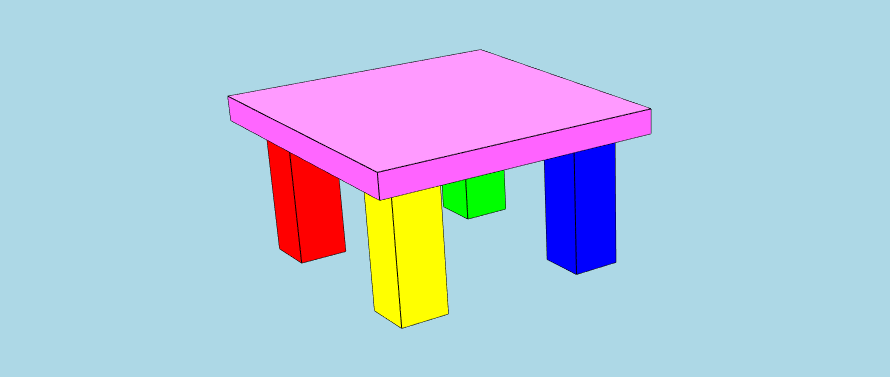
To demonstrate the API, let's use XKTModel's builder
methods to programmatically build a model that resembles the screenshot below. Then we'll serialize the XKTModel to an
ArrayBuffer, which we'll finally load that into a xeokit Viewer
using XKTLoaderPlugin.
We'll code this example to run in the browser, using the ES module in xeokit-xkt-utils.es.js. We could also code it to run on node, using the CommonJS module in xeokit-xkt-utils.cjs.js.
import {XKTModel, writeXKTModelToArrayBuffer, validateXKTArrayBuffer} from "./dist/xeokit-xkt-utils.es.js";

// Or in node:
// const {XKTModel, loadGLTFIntoXKTModel, writeXKTModelToArrayBuffer} = require("./xeokit-xkt-utils.cjs.js");

const xktModel = new XKTModel();

xktModel.createPrimitive({
     primitiveId: "legPrimitive",
     primitiveType: "triangles",
     positions: [
         1, 1, 1, -1, 1, 1, -1, -1, 1, 1, -1, 1, 1, 1, 1, 1, -1, 1, 1, -1, -1, 1, 1, -1, 1, 1, 1, 1, 1, -1, -1, 1,
         -1, -1, 1, 1, -1, 1, 1, -1, 1, -1, -1, -1, -1, -1, -1, 1, -1, -1, -1, 1, -1, -1, 1, -1, 1, -1, -1, 1, 1, -1,
         -1, -1, -1, -1, -1, 1, -1, 1, 1, -1
     ],
     normals: [
         0, 0, 1, 0, 0, 1, 0, 0, 1, 0, 0, 1, 1, 0, 0, 1, 0, 0, 1, 0, 0, 1, 0, 0, 0, 1, 0, 0, 1, 0, 0, 1, 0, 0, 1, 0,
         -1, 0, 0, -1, 0, 0, -1, 0, 0, -1, 0, 0, 0, -1, 0, 0, -1, 0, 0, -1, 0, 0, -1, 0, 0, 0, -1, 0, 0, -1, 0, 0,
         -1, 0, 0, -1
     ],
     indices: [
         0, 1, 2, 0, 2, 3, 4, 5, 6, 4, 6, 7, 8, 9, 10, 8, 10, 11, 12, 13, 14, 12, 14, 15, 16, 17, 18, 16, 18, 19,
         20, 21, 22, 20, 22, 23
     ],
     color: [255, 0, 0],
     opacity: 255
 });

xktModel.createEntity({
     entityId: "leg1",
     primitiveIds: ["legPrimitive"],
     position: [-4, -6, -4],
     scale: [1, 3, 1],
     rotation: [0, 0, 0]
 });

xktModel.createEntity({
     entityId: "leg2",
     primitiveIds: ["legPrimitive"],
     position: [4, -6, -4],
     scale: [1, 3, 1],
     rotation: [0, 0, 0]
 });

xktModel.createEntity({
     entityId: "leg3",
     primitiveIds: ["legPrimitive"],
     position: [4, -6, 4],
     scale: [1, 3, 1],
     rotation: [0, 0, 0]
 });

xktModel.createEntity({
     entityId: "leg4",
     primitiveIds: ["legPrimitive"],
     position: [-4, -6, 4],
     scale: [1, 3, 1],
     rotation: [0, 0, 0]
 });

xktModel.createEntity({
     entityId: "top",
     primitiveIds: ["legPrimitive"],
     position: [0, -3, 0],
     scale: [6, 0.5, 6],
     rotation: [0, 0, 0]
 });
Once we've built our XKTModel we need to finalize it. Then it's ready to use.
xktModel.finalize();Serializing the XKTModel to an ArrayBuffer
Next, we'll use writeXKTModelToArrayBuffer to serialize our XKTModel to an ArrayBuffer.
const xktArrayBuffer = writeXKTModelToArrayBuffer(xktModel);Validating the ArrayBuffer
Now we'll use validateXKTArrayBuffer to validate
the ArrayBuffer against our XKTModel. If this function
finds any errors, it will log them to the console and return false. Otherwise, it will return true to indicate that the ArrayBuffer is correct.
const xktArrayBufferValid = validateXKTArrayBuffer(xktArrayBuffer, xktModel);

if (!xktArrayBufferValid) {
    console.error("XKT array buffer is invalid!");
}
Loading the ArrayBuffer into a Viewer
Let's now create a Viewer, then load the ArrayBuffer into it using an XKTLoaderPlugin.
const viewer = new Viewer({
    canvasId: "myCanvas"
});

const xktLoader = new XKTLoaderPlugin(viewer);

const model = xktLoader.load({
    id: "myModel",
    xkt: xktArrayBuffer
});
Note that the XKTLoaderPlugin could also load our ArrayBuffer from a URL.
Finally, let's fit the whole model in view.
viewer.cameraFlight.flyTo(model);Loading glTF into an XKTModel
Let's use loadGLTFIntoXKTModel to parse glTF into an XKTModel.
We'll also use the classes and functions introduced in the previous examples to serialize the XKTModel to an ArrayBuffer, then validate the ArrayBuffer and load it into a Viewer.
const viewer = new Viewer({
    canvasId: "myCanvas"
});

const xktLoader = new XKTLoaderPlugin(viewer);

utils.loadJSON("./models/gltf/MAP/MAP.gltf", (json) => {

        const xktModel = new XKTModel();

        loadGLTFIntoXKTModel(json, xktModel).then(() => {

            const xktArrayBuffer = writeXKTModelToArrayBuffer(xktModel);

            const xktArrayBufferValid = validateXKTArrayBuffer(xktArrayBuffer, xktModel);

            xktLoader.load({
                id: "myModel",
                xkt: xktArrayBuffer
            });

            viewer.cameraFlight.flyTo(viewer.scene);
        });
    },
    (errMsg) => {  });
Building
Building the binaries in ./dist):
npm update
npm run build
This will build:
- ./dist/xeokit-xkt-utils.cjs.js - CommonJS module
- ./dist/xeokit-xkt-utils.es.js - ES module
Building the JavaScript API documentation in ./docs:
npm run docsBuilding the live tests in ./examples:
cd examples
npm update
npm run build